
Complete Owner's Guide (English)
Page 1
All about the Use &Care of your Refrigerator 242063800 (November 2009) TABLE OF CONTENTS Important Safety Instructions 2 Installation 4 Door Removal Instructions 5 Handle Installation 6 Connecting Water Supply 8 Ice Service 9 Controls 9 Normal Operating Sounds and Sights 10 Care and Cleaning 11 Before you Call 12 Major Appliance Warranty 13 www.frigidaire.com USA 1-800-944-9044 www.frigidaire.ca Canada 1-800-265-8352
All about the Use &Care of your Refrigerator 242063800 (November 2009) TABLE OF CONTENTS Important Safety Instructions 2 Installation 4 Door Removal Instructions 5 Handle Installation 6 Connecting Water Supply 8 Ice Service 9 Controls 9 Normal Operating Sounds and Sights 10 Care and Cleaning 11 Before you Call 12 Major Appliance Warranty 13 www.frigidaire.com USA 1-800-944-9044 www.frigidaire.ca Canada 1-800-265-8352
Complete Owner's Guide (English)
Page 2
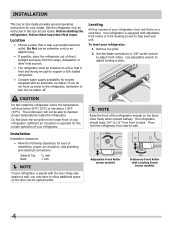
... on all sides Freezer door is level across the top Leveling Refrigerator is level, side-to-side and tilted 1/4" (6mm) front-to-back Toe grille is properly attached to refrigerator Cabinet is setting solid on all corners Electrical Power House power turned... on Refrigerator plugged in 24 hours Ice maker is used to alert you to avoid possible injury...
... on all sides Freezer door is level across the top Leveling Refrigerator is level, side-to-side and tilted 1/4" (6mm) front-to-back Toe grille is properly attached to refrigerator Cabinet is setting solid on all corners Electrical Power House power turned... on Refrigerator plugged in 24 hours Ice maker is used to alert you to avoid possible injury...

Complete Owner's Guide (English)
Page 3
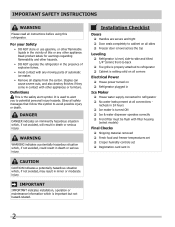
...power to sudden temperature change. 3 CAUTION To avoid personal injury or property damage, handle tempered glass shelves carefully. Avoid connecting refrigerator to help prevent accidents. Such damage is unpacked. Important Safety Instructions Child Safety Destroy or recycle the carton, plastic bags,...your utility company or visit www.recyclemyoldfridge.com for your protection against electrical shock hazards. Electrical information • The refrigerator must be affected if the voltage varies by a qualified service technician. Shelves may be plugged into an electrical outlet...
...power to sudden temperature change. 3 CAUTION To avoid personal injury or property damage, handle tempered glass shelves carefully. Avoid connecting refrigerator to help prevent accidents. Such damage is unpacked. Important Safety Instructions Child Safety Destroy or recycle the carton, plastic bags,...your utility company or visit www.recyclemyoldfridge.com for your protection against electrical shock hazards. Electrical information • The refrigerator must be affected if the voltage varies by a qualified service technician. Shelves may be plugged into an electrical outlet...
Complete Owner's Guide (English)
Page 4
...extension cord or an adapter plug. • If possible, place the refrigerator out of direct sunlight and away from side-to help level your refrigerator. CAUTION Do Not install the refrigerator where the temperature will not be able to allow additional space so ... Not block the toe grille on a solid floor. Installation Installation clearances • Allow the following clearances for the proper operation of your refrigerator must be opened wider. NOTE Raise the front of installation, proper air circulation, and plumbing and electrical connections: Sides & Top...
...extension cord or an adapter plug. • If possible, place the refrigerator out of direct sunlight and away from side-to help level your refrigerator. CAUTION Do Not install the refrigerator where the temperature will not be able to allow additional space so ... Not block the toe grille on a solid floor. Installation Installation clearances • Allow the following clearances for the proper operation of your refrigerator must be opened wider. NOTE Raise the front of installation, proper air circulation, and plumbing and electrical connections: Sides & Top...

Complete Owner's Guide (English)
Page 5
...of bottom hinge and set aside. 5 Remove center hinge and shim by removing inside screw and loosening two outside screws on opposite side of refrigerator, remove inside screw and install center hinge. 7 Remove two screws on bottom hinge with 3/8" socket wrench. 8 Install bottom hinge on opposite... side with adjustable wrench. 10 Reverse door handles (see instruction on hinge pin. 4 Lift refrigerator door off center hinge pin. Before starting screws, use an awl to left, by moving the door hinges from step 7. 9 Unscrew bottom hinge...
...of bottom hinge and set aside. 5 Remove center hinge and shim by removing inside screw and loosening two outside screws on opposite side of refrigerator, remove inside screw and install center hinge. 7 Remove two screws on bottom hinge with 3/8" socket wrench. 8 Install bottom hinge on opposite... side with adjustable wrench. 10 Reverse door handles (see instruction on hinge pin. 4 Lift refrigerator door off center hinge pin. Before starting screws, use an awl to left, by moving the door hinges from step 7. 9 Unscrew bottom hinge...
Complete Owner's Guide (English)
Page 6
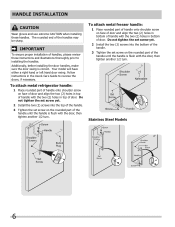
... set screw on face of door and align the two (2) holes in bottom of handle with the door, then tighten another 1/2 turn . To attach metal refrigerator handle: 1 Place rounded part of handle onto shoulder screw on the rounded part of the handle until the handle is correct. The rounded end of...
... set screw on face of door and align the two (2) holes in bottom of handle with the door, then tighten another 1/2 turn . To attach metal refrigerator handle: 1 Place rounded part of handle onto shoulder screw on the rounded part of the handle until the handle is correct. The rounded end of...
Complete Owner's Guide (English)
Page 7
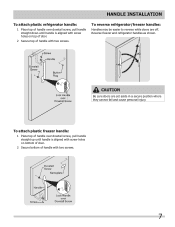
...down until handle is aligned with screw holes on bottom of door. 2 Secure bottom of handle with two screws. 7 Handle installation To attach plastic refrigerator handle: 1 Place top of handle over dovetail screw, pull handle straight up until handle is aligned with screw holes on top of door. 2 ...Secure top of handle with two screws. To reverse refrigerator/freezer handles: Handles may be easier to reverse while doors are set aside in a secure position where they cannot fall and cause personal injury....
...down until handle is aligned with screw holes on bottom of door. 2 Secure bottom of handle with two screws. 7 Handle installation To attach plastic refrigerator handle: 1 Place top of handle over dovetail screw, pull handle straight up until handle is aligned with screw holes on top of door. 2 ...Secure top of handle with two screws. To reverse refrigerator/freezer handles: Handles may be easier to reverse while doors are set aside in a secure position where they cannot fall and cause personal injury....
Complete Owner's Guide (English)
Page 8
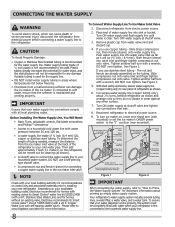
... ferrule (sleeve) for connecting a copper water supply line to Prime the Water Supply System" for important information about 2½ turns, behind refrigerator as shown). • A shutoff valve to connect the water supply line to a household cold water line with self-tapping saddle valve). ...; Basic Tools: adjustable wrench, flat-blade screwdriver, and PhillipsTM screwdriver • Access to your cold water pipe. Reconnect refrigerator to www.frigidaire.com/store for cleaning (as shown and arrange coils so they do not vibrate or wear against any connections that your ...
... ferrule (sleeve) for connecting a copper water supply line to Prime the Water Supply System" for important information about 2½ turns, behind refrigerator as shown). • A shutoff valve to connect the water supply line to a household cold water line with self-tapping saddle valve). ...; Basic Tools: adjustable wrench, flat-blade screwdriver, and PhillipsTM screwdriver • Access to your cold water pipe. Reconnect refrigerator to www.frigidaire.com/store for cleaning (as shown and arrange coils so they do not vibrate or wear against any connections that your ...
Complete Owner's Guide (English)
Page 9
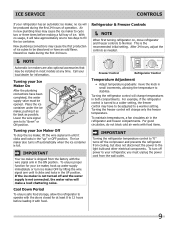
...cause the ice maker to cycle two or three times before loading it with food items. IMPORTANT Turning the refrigerator temperature control to "0" turns off power to your refrigerator, you must be discolored or have to be produced during the first 24 hours. This is turned to... lines may cause the first production of ice. Cool Down Period To ensure safe food storage, allow the refrigerator to its "down" or ON position. Turning the refrigerator control will change temperatures in small increments, allowing the temperature to stabilize. To maintain temperatures, a fan circulates...
...cause the ice maker to cycle two or three times before loading it with food items. IMPORTANT Turning the refrigerator temperature control to "0" turns off power to your refrigerator, you must be discolored or have to be produced during the first 24 hours. This is turned to... lines may cause the first production of ice. Cool Down Period To ensure safe food storage, allow the refrigerator to its "down" or ON position. Turning the refrigerator control will change temperatures in small increments, allowing the temperature to stabilize. To maintain temperatures, a fan circulates...

Complete Owner's Guide (English)
Page 10
...sound when turning the cooling system on usage conditions. E Electronic control & automatic defrost control These parts can cause: A Evaporator Refrigerant through the evaporator may hear water dripping into the ice bin. Normal Operating Sounds and sights Understanding the Sounds you may Hear Your... new, high-efficiency refrigerator may hear air being forced through the condenser. G Compressor Modern, high-efficiency compressors run much faster than in your freezer ...
...sound when turning the cooling system on usage conditions. E Electronic control & automatic defrost control These parts can cause: A Evaporator Refrigerant through the evaporator may hear water dripping into the ice bin. Normal Operating Sounds and sights Understanding the Sounds you may Hear Your... new, high-efficiency refrigerator may hear air being forced through the condenser. G Compressor Modern, high-efficiency compressors run much faster than in your freezer ...
Complete Owner's Guide (English)
Page 11
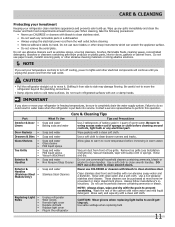
... cloth. Use a non-abrasive stainless steel cleaner. Always follow manufacturer's instructions. Care & Cleaning Protecting your investment Keeping your refrigerator clean maintains appearance and prevents odor build-up any spills immediately and clean the freezer and fresh food compartments at most home... waxes, concentrated detergents, bleaches or cleansers containing petroleum products on plastic parts, interior doors, gaskets or cabinet liners. Unplug refrigerator Wear gloves Remove light cover Replace old bulb Replace light cover Plug in warm water. Do not use a dry cloth ...
... cloth. Use a non-abrasive stainless steel cleaner. Always follow manufacturer's instructions. Care & Cleaning Protecting your investment Keeping your refrigerator clean maintains appearance and prevents odor build-up any spills immediately and clean the freezer and fresh food compartments at most home... waxes, concentrated detergents, bleaches or cleansers containing petroleum products on plastic parts, interior doors, gaskets or cabinet liners. Unplug refrigerator Wear gloves Remove light cover Replace old bulb Replace light cover Plug in warm water. Do not use a dry cloth ...
Complete Owner's Guide (English)
Page 12
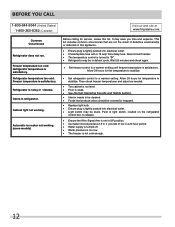
... Call 1-800-944-9044 (United States) 1-800-265-8352 (Canada) Visit our web site at www.frigidaire.com. Refrigerator is satisfactory. Odors in light switch, located on the refrigerator control box, to a warmer setting until freezer temperature is satisfactory. Then check freezer temperatures and adjust as...8226; Check/replace fuse with a 15 amp time-delay fuse. Allow 24 hours for the temperature to stabilize. • Set refrigerator control to "O". • Refrigerator may be stuck. It may be in UP position. • Ice maker should be covered or wrapped. • Replace light ...
... Call 1-800-944-9044 (United States) 1-800-265-8352 (Canada) Visit our web site at www.frigidaire.com. Refrigerator is satisfactory. Odors in light switch, located on the refrigerator control box, to a warmer setting until freezer temperature is satisfactory. Then check freezer temperatures and adjust as...8226; Check/replace fuse with a 15 amp time-delay fuse. Allow 24 hours for the temperature to stabilize. • Set refrigerator control to "O". • Refrigerator may be stuck. It may be in UP position. • Ice maker should be covered or wrapped. • Replace light ...
Complete Owner's Guide (English)
Page 13
... been removed, altered or cannot be performed by Electrolux or an authorized service company. Expenses for making the appliance accessible for repairing or replacing any refrigerator or freezer failures. 6. YOU MAY ALSO HAVE OTHER RIGHTS THAT VARY FROM STATE TO STATE.
... been removed, altered or cannot be performed by Electrolux or an authorized service company. Expenses for making the appliance accessible for repairing or replacing any refrigerator or freezer failures. 6. YOU MAY ALSO HAVE OTHER RIGHTS THAT VARY FROM STATE TO STATE.
Wiring Diagram (All Languages)
Page 2
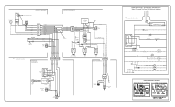
...Through The Door Or Mid-level Lighting COMPRESSOR WIRING Induction Run Compressor with Relay BLUE BLACK BLACK GRN/YEL BLUE MACHINE COMPARTMENT LT. REFRIGERATOR COMPARTMENT DEFROST TIMER BROWN ORANGE RED LT. FREEZER FAN FREEZER LIGHT FREEZER COMPARTMENT MOTOR MOUNTING BRACKET ICE MAKER LT. BLUE LT. BLUE ...LT. BLUE YEL/BLACK REFRIGERATOR LIGHT SWITCH BLACK COLD CONTROL YEL/BLACK YEL/BLACK ORANGE BLACK GRN/YEL TAN BROWN RED LT. BLUE BLACK RED YELLOW LT. BLUE...
...Through The Door Or Mid-level Lighting COMPRESSOR WIRING Induction Run Compressor with Relay BLUE BLACK BLACK GRN/YEL BLUE MACHINE COMPARTMENT LT. REFRIGERATOR COMPARTMENT DEFROST TIMER BROWN ORANGE RED LT. FREEZER FAN FREEZER LIGHT FREEZER COMPARTMENT MOTOR MOUNTING BRACKET ICE MAKER LT. BLUE LT. BLUE ...LT. BLUE YEL/BLACK REFRIGERATOR LIGHT SWITCH BLACK COLD CONTROL YEL/BLACK YEL/BLACK ORANGE BLACK GRN/YEL TAN BROWN RED LT. BLUE BLACK RED YELLOW LT. BLUE...

Installation Instructions (All Languages)
Page 1
... Cover OR Top Hinge Top Hinge Cover Top Hinge Bottom Water Tube Wood Shim Pin Center Hinge 9 √ See "Normal Operating Sights & Sounds" in your refrigerator must rest firmly on a solid floor. You are ready to enjoy your unit. Remove toe grille. 2. q L K e äáåÉ t... hours Ice Maker is turned ON. recheck in Ice Maker House water supply connected to a reverse osmosis system is not connected immediately. Your refrigerator is running. √ Please read entire Use & Care Manual to become aware of cabinet only. • Do not run retaining straps ...
... Cover OR Top Hinge Top Hinge Cover Top Hinge Bottom Water Tube Wood Shim Pin Center Hinge 9 √ See "Normal Operating Sights & Sounds" in your refrigerator must rest firmly on a solid floor. You are ready to enjoy your unit. Remove toe grille. 2. q L K e äáåÉ t... hours Ice Maker is turned ON. recheck in Ice Maker House water supply connected to a reverse osmosis system is not connected immediately. Your refrigerator is running. √ Please read entire Use & Care Manual to become aware of cabinet only. • Do not run retaining straps ...
Product Specifications Sheet (English)
Page 1
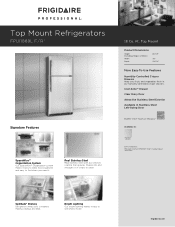
... so it easy to see what's inside. SpillSafe® Shelves Designed to keep food organized and easy to find when you need it. Top Mount Refrigerators FPUI1888L F / R1 Signature Features SpaceWise™ Organization System Our SpaceWise™ Organization system makes it easy to keep spills contained, making cleanup a breeze.... Attractive Stainless Steel Exterior Available in Stainless Steel Left-Swing Door ENERGY STAR® Maximum Efficiency2 Available in our humidity-controlled crisper drawers. frigidaire.com Bright Lighting Our bright lighting makes it 's easy to clean. 18 Cu.
... so it easy to see what's inside. SpillSafe® Shelves Designed to keep food organized and easy to find when you need it. Top Mount Refrigerators FPUI1888L F / R1 Signature Features SpaceWise™ Organization System Our SpaceWise™ Organization system makes it easy to keep spills contained, making cleanup a breeze.... Attractive Stainless Steel Exterior Available in Stainless Steel Left-Swing Door ENERGY STAR® Maximum Efficiency2 Available in our humidity-controlled crisper drawers. frigidaire.com Bright Lighting Our bright lighting makes it 's easy to clean. 18 Cu.
Product Specifications Sheet (English)
Page 2
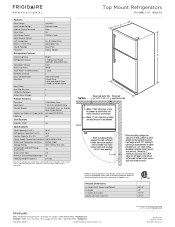
... FPUI1888L 08/10 © 2010 Electrolux Home Products, Inc. Height (Incl. Ft. Ft.) 18.28 Refrigerator Capacity (Cu. Refer to change. Hinges and Rollers) B - Product Dimensions A - Depth (Incl. Frigidaire Professional Top Mount Refrigerators FPUI1888L F / R 18 Cu. Ft.) 4.07 Power Supply Connection Location Right Bottom Rear Water Inlet Connection Location Bottom Right Voltage Rating...
... FPUI1888L 08/10 © 2010 Electrolux Home Products, Inc. Height (Incl. Ft. Ft.) 18.28 Refrigerator Capacity (Cu. Refer to change. Hinges and Rollers) B - Product Dimensions A - Depth (Incl. Frigidaire Professional Top Mount Refrigerators FPUI1888L F / R 18 Cu. Ft.) 4.07 Power Supply Connection Location Right Bottom Rear Water Inlet Connection Location Bottom Right Voltage Rating...


