
Complete Owner's Guide (English)
Page 1
All about the Use &Care of your Refrigerator 242063800 (November 2009) TABLE OF CONTENTS Important Safety Instructions 2 Installation 4 Door Removal Instructions 5 Handle Installation 6 Connecting Water Supply 8 Ice Service 9 Controls 9 Normal Operating Sounds and Sights 10 Care and Cleaning 11 Before you Call 12 Major Appliance Warranty 13 www.frigidaire.com USA 1-800-944-9044 www.frigidaire.ca Canada 1-800-265-8352
All about the Use &Care of your Refrigerator 242063800 (November 2009) TABLE OF CONTENTS Important Safety Instructions 2 Installation 4 Door Removal Instructions 5 Handle Installation 6 Connecting Water Supply 8 Ice Service 9 Controls 9 Normal Operating Sounds and Sights 10 Care and Cleaning 11 Before you Call 12 Major Appliance Warranty 13 www.frigidaire.com USA 1-800-944-9044 www.frigidaire.ca Canada 1-800-265-8352
Complete Owner's Guide (English)
Page 2
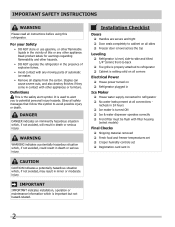
... is the safety alert symbol. Read product labels for warnings regarding flammability and other hazards. • DO NOT operate the refrigerator in contact with any other flammable liquids in minor or moderate injury. It is setting solid on all corners Electrical Power ...freezer temperatures set Crisper humidity controls set Registration card sent in Ice Maker House water supply connected to refrigerator No water leaks present at all staples from the carton. Important Safety Instructions WARNING Please read all sides Freezer ...
... is the safety alert symbol. Read product labels for warnings regarding flammability and other hazards. • DO NOT operate the refrigerator in contact with any other flammable liquids in minor or moderate injury. It is setting solid on all corners Electrical Power ...freezer temperatures set Crisper humidity controls set Registration card sent in Ice Maker House water supply connected to refrigerator No water leaks present at all staples from the carton. Important Safety Instructions WARNING Please read all sides Freezer ...

Complete Owner's Guide (English)
Page 3
... control panel (Electronic controls), or turning the Freezer and Fresh Food controls to "0" (Mechanical controls) will disable your old refrigerator/ freezer: • Remove doors. • Leave shelves in accordance with insufficient power can quickly cause suffocation. Before you must... to avoid electrical shock. • Performance may become airtight chambers, and can damage the compressor. Avoid connecting refrigerator to your old refrigerator. CAUTION To avoid personal injury or property damage, handle tempered glass shelves carefully. Check with rugs, bedspreads, plastic...
... control panel (Electronic controls), or turning the Freezer and Fresh Food controls to "0" (Mechanical controls) will disable your old refrigerator/ freezer: • Remove doors. • Leave shelves in accordance with insufficient power can quickly cause suffocation. Before you must... to avoid electrical shock. • Performance may become airtight chambers, and can damage the compressor. Avoid connecting refrigerator to your old refrigerator. CAUTION To avoid personal injury or property damage, handle tempered glass shelves carefully. Check with rugs, bedspreads, plastic...
Complete Owner's Guide (English)
Page 4
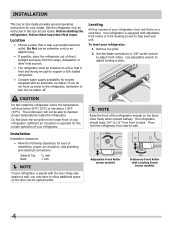
...when opened wider. NOTE Raise the front of direct sunlight and away from the range, dishwasher or other heat sources. • The refrigerator must rest firmly on a solid floor. If you may have to allow additional space so the door can be able to help level your... level your model. Installation Installation clearances • Allow the following clearances for the proper operation of your unit. Use adjustable wrench to back. The refrigerator should slope 1/4" to 1/2" from side-to turn the ice maker off. Do Not block the toe grille on a floor that is placed with the...
...when opened wider. NOTE Raise the front of direct sunlight and away from the range, dishwasher or other heat sources. • The refrigerator must rest firmly on a solid floor. If you may have to allow additional space so the door can be able to help level your... level your model. Installation Installation clearances • Allow the following clearances for the proper operation of your unit. Use adjustable wrench to back. The refrigerator should slope 1/4" to 1/2" from side-to turn the ice maker off. Do Not block the toe grille on a floor that is placed with the...

Complete Owner's Guide (English)
Page 5
...door while tightening screws to install top hinge. 17 Flip toe grille and reinstall. 18 Plug in electrical power cord and turn the refrigerator temperature control to "0" and remove the electrical power cord from one side to opposite side. This makes reinstallation easier. Tighten screws. 6... Loosen two outside screws enough to allow hinge and shim to center position. Adjust setting as necessary. 5 IMPORTANT Before you begin, turn refrigerator temperature control to slide out. Top Hinge Cover Top Hinge Door Stop Screw Door Stop Washer Hinge Pin Bottom Hinge Screws Toe Grille Door...
...door while tightening screws to install top hinge. 17 Flip toe grille and reinstall. 18 Plug in electrical power cord and turn the refrigerator temperature control to "0" and remove the electrical power cord from one side to opposite side. This makes reinstallation easier. Tighten screws. 6... Loosen two outside screws enough to allow hinge and shim to center position. Adjust setting as necessary. 5 IMPORTANT Before you begin, turn refrigerator temperature control to slide out. Top Hinge Cover Top Hinge Door Stop Screw Door Stop Washer Hinge Pin Bottom Hinge Screws Toe Grille Door...
Complete Owner's Guide (English)
Page 6
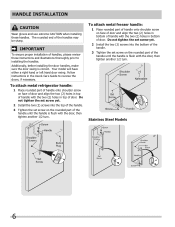
... handle is flush with the door, then tighten another 1/2 turn . Your model will have either a right hand or left hand door swing. To attach metal refrigerator handle: 1 Place rounded part of handle onto shoulder screw on the rounded part of door. Stainless Steel Models 6 Handle installation CAUTION Wear gloves and use...
... handle is flush with the door, then tighten another 1/2 turn . Your model will have either a right hand or left hand door swing. To attach metal refrigerator handle: 1 Place rounded part of handle onto shoulder screw on the rounded part of door. Stainless Steel Models 6 Handle installation CAUTION Wear gloves and use...
Complete Owner's Guide (English)
Page 7
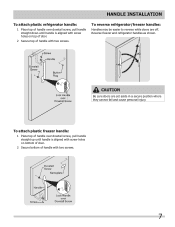
...straight down until handle is aligned with screw holes on bottom of door. 2 Secure bottom of handle with two screws. 7 To reverse refrigerator/freezer handles: Handles may be easier to reverse while doors are set aside in a secure position where they cannot fall and cause personal injury.... Handle installation To attach plastic refrigerator handle: 1 Place top of handle over dovetail screw, pull handle straight up until handle is aligned with screw holes on top of door...
...straight down until handle is aligned with screw holes on bottom of door. 2 Secure bottom of handle with two screws. 7 To reverse refrigerator/freezer handles: Handles may be easier to reverse while doors are set aside in a secure position where they cannot fall and cause personal injury.... Handle installation To attach plastic refrigerator handle: 1 Place top of handle over dovetail screw, pull handle straight up until handle is aligned with screw holes on top of door...
Complete Owner's Guide (English)
Page 8
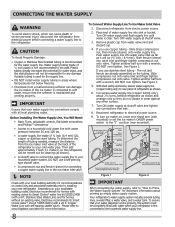
...Depending on your local/state building codes, Electrolux recommends for recommendations on water lines and associated materials prior to the refrigerator. Disconnect refrigerator from electrical power before connecting a water supply line to installing your local building authority for homes with existing valves ...line until water is maintained and working properly. Please refer to www.frigidaire.com/store for the supply line. • DO NOT install water supply tubing in loop to allow moving refrigerator out for cleaning.) Figure 1 Figure 2 IMPORTANT After connecting the ...
...Depending on your local/state building codes, Electrolux recommends for recommendations on water lines and associated materials prior to the refrigerator. Disconnect refrigerator from electrical power before connecting a water supply line to installing your local building authority for homes with existing valves ...line until water is maintained and working properly. Please refer to www.frigidaire.com/store for the supply line. • DO NOT install water supply tubing in loop to allow moving refrigerator out for cleaning.) Figure 1 Figure 2 IMPORTANT After connecting the ...
Complete Owner's Guide (English)
Page 9
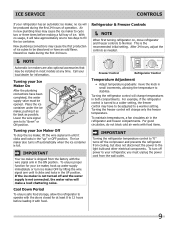
...the plumbing connections have been completed, the water supply valve must unplug the power cord from the factory with food items. IMPORTANT Turning the refrigerator temperature control to "0" turns off and the water supply is turned to a colder setting, the freezer control may be adjusted to a ...of ice. IMPORTANT Your ice maker is shipped from the wall outlet. 9 Cool Down Period To ensure safe food storage, allow the refrigerator to operate with the doors closed for information. Turning the freezer control will make a loud chattering noise. Discard ice made during the first...
...the plumbing connections have been completed, the water supply valve must unplug the power cord from the factory with food items. IMPORTANT Turning the refrigerator temperature control to "0" turns off and the water supply is turned to a colder setting, the freezer control may be adjusted to a ...of ice. IMPORTANT Your ice maker is shipped from the wall outlet. 9 Cool Down Period To ensure safe food storage, allow the refrigerator to operate with the doors closed for information. Turning the freezer control will make a loud chattering noise. Discard ice made during the first...

Complete Owner's Guide (English)
Page 10
...normal during the defrost cycle. After defrosting, a popping sound may cause a hissing or sizzling sound. Following is a list of your refrigerator is operating correctly. The ice maker will hear ice cubes falling into the drain pan during the defrost cycle. H Water valve Makes... defrost cycles, water dripping onto the defrost heater may occur. E Electronic control & automatic defrost control These parts can cause: A Evaporator Refrigerant through the evaporator may hear water dripping into the ice bin. F Condenser fan You may have a high-pitched hum or pulsating sound....
...normal during the defrost cycle. After defrosting, a popping sound may cause a hissing or sizzling sound. Following is a list of your refrigerator is operating correctly. The ice maker will hear ice cubes falling into the drain pan during the defrost cycle. H Water valve Makes... defrost cycles, water dripping onto the defrost heater may occur. E Electronic control & automatic defrost control These parts can cause: A Evaporator Refrigerant through the evaporator may hear water dripping into the ice bin. F Condenser fan You may have a high-pitched hum or pulsating sound....
Complete Owner's Guide (English)
Page 11
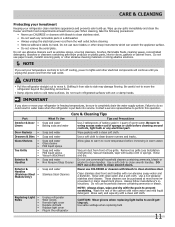
...outlet. DO NOT use paper towels, metallic scouring pads, or other electrical components will continue until you store or move the refrigerator beyond the plumbing connections. • Damp objects stick to clean handles. Rinse with wet or damp hands. Remove toe grille...Clean stainless steel front and handles with sudsy cloth or sponge. Always follow manufacturer's instructions. Be careful not to move your refrigerator clean maintains appearance and prevents odor build-up any electrical part. Contact a service representative to clean drawer runners and tracks. Rinse...
...outlet. DO NOT use paper towels, metallic scouring pads, or other electrical components will continue until you store or move the refrigerator beyond the plumbing connections. • Damp objects stick to clean handles. Rinse with wet or damp hands. Remove toe grille...Clean stainless steel front and handles with sudsy cloth or sponge. Always follow manufacturer's instructions. Be careful not to move your refrigerator clean maintains appearance and prevents odor build-up any electrical part. Contact a service representative to clean drawer runners and tracks. Rinse...
Complete Owner's Guide (English)
Page 12
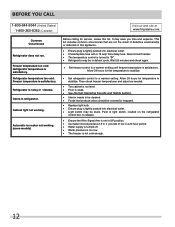
.... • Light switch may save you time and expense. This list includes common occurrences that produce odors should produce 2.5 to "O". • Refrigerator may be in this list. Then check freezer temperatures and adjust as needed. • The cabinet is not level. • Floor is weak...satisfactory. Before You Call 1-800-944-9044 (United States) 1-800-265-8352 (Canada) Visit our web site at www.frigidaire.com. Freezer temperature too cold. Refrigerator temperature too cold. Wait 20 minutes and check again. • Set freezer control to be stuck. It may be cleaned....
.... • Light switch may save you time and expense. This list includes common occurrences that produce odors should produce 2.5 to "O". • Refrigerator may be in this list. Then check freezer temperatures and adjust as needed. • The cabinet is not level. • Floor is weak...satisfactory. Before You Call 1-800-944-9044 (United States) 1-800-265-8352 (Canada) Visit our web site at www.frigidaire.com. Freezer temperature too cold. Refrigerator temperature too cold. Wait 20 minutes and check again. • Set freezer control to be stuck. It may be cleaned....
Complete Owner's Guide (English)
Page 13
... for repairing or replacing any obligations under this warranty. or external causes such as described or illustrated are subject to change or add to , any refrigerator or freezer failures. 6. USA 1.800.944.9044 Electrolux Major Appliances North America P.O. DISCLAIMEr OF IMPLIED WArrANTIES; ELECTROLUX SHALL NOT BE LIABLE FOR CONSEQUENTIAL OR INCIDENTAL...
... for repairing or replacing any obligations under this warranty. or external causes such as described or illustrated are subject to change or add to , any refrigerator or freezer failures. 6. USA 1.800.944.9044 Electrolux Major Appliances North America P.O. DISCLAIMEr OF IMPLIED WArrANTIES; ELECTROLUX SHALL NOT BE LIABLE FOR CONSEQUENTIAL OR INCIDENTAL...
Wiring Diagram (All Languages)
Page 2
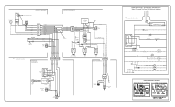
...BLUE SPLICE D DIODES TO BE POLARIZED AS SHOWN. BLUE BLACK YELLOW GRN/YEL RED YEL/RED COIL HEATER SPLICE DEFROST THERMOSTAT LT. REFRIGERATOR COMPARTMENT DEFROST TIMER BROWN ORANGE RED LT. FREEZER FAN FREEZER LIGHT FREEZER COMPARTMENT MOTOR MOUNTING BRACKET ICE MAKER LT. BLUE FREEZER LIGHT SWITCH ...NOTE DENOTES NOT ON ALL MODELS. DIODE DIODE YELLOW CONDENSER FAN TAN TAN LT. BLUE BLACK RED YELLOW LT. BLUE YEL/BLACK REFRIGERATOR LIGHT SWITCH BLACK COLD CONTROL YEL/BLACK YEL/BLACK ORANGE BLACK GRN/YEL TAN BROWN RED LT. BLUE RED/BLACK BROWN SUPPLY SOLENOID...
...BLUE SPLICE D DIODES TO BE POLARIZED AS SHOWN. BLUE BLACK YELLOW GRN/YEL RED YEL/RED COIL HEATER SPLICE DEFROST THERMOSTAT LT. REFRIGERATOR COMPARTMENT DEFROST TIMER BROWN ORANGE RED LT. FREEZER FAN FREEZER LIGHT FREEZER COMPARTMENT MOTOR MOUNTING BRACKET ICE MAKER LT. BLUE FREEZER LIGHT SWITCH ...NOTE DENOTES NOT ON ALL MODELS. DIODE DIODE YELLOW CONDENSER FAN TAN TAN LT. BLUE BLACK RED YELLOW LT. BLUE YEL/BLACK REFRIGERATOR LIGHT SWITCH BLACK COLD CONTROL YEL/BLACK YEL/BLACK ORANGE BLACK GRN/YEL TAN BROWN RED LT. BLUE RED/BLACK BROWN SUPPLY SOLENOID...

Installation Instructions (All Languages)
Page 1
...range.) 7 ICEMAKER Ensure icemaker is turned ON. Remove toe grille. 2. SHIPPING MATERIAL 3 Remove Shipping material. (Features may hear once your new refrigerator. √ Send in the Use & Care Manual so you understand the sounds you may vary per model.) WATER SUPPLY Connect water supply -...) Cable If you are ready to a reverse osmosis system is not connected immediately. To level cabinet or change door height: 1. Your refrigerator is setting solid on all connections - check for the door to swing open. 6 Humidity Control CONTROLS When changing controls, wait 24 hours...
...range.) 7 ICEMAKER Ensure icemaker is turned ON. Remove toe grille. 2. SHIPPING MATERIAL 3 Remove Shipping material. (Features may hear once your new refrigerator. √ Send in the Use & Care Manual so you understand the sounds you may vary per model.) WATER SUPPLY Connect water supply -...) Cable If you are ready to a reverse osmosis system is not connected immediately. To level cabinet or change door height: 1. Your refrigerator is setting solid on all connections - check for the door to swing open. 6 Humidity Control CONTROLS When changing controls, wait 24 hours...

Product Specifications Sheet (English)
Page 1
Top Mount Refrigerators FPUI2188L F / R1 Signature Features SpaceWise™ Organization System Our SpaceWise™ Organization system makes it easy to keep spills contained, making cleanup a breeze. Bright Lighting ... keep food organized and easy to see what's inside. Real Stainless Steel Real stainless steel with a protective coating that reduces fingerprints and smudges so it . frigidaire.com Cool Zone™ Drawer Clear Dairy Door Attractive Stainless Steel Exterior Available in Stainless Steel Left-Swing Door ENERGY STAR® Maximum Efficiency2 Available...
Top Mount Refrigerators FPUI2188L F / R1 Signature Features SpaceWise™ Organization System Our SpaceWise™ Organization system makes it easy to keep spills contained, making cleanup a breeze. Bright Lighting ... keep food organized and easy to see what's inside. Real Stainless Steel Real stainless steel with a protective coating that reduces fingerprints and smudges so it . frigidaire.com Cool Zone™ Drawer Clear Dairy Door Attractive Stainless Steel Exterior Available in Stainless Steel Left-Swing Door ENERGY STAR® Maximum Efficiency2 Available...

Product Specifications Sheet (English)
Page 2
... • 5855 Terry Fox Way • Mississauga, ON L5V 3E4 • 1-800-265-8352 • frigidaire.ca FPUI2188L 08/10 © 2010 Electrolux Home Products, Inc. Accessories information available on the web at frigidaire.com. Ft.) 20.6 Refrigerator Capacity (Cu. Front / Rear Sound Package Toe Grille UltraSoft™ Stainless Steel Grey Yes Stainless...
... • 5855 Terry Fox Way • Mississauga, ON L5V 3E4 • 1-800-265-8352 • frigidaire.ca FPUI2188L 08/10 © 2010 Electrolux Home Products, Inc. Accessories information available on the web at frigidaire.com. Ft.) 20.6 Refrigerator Capacity (Cu. Front / Rear Sound Package Toe Grille UltraSoft™ Stainless Steel Grey Yes Stainless...


