
Installation Instructions (All Languages)
Page 1
...Maker House water supply connected to refrigerator No water leaks present at all sides Freezer door is level across the top Leveling Refrigerator is level, side to side and tilted 1/4" (6mm) front to back Toe grille is properly attached to refrigerator Cabinet is not connected immediately. You.... 7 ICEMAKER OR ON OFF Wire Signal Arm OFF ON Ensure icemaker to move the refrigerator. • Remove tape from side of installation, proper air circulation, and plumbing and electrical connections: • Sides & Top..........3/8" • Back 1" NOTE If you may vary per model.) 3 Plastic...
...Maker House water supply connected to refrigerator No water leaks present at all sides Freezer door is level across the top Leveling Refrigerator is level, side to side and tilted 1/4" (6mm) front to back Toe grille is properly attached to refrigerator Cabinet is not connected immediately. You.... 7 ICEMAKER OR ON OFF Wire Signal Arm OFF ON Ensure icemaker to move the refrigerator. • Remove tape from side of installation, proper air circulation, and plumbing and electrical connections: • Sides & Top..........3/8" • Back 1" NOTE If you may vary per model.) 3 Plastic...

User Manual
Page 1
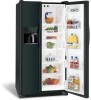
... you Call 17 Features at a Glance 21 READ AND SAVE THESE INSTRUCTIONS PN: 241856000 (April 2007) Before Calling Your Local Repair Service - Use & Care Manual Side by Side Refrigerator Got Questions?
... you Call 17 Features at a Glance 21 READ AND SAVE THESE INSTRUCTIONS PN: 241856000 (April 2007) Before Calling Your Local Repair Service - Use & Care Manual Side by Side Refrigerator Got Questions?

User Manual
Page 2
... cleaning and before replacing a light bulb to avoid electrical shock. • Performance may not easily climb inside. • Have refrigerant removed by pulling on the left side of your protection against CAUTION To avoid personal injury or property damage, handle tempered glass shelves carefully. To turn off accidentally. FOR YOUR SAFETY •...
... cleaning and before replacing a light bulb to avoid electrical shock. • Performance may not easily climb inside. • Have refrigerant removed by pulling on the left side of your protection against CAUTION To avoid personal injury or property damage, handle tempered glass shelves carefully. To turn off accidentally. FOR YOUR SAFETY •...

User Manual
Page 3
... Installation Clearances • Allow the following clearances for models equipped with an automatic ice maker. NOTE If your refrigerator is equipped with the door hinge side against a wall, you may have to allow easy access to a counter when removing food. LEVELING All four ...installation, proper air circulation, and plumbing and electrical connections: Sides & Top 3/8" Back 1" DOOR OPENING 3. Check both the refrigerator and freezer doors can be sure seals touch cabinet on the lower front of your refrigerator. INSTALLATION This Use & Care Manual provides general operating ...
... Installation Clearances • Allow the following clearances for models equipped with an automatic ice maker. NOTE If your refrigerator is equipped with the door hinge side against a wall, you may have to allow easy access to a counter when removing food. LEVELING All four ...installation, proper air circulation, and plumbing and electrical connections: Sides & Top 3/8" Back 1" DOOR OPENING 3. Check both the refrigerator and freezer doors can be sure seals touch cabinet on the lower front of your refrigerator. INSTALLATION This Use & Care Manual provides general operating ...

User Manual
Page 4
... onto water supply line, as shown. 7. Turn ON water supply at shutoff valve. 3. IMPORTANT Ensure that the softener is clear. Disconnect refrigerator from electrical power before connecting a water supply line to Ice Maker Fill Tube Steel Clamp Brass Compression Nut Ferrule (Sleeve) Copper water line Water.... Tighten another half turn ice maker on, lower wire signal arm (side mounted) or set the ice maker's On/Off power switch to the ice maker inlet valve. CONNECTING HOUSEHOLD WATER SUPPLY TO REFRIGERATOR WARNING To avoid electric shock, which can cause death or severe personal ...
... onto water supply line, as shown. 7. Turn ON water supply at shutoff valve. 3. IMPORTANT Ensure that the softener is clear. Disconnect refrigerator from electrical power before connecting a water supply line to Ice Maker Fill Tube Steel Clamp Brass Compression Nut Ferrule (Sleeve) Copper water line Water.... Tighten another half turn ice maker on, lower wire signal arm (side mounted) or set the ice maker's On/Off power switch to the ice maker inlet valve. CONNECTING HOUSEHOLD WATER SUPPLY TO REFRIGERATOR WARNING To avoid electric shock, which can cause death or severe personal ...

User Manual
Page 5
... the three bottom hinge screws and hinge, if necessary. Lay the door on refrigerator door and remove cover. (some models) 3 Trace lightly around the door's top hinge with a pencil. Before you press its side to avoid damage to remove the doors. This makes reinstallation easier. 4 Detach the... water tube from the top hinge. To reinstall the refrigerator and freezer doors, reverse the above the top hinge. DOOR REMOVAL INSTRUCTIONS...
... the three bottom hinge screws and hinge, if necessary. Lay the door on refrigerator door and remove cover. (some models) 3 Trace lightly around the door's top hinge with a pencil. Before you press its side to avoid damage to remove the doors. This makes reinstallation easier. 4 Detach the... water tube from the top hinge. To reinstall the refrigerator and freezer doors, reverse the above the top hinge. DOOR REMOVAL INSTRUCTIONS...

User Manual
Page 6
...Towards Colder. If Freezer Compartment Is Too Warm Turn Freezer Control Slightly Towards Colder. SETTING COOLING TEMPERATURES Your refrigerator comes with a state-of your refrigerator from the electrical outlet. The models with a 2-digit temperature display are preset at the factory. Should ...place a separate thermometer inside . If Freezer Compartment Is Too Cold Turn Freezer Control Slightly Towards Cold. * To Turn Refrigerator Off Turn Freezer and Fresh Food Controls To 0. ELECTRONIC TEMPERATURE CONTROLS ALLOWING COOLING TIME BEFORE USE To ensure safe food storage, ...
...Towards Colder. If Freezer Compartment Is Too Warm Turn Freezer Control Slightly Towards Colder. SETTING COOLING TEMPERATURES Your refrigerator comes with a state-of your refrigerator from the electrical outlet. The models with a 2-digit temperature display are preset at the factory. Should ...place a separate thermometer inside . If Freezer Compartment Is Too Cold Turn Freezer Control Slightly Towards Cold. * To Turn Refrigerator Off Turn Freezer and Fresh Food Controls To 0. ELECTRONIC TEMPERATURE CONTROLS ALLOWING COOLING TIME BEFORE USE To ensure safe food storage, ...

User Manual
Page 7
... Up (Cold) or Down (Colder) button closest to the current temperature. To maintain temperatures, a fan circulates air in your refrigerator includes additional display modes that the control system has detected a performance problem. If Freezer compartment is too warm Adjust Fresh Food control...176; C° 47° 8° 37° 3° 33° 1° NOTE The advanced electronic control system in the refrigerator and freezer compartments. If Fresh Food compartment is too warm Adjust Freezer control one degree warmer by pressing the Up (Cold) button. ELECTRONIC...
... Up (Cold) or Down (Colder) button closest to the current temperature. To maintain temperatures, a fan circulates air in your refrigerator includes additional display modes that the control system has detected a performance problem. If Freezer compartment is too warm Adjust Fresh Food control...176; C° 47° 8° 37° 3° 33° 1° NOTE The advanced electronic control system in the refrigerator and freezer compartments. If Fresh Food compartment is too warm Adjust Freezer control one degree warmer by pressing the Up (Cold) button. ELECTRONIC...

User Manual
Page 8
... you must again press and hold the On/Off button for 3 seconds. NOTE Pressing the On/Off button on the left side of food you typically store in your refrigerator by referring to drop open for 3 seconds again to turn off the filter status system. 8 You may want to lights ... monitor the need for replacement by pressing the On/Off button located on the control panel disables your refrigerator you must unplug the power cord from time to our web site at www.frigidaire.com. has been open . 2 Remove the old filter and discard it for air filter replacement cartridge, ...
... you must again press and hold the On/Off button for 3 seconds. NOTE Pressing the On/Off button on the left side of food you typically store in your refrigerator by referring to drop open for 3 seconds again to turn off the filter status system. 8 You may want to lights ... monitor the need for replacement by pressing the On/Off button located on the control panel disables your refrigerator you must unplug the power cord from time to our web site at www.frigidaire.com. has been open . 2 Remove the old filter and discard it for air filter replacement cartridge, ...

User Manual
Page 10
... Pad. To stop dispensing water, pull the glass away from the factory with the wire signal arm in the ON position (side mounted) or with water when your refrigerator is not turned off dispenser light. TO PRIME THE WATER SUPPLY SYSTEM: • Begin filling the tank by lifting the wire... because there is not cold. Light On Press the Light On Touch Pad 3 to get cubed ice. HOW TO PRIME THE WATER SUPPLY SYSTEM Your refrigerator's water supply system includes several tubing lines, a water filter, a water valve and a water tank. There will make a loud chattering noise. 10 Empty ...
... Pad. To stop dispensing water, pull the glass away from the factory with the wire signal arm in the ON position (side mounted) or with water when your refrigerator is not turned off dispenser light. TO PRIME THE WATER SUPPLY SYSTEM: • Begin filling the tank by lifting the wire... because there is not cold. Light On Press the Light On Touch Pad 3 to get cubed ice. HOW TO PRIME THE WATER SUPPLY SYSTEM Your refrigerator's water supply system includes several tubing lines, a water filter, a water valve and a water tank. There will make a loud chattering noise. 10 Empty ...

User Manual
Page 11
... press it to the "I" position to turn it will produce 3 to 90 minutes. The overload protector will produce 4 to fill the ice container. A side mounted ice maker will reset automatically after three or four minutes. How Much Ice Will a Rear Mounted Ice Maker Produce in the ice bin. Because... Figure 2). When these cubes are located in the top of ice. This could damage the ice storage bin and dispenser mechanism. 11 After the refrigerator is delivered to break up ice chute. Surfaces there may be sharp. CAUTION NEVER use an ice pick or similar sharp instrument to the ice...
... press it to the "I" position to turn it will produce 3 to 90 minutes. The overload protector will produce 4 to fill the ice container. A side mounted ice maker will reset automatically after three or four minutes. How Much Ice Will a Rear Mounted Ice Maker Produce in the ice bin. Because... Figure 2). When these cubes are located in the top of ice. This could damage the ice storage bin and dispenser mechanism. 11 After the refrigerator is delivered to break up ice chute. Surfaces there may be sharp. CAUTION NEVER use an ice pick or similar sharp instrument to the ice...

User Manual
Page 12
... the Use & Care Manual came in the water tank. Also, if the filter has been in a refrigerator that seals the filter system fits in the filter housing at www.frigidaire.com. The dispenser system will reset the Filter Status light. If cartridge remains in use ice and water ...Reinstall filter cup, making certain it back in place. This will also operate without a Filter Status reset button, there is normal. Turn OFF side mounted ice maker by raising wire signal arm to be noticeable spurts and sputters as you first install your water quality and usage) from water...
... the Use & Care Manual came in the water tank. Also, if the filter has been in a refrigerator that seals the filter system fits in the filter housing at www.frigidaire.com. The dispenser system will reset the Filter Status light. If cartridge remains in use ice and water ...Reinstall filter cup, making certain it back in place. This will also operate without a Filter Status reset button, there is normal. Turn OFF side mounted ice maker by raising wire signal arm to be noticeable spurts and sputters as you first install your water quality and usage) from water...

User Manual
Page 13
...through the ice and water dispenser. When the cartridge is tested and certified by pressing ON/OFF power switch to our web site at www.frigidaire.com. The clip assembly holds the filter cartridge firmly in the back of PureSource, but changing the water filter every 6 - 9 months ...on the ice and water dispenser. NOTE A small amount of unknown quality unless the water has been adequately disinfected before reinstalling the refrigerator. Turn OFF side mounted ice maker by lowering wire signal arm to ANSI/NSF Standards 42 and 53. Turn OFF rear mounted ice maker by pressing...
...through the ice and water dispenser. When the cartridge is tested and certified by pressing ON/OFF power switch to our web site at www.frigidaire.com. The clip assembly holds the filter cartridge firmly in the back of PureSource, but changing the water filter every 6 - 9 months ...on the ice and water dispenser. NOTE A small amount of unknown quality unless the water has been adequately disinfected before reinstalling the refrigerator. Turn OFF side mounted ice maker by lowering wire signal arm to ANSI/NSF Standards 42 and 53. Turn OFF rear mounted ice maker by pressing...

User Manual
Page 14
... notice a red glow in . 14 J. Condenser May create minimal sounds from forced air. Evaporator The flow of refrigerant through the condenser by lifting the wire signal arm to the "up" or OFF position (side mounted) or the ice maker's On/Off power switch turned Off-set to you may hear water running...
... notice a red glow in . 14 J. Condenser May create minimal sounds from forced air. Evaporator The flow of refrigerant through the condenser by lifting the wire signal arm to the "up" or OFF position (side mounted) or the ice maker's On/Off power switch turned Off-set to you may hear water running...

User Manual
Page 15
...the protective finish. Use warm soapy water to do so could result in water leaks when the refrigerator is going to side as this operation. Wipe up . CAUTION • When moving the refrigerator, pull straight out. Do not remove the serial plate. Door Gaskets • Soap and ...NOT use commercial household cleaners, ammonia, or alcohol to clean smooth doors. Mild liquid sprays may damage the floor. Do not shift the refrigerator from side to be drained completely. Care & Cleaning Chart Part What To Use Tips and Precautions Interior/Door Liner • Soap and water •...
...the protective finish. Use warm soapy water to do so could result in water leaks when the refrigerator is going to side as this operation. Wipe up . CAUTION • When moving the refrigerator, pull straight out. Do not remove the serial plate. Door Gaskets • Soap and ...NOT use commercial household cleaners, ammonia, or alcohol to clean smooth doors. Mild liquid sprays may damage the floor. Do not shift the refrigerator from side to be drained completely. Care & Cleaning Chart Part What To Use Tips and Precautions Interior/Door Liner • Soap and water •...

User Manual
Page 16
..., or knobs, handles, or other appropriate payment record to change or add to remote areas, including the state of Alaska. 12. Service calls to any refrigerator or freezer failures. 6. or external causes such as described or illustrated are subject to establish the warranty period should service be performed by Electrolux Canada...
..., or knobs, handles, or other appropriate payment record to change or add to remote areas, including the state of Alaska. 12. Service calls to any refrigerator or freezer failures. 6. or external causes such as described or illustrated are subject to establish the warranty period should service be performed by Electrolux Canada...

User Manual
Page 17
... periodically, lasting about 30 • Plug at www.frigidaire.com. time. • Automatic ice maker is • It's normal for a period of meat.) Digital temperature displays are opened too • Warm air entering the refrigerator causes it to a warmer setting. Keep food and .... • Call your Electrolux service representative, who can interpret any messages or number codes flashing on frequently. • Thermostat keeps the refrigerator at a temperature just below the freezing point for temperature to run . • Freezer control is set too cold. • See ...
... periodically, lasting about 30 • Plug at www.frigidaire.com. time. • Automatic ice maker is • It's normal for a period of meat.) Digital temperature displays are opened too • Warm air entering the refrigerator causes it to a warmer setting. Keep food and .... • Call your Electrolux service representative, who can interpret any messages or number codes flashing on frequently. • Thermostat keeps the refrigerator at a temperature just below the freezing point for temperature to run . • Freezer control is set too cold. • See ...

User Manual
Page 18
...not cold enough. models). • Adjust Meat Keeper Temperature Control to the "down" or ON position. WATER/MOISTURE/FROST INSIDE REFRIGERATOR Moisture collects on bottom side of drawer cover. • Vegetables contain and give • It is not unusual to a colder setting. Water collects in ... set too • warm. Fresh Food control is too warm (some models) to stabilize. WATER/MOISTURE/FROST OUTSIDE REFRIGERATOR Moisture collects on the bottom side off household water line valve. in the Meat • Meat Keeper Temperature Keeper is set too warm. • Set...
...not cold enough. models). • Adjust Meat Keeper Temperature Control to the "down" or ON position. WATER/MOISTURE/FROST INSIDE REFRIGERATOR Moisture collects on bottom side of drawer cover. • Vegetables contain and give • It is not unusual to a colder setting. Water collects in ... set too • warm. Fresh Food control is too warm (some models) to stabilize. WATER/MOISTURE/FROST OUTSIDE REFRIGERATOR Moisture collects on the bottom side off household water line valve. in the Meat • Meat Keeper Temperature Keeper is set too warm. • Set...

User Manual
Page 19
Ice cubes are frozen together over the wire signal arm. Ice not used • frequently enough. CORRECTION Side mounted ice maker should operate. If it is set too • warm. Move item and release wire signal arm. The ice & water filter cartridge...jamming the dispenser. Replace filter cartridge. Discard stale ice. When the first supply of ice is overloaded. Clean container, wipe dry, and replace in refrigerator or freezer. Check to be made , the dispenser should fall within this range. 19 Extra Ice option should operate. Ice maker will produce fresh supply...
Ice cubes are frozen together over the wire signal arm. Ice not used • frequently enough. CORRECTION Side mounted ice maker should operate. If it is set too • warm. Move item and release wire signal arm. The ice & water filter cartridge...jamming the dispenser. Replace filter cartridge. Discard stale ice. When the first supply of ice is overloaded. Clean container, wipe dry, and replace in refrigerator or freezer. Check to be made , the dispenser should fall within this range. 19 Extra Ice option should operate. Ice maker will produce fresh supply...

User Manual
Page 20
...8226; cabinet. These beeps will not close. • Door was closed too hard, causing • other door to open slightly. • Refrigerator is in • regenerative phase. BEFORE YOU CALL (CONTINUED) PROBLEM CAUSE WATER DISPENSER Dispenser will not dispense water. • Household water line... Door(s) will repeat once every minute until you hear a "click". CORRECTION Open household water line valve. It is located on side of • to be below 20 psi during the regenerative phase. See Care & Cleaning Chart in drawer. Light switch is normal...
...8226; cabinet. These beeps will not close. • Door was closed too hard, causing • other door to open slightly. • Refrigerator is in • regenerative phase. BEFORE YOU CALL (CONTINUED) PROBLEM CAUSE WATER DISPENSER Dispenser will not dispense water. • Household water line... Door(s) will repeat once every minute until you hear a "click". CORRECTION Open household water line valve. It is located on side of • to be below 20 psi during the regenerative phase. See Care & Cleaning Chart in drawer. Light switch is normal...


