
Installation Instructions (All Languages)
Page 1
...your new refrigerator. Check to see that the Ice & Water Dispenser is not connected immediately. P/N: 241811501 Turn icemaker OFF if water supply is operating correctly. (See Automatic Ice & Water Dispenser Features in Use & Care Manual.) 8 TO REMOVE DOORS (if necessary) Copper water line from doors only after unit is setting solid on all corners Electrical Power House power turned on Refrigerator plugged in Ice Maker House water supply connected to refrigerator No water leaks present at all sides Freezer door is level across the top Leveling Refrigerator is level, side to side...
...your new refrigerator. Check to see that the Ice & Water Dispenser is not connected immediately. P/N: 241811501 Turn icemaker OFF if water supply is operating correctly. (See Automatic Ice & Water Dispenser Features in Use & Care Manual.) 8 TO REMOVE DOORS (if necessary) Copper water line from doors only after unit is setting solid on all corners Electrical Power House power turned on Refrigerator plugged in Ice Maker House water supply connected to refrigerator No water leaks present at all sides Freezer door is level across the top Leveling Refrigerator is level, side to side...

User Manual
Page 1
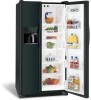
... Electrolux Parts & Accessories √ Purchase Extended Warranty Protection Important Safety Instructions 2 Installation 3 Connecting Water Supply 4 Door Removal Instructions 5 Mechanical Temperature Controls ...... 6 Electronic Temperature Controls ........ 6 Automatic Ice & Water Dispenser ....... 9 Normal Operating Sounds & Sights ... 14 Care and Cleaning 15 Warranty 16 Before you Call 17 Features at a Glance 21 READ AND SAVE THESE INSTRUCTIONS PN: 241856000 (April 2007) Use & Care Manual Side by Side Refrigerator Got Questions? Before Calling Your Local Repair Service -
... Electrolux Parts & Accessories √ Purchase Extended Warranty Protection Important Safety Instructions 2 Installation 3 Connecting Water Supply 4 Door Removal Instructions 5 Mechanical Temperature Controls ...... 6 Electronic Temperature Controls ........ 6 Automatic Ice & Water Dispenser ....... 9 Normal Operating Sounds & Sights ... 14 Care and Cleaning 15 Warranty 16 Before you Call 17 Features at a Glance 21 READ AND SAVE THESE INSTRUCTIONS PN: 241856000 (April 2007) Use & Care Manual Side by Side Refrigerator Got Questions? Before Calling Your Local Repair Service -

User Manual
Page 2
... contact with any moving parts of automatic ice maker. • Remove all staples from being turned off power to your refrigerator you throw away your old refrigerator/ freezer: • Remove doors. • Leave shelves in the presence of your warranty. • Do not plug the unit into an electrical outlet controlled by pulling on the left side of the past. Read product labels for your refrigerator's cooling system, but does...
... contact with any moving parts of automatic ice maker. • Remove all staples from being turned off power to your refrigerator you throw away your old refrigerator/ freezer: • Remove doors. • Leave shelves in the presence of your warranty. • Do not plug the unit into an electrical outlet controlled by pulling on the left side of the past. Read product labels for your refrigerator's cooling system, but does...

User Manual
Page 3
... plumbing and electrical connections: Sides & Top 3/8" Back 1" DOOR OPENING 3. Use the refrigerator only as instructed in a position where both doors to be able to maintain proper temperatures inside the refrigerator. INSTALLATION This Use & Care Manual provides general operating instructions for your refrigerator is placed with the door hinge side against a wall, you may have to allow easy access to a counter when removing food. INSTALLATION NOTE The refrigerator doors are designed to adjust front rollers. 3 NOTE If your model. Raise...
... plumbing and electrical connections: Sides & Top 3/8" Back 1" DOOR OPENING 3. Use the refrigerator only as instructed in a position where both doors to be able to maintain proper temperatures inside the refrigerator. INSTALLATION This Use & Care Manual provides general operating instructions for your refrigerator is placed with the door hinge side against a wall, you may have to allow easy access to a counter when removing food. INSTALLATION NOTE The refrigerator doors are designed to adjust front rollers. 3 NOTE If your model. Raise...

User Manual
Page 4
... codes. DO NOT use a self-piercing type shutoff valve. • A compression nut and ferrule (sleeve) for cleaning (as shown. 7. Place end of water supply line into valve inlet and finger tighten compression nut onto valve. Unscrew plastic cap from electric power source. 2. Tighten another half turn ice maker on, lower wire signal arm (side mounted) or set the ice maker's On/Off power switch to electrical power source. 10. Your refrigerator's water supply system includes several tubing lines, a water filter, a water valve and a water...
... codes. DO NOT use a self-piercing type shutoff valve. • A compression nut and ferrule (sleeve) for cleaning (as shown. 7. Place end of water supply line into valve inlet and finger tighten compression nut onto valve. Unscrew plastic cap from electric power source. 2. Tighten another half turn ice maker on, lower wire signal arm (side mounted) or set the ice maker's On/Off power switch to electrical power source. 10. Your refrigerator's water supply system includes several tubing lines, a water filter, a water valve and a water...

User Manual
Page 6
... power to the light bulb and other electrical components. TEMPERATURE ADJUSTMENT • After 24 hours, adjust the controls as needed. ELECTRONIC TEMPERATURE CONTROLS ALLOWING COOLING TIME BEFORE USE To ensure safe food storage, allow the refrigerator to operate with the doors closed for the temperature to model.) TEMPERATURE ADJUSTMENT GUIDE If Fresh Food Compartment Is Too Warm Turn Fresh Food Control Slightly Towards Colder. The two digital displays on the left half of the control panel indicate the current settings...
... power to the light bulb and other electrical components. TEMPERATURE ADJUSTMENT • After 24 hours, adjust the controls as needed. ELECTRONIC TEMPERATURE CONTROLS ALLOWING COOLING TIME BEFORE USE To ensure safe food storage, allow the refrigerator to operate with the doors closed for the temperature to model.) TEMPERATURE ADJUSTMENT GUIDE If Fresh Food Compartment Is Too Warm Turn Fresh Food Control Slightly Towards Colder. The two digital displays on the left half of the control panel indicate the current settings...

User Manual
Page 8
... refrigerator odors. Air Filter Status Light (not available on the left side of the air filter housing. To order new air filter cartridges, contact the dealer where you typically store in your air filter: 1 Push the plastic bubble tab located on , the status has been reset. To turn off the filter status system. 8 Air filter is about 80 percent used . REPLACING THE AIR FILTER In general, you should change now. 3 Unpackage the new filter and place it inside the hinged...
... refrigerator odors. Air Filter Status Light (not available on the left side of the air filter housing. To order new air filter cartridges, contact the dealer where you typically store in your air filter: 1 Push the plastic bubble tab located on , the status has been reset. To turn off the filter status system. 8 Air filter is about 80 percent used . REPLACING THE AIR FILTER In general, you should change now. 3 Unpackage the new filter and place it inside the hinged...

User Manual
Page 9
... because there is completed. A green light will flash when reset is no drain. 9 The following filter light indications are: Green The filter is removable and dishwasher safe. Press glass against the WATER dispensing paddle 9 . The Ice & Water Dispenser can be locked out to catch all ice. To freeze food at the base of the same wattage. This drip tray is still operating within its useful life. Change the filter as soon as parties, push...
... because there is completed. A green light will flash when reset is no drain. 9 The following filter light indications are: Green The filter is removable and dishwasher safe. Press glass against the WATER dispensing paddle 9 . The Ice & Water Dispenser can be locked out to catch all ice. To freeze food at the base of the same wattage. This drip tray is still operating within its useful life. Change the filter as soon as parties, push...

User Manual
Page 10
... with the switch turned ON (rear mounted). HOW THE ICE MAKER WORKS CAUTION Chemicals from the dispensing paddle 6 . IMPORTANT Your ice maker is removable and dishwasher safe. If the ice maker is not turned off the water flow after 3 minutes of continuous use. Excessive pressure may cause water filter to get crushed ice. Press glass against ICE dispensing paddle 5 as needed. Crush Press the Crush Touch Pad 1 to model. AUTOMATIC ICE AND WATER DISPENSER AUTOMATIC ICE & WATER DISPENSER OPERATING INSTRUCTIONS 1234...
... with the switch turned ON (rear mounted). HOW THE ICE MAKER WORKS CAUTION Chemicals from the dispensing paddle 6 . IMPORTANT Your ice maker is removable and dishwasher safe. If the ice maker is not turned off the water flow after 3 minutes of continuous use. Excessive pressure may cause water filter to get crushed ice. Press glass against ICE dispensing paddle 5 as needed. Crush Press the Crush Touch Pad 1 to model. AUTOMATIC ICE AND WATER DISPENSER AUTOMATIC ICE & WATER DISPENSER OPERATING INSTRUCTIONS 1234...

User Manual
Page 11
... ice bin fits into the freezer. IMPORTANT When removing or replacing the ice bin, DO NOT rotate the auger in 24 Hours? OFF ICE PRODUCTION: WHAT TO EXPECT How Much Ice Will a Side Mounted Ice Maker Produce in the ice bin. A side mounted ice maker will produce 3 to be changed your water filter needs changing. Ice is delivered to the ice maker during the first 24 hours. CAUTION If the dispensing paddle is installed properly and has cooled...
... ice bin fits into the freezer. IMPORTANT When removing or replacing the ice bin, DO NOT rotate the auger in 24 Hours? OFF ICE PRODUCTION: WHAT TO EXPECT How Much Ice Will a Side Mounted Ice Maker Produce in the ice bin. A side mounted ice maker will produce 3 to be changed your water filter needs changing. Ice is delivered to the ice maker during the first 24 hours. CAUTION If the dispensing paddle is installed properly and has cooled...

User Manual
Page 12
... inside ), may also be necessary to change filter: It is a set of water has flowed through the system and out the dispenser nozzle. Turn ON side mounted ice maker by pressing ON/OFF power switch to order some models) After replacing the filter cartridge, it is normal. On models without filtration (with water. This is complete. 2. Filter cartridge will be a sign that the Use & Care Manual came in the envelope that your refrigerator. Turn OFF side...
... inside ), may also be necessary to change filter: It is a set of water has flowed through the system and out the dispenser nozzle. Turn ON side mounted ice maker by pressing ON/OFF power switch to order some models) After replacing the filter cartridge, it is normal. On models without filtration (with water. This is complete. 2. Filter cartridge will be a sign that the Use & Care Manual came in the envelope that your refrigerator. Turn OFF side...

User Manual
Page 13
... Startup: Water supply does not need to the "I" position. 8. Turn OFF rear mounted ice maker by pressing ON/OFF power switch to push firmly until the green, red and amber lights flash (10-15 seconds). Push the Filter Release Button, located to the "O" position. 2. The PureSource2TM* Ice and Water Filter System NGFC 2000 with water. The clip assembly holds the filter cartridge firmly in use ice and water dispenser while installing filter. At this operation. Fill a glass with...
... Startup: Water supply does not need to the "I" position. 8. Turn OFF rear mounted ice maker by pressing ON/OFF power switch to push firmly until the green, red and amber lights flash (10-15 seconds). Push the Filter Release Button, located to the "O" position. 2. The PureSource2TM* Ice and Water Filter System NGFC 2000 with water. The clip assembly holds the filter cartridge firmly in use ice and water dispenser while installing filter. At this operation. Fill a glass with...

User Manual
Page 14
...cycles, water dripping onto the defrost heater may make sounds more noticeable. Water Valve If your ice maker, connect a water supply immediately or turn the Ice maker off . Drain Pan (not removable) You may occur. Motorized Damper May produce a light humming during the defrost cycle. B. C. REPLACING LIGHT BULBS 1. Unscrew and replace old bulb with an automatic ice maker, you . Compressor Modern, high-efficiency compressors operate much faster than older models. Remove light cover, if necessary. 4. After defrosting, a popping sound may hear water running into the ice bin...
...cycles, water dripping onto the defrost heater may make sounds more noticeable. Water Valve If your ice maker, connect a water supply immediately or turn the Ice maker off . Drain Pan (not removable) You may occur. Motorized Damper May produce a light humming during the defrost cycle. B. C. REPLACING LIGHT BULBS 1. Unscrew and replace old bulb with an automatic ice maker, you . Compressor Modern, high-efficiency compressors operate much faster than older models. Remove light cover, if necessary. 4. After defrosting, a popping sound may hear water running into the ice bin...

User Manual
Page 15
... controls your refrigerator and freezer clean to your refrigerator you have already removed. Any glue left from side to be drained completely. IMPORTANT If the refrigerator is put back into service. Contact a service representative to cold metal surfaces. Door Gaskets • Soap and water Wipe gaskets with an Models Only) ammonia-soaked paper towel, and rinse. Remove toe grille. Always follow manufacturer's instructions. It will remove the protective finish. CARE & CLEANING Keep your refrigerator's cooling...
... controls your refrigerator and freezer clean to your refrigerator you have already removed. Any glue left from side to be drained completely. IMPORTANT If the refrigerator is put back into service. Contact a service representative to cold metal surfaces. Door Gaskets • Soap and water Wipe gaskets with an Models Only) ammonia-soaked paper towel, and rinse. Remove toe grille. Always follow manufacturer's instructions. It will remove the protective finish. CARE & CLEANING Keep your refrigerator's cooling...

User Manual
Page 16
... serial numbers that prove to be defective in materials or workmanship when such appliance is installed, used and maintained in accordance with the provided instructions. 8. Products purchased "as described or illustrated are not a part of the appliance when it is in your best interest to repair or replace appliance light bulbs, air filters, water filters, other consumables, or knobs, handles, or other than in a commercial setting. 7. Service...
... serial numbers that prove to be defective in materials or workmanship when such appliance is installed, used and maintained in accordance with the provided instructions. 8. Products purchased "as described or illustrated are not a part of the appliance when it is in your best interest to repair or replace appliance light bulbs, air filters, water filters, other consumables, or knobs, handles, or other than in a commercial setting. 7. Service...

User Manual
Page 17
... problem. • Call your Electrolux service representative, who can interpret any messages or number codes flashing on frequently. • Thermostat keeps the refrigerator at a temperature just below the freezing point for temperature to work longer under hot. Allow 24 hours section). See Care & Cleaning Chart in Fresh Food refrigerator temperature is • Clean or change gasket. Food stored in defrost cycle. • This is satisfactory. minutes. • Ensure plug is level. Open doors...
... problem. • Call your Electrolux service representative, who can interpret any messages or number codes flashing on frequently. • Thermostat keeps the refrigerator at a temperature just below the freezing point for temperature to work longer under hot. Allow 24 hours section). See Care & Cleaning Chart in Fresh Food refrigerator temperature is • Clean or change gasket. Food stored in defrost cycle. • This is satisfactory. minutes. • Ensure plug is level. Open doors...

User Manual
Page 18
...; Ice maker power switch is • Turn power switch to the "down" or ON position. Remove valve. • Saddle valve on inside DOORS/DRAWERS. WATER/MOISTURE/FROST INSIDE REFRIGERATOR Moisture collects on cold water Ensure that valve is not a self-piercing saddle valve. Water drawer. collecting in Care and Cleaning section. cartridge. • See PROBLEM section TEMPERATURES ARE • Freezer is • Move wire signal arm to On ("I") position. (rear mounted) Off. • Turn on household water line valve. • Household water line valve is not open...
...; Ice maker power switch is • Turn power switch to the "down" or ON position. Remove valve. • Saddle valve on inside DOORS/DRAWERS. WATER/MOISTURE/FROST INSIDE REFRIGERATOR Moisture collects on cold water Ensure that valve is not a self-piercing saddle valve. Water drawer. collecting in Care and Cleaning section. cartridge. • See PROBLEM section TEMPERATURES ARE • Freezer is • Move wire signal arm to On ("I") position. (rear mounted) Off. • Turn on household water line valve. • Household water line valve is not open...

User Manual
Page 19
Freezer is set too • warm. Freezer control is not cold enough. Household water line valve is not open . The ice & water filter cartridge may be clogged. Replace filter cartridge. Allow 24 hours for temperature to colder setting. Discard stale ice. When ice is not closed . Motor is set too • warm. The ice & water filter cartridge could be clogged. Ice cubes are jammed • between ice maker and back of ice is made , dispenser should operate. Remove any ice cubes that are jamming the dispenser. Ice maker will produce...
Freezer is set too • warm. Freezer control is not cold enough. Household water line valve is not open . The ice & water filter cartridge may be clogged. Replace filter cartridge. Allow 24 hours for temperature to colder setting. Discard stale ice. When ice is not closed . Motor is set too • warm. The ice & water filter cartridge could be clogged. Ice cubes are jammed • between ice maker and back of ice is made , dispenser should operate. Remove any ice cubes that are jamming the dispenser. Ice maker will produce...

User Manual
Page 20
CORRECTION Open household water line valve. Draw and discard 10 - 12 glasses of • to move. Connect unit to cold water line that freezer door is activated. 20 Contact a carpenter to correct a sagging or sloping floor. Ensure floor is reaching • refrigerator. See Care & Cleaning Chart in drawer. IF YOU HEAR (electronic models only) 5 beeps • A door has been left open for water connections. Filter should be flush with strong odors is located on...
CORRECTION Open household water line valve. Draw and discard 10 - 12 glasses of • to move. Connect unit to cold water line that freezer door is activated. 20 Contact a carpenter to correct a sagging or sloping floor. Ensure floor is reaching • refrigerator. See Care & Cleaning Chart in drawer. IF YOU HEAR (electronic models only) 5 beeps • A door has been left open for water connections. Filter should be flush with strong odors is located on...

Ice Maker Information
Page 1
... change the fill time. IMPORTANT If any green grounding wires are removed during servicing, they must be returned to 4.3 oz.). ICE MAKER INFORMATION LEFT SIDE MOUNTED Test Cycling Remove cover by inserting screwdriver in notch at 15°F (-9°C) Heater Wattage 165 ICE MAKER CONNECTOR PLUG CONNECTIONS Wire Number Wire Color Connects to touch insulation; DO NOT allow torch to : 1 Green/Yellow Ground 2 Yellow Water Valve 3 Black Line 4 Lt. P-2 CONDENSER FAN MOTOR Watts RPM Amps 3.1 (Energy Star - AUTOMATIC DEFROST SIDE...
... change the fill time. IMPORTANT If any green grounding wires are removed during servicing, they must be returned to 4.3 oz.). ICE MAKER INFORMATION LEFT SIDE MOUNTED Test Cycling Remove cover by inserting screwdriver in notch at 15°F (-9°C) Heater Wattage 165 ICE MAKER CONNECTOR PLUG CONNECTIONS Wire Number Wire Color Connects to touch insulation; DO NOT allow torch to : 1 Green/Yellow Ground 2 Yellow Water Valve 3 Black Line 4 Lt. P-2 CONDENSER FAN MOTOR Watts RPM Amps 3.1 (Energy Star - AUTOMATIC DEFROST SIDE...


