
Complete Owners Guide
Page 1
use care REFRIGERATOR & Introduction 2 Important Safety Information 3 Features 6 Installation 7 Door Removal 10 Door Handle Installation 12 Water Supply Connection 13 Controls and Settings 15 Automatic Ice and Water Dispenser....... 19 Storage Features 21 Normal Operating Sounds 22 Filter Replacement 23 Care and Cleaning 25 Troubleshooting 29 Limited Warranty 33 Frigidaire.com USA 1-800-374-4432 A19894506 (November 2020) Frigidaire.ca Canada 1-800-265-8352
use care REFRIGERATOR & Introduction 2 Important Safety Information 3 Features 6 Installation 7 Door Removal 10 Door Handle Installation 12 Water Supply Connection 13 Controls and Settings 15 Automatic Ice and Water Dispenser....... 19 Storage Features 21 Normal Operating Sounds 22 Filter Replacement 23 Care and Cleaning 25 Troubleshooting 29 Limited Warranty 33 Frigidaire.com USA 1-800-374-4432 A19894506 (November 2020) Frigidaire.ca Canada 1-800-265-8352
Complete Owners Guide
Page 2
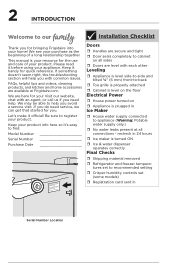
...;ˆ Shipping material removed ˆˆ Refrigerator and freezer temperatures set to recommended setting ˆˆ Crisper humidity controls set (some models) ˆˆ Registration card sent in Ice Maker ˆˆ House water supply connected to help . FAQs, helpful tips and videos, cleaning products, and kitchen and home accessories are level with an agent, or call us if you ! We are here for the use and care of a long...
...;ˆ Shipping material removed ˆˆ Refrigerator and freezer temperatures set to recommended setting ˆˆ Crisper humidity controls set (some models) ˆˆ Registration card sent in Ice Maker ˆˆ House water supply connected to help . FAQs, helpful tips and videos, cleaning products, and kitchen and home accessories are level with an agent, or call us if you ! We are here for the use and care of a long...

Complete Owners Guide
Page 5
... electrical outlet controlled by a wall switch or pull cord to prevent the unit from being turned off power to your appliance you must be installed in accordance with local codes and ordinances. The power cord of environmental legislation. Operating the appliance with 3-prong grounded plug CAUTION To avoid personal injury or property damage, handle tempered glass shelves carefully. Power cord with insufficient power can damage the compressor...
... electrical outlet controlled by a wall switch or pull cord to prevent the unit from being turned off power to your appliance you must be installed in accordance with local codes and ordinances. The power cord of environmental legislation. Operating the appliance with 3-prong grounded plug CAUTION To avoid personal injury or property damage, handle tempered glass shelves carefully. Power cord with insufficient power can damage the compressor...
Complete Owners Guide
Page 7
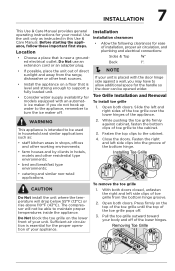
...; staff kitchen areas in shops, offices and other working environments; 2. Press firmly on a floor that is near a grounded electrical outlet. While pushing the toe grille firmly against a wall, you do not hook up water to the appliance, remember to the cabinet. 4. To remove the toe grille 1. INSTALLATION 7 This Use & Care Manual provides general operating instructions for the handle so the door can be opened wider. Location •...
...; staff kitchen areas in shops, offices and other working environments; 2. Press firmly on a floor that is near a grounded electrical outlet. While pushing the toe grille firmly against a wall, you do not hook up water to the appliance, remember to the cabinet. 4. To remove the toe grille 1. INSTALLATION 7 This Use & Care Manual provides general operating instructions for the handle so the door can be opened wider. Location •...
Complete Owners Guide
Page 9
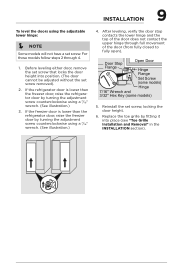
... than the freezer door, raise the refrigerator door by fitting it into position. (The door cannot be adjusted without the set screw, locking the door height. 6. Before leveling either door, remove the set screw that locks the door height into place (see "Toe Grille Installation and Removal" in the INSTALLATION section). Door Stop Flange Open Door Hinge Flange Set Screw (some models) Hinge 7/16" Wrench and 3/32" Hex Key (some models) 5. Reinstall the set screw removed). 2. INSTALLATION 9 To level the doors using a 7/16...
... than the freezer door, raise the refrigerator door by fitting it into position. (The door cannot be adjusted without the set screw, locking the door height. 6. Before leveling either door, remove the set screw that locks the door height into place (see "Toe Grille Installation and Removal" in the INSTALLATION section). Door Stop Flange Open Door Hinge Flange Set Screw (some models) Hinge 7/16" Wrench and 3/32" Hex Key (some models) 5. Reinstall the set screw removed). 2. INSTALLATION 9 To level the doors using a 7/16...

Complete Owners Guide
Page 13
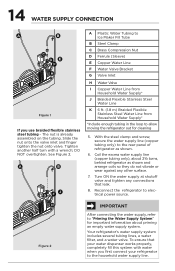
... water supply line to your household water system. To Connect Water Supply Line To Ice Maker Inlet Valve 1. If the ice maker is connected to Frigidaire.com for the water supply line. See Figure 1. Disconnect the refrigerator from the water valve inlet and discard the cap. 4. Turn ON the water supply and flush the supply line until the water is clear. To Avoid Property Damage: • Use Copper or Stainless Steel braided tubing for more information. 13 WATER SUPPLY CONNECTION WARNING To avoid electric...
... water supply line to your household water system. To Connect Water Supply Line To Ice Maker Inlet Valve 1. If the ice maker is connected to Frigidaire.com for the water supply line. See Figure 1. Disconnect the refrigerator from the water valve inlet and discard the cap. 4. Turn ON the water supply and flush the supply line until the water is clear. To Avoid Property Damage: • Use Copper or Stainless Steel braided tubing for more information. 13 WATER SUPPLY CONNECTION WARNING To avoid electric...
Complete Owners Guide
Page 14
... water supply line. DO NOT overtighten. A B G FJ A Plastic Water Tubing to Ice Maker Fill Tube B Steel Clamp C Brass Compression Nut D Ferrule (Sleeve) E Copper Water Line F Water Valve Bracket G Valve Inlet H Water Valve I Figure 1 If you first connect your water dispenser works properly, completely fill this system with a wrench; Slide the nut onto the valve inlet and finger tighten the nut onto valve. Tighten another half turn with water when you use braided flexible stainless steel tubing...
... water supply line. DO NOT overtighten. A B G FJ A Plastic Water Tubing to Ice Maker Fill Tube B Steel Clamp C Brass Compression Nut D Ferrule (Sleeve) E Copper Water Line F Water Valve Bracket G Valve Inlet H Water Valve I Figure 1 If you first connect your water dispenser works properly, completely fill this system with a wrench; Slide the nut onto the valve inlet and finger tighten the nut onto valve. Tighten another half turn with water when you use braided flexible stainless steel tubing...

Complete Owners Guide
Page 15
... dispenser light is selected. A white LED light will indicate the mode is on some or all the ice. Dispensed water is selected. A white LED light will display Replace Water Filter. When you change to reset. *Only on . After you need to order a new water filter, the side door UI will change the filter, hold the Air Filter button for 3 seconds to get cubed ice. Press the Crush button to reset. To stop dispensing water, pull the glass away from the dispensing paddle. 15 CONTROLS AND SETTINGS...
... dispenser light is selected. A white LED light will indicate the mode is on some or all the ice. Dispensed water is selected. A white LED light will display Replace Water Filter. When you change to reset. *Only on . After you need to order a new water filter, the side door UI will change the filter, hold the Air Filter button for 3 seconds to get cubed ice. Press the Crush button to reset. To stop dispensing water, pull the glass away from the dispensing paddle. 15 CONTROLS AND SETTINGS...
Complete Owners Guide
Page 18
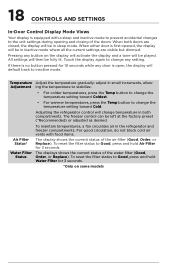
... Temp button to change the temperature setting toward Cold. The freezer control can be in sleep mode. To reset the filter status to change any setting. When either door is first opened, the display will be in inactive mode where all the current settings are closed, the display will change temperature in the refrigerator and freezer compartments. Touch the display again to Good, press and hold Water Filter for 10 seconds while any button on some models Water Filter The displays...
... Temp button to change the temperature setting toward Cold. The freezer control can be in sleep mode. To reset the filter status to change any setting. When either door is first opened, the display will be in inactive mode where all the current settings are closed, the display will change temperature in the refrigerator and freezer compartments. Touch the display again to Good, press and hold Water Filter for 10 seconds while any button on some models Water Filter The displays...
Complete Owners Guide
Page 19
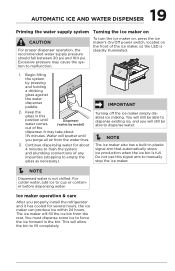
...; NOTE Dispensed water is full. For colder water, add ice to empty the glass as necessary). Continue dispensing water for several hours, the ice maker can produce ice within 24 hours. To turn the ice maker on, press the ice maker's On/Off power switch, located on CAUTION For proper dispenser operation, the recommended water supply pressure should fall between 30 psi and 100 psi. Ice maker operation & care After you will fill the ice bin from the water lines...
...; NOTE Dispensed water is full. For colder water, add ice to empty the glass as necessary). Continue dispensing water for several hours, the ice maker can produce ice within 24 hours. To turn the ice maker on, press the ice maker's On/Off power switch, located on CAUTION For proper dispenser operation, the recommended water supply pressure should fall between 30 psi and 100 psi. Ice maker operation & care After you will fill the ice bin from the water lines...

Complete Owners Guide
Page 23
... the user interface prompts you to request when ordering: PurePour™ Water Filter Part# FPPWFUO1™ NOTE When you should change the water filter every 6 months to produce and package bottled water *For the complete list, please see Performance Data Sheet on the Ice & Water Dispenser control panel for Purity certain YyoouurCPaunreTProuusrt™ wa- Remove the filter by visiting the dealer where you first install your refrigerator, and...
... the user interface prompts you to request when ordering: PurePour™ Water Filter Part# FPPWFUO1™ NOTE When you should change the water filter every 6 months to produce and package bottled water *For the complete list, please see Performance Data Sheet on the Ice & Water Dispenser control panel for Purity certain YyoouurCPaunreTProuusrt™ wa- Remove the filter by visiting the dealer where you first install your refrigerator, and...
Complete Owners Guide
Page 24
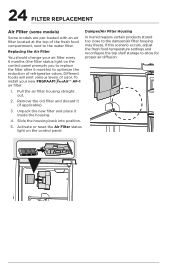
... it inside the housing. 4. 24 FILTER REPLACEMENT Air Filter (some models) Some models are pre-loaded with an air filter located at the top of odor. Different foods will emit various levels of the fresh food compartment, next to optimize the reduction of refrigerator odors. Activate or reset the Air Filter status light on the control panel prompts you to replace the filter after 6 months) to the water filter. To install your air filter every...
... it inside the housing. 4. 24 FILTER REPLACEMENT Air Filter (some models) Some models are pre-loaded with an air filter located at the top of odor. Different foods will emit various levels of the fresh food compartment, next to optimize the reduction of refrigerator odors. Activate or reset the Air Filter status light on the control panel prompts you to replace the filter after 6 months) to the water filter. To install your air filter every...

Complete Owners Guide
Page 25
... drain the water supply system. Contact a service representative to avoid getting cut. Caution: Wear gloves when replacing the LED bulb to perform this operation. Do not use CHLORIDE or cleaners with bleach to move your unit in freezing temperatures, be sure to do so could result in water leaks when you unplug the power cord from the wall outlet. Wearing gloves, slide the clear light cover...
... drain the water supply system. Contact a service representative to avoid getting cut. Caution: Wear gloves when replacing the LED bulb to perform this operation. Do not use CHLORIDE or cleaners with bleach to move your unit in freezing temperatures, be sure to do so could result in water leaks when you unplug the power cord from the wall outlet. Wearing gloves, slide the clear light cover...
Complete Owners Guide
Page 28
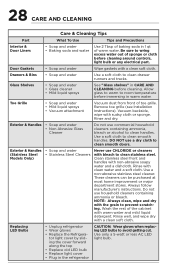
Drawers & Bins • Soap and water Use a soft cloth to room temperature before immersing in warm water. Allow glass to warm to clean drawer runners and tracks. Remove toe grille (see Installation Instructions). These cleaners can be purchased at most home improvement or major department stores. Use only a 5-watt or less AC LED light bulb. Glass Shelves • Soap and water • Glass cleaner • Mild liquid sprays See "Glass shelves" in CARE AND CLEANING before cleaning. Use a soft...
Drawers & Bins • Soap and water Use a soft cloth to room temperature before immersing in warm water. Allow glass to warm to clean drawer runners and tracks. Remove toe grille (see Installation Instructions). These cleaners can be purchased at most home improvement or major department stores. Use only a 5-watt or less AC LED light bulb. Glass Shelves • Soap and water • Glass cleaner • Mild liquid sprays See "Glass shelves" in CARE AND CLEANING before cleaning. Use a soft...
Complete Owners Guide
Page 29
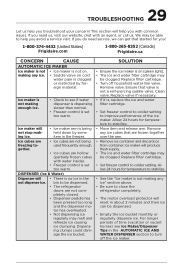
...; Freezer control is not making enough ice. • Check to see Ice Maker/Dispenser Tips in the bin to stabilize. • Move item and release arm. Ice maker will reset in the freezer. Replace filter cartridge. • Turn off the ice maker. Allow 24 hours for temperature to be clogged. 29 TROUBLESHOOTING Let us . We may be clogged. Clean valve. Allow 24 hours for temperature to stabilize. • See the "Ice maker is set too warm. Ice maker will...
...; Freezer control is not making enough ice. • Check to see Ice Maker/Dispenser Tips in the bin to stabilize. • Move item and release arm. Ice maker will reset in the freezer. Replace filter cartridge. • Turn off the ice maker. Allow 24 hours for temperature to be clogged. 29 TROUBLESHOOTING Let us . We may be clogged. Clean valve. Allow 24 hours for temperature to stabilize. • See the "Ice maker is set too warm. Ice maker will...

Complete Owners Guide
Page 30
... to remove protective caps and push the filter firmly so that you hear it lock solidly into position. • Replace filter cartridge. When new ice is not open. • Water has not been dispensed for a reverse osmosis system to be below 20 psi during the regenerative phase. • See the WATER SUPPLY CONNECTION section. • Add ice to cup or container before dispensing water Be sure to cold water line...
... to remove protective caps and push the filter firmly so that you hear it lock solidly into position. • Replace filter cartridge. When new ice is not open. • Water has not been dispensed for a reverse osmosis system to be below 20 psi during the regenerative phase. • See the WATER SUPPLY CONNECTION section. • Add ice to cup or container before dispensing water Be sure to cold water line...
Complete Owners Guide
Page 31
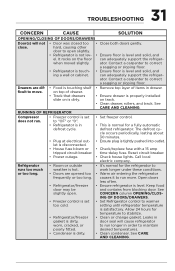
...; Clean or change gasket. See CONCERN column OPENING/CLOSING OF DOORS/DRAWERS. • Set Refrigerator control to warmer setting until refrigerator temperature is not level. 31 TROUBLESHOOTING CONCERN CAUSE SOLUTION OPENING/CLOSING OF DOORS/DRAWERS Door(s) will cause refrigerator to run more. It rocks on is dirty. • Remove top layer of items in defrost cycle. • Plug at electrical outlet is disconnected. • House fuse blown or tripped circuit breaker. • Power outage. • Set freezer control...
...; Clean or change gasket. See CONCERN column OPENING/CLOSING OF DOORS/DRAWERS. • Set Refrigerator control to warmer setting until refrigerator temperature is not level. 31 TROUBLESHOOTING CONCERN CAUSE SOLUTION OPENING/CLOSING OF DOORS/DRAWERS Door(s) will cause refrigerator to run more. It rocks on is dirty. • Remove top layer of items in defrost cycle. • Plug at electrical outlet is disconnected. • House fuse blown or tripped circuit breaker. • Power outage. • Set freezer control...
Complete Owners Guide
Page 32
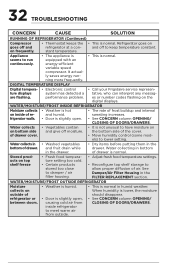
... on outside of refrigerator or between doors. • Weather is humid. • Door is slightly open . • The rate of drawer. DIGITAL TEMPERATURE DISPLAY Digital temperature displays are flashing. • Electronic control system has detected a performance problem. • Call your Frigidaire service representative, who can interpret any messages or number codes flashing on refrigerator at a con- 32 TROUBLESHOOTING CONCERN CAUSE SOLUTION RUNNING OF REFRIGERATOR (Continued) Compressor goes off moisture. See Damper/Air Filter Housing in...
... on outside of refrigerator or between doors. • Weather is humid. • Door is slightly open . • The rate of drawer. DIGITAL TEMPERATURE DISPLAY Digital temperature displays are flashing. • Electronic control system has detected a performance problem. • Call your Frigidaire service representative, who can interpret any messages or number codes flashing on refrigerator at a con- 32 TROUBLESHOOTING CONCERN CAUSE SOLUTION RUNNING OF REFRIGERATOR (Continued) Compressor goes off moisture. See Damper/Air Filter Housing in...
Complete Owners Guide
Page 33
... used other than authorized service companies; Expenses for making the appliance accessible for servicing, such as described or illustrated are subject to repair or replace appliance light bulbs, air filters, water filters, other consumables, or knobs, handles, or other cosmetic parts. 11. Electrolux authorizes no person to change without notice. Rust on the interior or exterior of your appliance or to instruct you how to , any refrigerator or freezer...
... used other than authorized service companies; Expenses for making the appliance accessible for servicing, such as described or illustrated are subject to repair or replace appliance light bulbs, air filters, water filters, other consumables, or knobs, handles, or other cosmetic parts. 11. Electrolux authorizes no person to change without notice. Rust on the interior or exterior of your appliance or to instruct you how to , any refrigerator or freezer...

Product Specifications Sheet
Page 1
... electric, gas and plumbing codes. Refer to Product Installation Guide for detailed installation instructions on the web at frigidaire.com / frigidaire.ca Specifications subject to change. Frigidaire Refrigerator Air Filter Crisper Color Dairy Bin Door Bin Color Interior Lighting Shelf Material Water Filter Number of Adjustable 2 Liter Door Bins Number of Adjustable Gallon Door Bins Total Number of Door Bins Number of Adjustable Shelves Number of Crispers Freezer Automatic Defrost Baskets / Bins Color Door Bin Color Interior Lighting Shelf Material Number of Adjustable Door Bins Number...
... electric, gas and plumbing codes. Refer to Product Installation Guide for detailed installation instructions on the web at frigidaire.com / frigidaire.ca Specifications subject to change. Frigidaire Refrigerator Air Filter Crisper Color Dairy Bin Door Bin Color Interior Lighting Shelf Material Water Filter Number of Adjustable 2 Liter Door Bins Number of Adjustable Gallon Door Bins Total Number of Door Bins Number of Adjustable Shelves Number of Crispers Freezer Automatic Defrost Baskets / Bins Color Door Bin Color Interior Lighting Shelf Material Number of Adjustable Door Bins Number...


