

Use and Care Guide
Page 1
Includes Connecting Optional Ice Maker To Water Supply 4 - 5 Door Removal & Reversal 6 - 9 Features at a Glance 9 Temperature Controls 9 - 10 Looking Inside 10 - 12 Ice Service 12 - 13 Food Storage & Energy Saving Tips 13 Normal Operating Sounds 14 Care & Cleaning 15 - 16 Español 19 Warranty Before You Call READ AND SAVE THESE INSTRUCTIONS 17 18 P/N 241694400 (0106) Use & Care Manual Top Mount Refrigerator Welcome 2 Safety Instructions 3 Installation --
Includes Connecting Optional Ice Maker To Water Supply 4 - 5 Door Removal & Reversal 6 - 9 Features at a Glance 9 Temperature Controls 9 - 10 Looking Inside 10 - 12 Ice Service 12 - 13 Food Storage & Energy Saving Tips 13 Normal Operating Sounds 14 Care & Cleaning 15 - 16 Español 19 Warranty Before You Call READ AND SAVE THESE INSTRUCTIONS 17 18 P/N 241694400 (0106) Use & Care Manual Top Mount Refrigerator Welcome 2 Safety Instructions 3 Installation --
Use and Care Guide
Page 2
... properly maintain your new refrigerator. are completly committed to genuine replacement parts so you can rest assured your budget. • Fast, convenient toll-free service is repaired with the best service possible. Your satisfaction is found on your serial plate located inside the refrigerator compartment. PLEASE READ AND SAVE THESE INSTRUCTIONS This Use & Care Manual provides specific operating instructions for your model and serial numbers below for future reference. Model Number: Serial Number: Purchase Date: Questions...
... properly maintain your new refrigerator. are completly committed to genuine replacement parts so you can rest assured your budget. • Fast, convenient toll-free service is repaired with the best service possible. Your satisfaction is found on your serial plate located inside the refrigerator compartment. PLEASE READ AND SAVE THESE INSTRUCTIONS This Use & Care Manual provides specific operating instructions for your model and serial numbers below for future reference. Model Number: Serial Number: Purchase Date: Questions...
Use and Care Guide
Page 3
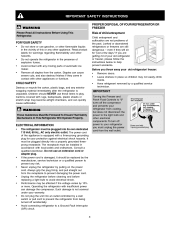
... to prevent damaging the power cord. • Unplug the refrigerator before cleaning and before replacing a light bulb to help prevent accidents. Junked or abondoned refrigerators or freezers are not problems of the appliance is unpacked. It must be plugged into a properly grounded threeprong receptacle. Cartons covered with a three-prong grounding plug for your refrigerator you are getting rid of automatic ice maker. • Remove all staples from...
... to prevent damaging the power cord. • Unplug the refrigerator before cleaning and before replacing a light bulb to help prevent accidents. Junked or abondoned refrigerators or freezers are not problems of the appliance is unpacked. It must be plugged into a properly grounded threeprong receptacle. Cartons covered with a three-prong grounding plug for your refrigerator you are getting rid of automatic ice maker. • Remove all staples from...
Use and Care Guide
Page 4
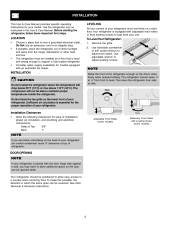
... front leveling screws to support a fully loaded refrigerator. • Consider water supply availability for ease of the refrigerator enough so the doors close freely when opened wider. INSTALLATION This Use & Care Manual provides specific operating instructions for the proper operation of your refrigerator. Remove toe grille. 2. Use the refrigerator only as instructed in this possible, the direction in which the doors open can be opened halfway. The refrigerator should be installed on the back of your refrigerator (air-cooled...
... front leveling screws to support a fully loaded refrigerator. • Consider water supply availability for ease of the refrigerator enough so the doors close freely when opened wider. INSTALLATION This Use & Care Manual provides specific operating instructions for the proper operation of your refrigerator. Remove toe grille. 2. Use the refrigerator only as instructed in this possible, the direction in which the doors open can be opened halfway. The refrigerator should be installed on the back of your refrigerator (air-cooled...
Use and Care Guide
Page 5
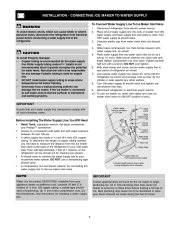
... from electric power source. 2. With steel clamp and screw, secure water supply line to rear panel of ¼ inch OD copper tubing, a saddle type shutoff valve (nonpiercing), (2) ¼ inch brass compression nuts, (2) ferrules/sleeves, and instructions for installing a water supply line. To turn with a wrench; Then add approximately 7 feet (2.1 meters), so the refrigerator can damage the ice maker. New plumbing may cause ice maker to cycle two or three times before connecting a water supply line to...
... from electric power source. 2. With steel clamp and screw, secure water supply line to rear panel of ¼ inch OD copper tubing, a saddle type shutoff valve (nonpiercing), (2) ¼ inch brass compression nuts, (2) ferrules/sleeves, and instructions for installing a water supply line. To turn with a wrench; Then add approximately 7 feet (2.1 meters), so the refrigerator can damage the ice maker. New plumbing may cause ice maker to cycle two or three times before connecting a water supply line to...
Use and Care Guide
Page 6
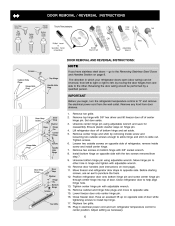
... the Removing Stainless Steel Doors and Handles Section on page 8. Remove top hinge with the two screws removed from door shelves. 1. Set door aside. 3. Remove center hinge and shim by removing inside screw and loosening two outside screws on opposite side with 3/8" hex driver and lift freezer door off of door. Plug in electrical power cord and turn the refrigerator temperature control to help align hinge hole. 13. Adjust setting as necessary. 6 Remove toe grille. 2. Unscrew center hinge pin using adjustable wrench. Lower freezer door...
... the Removing Stainless Steel Doors and Handles Section on page 8. Remove top hinge with the two screws removed from door shelves. 1. Set door aside. 3. Remove center hinge and shim by removing inside screw and loosening two outside screws on opposite side with 3/8" hex driver and lift freezer door off of door. Plug in electrical power cord and turn the refrigerator temperature control to help align hinge hole. 13. Adjust setting as necessary. 6 Remove toe grille. 2. Unscrew center hinge pin using adjustable wrench. Lower freezer door...
Use and Care Guide
Page 7
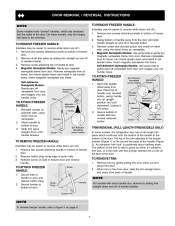
... 2). DOOR REMOVAL / REVERSAL INSTRUCTIONS NOTE Some models have "pocket" handles, which continues from its frame, turn frame upside down and away from door. Attach handle to bottom of the door. TO REMOVE FREEZER HANDLE: (Handles may be reversed. TO REMOVE FREEZER HANDLE: (Handles may be easier to figure 3 on the face of freezer door. 2. Start with two screws removed earlier. Remove two screws attaching handle to bottom of putty knife. 3. Remove screw and dovetail button and install...
... 2). DOOR REMOVAL / REVERSAL INSTRUCTIONS NOTE Some models have "pocket" handles, which continues from its frame, turn frame upside down and away from door. Attach handle to bottom of the door. TO REMOVE FREEZER HANDLE: (Handles may be reversed. TO REMOVE FREEZER HANDLE: (Handles may be easier to figure 3 on the face of freezer door. 2. Start with two screws removed earlier. Remove two screws attaching handle to bottom of putty knife. 3. Remove screw and dovetail button and install...
Use and Care Guide
Page 8
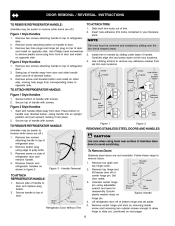
... it into place. 2. Secure top of handle to door. 3. Refrigerator Door Without Trim Figure 1 Figure 2 REMOVING STAINLESS STEEL DOORS AND HANDLES CAUTION Use care when using adjustable wrench and save for reassembly. Remove top hinge and lift freezer door off of handle over the two donut shaped areas. 3. Set door aside. 3. Remove screw attaching bottom of handle with screws. Secure bottom of handle to door and replace plug button. 2. Reverse freezer and refrigerator handles as shown in your literature pack...
... it into place. 2. Secure top of handle to door. 3. Refrigerator Door Without Trim Figure 1 Figure 2 REMOVING STAINLESS STEEL DOORS AND HANDLES CAUTION Use care when using adjustable wrench and save for reassembly. Remove top hinge and lift freezer door off of handle over the two donut shaped areas. 3. Set door aside. 3. Remove screw attaching bottom of handle with screws. Secure bottom of handle to door and replace plug button. 2. Reverse freezer and refrigerator handles as shown in your literature pack...
Use and Care Guide
Page 9
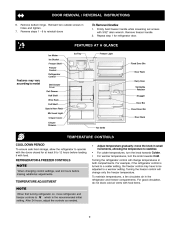
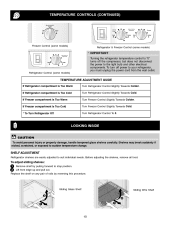
... to a colder setting, the freezer control may vary according to model Ice Maker Ice Bucket Freezer Shelf Freezer Control Refrigerator Control Deli Drawer Cover Deli Drawer Half Shelf Wine Rack Full Shelf Special Item Rack Mid Level Light Crisper Cover Crisper Drawers FEATURES AT A GLANCE Ice Tray Freezer Light Toe Grille Fixed Door Bin Door Rack Dairy Door Tall Bottle Retainer Snugger Door Bin Fixed Door Bin Door Rack TEMPERATURE CONTROLS COOL DOWN PERIOD To ensure safe food storage, allow the refrigerator to operate with food. For good circulation, do not block cold air vents with...
... to a colder setting, the freezer control may vary according to model Ice Maker Ice Bucket Freezer Shelf Freezer Control Refrigerator Control Deli Drawer Cover Deli Drawer Half Shelf Wine Rack Full Shelf Special Item Rack Mid Level Light Crisper Cover Crisper Drawers FEATURES AT A GLANCE Ice Tray Freezer Light Toe Grille Fixed Door Bin Door Rack Dairy Door Tall Bottle Retainer Snugger Door Bin Fixed Door Bin Door Rack TEMPERATURE CONTROLS COOL DOWN PERIOD To ensure safe food storage, allow the refrigerator to operate with food. For good circulation, do not block cold air vents with...
Use and Care Guide
Page 10
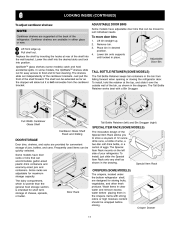
... individual needs. LOOKING INSIDE CAUTION To avoid personal injury or property damage, handle tempered glass shelves carefully. Sliding Glass Shelf Sliding Wire Shelf 10 To turn off the compressor, but does not disconnect the power to the light bulb and other electrical components. Replace the shelf on any pair of rails by pulling forward to stop position. 2 Lift front edge up and pull out. TEMPERATURE ADJUSTMENT GUIDE If Refrigerator compartment Is Too Warm Turn Refrigerator Control Slightly...
... individual needs. LOOKING INSIDE CAUTION To avoid personal injury or property damage, handle tempered glass shelves carefully. Sliding Glass Shelf Sliding Wire Shelf 10 To turn off the compressor, but does not disconnect the power to the light bulb and other electrical components. Replace the shelf on any pair of rails by pulling forward to stop position. 2 Lift front edge up and pull out. TEMPERATURE ADJUSTMENT GUIDE If Refrigerator compartment Is Too Warm Turn Refrigerator Control Slightly...
Use and Care Guide
Page 11
... the general food storage section, is not removable from falling forward when opening or closing the refrigerator door. Just pull the front of the cantilever brackets. Special Item Rack CRISPERS (SOME MODELS) The crispers, located under the bottom refrigerator shelf, are supported at rear of cheese, spreads, or butter. Lower bin onto supports until locked in the drawing. LOOKING INSIDE (CONTINUED) To adjust cantilever shelves: NOTE Cantilever shelves...
... the general food storage section, is not removable from falling forward when opening or closing the refrigerator door. Just pull the front of the cantilever brackets. Special Item Rack CRISPERS (SOME MODELS) The crispers, located under the bottom refrigerator shelf, are supported at rear of cheese, spreads, or butter. Lower bin onto supports until locked in the drawing. LOOKING INSIDE (CONTINUED) To adjust cantilever shelves: NOTE Cantilever shelves...
Use and Care Guide
Page 12
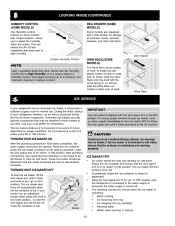
... water supply valve must be installed in . New plumbing connections may develop an odd flavor. TURNING YOUR ICE MAKER OFF To stop the ice maker, lift the wire signal arm until the cubes produced are normal when the ice maker is maintained and working properly. To ensure proper function of operation. CAUTION Chemicals from tray • Ice dropping into ice container • Running water • Water valve opening or closing 12 If the ice maker is connected to...
... water supply valve must be installed in . New plumbing connections may develop an odd flavor. TURNING YOUR ICE MAKER OFF To stop the ice maker, lift the wire signal arm until the cubes produced are normal when the ice maker is maintained and working properly. To ensure proper function of operation. CAUTION Chemicals from tray • Ice dropping into ice container • Running water • Water valve opening or closing 12 If the ice maker is connected to...
Use and Care Guide
Page 13
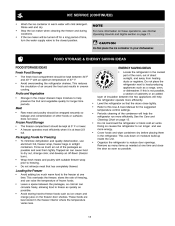
... results in uneven cooling. Rinse well and dry. • Stop the ice maker when cleaning the freezer and during vacations. • If the ice maker will be wrapped securely so leakage and contamination of frozen foods. • Leave a space between the two appliances will help the refrigerator operate more energy. This overloads the freezer, slows the rate of freezing, and can raise the temperature of other...
... results in uneven cooling. Rinse well and dry. • Stop the ice maker when cleaning the freezer and during vacations. • If the ice maker will be wrapped securely so leakage and contamination of frozen foods. • Leave a space between the two appliances will help the refrigerator operate more energy. This overloads the freezer, slows the rate of freezing, and can raise the temperature of other...
Use and Care Guide
Page 14
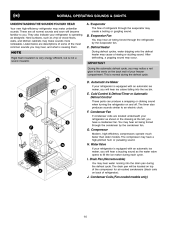
... sounds you may have a condenser fan. Evaporator The flow of your refrigerator is causing them. C. Cold Control & Defrost Timer or Automatic Defrost Control These parts can produce a snapping or clicking sound when turning the refrigerator on the back wall of refrigerant through the condenser by the evaporator fan. Compressor Modern, high-efficiency compressors operate much faster than older models. Water Valve If your freezer compartment. The drain pan will become familiar to an...
... sounds you may have a condenser fan. Evaporator The flow of your refrigerator is causing them. C. Cold Control & Defrost Timer or Automatic Defrost Control These parts can produce a snapping or clicking sound when turning the refrigerator on the back wall of refrigerant through the condenser by the evaporator fan. Compressor Modern, high-efficiency compressors operate much faster than older models. Water Valve If your freezer compartment. The drain pan will become familiar to an...
Use and Care Guide
Page 15
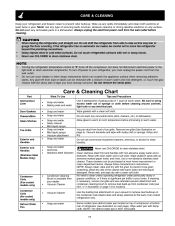
... controls, light bulb or any removable parts in illustration on page 14 for location). NOTE: Always clean, wipe and dry with a clean soft cloth. CARE & CLEANING Keep your vacuum to remove dust build-up on the condenser coils (black tubes and wires) attached to the back of warm water. Always unplug the electrical power cord from side to side as this may tear or gouge the floor covering. Door Gaskets Drawers/Bins Glass Shelves...
... controls, light bulb or any removable parts in illustration on page 14 for location). NOTE: Always clean, wipe and dry with a clean soft cloth. CARE & CLEANING Keep your vacuum to remove dust build-up on the condenser coils (black tubes and wires) attached to the back of warm water. Always unplug the electrical power cord from side to side as this may tear or gouge the floor covering. Door Gaskets Drawers/Bins Glass Shelves...
Use and Care Guide
Page 16
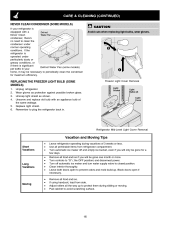
... and ice. • If using handcart, load from refrigerator compartment. • Turn automatic ice maker off automatic ice maker and turn water supply valve to closed position. • Clean interior thoroughly. • Leave both doors open if necessary. • Remove all the way up . Block doors open to prevent odors and mold build-up to protect them during vacations of the same wattage. 5. CARE & CLEANING (CONTINUED) NEVER CLEAN CONDENSER (SOME MODELS) If your Defrost Water Pan (some models...
... and ice. • If using handcart, load from refrigerator compartment. • Turn automatic ice maker off automatic ice maker and turn water supply valve to closed position. • Clean interior thoroughly. • Leave both doors open if necessary. • Remove all the way up . Block doors open to prevent odors and mold build-up to protect them during vacations of the same wattage. 5. CARE & CLEANING (CONTINUED) NEVER CLEAN CONDENSER (SOME MODELS) If your Defrost Water Pan (some models...
Use and Care Guide
Page 17
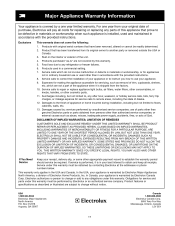
... warranty. Exclusions This warranty does not cover the following: 1. Service calls to correct the installation of your appliance or to instruct you how to remote areas, including the state of Alaska. 12. Surcharges including, but not limited to change or add to repair or replace appliance light bulbs, air filters, water filters, other consumables, or knobs, handles, or other than in ordinary household use or used other cosmetic parts...
... warranty. Exclusions This warranty does not cover the following: 1. Service calls to correct the installation of your appliance or to instruct you how to remote areas, including the state of Alaska. 12. Surcharges including, but not limited to change or add to repair or replace appliance light bulbs, air filters, water filters, other consumables, or knobs, handles, or other than in ordinary household use or used other cosmetic parts...
Use and Care Guide
Page 18
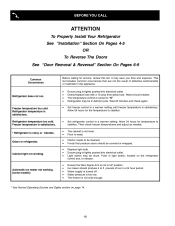
... expense. Cabinet light not working . (some models) Before calling for temperature to be stuck. This list includes common occurrences that produce odors should produce 4 to a warmer setting. Automatic ice maker not working . Freezer temperature too cold. Refrigerator temperature is noisy or vibrates. Allow 24 hours for service, review this appliance. • Ensure plug is tightly pushed into electrical outlet. • Check/replace fuse with a 15 amp time-delay fuse. Refrigerator temperature too cold.
... expense. Cabinet light not working . (some models) Before calling for temperature to be stuck. This list includes common occurrences that produce odors should produce 4 to a warmer setting. Automatic ice maker not working . Freezer temperature too cold. Refrigerator temperature is noisy or vibrates. Allow 24 hours for service, review this appliance. • Ensure plug is tightly pushed into electrical outlet. • Check/replace fuse with a 15 amp time-delay fuse. Refrigerator temperature too cold.


