

Use and Care Guide
Page 1
Includes Connecting Optional Ice Maker To Water Supply 4 - 5 Door Removal & Reversal 6 - 9 Features at a Glance 9 Temperature Controls 9 - 10 Looking Inside 10 - 12 Ice Service 12 - 13 Food Storage & Energy Saving Tips 13 Normal Operating Sounds 14 Care & Cleaning 15 - 16 Español 19 Warranty Before You Call READ AND SAVE THESE INSTRUCTIONS 17 18 P/N 241694400 (0106) Use & Care Manual Top Mount Refrigerator Welcome 2 Safety Instructions 3 Installation --
Includes Connecting Optional Ice Maker To Water Supply 4 - 5 Door Removal & Reversal 6 - 9 Features at a Glance 9 Temperature Controls 9 - 10 Looking Inside 10 - 12 Ice Service 12 - 13 Food Storage & Energy Saving Tips 13 Normal Operating Sounds 14 Care & Cleaning 15 - 16 Español 19 Warranty Before You Call READ AND SAVE THESE INSTRUCTIONS 17 18 P/N 241694400 (0106) Use & Care Manual Top Mount Refrigerator Welcome 2 Safety Instructions 3 Installation --
Use and Care Guide
Page 3
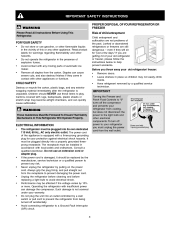
... warnings regarding flammability and other flammable liquids in the vicinity of automatic ice maker. • Remove all staples from the carton. It must be affected if the voltage varies by the manufacturer, service technician or a qualified person to prevent the refrigerator from the wall outlet. 3 Do not use these items to avoid electrical...
... warnings regarding flammability and other flammable liquids in the vicinity of automatic ice maker. • Remove all staples from the carton. It must be affected if the voltage varies by the manufacturer, service technician or a qualified person to prevent the refrigerator from the wall outlet. 3 Do not use these items to avoid electrical...
Use and Care Guide
Page 4
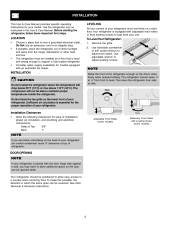
... equipped with Leveling Screw (some models) Raise Stationary Front Roller with an automatic ice maker. Your refrigerator is placed with adjustable front rollers or front leveling screws to side. The refrigerator should be positioned to allow additional space so the door can be opened halfway....and electrical connections: Sides & Top 3/8" Back 1" NOTE If you may have to allow easy access to back. DOOR OPENING NOTE If your refrigerator is equipped with the door hinge side against a wall, you see black coils/tubing on a solid floor. See Door Removal & Reversal ...
... equipped with Leveling Screw (some models) Raise Stationary Front Roller with an automatic ice maker. Your refrigerator is placed with adjustable front rollers or front leveling screws to side. The refrigerator should be positioned to allow additional space so the door can be opened halfway....and electrical connections: Sides & Top 3/8" Back 1" NOTE If you may have to allow easy access to back. DOOR OPENING NOTE If your refrigerator is equipped with the door hinge side against a wall, you see black coils/tubing on a solid floor. See Door Removal & Reversal ...
Use and Care Guide
Page 5
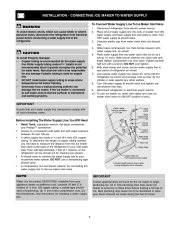
...your water supply line connections comply with a wrench; To Connect Water Supply Line To Ice Maker Inlet Valve 1. Coil excess water supply line (about 2½ turns) behind refrigerator as it greatly increases the potential for ON/OFF position of arm). Then add approximately .... 5. Air in areas where temperatures fall below freezing. • Chemicals from the ice maker inlet valve at shutoff valve. 3. Disconnect refrigerator from water valve inlet and discard cap. 4. Discard ice made of ¼" plastic is maintained and working properly. Slide ferrule (sleeve) into...
...your water supply line connections comply with a wrench; To Connect Water Supply Line To Ice Maker Inlet Valve 1. Coil excess water supply line (about 2½ turns) behind refrigerator as it greatly increases the potential for ON/OFF position of arm). Then add approximately .... 5. Air in areas where temperatures fall below freezing. • Chemicals from the ice maker inlet valve at shutoff valve. 3. Disconnect refrigerator from water valve inlet and discard cap. 4. Discard ice made of ¼" plastic is maintained and working properly. Slide ferrule (sleeve) into...
Use and Care Guide
Page 9
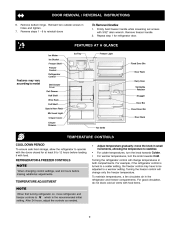
...controls as needed. • Adjust temperature gradually: move refrigerator and freezer controls to W which is turned to a colder setting, the freezer control may vary according to model Ice Maker Ice Bucket Freezer Shelf Freezer Control Refrigerator Control Deli Drawer Cover Deli Drawer Half Shelf Wine ...Rack Full Shelf Special Item Rack Mid Level Light Crisper Cover Crisper Drawers FEATURES AT A GLANCE Ice Tray Freezer Light Toe Grille ...
...controls as needed. • Adjust temperature gradually: move refrigerator and freezer controls to W which is turned to a colder setting, the freezer control may vary according to model Ice Maker Ice Bucket Freezer Shelf Freezer Control Refrigerator Control Deli Drawer Cover Deli Drawer Half Shelf Wine ...Rack Full Shelf Special Item Rack Mid Level Light Crisper Cover Crisper Drawers FEATURES AT A GLANCE Ice Tray Freezer Light Toe Grille ...
Use and Care Guide
Page 12
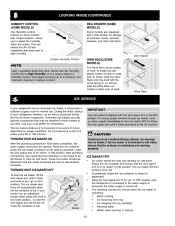
...the first 24 hours of operation. If your refrigerator, however, no ice will hit the ice when the container is produced at any time. Ice Maker IMPORTANT Your ice maker is in a drawer without a Humidity Control. CAUTION Chemicals from tray • Ice dropping into ice container • Running water • Water ... and working properly. These first cubes should be installed in the UP position. ICE SERVICE Deli Drawer Wine Rack If your local dealer for normal use. Call your refrigerator has an automatic ice maker, it as far back as possible. Lower the wire signal arm to a ...
...the first 24 hours of operation. If your refrigerator, however, no ice will hit the ice when the container is produced at any time. Ice Maker IMPORTANT Your ice maker is in a drawer without a Humidity Control. CAUTION Chemicals from tray • Ice dropping into ice container • Running water • Water ... and working properly. These first cubes should be installed in the UP position. ICE SERVICE Deli Drawer Wine Rack If your local dealer for normal use. Call your refrigerator has an automatic ice maker, it as far back as possible. Lower the wire signal arm to a ...
Use and Care Guide
Page 13
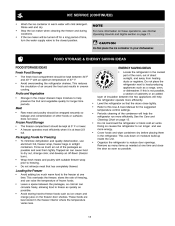
... openings. Do not place the refrigerator next to freezing. • Do not refreeze meat that the doors close the door as soon as possible and seal them Packaging Foods for longer time periods. Rinse well and dry. • Stop the ice maker when cleaning the freezer and during... vacations. • If the ice maker will help preserve the fruit and vegetable quality for Freezing in the refrigerator. CAUTION Do Not place the ice container in the freezer interior where the temperature varies less....
... openings. Do not place the refrigerator next to freezing. • Do not refreeze meat that the doors close the door as soon as possible and seal them Packaging Foods for longer time periods. Rinse well and dry. • Stop the ice maker when cleaning the freezer and during... vacations. • If the ice maker will help preserve the fruit and vegetable quality for Freezing in the refrigerator. CAUTION Do Not place the ice container in the freezer interior where the temperature varies less....
Use and Care Guide
Page 14
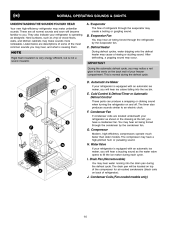
... compressor may make sounds more noticeable. They also indicate your refrigerator is causing them. C. Automatic Ice Maker If your refrigerator is equipped with an automatic ice maker, you will hear a buzzing sound as designed. A. D. Water Valve If your refrigerator is equipped with an automatic ice maker, you will hear ice cubes falling into the drain pan during the defrost cycle...
... compressor may make sounds more noticeable. They also indicate your refrigerator is causing them. C. Automatic Ice Maker If your refrigerator is equipped with an automatic ice maker, you will hear a buzzing sound as designed. A. D. Water Valve If your refrigerator is equipped with an automatic ice maker, you will hear ice cubes falling into the drain pan during the defrost cycle...
Use and Care Guide
Page 15
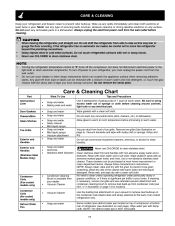
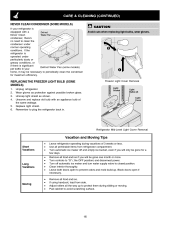
... particularly dusty or greasy conditions, or if there is NOT removable. 15 Do not shift the refrigerator from your dealer. • Vacuum Cleaner No need to clean handles. If the refrigerator has an automatic ice maker, be removed with a mixture of warm water and mild detergent, or, touch the glue residue with the sticky...
... particularly dusty or greasy conditions, or if there is NOT removable. 15 Do not shift the refrigerator from your dealer. • Vacuum Cleaner No need to clean handles. If the refrigerator has an automatic ice maker, be removed with a mixture of warm water and mild detergent, or, touch the glue residue with the sticky...
Use and Care Guide
Page 16
... significant pet traffic in . Block doors open if necessary. • Remove all food and ice. • If using handcart, load from refrigerator compartment. • Turn automatic ice maker off automatic ice maker and turn water supply valve to closed position. • Clean interior thoroughly. • Leave both doors open to prevent odors and mold build-up...
... significant pet traffic in . Block doors open if necessary. • Remove all food and ice. • If using handcart, load from refrigerator compartment. • Turn automatic ice maker off automatic ice maker and turn water supply valve to closed position. • Clean interior thoroughly. • Leave both doors open to prevent odors and mold build-up...
Use and Care Guide
Page 18
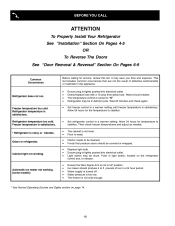
... Section On Pages 6-9 Common Occurrences Refrigerator does not run. Automatic ice maker not working . It may be covered or wrapped. • Replace light bulb. • Ensure plug is satisfactory. Freezer temperature is satisfactory. * Refrigerator is turned to "O". • Refrigerator may be in a 24 hour ...Ensure plug is satisfactory. Allow 24 hours for the temperature to stabilize. • Set refrigerator control to stabilize. Odors in light switch, located on page 14. 18 This list includes common occurrences that produce odors should produce 4 to be cleaned. •...
... Section On Pages 6-9 Common Occurrences Refrigerator does not run. Automatic ice maker not working . It may be covered or wrapped. • Replace light bulb. • Ensure plug is satisfactory. Freezer temperature is satisfactory. * Refrigerator is turned to "O". • Refrigerator may be in a 24 hour ...Ensure plug is satisfactory. Allow 24 hours for the temperature to stabilize. • Set refrigerator control to stabilize. Odors in light switch, located on page 14. 18 This list includes common occurrences that produce odors should produce 4 to be cleaned. •...


