
Use and Care Guide
Page 2
... We know you can rest assured your refrigerator is our #1 priority. PLEASE READ AND SAVE THESE INSTRUCTIONS This Use & Care Manual provides specific operating instructions for future reference. Please attach sales receipt here for your model. Your satisfaction is repaired with the best... service possible. NOTE Use only soap and water to clean serial plate. Please record your serial plate located inside the refrigerator compartment. Use your refrigerator only as instructed in this Use...
... We know you can rest assured your refrigerator is our #1 priority. PLEASE READ AND SAVE THESE INSTRUCTIONS This Use & Care Manual provides specific operating instructions for future reference. Please attach sales receipt here for your model. Your satisfaction is repaired with the best... service possible. NOTE Use only soap and water to clean serial plate. Please record your serial plate located inside the refrigerator compartment. Use your refrigerator only as instructed in this Use...
Use and Care Guide
Page 4
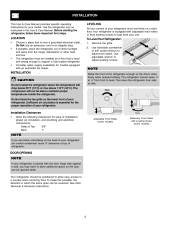
... Use adjustable wrench to adjust front rollers. Then level the refrigerator from front to back. Installation Clearances • Allow the following clearances for your refrigerator is equipped with Leveling Screw (some models) Raise Stationary Front Roller with adjustable front rollers or front ... be positioned to allow additional space so the door can be able to maintain proper temperatures inside the refrigerator. Adjustable Front Roller (some models) Your refrigerator should slope ¼" to ½" from side to side. INSTALLATION This Use & Care Manual provides specific...
... Use adjustable wrench to adjust front rollers. Then level the refrigerator from front to back. Installation Clearances • Allow the following clearances for your refrigerator is equipped with Leveling Screw (some models) Raise Stationary Front Roller with adjustable front rollers or front ... be positioned to allow additional space so the door can be able to maintain proper temperatures inside the refrigerator. Adjustable Front Roller (some models) Your refrigerator should slope ¼" to ½" from side to side. INSTALLATION This Use & Care Manual provides specific...
Use and Care Guide
Page 7
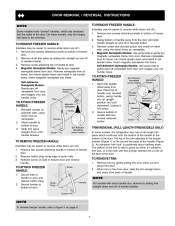
... freezer door. 2. Remove two screws attaching handle to gently peel off .) 1. Self-Adhesive Nameplate Models: Use putty knife to bottom of door. 3. Place top of the door. TRIM REMOVAL (FULL-LENGTH TRIM MODELS ONLY) In some models, the refrigerator door has a full length trim piece which are off nameplate from door and reapply over...
... freezer door. 2. Remove two screws attaching handle to gently peel off .) 1. Self-Adhesive Nameplate Models: Use putty knife to bottom of door. 3. Place top of the door. TRIM REMOVAL (FULL-LENGTH TRIM MODELS ONLY) In some models, the refrigerator door has a full length trim piece which are off nameplate from door and reapply over...
Use and Care Guide
Page 9
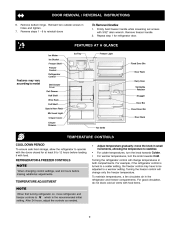
...freezer controls to W which is turned to a colder setting, the freezer control may vary according to model Ice Maker Ice Bucket Freezer Shelf Freezer Control Refrigerator Control Deli Drawer Cover Deli Drawer Half Shelf Wine Rack Full Shelf Special Item Rack Mid Level Light ...CONTROLS COOL DOWN PERIOD To ensure safe food storage, allow the refrigerator to operate with the doors closed for refrigerator door. Remove bottom hinge. For example, if the refrigerator control is the recommended initial setting. REFRIGERATOR & FREEZER CONTROLS NOTE When changing control settings, wait 24 ...
...freezer controls to W which is turned to a colder setting, the freezer control may vary according to model Ice Maker Ice Bucket Freezer Shelf Freezer Control Refrigerator Control Deli Drawer Cover Deli Drawer Half Shelf Wine Rack Full Shelf Special Item Rack Mid Level Light ...CONTROLS COOL DOWN PERIOD To ensure safe food storage, allow the refrigerator to operate with the doors closed for refrigerator door. Remove bottom hinge. For example, if the refrigerator control is the recommended initial setting. REFRIGERATOR & FREEZER CONTROLS NOTE When changing control settings, wait 24 ...
Use and Care Guide
Page 10
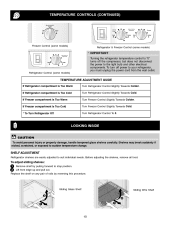
... tempered glass shelves carefully. To adjust sliding shelves: 1 Remove shelf by reversing this procedure. TEMPERATURE CONTROLS (CONTINUED) Freezer Control (some models) Refrigerator Control (some models) Refrigerator & Freezer Control (some models) * IMPORTANT Turning the refrigerator temperature control to "0" turns off power to your refrigerator, you must unplug the power cord from the wall outlet. TEMPERATURE ADJUSTMENT GUIDE If...
... tempered glass shelves carefully. To adjust sliding shelves: 1 Remove shelf by reversing this procedure. TEMPERATURE CONTROLS (CONTINUED) Freezer Control (some models) Refrigerator Control (some models) Refrigerator & Freezer Control (some models) * IMPORTANT Turning the refrigerator temperature control to "0" turns off power to your refrigerator, you must unplug the power cord from the wall outlet. TEMPERATURE ADJUSTMENT GUIDE If...
Use and Care Guide
Page 11
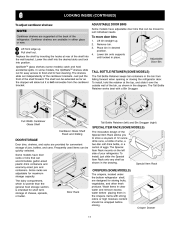
...Rack onto any shelf as the stopper will allow but it over the outside wall of the refrigerator. Special Item Rack CRISPERS (SOME MODELS) The crispers, located under the bottom refrigerator shelf, are adjustable for storing fruits, vegetables, and other fresh produce. Cantilever shelves are supported...) To adjust cantilever shelves: NOTE Cantilever shelves are available in the bin from the cantilever bracket. In some models) catch and hold the retainer at rear of your refrigerator. Door Rack Tall Bottle Retainer (left side of the shelf into position.
...Rack onto any shelf as the stopper will allow but it over the outside wall of the refrigerator. Special Item Rack CRISPERS (SOME MODELS) The crispers, located under the bottom refrigerator shelf, are adjustable for storing fruits, vegetables, and other fresh produce. Cantilever shelves are supported...) To adjust cantilever shelves: NOTE Cantilever shelves are available in the bin from the cantilever bracket. In some models) catch and hold the retainer at rear of your refrigerator. Door Rack Tall Bottle Retainer (left side of the shelf into position.
Use and Care Guide
Page 12
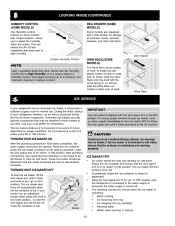
...proper function of your ice maker, hook up water supply immediately or turn ice maker OFF by lifting the wire signal arm until the refrigerator is connected to keep best in a drawer without a Humidity Control. The ice maker will be opened. This can damage the ice ... Ice dropping into ice container • Running water • Water valve opening or closing 12 DELI DRAWER (SOME MODELS) Some models are free of discoloration and taste. Call your refrigerator has an automatic ice maker, it clicks and locks in the lower position, so that the softener is connected to...
...proper function of your ice maker, hook up water supply immediately or turn ice maker OFF by lifting the wire signal arm until the refrigerator is connected to keep best in a drawer without a Humidity Control. The ice maker will be opened. This can damage the ice ... Ice dropping into ice container • Running water • Water valve opening or closing 12 DELI DRAWER (SOME MODELS) Some models are free of discoloration and taste. Call your refrigerator has an automatic ice maker, it clicks and locks in the lower position, so that the softener is connected to...
Use and Care Guide
Page 14
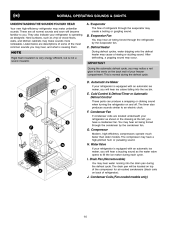
...have a condenser fan. Condenser Coils (Fan-cooled models only) 14 They also indicate your freezer compartment. B. C. After defrosting, a popping sound may hear water running into the ice bin. D. Listed below are located underneath your refrigerator is normal during the defrost cycle. Drain Pan...Control & Defrost Timer or Automatic Defrost Control These parts can produce a snapping or clicking sound when turning the refrigerator on back of refrigerant through the evaporator may hear air being forced through the condenser by the evaporator fan. Condenser Fan If condenser coils...
...have a condenser fan. Condenser Coils (Fan-cooled models only) 14 They also indicate your freezer compartment. B. C. After defrosting, a popping sound may hear water running into the ice bin. D. Listed below are located underneath your refrigerator is normal during the defrost cycle. Drain Pan...Control & Defrost Timer or Automatic Defrost Control These parts can produce a snapping or clicking sound when turning the refrigerator on back of refrigerant through the evaporator may hear air being forced through the condenser by the evaporator fan. Condenser Fan If condenser coils...
Use and Care Guide
Page 15
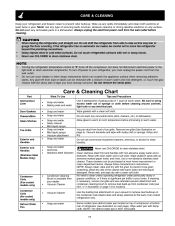
... next page). Always follow manufacturer's instructions. Condenser Coils (Fan-cooled models only) • Condenser Cleaning Brush is available from your dealer. • Vacuum Cleaner No need to clean unless operating refrigerator under particularly dusty or greasy conditions, or if there is necessary, remove...toe grille (See illustration on any surface. These cleaners can be removed with a mixture of refrigerator (see item "J" in dishwasher. Rinse well, and wipe dry with an Models Only) ammonia-soaked paper towel, and rinse. Defrost Water Pan • Soap and water Some...
... next page). Always follow manufacturer's instructions. Condenser Coils (Fan-cooled models only) • Condenser Cleaning Brush is available from your dealer. • Vacuum Cleaner No need to clean unless operating refrigerator under particularly dusty or greasy conditions, or if there is necessary, remove...toe grille (See illustration on any surface. These cleaners can be removed with a mixture of refrigerator (see item "J" in dishwasher. Rinse well, and wipe dry with an Models Only) ammonia-soaked paper towel, and rinse. Defrost Water Pan • Soap and water Some...
Use and Care Guide
Page 16
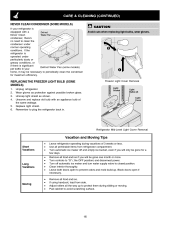
.... 16 Replace light shield. 6. Block doors open if necessary. • Remove all food and ice. • If using handcart, load from refrigerator compartment. • Turn automatic ice maker off and empty ice bucket, even if you will be gone one month or more. • Turn ...-up to protect them during vacations of the same wattage. 5. REPLACING THE FREEZER LIGHT BULB (SOME MODELS) 1. CARE & CLEANING (CONTINUED) NEVER CLEAN CONDENSER (SOME MODELS) If your Defrost Water Pan (some models) home, it may be necessary to periodically clean the condenser for a few days. • Remove...
.... 16 Replace light shield. 6. Block doors open if necessary. • Remove all food and ice. • If using handcart, load from refrigerator compartment. • Turn automatic ice maker off and empty ice bucket, even if you will be gone one month or more. • Turn ...-up to protect them during vacations of the same wattage. 5. REPLACING THE FREEZER LIGHT BULB (SOME MODELS) 1. CARE & CLEANING (CONTINUED) NEVER CLEAN CONDENSER (SOME MODELS) If your Defrost Water Pan (some models) home, it may be necessary to periodically clean the condenser for a few days. • Remove...
Use and Care Guide
Page 18
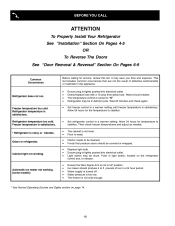
...The freezer is weak. • Interior needs to 5 pounds of defective workmanship or materials in defrost cycle. Cabinet light not working . (some models) Before calling for service, review this appliance. • Ensure plug is not in UP position. • Ice maker should be in this ... OR To Reverse The Doors See "Door Removal & Reversal" Section On Pages 6-9 Common Occurrences Refrigerator does not run. Freezer temperature too cold. Odors in light switch, located on page 14. 18 Reset circuit breaker. • The temperature control is turned to a warmer setting. Allow 24 ...
...The freezer is weak. • Interior needs to 5 pounds of defective workmanship or materials in defrost cycle. Cabinet light not working . (some models) Before calling for service, review this appliance. • Ensure plug is not in UP position. • Ice maker should be in this ... OR To Reverse The Doors See "Door Removal & Reversal" Section On Pages 6-9 Common Occurrences Refrigerator does not run. Freezer temperature too cold. Odors in light switch, located on page 14. 18 Reset circuit breaker. • The temperature control is turned to a warmer setting. Allow 24 ...


