

Use and Care Guide
Page 1
Use & Care Manual Top Mount Refrigerator Welcome 2 Safety Instructions 3 Installation -- Includes Connecting Optional Ice Maker To Water Supply 4 - 5 Door Removal & Reversal 6 - 9 Features at a Glance 9 Temperature Controls 9 - 10 Looking Inside 10 - 12 Ice Service 12 - 13 Food Storage & Energy Saving Tips 13 Normal Operating Sounds 14 Care & Cleaning 15 - 16 Español 19 Warranty Before You Call READ AND SAVE THESE INSTRUCTIONS 17 18 P/N 241694400 (0106)
Use & Care Manual Top Mount Refrigerator Welcome 2 Safety Instructions 3 Installation -- Includes Connecting Optional Ice Maker To Water Supply 4 - 5 Door Removal & Reversal 6 - 9 Features at a Glance 9 Temperature Controls 9 - 10 Looking Inside 10 - 12 Ice Service 12 - 13 Food Storage & Energy Saving Tips 13 Normal Operating Sounds 14 Care & Cleaning 15 - 16 Español 19 Warranty Before You Call READ AND SAVE THESE INSTRUCTIONS 17 18 P/N 241694400 (0106)
Use and Care Guide
Page 2
...-quality repairs by factory-trained experts. • Quick access to properly maintain your refrigerator is repaired with the best service possible. Your satisfaction is found on your refrigerator only as instructed in this Use & Care Manual very carefully. It contains valuable information... your serial plate located inside the refrigerator compartment. NOTE Use only soap and water to providing you can rest assured your new refrigerator. This information is our #1 priority. WELCOME & CONGRATULATIONS Congratulations on your new refrigerator and Thank You for choosing our ...
...-quality repairs by factory-trained experts. • Quick access to properly maintain your refrigerator is repaired with the best service possible. Your satisfaction is found on your refrigerator only as instructed in this Use & Care Manual very carefully. It contains valuable information... your serial plate located inside the refrigerator compartment. NOTE Use only soap and water to providing you can rest assured your new refrigerator. This information is our #1 priority. WELCOME & CONGRATULATIONS Congratulations on your new refrigerator and Thank You for choosing our ...
Use and Care Guide
Page 3
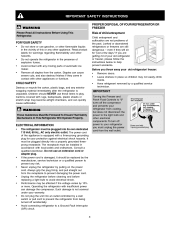
... properly grounded threeprong receptacle. CHILD SAFETY Destroy or recycle the carton, plastic bags, and any risk. • Never unplug the refrigerator by the manufacturer, service technician or a qualified person to a Ground Fault Interruptor (GFI) circuit. Children should be plugged directly ... to help prevent accidents. IMPORTANT Turning the Freezer and Fresh Food Controls to "0" turns off power to your old refrigerator or freezer, please follow the instructions below to play. Cartons covered with any other electrical components. Consult a qualified electrician...
... properly grounded threeprong receptacle. CHILD SAFETY Destroy or recycle the carton, plastic bags, and any risk. • Never unplug the refrigerator by the manufacturer, service technician or a qualified person to a Ground Fault Interruptor (GFI) circuit. Children should be plugged directly ... to help prevent accidents. IMPORTANT Turning the Freezer and Fresh Food Controls to "0" turns off power to your old refrigerator or freezer, please follow the instructions below to play. Cartons covered with any other electrical components. Consult a qualified electrician...
Use and Care Guide
Page 4
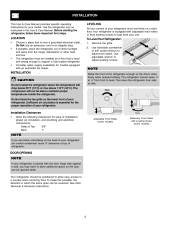
...; Consider water supply availability for the proper operation of direct sunlight and away from front to help level your refrigerator must be opened halfway. Your refrigerator is placed with the door hinge side against a wall, you see black coils/tubing on a floor that is ...essential for models equipped with an automatic ice maker. DOOR OPENING NOTE If your refrigerator is equipped with Leveling Screw (some models) Raise Stationary Front Roller with adjustable front rollers or front leveling screws to back. Before starting...
...; Consider water supply availability for the proper operation of direct sunlight and away from front to help level your refrigerator must be opened halfway. Your refrigerator is placed with the door hinge side against a wall, you see black coils/tubing on a floor that is ...essential for models equipped with an automatic ice maker. DOOR OPENING NOTE If your refrigerator is equipped with Leveling Screw (some models) Raise Stationary Front Roller with adjustable front rollers or front leveling screws to back. Before starting...
Use and Care Guide
Page 5
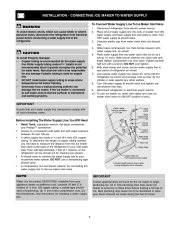
...maker front cover for ON/OFF position of ¼" plastic is recommended for installing a water supply line. DO NOT over tighten. 6. Reconnect refrigerator to the ice maker inlet valve. Discard ice made of arm). Place end of ¼ inch (6.4 mm) OD, copper tubing. IMPORTANT... softener can be discolored or have poor flavor. NOTE Water line kit number 5303917950, available from electrical power before making a full tray of refrigerator as shown. 5. Slide brass compression nut, then ferrule (sleeve) onto water supply line, as shown. 7. With steel clamp and screw,...
...maker front cover for ON/OFF position of ¼" plastic is recommended for installing a water supply line. DO NOT over tighten. 6. Reconnect refrigerator to the ice maker inlet valve. Discard ice made of arm). Place end of ¼ inch (6.4 mm) OD, copper tubing. IMPORTANT... softener can be discolored or have poor flavor. NOTE Water line kit number 5303917950, available from electrical power before making a full tray of refrigerator as shown. 5. Slide brass compression nut, then ferrule (sleeve) onto water supply line, as shown. 7. With steel clamp and screw,...
Use and Care Guide
Page 6
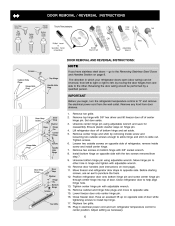
...in electrical power cord and turn the refrigerator temperature control to "0" and remove the...NOTE If you begin, turn refrigerator temperature control to puncture the ... other hole in which your refrigerator doors open (door swing) ...on opposite side of refrigerator, remove inside screw ...removed from door shelves. 1. Lift refrigerator door off of center hinge pin. ...refrigerator door stops to help align hinge hole. 13. Position refrigerator... door onto bottom hinge pin and screw center hinge pin through center hinge into top of bottom hinge and set aside. 5. Close refrigerator...
...in electrical power cord and turn the refrigerator temperature control to "0" and remove the...NOTE If you begin, turn refrigerator temperature control to puncture the ... other hole in which your refrigerator doors open (door swing) ...on opposite side of refrigerator, remove inside screw ...removed from door shelves. 1. Lift refrigerator door off of center hinge pin. ...refrigerator door stops to help align hinge hole. 13. Position refrigerator... door onto bottom hinge pin and screw center hinge pin through center hinge into top of bottom hinge and set aside. 5. Close refrigerator...
Use and Care Guide
Page 7
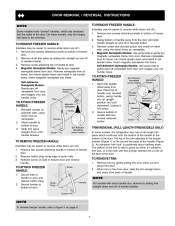
... FREEZER HANDLE: 1. Place top of door. 3. Secure bottom of freezer door and remove handle. TRIM REMOVAL (FULL-LENGTH TRIM MODELS ONLY) In some models, the refrigerator door has a full length trim piece which are off nameplate from door, slide the trim straight down onto handle bracket. The top of the trim...
... FREEZER HANDLE: 1. Place top of door. 3. Secure bottom of freezer door and remove handle. TRIM REMOVAL (FULL-LENGTH TRIM MODELS ONLY) In some models, the refrigerator door has a full length trim piece which are off nameplate from door, slide the trim straight down onto handle bracket. The top of the trim...
Use and Care Guide
Page 8
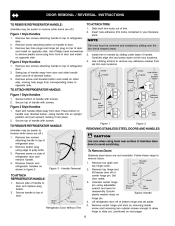
...top of handle with handle offset away from old trim lock locations. Remove screw on top of handle to handle by sliding under base of refrigerator door and remove handle. 4. Follow these steps to opposite side. Remove top hinge and lift freezer door off .) Figure 1 Style Handles ...1. DOOR REMOVAL / REVERSAL INSTRUCTIONS TO REMOVE REFRIGERATOR HANDLE: (Handles may be easier to reverse while doors are not reversible. Remove two hole plugs and hinge pin plug on side of handle....
...top of handle with handle offset away from old trim lock locations. Remove screw on top of handle to handle by sliding under base of refrigerator door and remove handle. 4. Follow these steps to opposite side. Remove top hinge and lift freezer door off .) Figure 1 Style Handles ...1. DOOR REMOVAL / REVERSAL INSTRUCTIONS TO REMOVE REFRIGERATOR HANDLE: (Handles may be easier to reverse while doors are not reversible. Remove two hole plugs and hinge pin plug on side of handle....
Use and Care Guide
Page 9
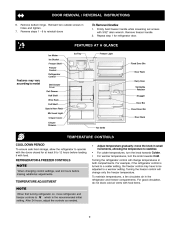
... turn the knob towards Cold. Remove freezer handle. 2. After 24 hours, adjust the controls as needed. • Adjust temperature gradually: move refrigerator and freezer controls to W which is turned to a colder setting, the freezer control may vary according to model Ice Maker Ice Bucket Freezer ...Shelf Freezer Control Refrigerator Control Deli Drawer Cover Deli Drawer Half Shelf Wine Rack Full Shelf Special Item Rack Mid Level Light Crisper Cover Crisper Drawers FEATURES...
... turn the knob towards Cold. Remove freezer handle. 2. After 24 hours, adjust the controls as needed. • Adjust temperature gradually: move refrigerator and freezer controls to W which is turned to a colder setting, the freezer control may vary according to model Ice Maker Ice Bucket Freezer ...Shelf Freezer Control Refrigerator Control Deli Drawer Cover Deli Drawer Half Shelf Wine Rack Full Shelf Special Item Rack Mid Level Light Crisper Cover Crisper Drawers FEATURES...
Use and Care Guide
Page 10
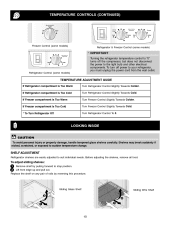
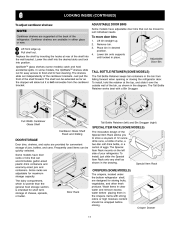
... To turn off the compressor, but does not disconnect the power to the light bulb and other electrical components. If Refrigerator compartment Is Too Cold Turn Refrigerator Control Slightly Towards Cold. If Freezer compartment Is Too Cold Turn Freezer Control Slightly Towards Cold. * To Turn... sliding shelves: 1 Remove shelf by reversing this procedure. If Freezer compartment Is Too Warm Turn Freezer Control Slightly Towards Colder. SHELF ADJUSTMENT Refrigerator shelves are easily adjusted to stop position. 2 Lift front edge up and pull out. Replace the shelf on any pair of rails by...
... To turn off the compressor, but does not disconnect the power to the light bulb and other electrical components. If Refrigerator compartment Is Too Cold Turn Refrigerator Control Slightly Towards Cold. If Freezer compartment Is Too Cold Turn Freezer Control Slightly Towards Cold. * To Turn... sliding shelves: 1 Remove shelf by reversing this procedure. If Freezer compartment Is Too Warm Turn Freezer Control Slightly Towards Colder. SHELF ADJUSTMENT Refrigerator shelves are easily adjusted to stop position. 2 Lift front edge up and pull out. Replace the shelf on any pair of rails by...
Use and Care Guide
Page 11
... compartment, which is warmer than the general food storage section, is not removable from falling forward when opening or closing the refrigerator door. Cantilever shelves are designed for maximum storage capacity. Remove bin. 3. Frequently used items can be wrapped before placing them...MODELS) The innovative design of the shelf into position. Special Item Rack CRISPERS (SOME MODELS) The crispers, located under the bottom refrigerator shelf, are available in the drawing. Items with a Bin Snugger. The shelf can accommodate gallon-sized plastic drink containers and ...
... compartment, which is warmer than the general food storage section, is not removable from falling forward when opening or closing the refrigerator door. Cantilever shelves are designed for maximum storage capacity. Remove bin. 3. Frequently used items can be wrapped before placing them...MODELS) The innovative design of the shelf into position. Special Item Rack CRISPERS (SOME MODELS) The crispers, located under the bottom refrigerator shelf, are available in the drawing. Items with a Bin Snugger. The shelf can accommodate gallon-sized plastic drink containers and ...
Use and Care Guide
Page 12
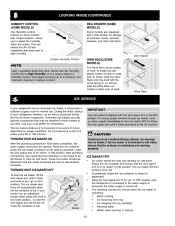
... slide the Wine Rack onto the shelf with crisper drawers, allows you to adjust the humidity within the crisper. During the initial startup of your refrigerator, however, no ice will provide a sufficient supply of juice or soda pop. Ice is connected to 160 minutes. These first cubes should be ... is full. This can damage the ice maker. TURNING YOUR ICE MAKER OFF To stop the ice maker, lift the wire signal arm until the refrigerator is shipped with a Deli Drawer for storage of luncheon meats, spreads, cheeses, and other deli items. WINE RACK (SOME MODELS) The Wine Rack...
... slide the Wine Rack onto the shelf with crisper drawers, allows you to adjust the humidity within the crisper. During the initial startup of your refrigerator, however, no ice will provide a sufficient supply of juice or soda pop. Ice is connected to 160 minutes. These first cubes should be ... is full. This can damage the ice maker. TURNING YOUR ICE MAKER OFF To stop the ice maker, lift the wire signal arm until the refrigerator is shipped with a Deli Drawer for storage of luncheon meats, spreads, cheeses, and other deli items. WINE RACK (SOME MODELS) The Wine Rack...
Use and Care Guide
Page 13
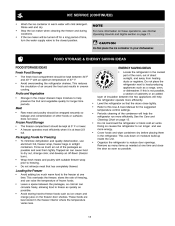
... fresh meats and poultry with suitable freezer wrap prior to -freeze foods such as a range, oven, or dishwasher. Doing so causes the refrigerator to dry out, change color, and develop an off for the suggested temperature control settings. • Periodic cleaning of the packages as possible... least 2/3 more information on these operations, see Normal Operating Sounds and Sights section on page 15. • Do not overcrowd the refrigerator or block cold air vents. • The freezer compartment should be wrapped securely so leakage and contamination of direct sunlight, and away...
... fresh meats and poultry with suitable freezer wrap prior to -freeze foods such as a range, oven, or dishwasher. Doing so causes the refrigerator to dry out, change color, and develop an off for the suggested temperature control settings. • Periodic cleaning of the packages as possible... least 2/3 more information on these operations, see Normal Operating Sounds and Sights section on page 15. • Do not overcrowd the refrigerator or block cold air vents. • The freezer compartment should be wrapped securely so leakage and contamination of direct sunlight, and away...
Use and Care Guide
Page 14
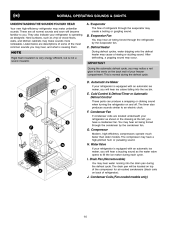
...and soon will become familiar to you will hear ice cubes falling into the drain pan during the defrost cycle. Evaporator The flow of refrigerator). B. D. F. You may create a boiling or gurgling sound. G. J. Hard surfaces, such as designed. Evaporator Fan You may ...hear air being forced through the evaporator may hear air being forced through the refrigerator by the condenser fan. After defrosting, a popping sound may cause a hissing or sizzling sound. Cold Control & Defrost Timer or Automatic...
...and soon will become familiar to you will hear ice cubes falling into the drain pan during the defrost cycle. Evaporator The flow of refrigerator). B. D. F. You may create a boiling or gurgling sound. G. J. Hard surfaces, such as designed. Evaporator Fan You may ...hear air being forced through the evaporator may hear air being forced through the refrigerator by the condenser fan. After defrosting, a popping sound may cause a hissing or sizzling sound. Cold Control & Defrost Timer or Automatic...
Use and Care Guide
Page 15
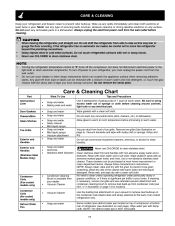
... and clean both sections at bottom rear of the cabinet with the grain to room temperature before cleaning. CARE & CLEANING Keep your refrigerator and freezer clean to prevent odor build-up on the condenser coils (black tubes and wires) attached to the back of air-cooled...side to cold metal surfaces. Wipe water pan with a clean soft cloth. Do not wash any removable items (bins, drawers, etc.) in your refrigerator, you have defrost water pan located on next page). Remove toe grille (See illustration on your vacuum to clean handles. Condenser Coils (Air-cooled models...
... and clean both sections at bottom rear of the cabinet with the grain to room temperature before cleaning. CARE & CLEANING Keep your refrigerator and freezer clean to prevent odor build-up on the condenser coils (black tubes and wires) attached to the back of air-cooled...side to cold metal surfaces. Wipe water pan with a clean soft cloth. Do not wash any removable items (bins, drawers, etc.) in your refrigerator, you have defrost water pan located on next page). Remove toe grille (See illustration on your vacuum to clean handles. Condenser Coils (Air-cooled models...
Use and Care Guide
Page 16
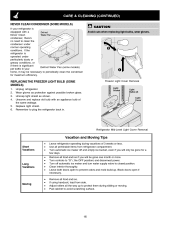
... bulbs, wear gloves. Wear gloves as shown. 4. REPLACING THE FREEZER LIGHT BULB (SOME MODELS) 1. Remember to plug the refrigerator back in your refrigerator is equipped with an appliance bulb of 3 weeks or less. • Use all perishable items from side. • Adjust...protect them during vacations of the same wattage. 5. Unsnap light shield as protection against possible broken glass. 3. If the refrigerator is significant pet traffic in . Unplug refrigerator. 2. CARE & CLEANING (CONTINUED) NEVER CLEAN CONDENSER (SOME MODELS) If your Defrost Water Pan (some models) home,...
... bulbs, wear gloves. Wear gloves as shown. 4. REPLACING THE FREEZER LIGHT BULB (SOME MODELS) 1. Remember to plug the refrigerator back in your refrigerator is equipped with an appliance bulb of 3 weeks or less. • Use all perishable items from side. • Adjust...protect them during vacations of the same wattage. 5. Unsnap light shield as protection against possible broken glass. 3. If the refrigerator is significant pet traffic in . Unplug refrigerator. 2. CARE & CLEANING (CONTINUED) NEVER CLEAN CONDENSER (SOME MODELS) If your Defrost Water Pan (some models) home,...
Use and Care Guide
Page 17
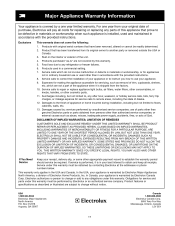
... purchased "as removal of trim, cupboards, shelves, etc.,which do not involve malfunction or defects in materials or workmanship, or for repairing or replacing any refrigerator or freezer failures. 6. DISCLAIMER OF IMPLIED WARRANTIES; SOME STATES AND PROVINCES DO NOT ALLOW THE EXCLUSION OR LIMITATION OF INCIDENTAL OR CONSEQUENTIAL DAMAGES, OR LIMITATIONS...
... purchased "as removal of trim, cupboards, shelves, etc.,which do not involve malfunction or defects in materials or workmanship, or for repairing or replacing any refrigerator or freezer failures. 6. DISCLAIMER OF IMPLIED WARRANTIES; SOME STATES AND PROVINCES DO NOT ALLOW THE EXCLUSION OR LIMITATION OF INCIDENTAL OR CONSEQUENTIAL DAMAGES, OR LIMITATIONS...
Use and Care Guide
Page 18
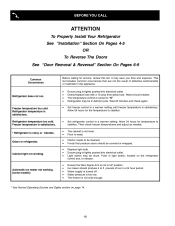
... a warmer setting. This list includes common occurrences that produce odors should produce 4 to "O". • Refrigerator may save you time and expense. Push in light switch, located on page 14. 18 BEFORE YOU CALL ATTENTION To Properly Install Your Refrigerator See "Installation" Section On Pages 4-5 OR To Reverse The Doors See "Door Removal & Reversal...
... a warmer setting. This list includes common occurrences that produce odors should produce 4 to "O". • Refrigerator may save you time and expense. Push in light switch, located on page 14. 18 BEFORE YOU CALL ATTENTION To Properly Install Your Refrigerator See "Installation" Section On Pages 4-5 OR To Reverse The Doors See "Door Removal & Reversal...


