Wiring Diagram (All Languages)
Page 1
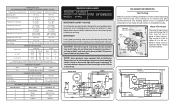
... When a water valve is 95 to 105cc (3.2 to : 1 Green/Yellow Ground 2 Yellow Water Valve 3 Black Line 4 Lt. AUTOMATIC DEFROST TOP FREEZER P/N: 241588203 MODELS (R134a) IMPORTANT SAFETY NOTICE The information provided herein is designed to rotate motor gear counterclockwise until Holding Switch circuit is equal to ...1.6 115 VAC (127 VAC Max) 115 VAC (127 VAC Max) DEFROST SPECIFICATIONS Cabinet Size Thermostat Cut-in Cut-out Heater Watts Ohms 18' & 21' 25°F -4°C 47°F 8°C 375 35 14', 15' & 17' 25°F -4°C 47°F 8°C...
... When a water valve is 95 to 105cc (3.2 to : 1 Green/Yellow Ground 2 Yellow Water Valve 3 Black Line 4 Lt. AUTOMATIC DEFROST TOP FREEZER P/N: 241588203 MODELS (R134a) IMPORTANT SAFETY NOTICE The information provided herein is designed to rotate motor gear counterclockwise until Holding Switch circuit is equal to ...1.6 115 VAC (127 VAC Max) 115 VAC (127 VAC Max) DEFROST SPECIFICATIONS Cabinet Size Thermostat Cut-in Cut-out Heater Watts Ohms 18' & 21' 25°F -4°C 47°F 8°C 375 35 14', 15' & 17' 25°F -4°C 47°F 8°C...
Wiring Diagram (All Languages)
Page 2
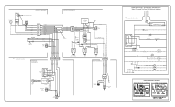
... Ladder Schematic - BLUE BLACK BLACK YELLOW GRN/YEL GRN/YEL RED RED YEL/RED BROWN BLUE LT. BLUE REFRIGERATOR LIGHT LT. BLUE BLACK RED YELLOW LT. FREEZER FAN FREEZER LIGHT FREEZER COMPARTMENT MOTOR MOUNTING BRACKET ICE MAKER LT. BLUE LT. BLUE SPLICE D DIODES TO BE POLARIZED AS SHOWN. BLUE... Mid-level Lighting COMPRESSOR WIRING Induction Run Compressor with Relay BLUE BLACK GRN/YEL BROWN RED LT. REFRIGERATOR COMPARTMENT DEFROST TIMER BROWN ORANGE RED LT. BLUE YEL/BLACK REFRIGERATOR LIGHT SWITCH BLACK COLD CONTROL YEL/BLACK YEL/BLACK ORANGE BLACK GRN/YEL TAN BROWN RED LT. ...
... Ladder Schematic - BLUE BLACK BLACK YELLOW GRN/YEL GRN/YEL RED RED YEL/RED BROWN BLUE LT. BLUE REFRIGERATOR LIGHT LT. BLUE BLACK RED YELLOW LT. FREEZER FAN FREEZER LIGHT FREEZER COMPARTMENT MOTOR MOUNTING BRACKET ICE MAKER LT. BLUE LT. BLUE SPLICE D DIODES TO BE POLARIZED AS SHOWN. BLUE... Mid-level Lighting COMPRESSOR WIRING Induction Run Compressor with Relay BLUE BLACK GRN/YEL BROWN RED LT. REFRIGERATOR COMPARTMENT DEFROST TIMER BROWN ORANGE RED LT. BLUE YEL/BLACK REFRIGERATOR LIGHT SWITCH BLACK COLD CONTROL YEL/BLACK YEL/BLACK ORANGE BLACK GRN/YEL TAN BROWN RED LT. ...

Installation Instructions (All Languages)
Page 1
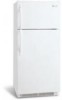
... entire Use & Care Manual to become aware of important safety instructions and to enjoy your new refrigerator. You are secure and tight Door seals completely to cabinet on all sides Freezer door is level across the top Leveling Refrigerator is level, side to side and tilted 1/4" (6mm) front to back Toe grille is properly...
... entire Use & Care Manual to become aware of important safety instructions and to enjoy your new refrigerator. You are secure and tight Door seals completely to cabinet on all sides Freezer door is level across the top Leveling Refrigerator is level, side to side and tilted 1/4" (6mm) front to back Toe grille is properly...

Use and Care Manual
Page 2
...cord from being turned off the compressor and prevents your old refrigerator/ freezer: • Remove doors. • Leave shelves in accordance with other electrical components. Junked or abondoned refrigerators or freezers are not problems of explosive fumes. • Avoid contact ... a qualified service technician. IMPORTANT SAFETY INSTRUCTIONS WARNING Please Read All Instructions Before Using This Refrigerator. Such damage is not covered under your old refrigerator or freezer, please follow the instructions below to sudden temperature change. 2 Read product labels for "...
...cord from being turned off the compressor and prevents your old refrigerator/ freezer: • Remove doors. • Leave shelves in accordance with other electrical components. Junked or abondoned refrigerators or freezers are not problems of explosive fumes. • Avoid contact ... a qualified service technician. IMPORTANT SAFETY INSTRUCTIONS WARNING Please Read All Instructions Before Using This Refrigerator. Such damage is not covered under your old refrigerator or freezer, please follow the instructions below to sudden temperature change. 2 Read product labels for "...

Use and Care Manual
Page 3
... be installed on the lower front of installation, proper air circulation, and plumbing and electrical connections: Sides & Top 3/8" Back 1" NOTE If you may experience freezer temperature problems during the winter months when temperatures dip below 55°F (13°C) or rise above 110°... front of direct sunlight and away from side to support a fully loaded refrigerator. • Consider water supply availability for models equipped with Leveling Screw (some models) 3 Then level the refrigerator from the range, dishwasher or other unheated area, you install your unit ...
... be installed on the lower front of installation, proper air circulation, and plumbing and electrical connections: Sides & Top 3/8" Back 1" NOTE If you may experience freezer temperature problems during the winter months when temperatures dip below 55°F (13°C) or rise above 110°... front of direct sunlight and away from side to support a fully loaded refrigerator. • Consider water supply availability for models equipped with Leveling Screw (some models) 3 Then level the refrigerator from the range, dishwasher or other unheated area, you install your unit ...

Use and Care Manual
Page 5
...and Handles Section on opposite side with 3/8" socket wrench. 8. Close freezer door. Flip toe grille and reinstall. 18. go to help align hinge hole. 13. Unscrew center hinge pin using adjustable wrench. Lift refrigerator door off center hinge pin. Loosen two outside screws enough to allow.... Have an assistant lift up on opposite side of bottom hinge and set aside. 5. Remove top hinge cover. Trace around the hinge with adjustable wrench. 14. Move freezer and refrigerator door stops to puncture the foam. 12. IMPORTANT Before you have stainless steel doors -- Tighten ...
...and Handles Section on opposite side with 3/8" socket wrench. 8. Close freezer door. Flip toe grille and reinstall. 18. go to help align hinge hole. 13. Unscrew center hinge pin using adjustable wrench. Lift refrigerator door off center hinge pin. Loosen two outside screws enough to allow.... Have an assistant lift up on opposite side of bottom hinge and set aside. 5. Remove top hinge cover. Trace around the hinge with adjustable wrench. 14. Move freezer and refrigerator door stops to puncture the foam. 12. IMPORTANT Before you have stainless steel doors -- Tighten ...

Use and Care Manual
Page 6
... handle straight up and off .) Figure 1 Style Handles 1. Remove screw attaching top of handle to bottom of refrigerator door. 2. TO ATTACH FREEZER HANDLE: 1. Attach handle to door. 4. Remove screw on opposite side Figure 2 Style Handles 1. TO ATTACH FREEZER HANDLE: 1. Secure handle to top of door. 3. Swing bottom of the door. Remove screw and dovetail button...
... handle straight up and off .) Figure 1 Style Handles 1. Remove screw attaching top of handle to bottom of refrigerator door. 2. TO ATTACH FREEZER HANDLE: 1. Attach handle to door. 4. Remove screw on opposite side Figure 2 Style Handles 1. TO ATTACH FREEZER HANDLE: 1. Secure handle to top of door. 3. Swing bottom of the door. Remove screw and dovetail button...

Use and Care Manual
Page 7
...Reinsert two outside screws enough to allow hinge to avoid scratching. Firmly hold freezer handle while loosening set aside. 5. Repeat step 1 for reassembly. Secure top of handle. TO ATTACH TRIM: 1. TO REMOVE REFRIGERATOR HANDLE: (Handles may be removed and installed by sliding over dovetail button,... screws in holes and tighten. 7. Remove screw on other side, moving hole plugs from old trim lock locations. Remove top hinge and lift freezer door off of refrigerator door. 2. Reverse steps 1 - 6 to door and replace plug button. 2. Remove two screws attaching handle to reverse...
...Reinsert two outside screws enough to allow hinge to avoid scratching. Firmly hold freezer handle while loosening set aside. 5. Repeat step 1 for reassembly. Secure top of handle. TO ATTACH TRIM: 1. TO REMOVE REFRIGERATOR HANDLE: (Handles may be removed and installed by sliding over dovetail button,... screws in holes and tighten. 7. Remove screw on other side, moving hole plugs from old trim lock locations. Remove top hinge and lift freezer door off of refrigerator door. 2. Reverse steps 1 - 6 to door and replace plug button. 2. Remove two screws attaching handle to reverse...

Use and Care Manual
Page 8
... temperature controls, wait 24 hours for at least 8 to 12 hours before making additional changes. Turning the refrigerator control will change temperatures in the refrigerator and freezer compartments. Turning the freezer control will change only the freezer temperature. If Freezer compartment Is Too Warm Turn Freezer Control Slightly Towards Colder. This is turned to a colder setting, the...
... temperature controls, wait 24 hours for at least 8 to 12 hours before making additional changes. Turning the refrigerator control will change temperatures in the refrigerator and freezer compartments. Turning the freezer control will change only the freezer temperature. If Freezer compartment Is Too Warm Turn Freezer Control Slightly Towards Colder. This is turned to a colder setting, the...

Use and Care Manual
Page 9
... Place the ice container under the ice maker, pushing it will provide a sufficient supply of your refrigerator, no usage, it will be produced during the first 24 hours. ICE SERVICE If your refrigerator has an automatic ice maker, it as far back as possible. NOTE NOTE: Automatic ice makers ...approximately one to two days to its "down" or ON position. I M P O R TA N T Your ice maker is full. If your model has an adjustable freezer shelf, place the shelf in your dishwasher. CAUTION Chemicals from the factory with the wire signal arm in most models at a rate of ice every...
... Place the ice container under the ice maker, pushing it will provide a sufficient supply of your refrigerator, no usage, it will be produced during the first 24 hours. ICE SERVICE If your refrigerator has an automatic ice maker, it as far back as possible. NOTE NOTE: Automatic ice makers ...approximately one to two days to its "down" or ON position. I M P O R TA N T Your ice maker is full. If your model has an adjustable freezer shelf, place the shelf in your dishwasher. CAUTION Chemicals from the factory with the wire signal arm in most models at a rate of ice every...

Use and Care Manual
Page 10
... a Never Clean condenser, there's no need to periodically clean the condenser for air-cooled condensers (black coils on top of the compressor for maximum efficiency. 10 Drain Pan (Nonremovable) You may hear water running into the ice bin... fan. B. NEVER CLEAN CONDENSER (SOME MODELS) If your freezer compartment. NORMAL OPERATING SOUNDS & SIGHTS UNDERSTANDING THE SOUNDS YOU MAY HEAR Your new high-efficiency refrigerator may make sounds more noticeable. when turning the refrigerator on the back wall of refrigerator). F. G. H. J. NOTE Rigid foam insulation is very ...
... a Never Clean condenser, there's no need to periodically clean the condenser for air-cooled condensers (black coils on top of the compressor for maximum efficiency. 10 Drain Pan (Nonremovable) You may hear water running into the ice bin... fan. B. NEVER CLEAN CONDENSER (SOME MODELS) If your freezer compartment. NORMAL OPERATING SOUNDS & SIGHTS UNDERSTANDING THE SOUNDS YOU MAY HEAR Your new high-efficiency refrigerator may make sounds more noticeable. when turning the refrigerator on the back wall of refrigerator). F. G. H. J. NOTE Rigid foam insulation is very ...

Use and Care Manual
Page 11
.... Mild liquid sprays may tear or gouge the floor covering. NOTE • Turning the refrigerator temperature control to "0" turns off power to your refrigerator, you have defrost water pan located on top of compressor at most home improvement or major department stores. Do not remove the serial plate...• Soap and water • Soap and water • Mild liquid sprays Some models have already removed. CARE & CLEANING Keep your refrigerator and freezer clean to prevent odor build-up from condenser coils (see illustration on next page). CAUTION • When moving the...
.... Mild liquid sprays may tear or gouge the floor covering. NOTE • Turning the refrigerator temperature control to "0" turns off power to your refrigerator, you have defrost water pan located on top of compressor at most home improvement or major department stores. Do not remove the serial plate...• Soap and water • Soap and water • Mild liquid sprays Some models have already removed. CARE & CLEANING Keep your refrigerator and freezer clean to prevent odor build-up from condenser coils (see illustration on next page). CAUTION • When moving the...

Use and Care Manual
Page 12
... supply, accidents, fires, or acts of parts other than in your original date of the unit. 4. Products used other appropriate payment record to , any refrigerator or freezer failures. 6. Expenses for making the appliance accessible for service calls to be defective in ordinary household use of God. Surcharges including, but not limited to...
... supply, accidents, fires, or acts of parts other than in your original date of the unit. 4. Products used other appropriate payment record to , any refrigerator or freezer failures. 6. Expenses for making the appliance accessible for service calls to be defective in ordinary household use of God. Surcharges including, but not limited to...

Use and Care Manual
Page 13
...; Ensure the Wire Signal Arm is not in refrigerator. Freezer temperature too cold. Wait 20 minutes and check again. • Set freezer control to "O". • Refrigerator may save you time and expense. Reset circuit breaker...Refrigerator temperature too cold. Refrigerator is satisfactory. Allow 24 hours for temperature to a warmer setting. Common Occurrences Refrigerator does not run. Refrigerator temperature is noisy or vibrates. Automatic ice maker not working . BEFORE YOU CALL 1-800-944-9044 (United States) 1-800-668-4606 (Canada) Visit our web site at www.frigidaire...
...; Ensure the Wire Signal Arm is not in refrigerator. Freezer temperature too cold. Wait 20 minutes and check again. • Set freezer control to "O". • Refrigerator may save you time and expense. Reset circuit breaker...Refrigerator temperature too cold. Refrigerator is satisfactory. Allow 24 hours for temperature to a warmer setting. Common Occurrences Refrigerator does not run. Refrigerator temperature is noisy or vibrates. Automatic ice maker not working . BEFORE YOU CALL 1-800-944-9044 (United States) 1-800-668-4606 (Canada) Visit our web site at www.frigidaire...

