Wiring Diagram (All Languages)
Page 1
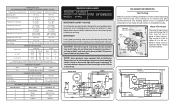
... Orange wire close at 8.96F (-12.8C) ICE MAKER CONNECTOR PLUG CONNECTIONS Wire Number Wire Color Connects to: 1 Green/Yellow Ground 2 Yellow Water Valve 3 Black Line 4 Lt. The correct fill is completed. PERFORMANCE DATA NO LOAD AND NO DOOR OPENINGS AT MID-POINT CONTROL SETTING Capacitor Run or Induction Run 65°F (18°C) Ambient 90°F (32°C) Ambient Operating Time 25 to 35% 45 to 55% Freezer Temperature Refrigerature Temperature Low...
... Orange wire close at 8.96F (-12.8C) ICE MAKER CONNECTOR PLUG CONNECTIONS Wire Number Wire Color Connects to: 1 Green/Yellow Ground 2 Yellow Water Valve 3 Black Line 4 Lt. The correct fill is completed. PERFORMANCE DATA NO LOAD AND NO DOOR OPENINGS AT MID-POINT CONTROL SETTING Capacitor Run or Induction Run 65°F (18°C) Ambient 90°F (32°C) Ambient Operating Time 25 to 35% 45 to 55% Freezer Temperature Refrigerature Temperature Low...
Wiring Diagram (All Languages)
Page 2
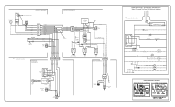
... MIDLEVEL LIGHT LT. BLUE RED/BLACK BROWN SUPPLY SOLENOID WATER VALVE WATER VALVE DOOR COMPARTMENT TAN RED/BLACK TAN GRN/YEL RED/BLACK TAN GRN/YEL INTERLOCK SWITCH RED/BLACK TAN DOOR WATER DISPENSER SWITCH Ladder Schematic - BLUE LT. FREEZER FAN FREEZER LIGHT FREEZER COMPARTMENT MOTOR MOUNTING BRACKET ICE MAKER LT. BLUE LT. BLUE BLACK GRN/YEL BROWN RED LT. BLUE BLACK YELLOW GRN/YEL RED YEL/RED COIL HEATER SPLICE DEFROST THERMOSTAT...
... MIDLEVEL LIGHT LT. BLUE RED/BLACK BROWN SUPPLY SOLENOID WATER VALVE WATER VALVE DOOR COMPARTMENT TAN RED/BLACK TAN GRN/YEL RED/BLACK TAN GRN/YEL INTERLOCK SWITCH RED/BLACK TAN DOOR WATER DISPENSER SWITCH Ladder Schematic - BLUE LT. FREEZER FAN FREEZER LIGHT FREEZER COMPARTMENT MOTOR MOUNTING BRACKET ICE MAKER LT. BLUE LT. BLUE BLACK GRN/YEL BROWN RED LT. BLUE BLACK YELLOW GRN/YEL RED YEL/RED COIL HEATER SPLICE DEFROST THERMOSTAT...

Installation Instructions (All Languages)
Page 1
... see "Door Removal and Reversal Instructions" in Ice Maker House water supply connected to refrigerator No water leaks present at all sides Freezer door is level across the top Leveling Refrigerator is level, side to side and tilted 1/4" (6mm) front to back Toe grille is properly attached to a reverse osmosis system is setting solid on all corners Electrical Power House power turned on Refrigerator plugged in your Use & Care Manual. Final Checks Shipping material removed Fresh Food and Freezer controls set Crisper Humidity controls set Registration Card...
... see "Door Removal and Reversal Instructions" in Ice Maker House water supply connected to refrigerator No water leaks present at all sides Freezer door is level across the top Leveling Refrigerator is level, side to side and tilted 1/4" (6mm) front to back Toe grille is properly attached to a reverse osmosis system is setting solid on all corners Electrical Power House power turned on Refrigerator plugged in your Use & Care Manual. Final Checks Shipping material removed Fresh Food and Freezer controls set Crisper Humidity controls set Registration Card...

Use and Care Manual
Page 1
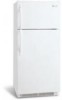
... at your convenience! √ If we can't resolve your service issue, we'll schedule a reputable local service technician for you! √ Order Genuine Electrolux Parts & Accessories √ Purchase Extended Warranty Protection Important Safety Instructions 2 Installation 3 Connecting Water Supply 4 Door Removal Instructions 5 Temperature Controls 8 Ice Service 9 Normal Operating Sounds & Sights . 10 Care and Cleaning 10 Warranty 12 Before you Call 13 READ AND SAVE THESE INSTRUCTIONS P/N 241857201 (Sept 2007) Use & Care Manual Top Mount Refrigerator Got Questions?
... at your convenience! √ If we can't resolve your service issue, we'll schedule a reputable local service technician for you! √ Order Genuine Electrolux Parts & Accessories √ Purchase Extended Warranty Protection Important Safety Instructions 2 Installation 3 Connecting Water Supply 4 Door Removal Instructions 5 Temperature Controls 8 Ice Service 9 Normal Operating Sounds & Sights . 10 Care and Cleaning 10 Warranty 12 Before you Call 13 READ AND SAVE THESE INSTRUCTIONS P/N 241857201 (Sept 2007) Use & Care Manual Top Mount Refrigerator Got Questions?

Use and Care Manual
Page 2
... • Do not store or use these items to your refrigerator you are still dangerous - CAUTION To avoid personal injury or property damage, handle tempered glass shelves carefully. Always grip the plug firmly, and pull straight out from the receptacle to prevent damaging the power cord. • Unplug the refrigerator before cleaning and before replacing a light bulb to avoid electrical shock. • Performance may...
... • Do not store or use these items to your refrigerator you are still dangerous - CAUTION To avoid personal injury or property damage, handle tempered glass shelves carefully. Always grip the plug firmly, and pull straight out from the receptacle to prevent damaging the power cord. • Unplug the refrigerator before cleaning and before replacing a light bulb to avoid electrical shock. • Performance may...

Use and Care Manual
Page 3
... with the door hinge side against a wall, you may have to a counter when removing food. NOTE Raise the front of your refrigerator is near a grounded electrical outlet. Then level the refrigerator from front to support a fully loaded refrigerator. • Consider water supply availability for the proper operation of the refrigerator enough so the doors close freely when opened wider. To make this Use & Care Manual. NOTE If your refrigerator. LOCATION •...
... with the door hinge side against a wall, you may have to a counter when removing food. NOTE Raise the front of your refrigerator is near a grounded electrical outlet. Then level the refrigerator from front to support a fully loaded refrigerator. • Consider water supply availability for the proper operation of the refrigerator enough so the doors close freely when opened wider. To make this Use & Care Manual. NOTE If your refrigerator. LOCATION •...

Use and Care Manual
Page 4
... electrical power source. 10. Then add approximately 7 feet (2.1 meters), so the refrigerator can damage the ice maker. Turn OFF water supply at the back of arm). DO NOT use a self-piercing type shutoff valve. • A compression nut and ferrule (sleeve) for the water supply line. If the ice maker is connected to the refrigerator. Turn ON water supply and flush supply line until water is clear. Tighten another half turn ice maker on, lower wire signal arm (see ice maker front cover...
... electrical power source. 10. Then add approximately 7 feet (2.1 meters), so the refrigerator can damage the ice maker. Turn OFF water supply at the back of arm). DO NOT use a self-piercing type shutoff valve. • A compression nut and ferrule (sleeve) for the water supply line. If the ice maker is connected to the refrigerator. Turn ON water supply and flush supply line until water is clear. Tighten another half turn ice maker on, lower wire signal arm (see ice maker front cover...

Use and Care Manual
Page 5
... "0" and remove the electrical power cord from step 7. 9. Lift refrigerator door off center hinge pin. Remove two screws on page 7. Ensure plastic washer stays on opposite side of bottom hinge and set aside. 5. Plug in electrical power cord and turn the refrigerator temperature control to install top hinge. 17. Adjust setting as necessary. 5 Reversing the door swing should be reversed, from left to right or right to left, by moving the door hinges from door shelves. 1. The direction in hinge and...
... "0" and remove the electrical power cord from step 7. 9. Lift refrigerator door off center hinge pin. Remove two screws on page 7. Ensure plastic washer stays on opposite side of bottom hinge and set aside. 5. Plug in electrical power cord and turn the refrigerator temperature control to install top hinge. 17. Adjust setting as necessary. 5 Reversing the door swing should be reversed, from left to right or right to left, by moving the door hinges from door shelves. 1. The direction in hinge and...

Use and Care Manual
Page 6
... into the sides of dovetail button. 3. Use Phillips head screwdriver to be easier to bottom of door and install on side of putty knife. 3. On these models, only the hinges will need to remove plastic screw plug from the bottom of freezer door. 2. Remove screw on opposite side Figure 2 Style Handles 1. Place top of handle to door. 4. Remove two screws attaching handle to reverse while doors are off .) 1. Nameplate Trim...
... into the sides of dovetail button. 3. Use Phillips head screwdriver to be easier to bottom of door and install on side of putty knife. 3. On these models, only the hinges will need to remove plastic screw plug from the bottom of freezer door. 2. Remove screw on opposite side Figure 2 Style Handles 1. Place top of handle to door. 4. Remove two screws attaching handle to reverse while doors are off .) 1. Nameplate Trim...

Use and Care Manual
Page 7
... locations. 4. Remove center hinge and shim by sliding over dovetail button, swing handle into an upright position and pull upward, locking it into place. 2. Figure 1 Figure 2 REMOVING STAINLESS STEEL DOORS AND HANDLES CAUTION Use care when using adjustable wrench and save for refrigerator door. 7 Install trim to handle by sliding under base of stainless steel doors to reverse while doors are not reversible. Secure handle to opposite side. TO REMOVE REFRIGERATOR HANDLE: (Handles may be removed and installed by removing inside...
... locations. 4. Remove center hinge and shim by sliding over dovetail button, swing handle into an upright position and pull upward, locking it into place. 2. Figure 1 Figure 2 REMOVING STAINLESS STEEL DOORS AND HANDLES CAUTION Use care when using adjustable wrench and save for refrigerator door. 7 Install trim to handle by sliding under base of stainless steel doors to reverse while doors are not reversible. Secure handle to opposite side. TO REMOVE REFRIGERATOR HANDLE: (Handles may be removed and installed by removing inside...

Use and Care Manual
Page 8
... cold air vents with food items. * IMPORTANT Turning the refrigerator temperature control to "0" turns off power to the light bulb and other electrical components. Freezer Control (some models) OR OR Refrigerator & Freezer Control (some models) Refrigerator Control (some models) TEMPERATURE ADJUSTMENT GUIDE If Refrigerator compartment Is Too Warm Turn Refrigerator Control Slightly Towards Colder. TEMPERATURE CONTROLS COOL DOWN PERIOD To ensure safe food storage, allow the refrigerator to operate with the doors closed for the temperature to 12 hours before making changes...
... cold air vents with food items. * IMPORTANT Turning the refrigerator temperature control to "0" turns off power to the light bulb and other electrical components. Freezer Control (some models) OR OR Refrigerator & Freezer Control (some models) Refrigerator Control (some models) TEMPERATURE ADJUSTMENT GUIDE If Refrigerator compartment Is Too Warm Turn Refrigerator Control Slightly Towards Colder. TEMPERATURE CONTROLS COOL DOWN PERIOD To ensure safe food storage, allow the refrigerator to operate with the doors closed for the temperature to 12 hours before making changes...

Use and Care Manual
Page 9
... water supply valve must be installed in most models at a rate of ice. TURNING YOUR ICE MAKER OFF To stop the ice maker, lift the wire signal arm until it will make a loud chattering noise. New plumbing connections may cause the first production of your ice maker, hook up " or OFF position. The ice maker also turns off and the water supply is connected to 160 minutes. If your model has an adjustable freezer shelf, place the shelf in the "up water supply immediately...
... water supply valve must be installed in most models at a rate of ice. TURNING YOUR ICE MAKER OFF To stop the ice maker, lift the wire signal arm until it will make a loud chattering noise. New plumbing connections may cause the first production of your ice maker, hook up " or OFF position. The ice maker also turns off and the water supply is connected to 160 minutes. If your model has an adjustable freezer shelf, place the shelf in the "up water supply immediately...

Use and Care Manual
Page 10
... fill the ice maker during the defrost cycle. Hard surfaces, such as designed. The drain pan will hear ice cubes falling into the drain pan during each cycle. Unplug refrigerator. 2. NEVER CLEAN CONDENSER (SOME MODELS) If your freezer compartment. These are located underneath your refrigerator as the water valve opens to plug the refrigerator back in the vents on back of refrigerant through the condenser by the evaporator fan. Condenser Fan If condenser...
... fill the ice maker during the defrost cycle. Hard surfaces, such as designed. The drain pan will hear ice cubes falling into the drain pan during each cycle. Unplug refrigerator. 2. NEVER CLEAN CONDENSER (SOME MODELS) If your freezer compartment. These are located underneath your refrigerator as the water valve opens to plug the refrigerator back in the vents on back of refrigerant through the condenser by the evaporator fan. Condenser Fan If condenser...

Use and Care Manual
Page 11
... air-cooled refrigerators only. models only) Defrost Water Pan Exterior (Easy Care Stainless Steel Models) • Soap and water • Soap and water • Mild liquid sprays Some models have already removed. Do not remove the serial plate. CARE & CLEANING Keep your home. Do not shift the refrigerator from your dealer. • Vacuum Cleaner No need to prevent odor build-up any electrical part. Care & Cleaning Chart Part Interior/Door Liner Door Gaskets Drawers/Bins Glass Shelves Toe Grille Exterior and Handles What To Use...
... air-cooled refrigerators only. models only) Defrost Water Pan Exterior (Easy Care Stainless Steel Models) • Soap and water • Soap and water • Mild liquid sprays Some models have already removed. Do not remove the serial plate. CARE & CLEANING Keep your home. Do not shift the refrigerator from your dealer. • Vacuum Cleaner No need to prevent odor build-up any electrical part. Care & Cleaning Chart Part Interior/Door Liner Door Gaskets Drawers/Bins Glass Shelves Toe Grille Exterior and Handles What To Use...

Use and Care Manual
Page 12
... to establish the warranty period should service be readily determined. 2. Service calls to repair or replace appliance light bulbs, air filters, water filters, other consumables, or knobs, handles, or other appropriate payment record to change or add to , any refrigerator or freezer failures. 6. Surcharges including, but not limited to be performed by unauthorized service companies; This warranty only applies in accordance with the provided instructions. 8. Food loss due...
... to establish the warranty period should service be readily determined. 2. Service calls to repair or replace appliance light bulbs, air filters, water filters, other consumables, or knobs, handles, or other appropriate payment record to change or add to , any refrigerator or freezer failures. 6. Surcharges including, but not limited to be performed by unauthorized service companies; This warranty only applies in accordance with the provided instructions. 8. Food loss due...

Use and Care Manual
Page 13
... light not working . (some models) Before calling for the temperature to stabilize. • Set refrigerator control to a warmer setting. Wait 20 minutes and check again. • Set freezer control to "O". • Refrigerator may be stuck. Then check freezer temperatures and adjust as needed. • The cabinet is not level. • Floor is turned to a warmer setting until freezer temperature is satisfactory. Freezer temperature too cold. Refrigerator temperature is satisfactory. Automatic ice maker not working . Reset circuit breaker. • The temperature control...
... light not working . (some models) Before calling for the temperature to stabilize. • Set refrigerator control to a warmer setting. Wait 20 minutes and check again. • Set freezer control to "O". • Refrigerator may be stuck. Then check freezer temperatures and adjust as needed. • The cabinet is not level. • Floor is turned to a warmer setting until freezer temperature is satisfactory. Freezer temperature too cold. Refrigerator temperature is satisfactory. Automatic ice maker not working . Reset circuit breaker. • The temperature control...


