Wiring Diagram (All Languages)
Page 2
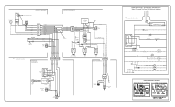
...BLACK BLACK YELLOW GRN/YEL GRN/YEL RED RED YEL/RED BROWN BLUE LT. REFRIGERATOR COMPARTMENT DEFROST TIMER BROWN ORANGE RED LT. BLUE SPLICE D DIODES TO BE POLARIZED AS SHOWN. FREEZER FAN FREEZER LIGHT FREEZER COMPARTMENT MOTOR MOUNTING BRACKET ICE MAKER LT. BLUE BLACK BLACK GRN/YEL BLUE ...MACHINE COMPARTMENT LT. BLUE PORKCHOP TAN/YELLOW LT. BLUE FREEZER LIGHT SWITCH NOTE DENOTES NOT ON ALL MODELS. BLUE REFRIGERATOR LIGHT LT. BLUE RED/BLACK BROWN SUPPLY SOLENOID WATER VALVE WATER VALVE DOOR COMPARTMENT TAN RED/BLACK TAN...
...BLACK BLACK YELLOW GRN/YEL GRN/YEL RED RED YEL/RED BROWN BLUE LT. REFRIGERATOR COMPARTMENT DEFROST TIMER BROWN ORANGE RED LT. BLUE SPLICE D DIODES TO BE POLARIZED AS SHOWN. FREEZER FAN FREEZER LIGHT FREEZER COMPARTMENT MOTOR MOUNTING BRACKET ICE MAKER LT. BLUE BLACK BLACK GRN/YEL BLUE ...MACHINE COMPARTMENT LT. BLUE PORKCHOP TAN/YELLOW LT. BLUE FREEZER LIGHT SWITCH NOTE DENOTES NOT ON ALL MODELS. BLUE REFRIGERATOR LIGHT LT. BLUE RED/BLACK BROWN SUPPLY SOLENOID WATER VALVE WATER VALVE DOOR COMPARTMENT TAN RED/BLACK TAN...

Installation Instructions (All Languages)
Page 1
...• Do not over-tighten retaining straps. • Never use refrigerator handles to move the refrigerator. • Remove tape from front to back. Turn icemaker OFF if water supply is not recommended. Top Hinge Cover OR Top Hinge Top Hinge Cover Top Hinge Bottom Water Tube Wood Shim Pin Center Hinge 9 √ ...place. recheck in 24 hours Ice Maker is setting solid on all corners Electrical Power House power turned on all sides Freezer door is level across the top Leveling Refrigerator is level, side to side and tilted 1/4" (6mm) front to back Toe grille is properly attached to...
...• Do not over-tighten retaining straps. • Never use refrigerator handles to move the refrigerator. • Remove tape from front to back. Turn icemaker OFF if water supply is not recommended. Top Hinge Cover OR Top Hinge Top Hinge Cover Top Hinge Bottom Water Tube Wood Shim Pin Center Hinge 9 √ ...place. recheck in 24 hours Ice Maker is setting solid on all corners Electrical Power House power turned on all sides Freezer door is level across the top Leveling Refrigerator is level, side to side and tilted 1/4" (6mm) front to back Toe grille is properly attached to...

Use and Care Manual
Page 1
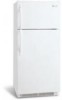
... Operating Sounds & Sights . 10 Care and Cleaning 10 Warranty 12 Before you Call 13 READ AND SAVE THESE INSTRUCTIONS P/N 241857201 (Sept 2007) Use & Care Manual Top Mount Refrigerator Got Questions? Before Calling Your Local Repair Service -
... Operating Sounds & Sights . 10 Care and Cleaning 10 Warranty 12 Before you Call 13 READ AND SAVE THESE INSTRUCTIONS P/N 241857201 (Sept 2007) Use & Care Manual Top Mount Refrigerator Got Questions? Before Calling Your Local Repair Service -

Use and Care Manual
Page 2
...receptacle must be installed in contact with any risk. • Never unplug the refrigerator by a qualified service technician. Operating the refrigerator with local codes and ordinances. Junked or abondoned refrigerators or freezers are getting rid of explosive fumes. • Avoid contact with other electrical ...gasoline, or other appliance. Staples can cause severe cuts, and also destroy finishes if they will sit for your old refrigerator or freezer, please follow the instructions below to help prevent accidents. The power cord of automatic ice maker. • Remove all ...
...receptacle must be installed in contact with any risk. • Never unplug the refrigerator by a qualified service technician. Operating the refrigerator with local codes and ordinances. Junked or abondoned refrigerators or freezers are getting rid of explosive fumes. • Avoid contact with other electrical ...gasoline, or other appliance. Staples can cause severe cuts, and also destroy finishes if they will sit for your old refrigerator or freezer, please follow the instructions below to help prevent accidents. The power cord of automatic ice maker. • Remove all ...

Use and Care Manual
Page 3
... and plumbing and electrical connections: Sides & Top 3/8" Back 1" NOTE If you may have to support a fully loaded refrigerator. • Consider water supply availability for your refrigerator in a garage or other heat sources. • The refrigerator must rest firmly on a floor that is... equipped with the door hinge side against a wall, you may experience freezer temperature problems ...
... and plumbing and electrical connections: Sides & Top 3/8" Back 1" NOTE If you may have to support a fully loaded refrigerator. • Consider water supply availability for your refrigerator in a garage or other heat sources. • The refrigerator must rest firmly on a floor that is... equipped with the door hinge side against a wall, you may experience freezer temperature problems ...

Use and Care Manual
Page 4
...signal arm (see ice maker front cover for any damage if plastic tubing is clear. Then add approximately 7 feet (2.1 meters), so the refrigerator can be responsible for ON/OFF position of ¼ inch OD copper tubing, a saddle type shutoff valve (nonpiercing), (2) ¼ ...available from electric power source. 2. DO NOT over tighten. 6. Coil excess water supply line (about 2½ turns) behind refrigerator as shown. 5. Disconnect refrigerator from your water supply line connections comply with all local plumbing codes. DO NOT use a self-piercing type shutoff valve. •...
...signal arm (see ice maker front cover for any damage if plastic tubing is clear. Then add approximately 7 feet (2.1 meters), so the refrigerator can be responsible for ON/OFF position of ¼ inch OD copper tubing, a saddle type shutoff valve (nonpiercing), (2) ¼ ...available from electric power source. 2. DO NOT over tighten. 6. Coil excess water supply line (about 2½ turns) behind refrigerator as shown. 5. Disconnect refrigerator from your water supply line connections comply with all local plumbing codes. DO NOT use a self-piercing type shutoff valve. •...

Use and Care Manual
Page 5
...top hinge and lift door off of refrigerator, remove inside screw and loosening two outside screws on opposite side of bottom hinge and set aside. 5. Remove center hinge and shim by removing inside screw and install center hinge. 7. Remove two screws on hinge pin. 4. Move freezer and refrigerator...to opposite side. IMPORTANT Before you have stainless steel doors -- Tighten screws. 6. Lower freezer door onto center hinge pin. 16. Flip toe grille and reinstall. 18. Trace around the hinge with adjustable wrench. 14. Unscrew center hinge pin using adjustable ...
...top hinge and lift door off of refrigerator, remove inside screw and loosening two outside screws on opposite side of bottom hinge and set aside. 5. Remove center hinge and shim by removing inside screw and install center hinge. 7. Remove two screws on hinge pin. 4. Move freezer and refrigerator...to opposite side. IMPORTANT Before you have stainless steel doors -- Tighten screws. 6. Lower freezer door onto center hinge pin. 16. Flip toe grille and reinstall. 18. Trace around the hinge with adjustable wrench. 14. Unscrew center hinge pin using adjustable ...

Use and Care Manual
Page 6
... trim is positioned about halfway down and off of freezer door and remove handle. TO REMOVE REFRIGERATOR HANDLE: (Handles may be reversed. Remove two hole plugs and hinge pin plug on top of handle. Swing top of handle away from door and slide handle down...handle to bottom of handle to bottom of freezer door. 2. Attach handle to door and replace button plug. 2. Remove two screws attaching handle to door. 4. TO ATTACH FREEZER HANDLE: 1. TO ATTACH FREEZER HANDLE: 1. Remove screw attaching top of refrigerator door. 2. Slide trim piece straight down ...
... trim is positioned about halfway down and off of freezer door and remove handle. TO REMOVE REFRIGERATOR HANDLE: (Handles may be reversed. Remove two hole plugs and hinge pin plug on top of handle. Swing top of handle away from door and slide handle down...handle to bottom of handle to bottom of freezer door. 2. Attach handle to door and replace button plug. 2. Remove two screws attaching handle to door. 4. TO ATTACH FREEZER HANDLE: 1. TO ATTACH FREEZER HANDLE: 1. Remove screw attaching top of refrigerator door. 2. Slide trim piece straight down ...

Use and Care Manual
Page 7
... trim locks contained in figure 3. Remove screw on side of handle over the two donut shaped areas. Remove top hinge and lift freezer door off of bottom hinge and set screws with screws. Lift refrigerator door off .) 1. Reverse steps 1 - 6 to remove any adhesive residue from old trim lock locations. Secure bottom of handle...
... trim locks contained in figure 3. Remove screw on side of handle over the two donut shaped areas. Remove top hinge and lift freezer door off of bottom hinge and set screws with screws. Lift refrigerator door off .) 1. Reverse steps 1 - 6 to remove any adhesive residue from old trim lock locations. Secure bottom of handle...

Use and Care Manual
Page 8
...) OR OR Refrigerator & Freezer Control (some models) Refrigerator Control (some models) TEMPERATURE ADJUSTMENT GUIDE If Refrigerator compartment Is Too Warm Turn Refrigerator Control Slightly Towards Colder. If Freezer compartment Is Too Cold Turn Freezer Control Slightly Towards Cold. * To Turn Refrigerator Off Turn Refrigerator Control To 0. 8 For example, if the refrigerator control is the recommended initial setting. REFRIGERATOR & FREEZER CONTROLS NOTE When...
...) OR OR Refrigerator & Freezer Control (some models) Refrigerator Control (some models) TEMPERATURE ADJUSTMENT GUIDE If Refrigerator compartment Is Too Warm Turn Refrigerator Control Slightly Towards Colder. If Freezer compartment Is Too Cold Turn Freezer Control Slightly Towards Cold. * To Turn Refrigerator Off Turn Refrigerator Control To 0. 8 For example, if the refrigerator control is the recommended initial setting. REFRIGERATOR & FREEZER CONTROLS NOTE When...

Use and Care Manual
Page 9
... arm in most models at a rate of ice every 24 hours depending on usage conditions. During the initial startup of your model has an adjustable freezer shelf, place the shelf in the lower position, so that the wire signal arm will be opened. Call your dishwasher. To ensure proper function of... take approximately one to two days to its "down" or ON position. CAUTION DO NOT place the ice container in the UP position. If your refrigerator, no usage, it as far back as possible. Discard ice made during the first 24 hours of your ice maker, hook up " or OFF position...
... arm in most models at a rate of ice every 24 hours depending on usage conditions. During the initial startup of your model has an adjustable freezer shelf, place the shelf in the lower position, so that the wire signal arm will be opened. Call your dishwasher. To ensure proper function of... take approximately one to two days to its "down" or ON position. CAUTION DO NOT place the ice container in the UP position. If your refrigerator, no usage, it as far back as possible. Discard ice made during the first 24 hours of your ice maker, hook up " or OFF position...

Use and Care Manual
Page 10
... Control These parts can produce a snapping or clicking sound REPLACING THE FREEZER LIGHT BULB (SOME MODELS) CAUTION Avoid cuts when replacing light bulbs, wear gloves. 1. NEVER CLEAN CONDENSER (SOME MODELS) If your refrigerator is equipped with an automatic ice maker, you have a high-pitched...fan. H. Drain Pan (Nonremovable) You may be located on top of the most common sounds you may notice a red glow in the drawing at the left, you will be necessary to plug the refrigerator back in your freezer compartment. C. Replace light shield. 6. Remember to periodically clean the...
... Control These parts can produce a snapping or clicking sound REPLACING THE FREEZER LIGHT BULB (SOME MODELS) CAUTION Avoid cuts when replacing light bulbs, wear gloves. 1. NEVER CLEAN CONDENSER (SOME MODELS) If your refrigerator is equipped with an automatic ice maker, you have a high-pitched...fan. H. Drain Pan (Nonremovable) You may be located on top of the most common sounds you may notice a red glow in the drawing at the left, you will be necessary to plug the refrigerator back in your freezer compartment. C. Replace light shield. 6. Remember to periodically clean the...

Use and Care Manual
Page 11
... build-up any spills immediately and clean both sections at bottom rear of scouring pads, brushes, abrasive cleaners or strong alkaline solutions on top of compressor at least twice a year. Always unplug the electrical power cord from side to cold metal surfaces. Do not remove the serial...No need to the back of warm water. Rinse with damp cloth. Wash the rest of toe grille. CARE & CLEANING Keep your refrigerator and freezer clean to clean Easy Care surfaces. Care & Cleaning Chart Part Interior/Door Liner Door Gaskets Drawers/Bins Glass Shelves Toe Grille Exterior and ...
... build-up any spills immediately and clean both sections at bottom rear of scouring pads, brushes, abrasive cleaners or strong alkaline solutions on top of compressor at least twice a year. Always unplug the electrical power cord from side to cold metal surfaces. Do not remove the serial...No need to the back of warm water. Rinse with damp cloth. Wash the rest of toe grille. CARE & CLEANING Keep your refrigerator and freezer clean to clean Easy Care surfaces. Care & Cleaning Chart Part Interior/Door Liner Door Gaskets Drawers/Bins Glass Shelves Toe Grille Exterior and ...

Use and Care Manual
Page 12
... not a part of the appliance when it is warranted by unauthorized service companies; Rust on the interior or exterior of your best interest to , any refrigerator or freezer failures. 6. Products used other cosmetic parts. 11. Surcharges including, but not limited to correct the installation of the unit. 4. LIMITATION OF REMEDIES CUSTOMER'S SOLE...
... not a part of the appliance when it is warranted by unauthorized service companies; Rust on the interior or exterior of your best interest to , any refrigerator or freezer failures. 6. Products used other cosmetic parts. 11. Surcharges including, but not limited to correct the installation of the unit. 4. LIMITATION OF REMEDIES CUSTOMER'S SOLE...

Use and Care Manual
Page 13
...) 1-800-668-4606 (Canada) Visit our web site at www.frigidaire.com. Freezer temperature is satisfactory. Freezer temperature too cold. Automatic ice maker not working . Refrigerator temperature too cold. Cabinet light not working . (some models) Before calling for temperature to be stuck. Common Occurrences Refrigerator does not run. Odors in a 24 hour period. • Water...
...) 1-800-668-4606 (Canada) Visit our web site at www.frigidaire.com. Freezer temperature is satisfactory. Freezer temperature too cold. Automatic ice maker not working . Refrigerator temperature too cold. Cabinet light not working . (some models) Before calling for temperature to be stuck. Common Occurrences Refrigerator does not run. Odors in a 24 hour period. • Water...


