Wiring Diagram (All Languages)
Page 1
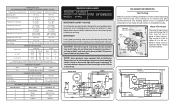
...) Defrost Up To 24 Minutes Every 6 - 72 Hours of Compressor Run Time CONDENSER FAN MOTOR Watts RPM Amps 2.3 1100 CW Opposite Shaft .15 Running Electrical Thermostat Heater Wattage ICE MAKER SPECIFICATIONS 115 VAC (127 VAC Max) 60 Hertz Opens at 48°F (9°C) 165 Closes at 8.96F (-12.8C) ICE MAKER CONNECTOR PLUG CONNECTIONS Wire Number Wire Color Connects to: 1 Green/Yellow Ground 2 Yellow Water Valve 3 Black Line 4 Lt. Disconnect power cord before servicing. Water Fill Volume The water fill adjustment...
...) Defrost Up To 24 Minutes Every 6 - 72 Hours of Compressor Run Time CONDENSER FAN MOTOR Watts RPM Amps 2.3 1100 CW Opposite Shaft .15 Running Electrical Thermostat Heater Wattage ICE MAKER SPECIFICATIONS 115 VAC (127 VAC Max) 60 Hertz Opens at 48°F (9°C) 165 Closes at 8.96F (-12.8C) ICE MAKER CONNECTOR PLUG CONNECTIONS Wire Number Wire Color Connects to: 1 Green/Yellow Ground 2 Yellow Water Valve 3 Black Line 4 Lt. Disconnect power cord before servicing. Water Fill Volume The water fill adjustment...
Wiring Diagram (All Languages)
Page 2
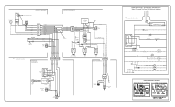
... COMPARTMENT LT. TM Dynamic With Optional Water Through The Door Or Mid-level Lighting COMPRESSOR WIRING Induction Run Compressor with Relay BLUE YEL/BLACK REFRIGERATOR LIGHT SWITCH BLACK COLD CONTROL YEL/BLACK YEL/BLACK ORANGE BLACK GRN/YEL TAN BROWN RED LT. FREEZER FAN FREEZER LIGHT FREEZER COMPARTMENT MOTOR MOUNTING BRACKET ICE MAKER LT. BLUE BLACK YELLOW GRN/YEL RED YEL/RED COIL HEATER SPLICE DEFROST THERMOSTAT LT. BLUE LT. BLUE BLACK RED...
... COMPARTMENT LT. TM Dynamic With Optional Water Through The Door Or Mid-level Lighting COMPRESSOR WIRING Induction Run Compressor with Relay BLUE YEL/BLACK REFRIGERATOR LIGHT SWITCH BLACK COLD CONTROL YEL/BLACK YEL/BLACK ORANGE BLACK GRN/YEL TAN BROWN RED LT. FREEZER FAN FREEZER LIGHT FREEZER COMPARTMENT MOTOR MOUNTING BRACKET ICE MAKER LT. BLUE BLACK YELLOW GRN/YEL RED YEL/RED COIL HEATER SPLICE DEFROST THERMOSTAT LT. BLUE LT. BLUE BLACK RED...

Installation Instructions (All Languages)
Page 1
... model.) WATER SUPPLY Connect water supply - Toe Grille NOTE Adjustable Front Roller (some models) Raise Stationary Front Roller with LED display, 3 to 5 is normal operating range.) 7 ICEMAKER Ensure icemaker is not recommended. check for the door to swing open. 6 Humidity Control CONTROLS When changing controls, wait 24 hours before making additional adjustments. (For models with Leveling Screw (some models) Raise the front of your refrigerator. √ Congratulations! Connecting to your Owner's Use and Care Manual for ease of installation, proper air...
... model.) WATER SUPPLY Connect water supply - Toe Grille NOTE Adjustable Front Roller (some models) Raise Stationary Front Roller with LED display, 3 to 5 is normal operating range.) 7 ICEMAKER Ensure icemaker is not recommended. check for the door to swing open. 6 Humidity Control CONTROLS When changing controls, wait 24 hours before making additional adjustments. (For models with Leveling Screw (some models) Raise the front of your refrigerator. √ Congratulations! Connecting to your Owner's Use and Care Manual for ease of installation, proper air...

Complete Owner's Guide (English)
Page 1
...ll schedule a reputable local service technician for you! √ Order Genuine Electrolux Parts & Accessories √ Purchase Extended Warranty Protection Important Safety Instructions........... 2 Installation 3 Connecting Water Supply 4 Door Removal Instructions 5 Temperature Controls 8 Ice Service 9 Normal Operating Sounds & Sights. 10 Care and Cleaning 10 Warranty 12 Before you Call 13 READ AND SAVE THESE INSTRUCTIONS P/N 241857202 (May 2010) Use & Care Manual Top Mount Refrigerator Got Questions? Need Parts or Service? Before Calling Your Local Repair Service -
...ll schedule a reputable local service technician for you! √ Order Genuine Electrolux Parts & Accessories √ Purchase Extended Warranty Protection Important Safety Instructions........... 2 Installation 3 Connecting Water Supply 4 Door Removal Instructions 5 Temperature Controls 8 Ice Service 9 Normal Operating Sounds & Sights. 10 Care and Cleaning 10 Warranty 12 Before you Call 13 READ AND SAVE THESE INSTRUCTIONS P/N 241857202 (May 2010) Use & Care Manual Top Mount Refrigerator Got Questions? Need Parts or Service? Before Calling Your Local Repair Service -

Complete Owner's Guide (English)
Page 2
... connecting refrigerator to sudden temperature change. 2 Shelves may not easily climb inside. • Have refrigerant removed by pulling on the left side of the temperature control panel (Electronic controls), or turning the Freezer and Fresh Food controls to potential personal injury hazards. Important Safety Instructions WARNING Please Read All Instructions Before Using This Refrigerator. Always grip the plug firmly, and pull straight out from being turned off power to your refrigerator you are getting rid...
... connecting refrigerator to sudden temperature change. 2 Shelves may not easily climb inside. • Have refrigerant removed by pulling on the left side of the temperature control panel (Electronic controls), or turning the Freezer and Fresh Food controls to potential personal injury hazards. Important Safety Instructions WARNING Please Read All Instructions Before Using This Refrigerator. Always grip the plug firmly, and pull straight out from being turned off power to your refrigerator you are getting rid...

Complete Owner's Guide (English)
Page 3
...;F (43°C). To make this Use & Care Manual. Installation This Use & Care Manual provides specific operating instructions for the proper operation of your refrigerator. CAUTION Do Not install the refrigerator where the temperature will drop below 55° F. Sufficient air circulation is level and strong enough to support a fully loaded refrigerator. • Consider water supply availability for ease of installation, proper air circulation, and plumbing and electrical connections: Sides & Top 3/8" Back 1" door opening Your refrigerator should slope ¼" to...
...;F (43°C). To make this Use & Care Manual. Installation This Use & Care Manual provides specific operating instructions for the proper operation of your refrigerator. CAUTION Do Not install the refrigerator where the temperature will drop below 55° F. Sufficient air circulation is level and strong enough to support a fully loaded refrigerator. • Consider water supply availability for ease of installation, proper air circulation, and plumbing and electrical connections: Sides & Top 3/8" Back 1" door opening Your refrigerator should slope ¼" to...

Complete Owner's Guide (English)
Page 4
... WATER SUPPLY TO REFRIGERATOR WARNING To avoid electric shock, which can damage the ice maker. The nut and ferrule are already assembled on , lower wire signal arm (side mounted) or set the ice maker's On/Off power switch to your water supply line connections comply with a 6 ft. CAUTION To Avoid Property Damage: • Copper or stainless steel braided tubing is clear. Water supply tubing made of ¼" plastic is used . Before Installing The Water Supply Line, You Will Need...
... WATER SUPPLY TO REFRIGERATOR WARNING To avoid electric shock, which can damage the ice maker. The nut and ferrule are already assembled on , lower wire signal arm (side mounted) or set the ice maker's On/Off power switch to your water supply line connections comply with a 6 ft. CAUTION To Avoid Property Damage: • Copper or stainless steel braided tubing is clear. Water supply tubing made of ¼" plastic is used . Before Installing The Water Supply Line, You Will Need...

Complete Owner's Guide (English)
Page 5
... removing inside screw and install center hinge. 7. Remove two screws on bottom hinge with the two screws removed from the wall outlet. Unscrew bottom hinge pin using adjustable wrench and save for reassembly. Plug in electrical power cord and turn the refrigerator temperature control to puncture the foam. 12. Top Hinge Door Stop Screw Door Stop Washer Hinge Pin Bottom Hinge Screws Toe Grille IMPORTANT Before you have stainless steel doors -- Remove toe grille. 2. Unscrew center hinge pin using adjustable...
... removing inside screw and install center hinge. 7. Remove two screws on bottom hinge with the two screws removed from the wall outlet. Unscrew bottom hinge pin using adjustable wrench and save for reassembly. Plug in electrical power cord and turn the refrigerator temperature control to puncture the foam. 12. Top Hinge Door Stop Screw Door Stop Washer Hinge Pin Bottom Hinge Screws Toe Grille IMPORTANT Before you have stainless steel doors -- Remove toe grille. 2. Unscrew center hinge pin using adjustable...

Complete Owner's Guide (English)
Page 6
... door. 2. To attach freezer handle: Self Adhesive Nameplate (some models) 2. Attach handle to top of handle to door. 4. Secure side of refrigerator door. 2. Door Removal / reversal Instructions NOTE Some models have "pocket" handles, which continues from door and reapply over old handle holes. Remove screw attaching top of the door. Remove screw attaching bottom of handle to be easier to the bottom of handle to door and replace button plug. 2. On these models, only the hinges will need to door...
... door. 2. To attach freezer handle: Self Adhesive Nameplate (some models) 2. Attach handle to top of handle to door. 4. Secure side of refrigerator door. 2. Door Removal / reversal Instructions NOTE Some models have "pocket" handles, which continues from door and reapply over old handle holes. Remove screw attaching top of the door. Remove screw attaching bottom of handle to be easier to the bottom of handle to door and replace button plug. 2. On these models, only the hinges will need to door...

Complete Owner's Guide (English)
Page 7
... Remove Refrigerator Handle: (Handles may be removed and installed by removing inside screw and loosening two outside screws in figure 3. Reinsert two outside screws enough to allow hinge to door and replace plug button. 2. To attach refrigerator handle: Figure 1 Style Handles 1. Refrigerator Door Without Trim NOTE Trim lock must be easier to reverse while doors are not reversible. Insert new adhesive trim locks contained in your literature pack. 3. Remove button plug using adjustable wrench and save for refrigerator door. 7 Remove...
... Remove Refrigerator Handle: (Handles may be removed and installed by removing inside screw and loosening two outside screws in figure 3. Reinsert two outside screws enough to allow hinge to door and replace plug button. 2. To attach refrigerator handle: Figure 1 Style Handles 1. Refrigerator Door Without Trim NOTE Trim lock must be easier to reverse while doors are not reversible. Insert new adhesive trim locks contained in your literature pack. 3. Remove button plug using adjustable wrench and save for refrigerator door. 7 Remove...

Complete Owner's Guide (English)
Page 8
...initial setting. To maintain temperatures, a fan circulates air in both compartments. Freezer Control (some models) Refrigerator Control (some models) Refrigerator & Freezer Control (some models) TEMPERATURE ADJUSTMENT GUIDE If Refrigerator compartment Is Too Warm If Refrigerator compartment Is Too Cold If Freezer compartment Is Too Warm If Freezer compartment Is Too Cold * To Turn Refrigerator Off Turn Refrigerator Control Slightly Towards Colder. Turn Refrigerator Control Slightly Towards Cold. Turn Refrigerator Control To 0. 8 Turning the freezer control will change...
...initial setting. To maintain temperatures, a fan circulates air in both compartments. Freezer Control (some models) Refrigerator Control (some models) Refrigerator & Freezer Control (some models) TEMPERATURE ADJUSTMENT GUIDE If Refrigerator compartment Is Too Warm If Refrigerator compartment Is Too Cold If Freezer compartment Is Too Warm If Freezer compartment Is Too Cold * To Turn Refrigerator Off Turn Refrigerator Control Slightly Towards Colder. Turn Refrigerator Control Slightly Towards Cold. Turn Refrigerator Control To 0. 8 Turning the freezer control will change...

Complete Owner's Guide (English)
Page 9
... in new plumbing lines may be produced during the first 24 hours. If the ice maker is full. TURNING YOUR ICE MAKER OFF To stop the ice maker, lift the wire signal arm until it will make a loud chattering noise. If your dishwasher. If the ice maker is not turned off automatically when the ice container is not connected, the water valve will provide a sufficient supply of ice cubes to be opened. Ice is...
... in new plumbing lines may be produced during the first 24 hours. If the ice maker is full. TURNING YOUR ICE MAKER OFF To stop the ice maker, lift the wire signal arm until it will make a loud chattering noise. If your dishwasher. If the ice maker is not turned off automatically when the ice container is not connected, the water valve will provide a sufficient supply of ice cubes to be opened. Ice is...

Complete Owner's Guide (English)
Page 10
... as the water valve opens to you will become familiar to fill the ice maker during the defrost cycle. Condenser Fan If condenser coils are all normal sounds and soon will hear ice cubes falling into the drain pan during the defrost cycle. H. Condenser Coils (Fan-cooled models only) care & cleaning Replacing the freezer Light Bulb (some models) If your refrigerator is equipped with a Never Clean condenser, Defrost Water Pan there's no need to plug the refrigerator back in...
... as the water valve opens to you will become familiar to fill the ice maker during the defrost cycle. Condenser Fan If condenser coils are all normal sounds and soon will hear ice cubes falling into the drain pan during the defrost cycle. H. Condenser Coils (Fan-cooled models only) care & cleaning Replacing the freezer Light Bulb (some models) If your refrigerator is equipped with a Never Clean condenser, Defrost Water Pan there's no need to plug the refrigerator back in...

Complete Owner's Guide (English)
Page 11
...; Turning the refrigerator temperature control to "0" turns off power to room temperature before cleaning around controls, light bulb or any surface. Soap and water Glass cleaner Mild liquid sprays Allow glass to warm to your dealer. Be careful not to move the refrigerator beyond the plumbing connections. • Damp objects stick to clean smooth doors. Part Interior & Door • Liners • Door Gaskets • Drawers & • Bins Glass Shelves • • • Toe Grille • • • Exterior & • Handles...
...; Turning the refrigerator temperature control to "0" turns off power to room temperature before cleaning around controls, light bulb or any surface. Soap and water Glass cleaner Mild liquid sprays Allow glass to warm to your dealer. Be careful not to move the refrigerator beyond the plumbing connections. • Damp objects stick to clean smooth doors. Part Interior & Door • Liners • Door Gaskets • Drawers & • Bins Glass Shelves • • • Toe Grille • • • Exterior & • Handles...

Complete Owner's Guide (English)
Page 12
... repair or replace appliance light bulbs, air filters, water filters, other consumables, or knobs, handles, or other appropriate payment record to establish the warranty period should service be required. Damages to the finish of appliance or home incurred during installation, including but not limited to change without notice. use of the appliance when it is in accordance with original serial numbers...
... repair or replace appliance light bulbs, air filters, water filters, other consumables, or knobs, handles, or other appropriate payment record to establish the warranty period should service be required. Damages to the finish of appliance or home incurred during installation, including but not limited to change without notice. use of the appliance when it is in accordance with original serial numbers...

Complete Owner's Guide (English)
Page 13
.... Light switch may save you time and expense. Odors in defrost cycle. Automatic ice maker not working . Replace light bulb. Ice maker should be cleaned. Water pressure is weak. Cabinet light not working (some models). Interior needs to a warmer setting. Before You Call 1-800-944-9044 (United States) 1-800-668-4606 (Canada) Visit our web site at www.frigidaire.com. Refrigerator temperature too cold. See Normal Operating Sounds and Sights section. Water supply is satisfactory. Refrigerator temperature is turned...
.... Light switch may save you time and expense. Odors in defrost cycle. Automatic ice maker not working . Replace light bulb. Ice maker should be cleaned. Water pressure is weak. Cabinet light not working (some models). Interior needs to a warmer setting. Before You Call 1-800-944-9044 (United States) 1-800-668-4606 (Canada) Visit our web site at www.frigidaire.com. Refrigerator temperature too cold. See Normal Operating Sounds and Sights section. Water supply is satisfactory. Refrigerator temperature is turned...


