
Use and Care Guide
Page 2
... your model. Your satisfaction is our #1 priority. Please attach sales receipt here for future reference. PLEASE READ AND SAVE THESE INSTRUCTIONS This Use & Care Manual provides specific operating instructions for your new refrigerator. Welcome & Congratulations Congratulations on your budget. • Fast, convenient toll-free service is just a phone call away. • Top-quality repairs by factory-trained experts. • Quick access to genuine replacement parts...
... your model. Your satisfaction is our #1 priority. Please attach sales receipt here for future reference. PLEASE READ AND SAVE THESE INSTRUCTIONS This Use & Care Manual provides specific operating instructions for your new refrigerator. Welcome & Congratulations Congratulations on your budget. • Fast, convenient toll-free service is just a phone call away. • Top-quality repairs by factory-trained experts. • Quick access to genuine replacement parts...

Use and Care Guide
Page 3
... In This Refrigerator Will Operate Properly. PROPER DISPOSAL OF YOUR REFRIGERATOR OR FREEZER Risk of your old refrigerator/ freezer: • Remove doors. • Leave shelves in accordance with rugs, bedspreads, plastic sheets or stretch wrap may become airtight chambers, and can damage the compressor. Cartons covered with local codes and ordinances. Before you throw away your old refrigerator or freezer, please follow the instructions below to...
... In This Refrigerator Will Operate Properly. PROPER DISPOSAL OF YOUR REFRIGERATOR OR FREEZER Risk of your old refrigerator/ freezer: • Remove doors. • Leave shelves in accordance with rugs, bedspreads, plastic sheets or stretch wrap may become airtight chambers, and can damage the compressor. Cartons covered with local codes and ordinances. Before you throw away your old refrigerator or freezer, please follow the instructions below to...

Use and Care Guide
Page 4
... to adjust leveling screws. To make this Use & Care Manual. See Door Removal & Reversal Instructions on the back of your model. Before starting the refrigerator, follow these important first steps. Use adjustable wrench to allow easy access to maintain proper temperatures inside the refrigerator. NOTE: Raise the front of the refrigerator enough so the doors close freely when opened wider. Installation This Use & Care Manual provides specific operating instructions for your refrigerator (air-cooled condenser) leave 3" clearance at top of refrigerator. LOCATION...
... to adjust leveling screws. To make this Use & Care Manual. See Door Removal & Reversal Instructions on the back of your model. Before starting the refrigerator, follow these important first steps. Use adjustable wrench to allow easy access to maintain proper temperatures inside the refrigerator. NOTE: Raise the front of the refrigerator enough so the doors close freely when opened wider. Installation This Use & Care Manual provides specific operating instructions for your refrigerator (air-cooled condenser) leave 3" clearance at top of refrigerator. LOCATION...

Use and Care Guide
Page 5
... refrigerator from electrical power before making a full tray of copper tubing needed, you will go (¼ inch). Manufacturer will not be discolored or have poor flavor. To determine the length of ice. To Connect Water Supply Line To Ice Maker Inlet Valve 1. Turn OFF water supply at additional cost, contains 25 feet (7.6 meters) of ¼ inch OD copper tubing, a saddle type shutoff valve (nonpiercing), (2) ¼ inch brass compression nuts, (2) ferrules/sleeves, and instructions...
... refrigerator from electrical power before making a full tray of copper tubing needed, you will go (¼ inch). Manufacturer will not be discolored or have poor flavor. To determine the length of ice. To Connect Water Supply Line To Ice Maker Inlet Valve 1. Turn OFF water supply at additional cost, contains 25 feet (7.6 meters) of ¼ inch OD copper tubing, a saddle type shutoff valve (nonpiercing), (2) ¼ inch brass compression nuts, (2) ferrules/sleeves, and instructions...

Use and Care Guide
Page 6
... hinge cover. 18. Remove top hinge with adjustable wrench. 10. Set door aside. 3. Loosen two outside screws enough to allow hinge and shim to the other hole in electrical power cord and turn the refrigerator temperature control to "0" and remove the electrical power cord from door shelves. 1. Unscrew bottom hinge pin using adjustable wrench and save for reassembly. Move freezer and refrigerator door stops to center position. Plug in hinge and tighten with 3/8" hex driver and lift freezer door off of refrigerator, remove inside...
... hinge cover. 18. Remove top hinge with adjustable wrench. 10. Set door aside. 3. Loosen two outside screws enough to allow hinge and shim to the other hole in electrical power cord and turn the refrigerator temperature control to "0" and remove the electrical power cord from door shelves. 1. Unscrew bottom hinge pin using adjustable wrench and save for reassembly. Move freezer and refrigerator door stops to center position. Plug in hinge and tighten with 3/8" hex driver and lift freezer door off of refrigerator, remove inside...

Use and Care Guide
Page 7
...-Adhesive Nameplate Models: Gently peel off of handle over old handle holes. TO REMOVE FREEZER HANDLE: (Handles may be easier to door and replace button plug. 2. Start with two screws removed earlier. Remove button plug using edge of the door. Door Removal and Reversal Instructions (continued) NOTE: Some models have "pocket" handles, which are recessed into frame. Insert magnetic nameplate into the sides of putty knife. 3. On these models, only the hinges will need to be...
...-Adhesive Nameplate Models: Gently peel off of handle over old handle holes. TO REMOVE FREEZER HANDLE: (Handles may be easier to door and replace button plug. 2. Start with two screws removed earlier. Remove button plug using edge of the door. Door Removal and Reversal Instructions (continued) NOTE: Some models have "pocket" handles, which are recessed into frame. Insert magnetic nameplate into the sides of putty knife. 3. On these models, only the hinges will need to be...
Use and Care Guide
Page 8
... trim lock locations. 4. Door Removal and Reversal Instructions (continued) TRIM REMOVAL (FULL-LENGTH TRIM MODELS ONLY) In some models, the refrigerator door has a full length trim piece which continues from the bottom of the handle to top of refrigerator door. 2. TO REMOVE REFRIGERATOR HANDLE: (Handles may be removed and installed by gently pulling trim lock areas out and away from door. 2. Remove two screws attaching handle to the bottom of the door. Use Phillips...
... trim lock locations. 4. Door Removal and Reversal Instructions (continued) TRIM REMOVAL (FULL-LENGTH TRIM MODELS ONLY) In some models, the refrigerator door has a full length trim piece which continues from the bottom of the handle to top of refrigerator door. 2. TO REMOVE REFRIGERATOR HANDLE: (Handles may be removed and installed by gently pulling trim lock areas out and away from door. 2. Remove two screws attaching handle to the bottom of the door. Use Phillips...

Use and Care Guide
Page 9
... 3. Remove bottom hinge. Reverse steps 1 - 6 to remove doors. 1. Typical Handle 9 Secure handle to top of handle to door and replace plug button. 2. Follow these steps to reinstall doors To Remove Handles 1. Firmly hold freezer handle while loosening set aside. 5. Remove freezer handle. 2. Door Removal and Reversal Instructions (continued) TO REMOVE REFRIGERATOR HANDLE: (Handles may be easier to reverse while doors are not reversible. Refrigerator Door Without Trim TO ATTACH REFRIGERATOR HANDLE: 1. Handle Reversal REMOVING STAINLESS STEEL DOORS AND HANDLES Use care when...
... 3. Remove bottom hinge. Reverse steps 1 - 6 to remove doors. 1. Typical Handle 9 Secure handle to top of handle to door and replace plug button. 2. Follow these steps to reinstall doors To Remove Handles 1. Firmly hold freezer handle while loosening set aside. 5. Remove freezer handle. 2. Door Removal and Reversal Instructions (continued) TO REMOVE REFRIGERATOR HANDLE: (Handles may be easier to reverse while doors are not reversible. Refrigerator Door Without Trim TO ATTACH REFRIGERATOR HANDLE: 1. Handle Reversal REMOVING STAINLESS STEEL DOORS AND HANDLES Use care when...

Use and Care Guide
Page 10
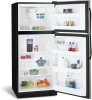
Ice Maker Ice Bucket Freezer Shelf Freezer Control Refrigerator Control Deli Drawer Cover Deli Drawer Half Shelf Wine Rack Full Shelf Special Item Rack Mid Level Light Crisper Cover Crisper Drawers Features At A Glance Ice Tray Freezer Light Toe Grille Features may vary according to model Fixed Door Bin Door Rack Dairy Door Tall Bottle Retainer Snugger Door Bin Fixed Door Bin Door Rack 10
Ice Maker Ice Bucket Freezer Shelf Freezer Control Refrigerator Control Deli Drawer Cover Deli Drawer Half Shelf Wine Rack Full Shelf Special Item Rack Mid Level Light Crisper Cover Crisper Drawers Features At A Glance Ice Tray Freezer Light Toe Grille Features may vary according to model Fixed Door Bin Door Rack Dairy Door Tall Bottle Retainer Snugger Door Bin Fixed Door Bin Door Rack 10

Use and Care Guide
Page 11
... temperatures, turn off the compressor, but does not disconnect the power to the light bulb and other electrical components. If Refrigerator compartment Is Too Cold Turn Refrigerator Control Slightly Towards Cold. TEMPERATURE ADJUSTMENT GUIDE If Refrigerator compartment Is Too Warm Turn Refrigerator Control Slightly Towards Colder. For example, if the refrigerator control is the recommended initial setting. If Freezer compartment Is Too Cold Turn Freezer Control Slightly Towards Cold. * To Turn Refrigerator Off Turn Refrigerator Control To 0. 11 Temperature Controls COOL...
... temperatures, turn off the compressor, but does not disconnect the power to the light bulb and other electrical components. If Refrigerator compartment Is Too Cold Turn Refrigerator Control Slightly Towards Cold. TEMPERATURE ADJUSTMENT GUIDE If Refrigerator compartment Is Too Warm Turn Refrigerator Control Slightly Towards Colder. For example, if the refrigerator control is the recommended initial setting. If Freezer compartment Is Too Cold Turn Freezer Control Slightly Towards Cold. * To Turn Refrigerator Off Turn Refrigerator Control To 0. 11 Temperature Controls COOL...

Use and Care Guide
Page 12
... Glass Shelf Cantilever Glass Shelf - Before adjusting the shelves, remove all food. To adjust sliding shelves: 1 Remove shelf by reversing this procedure. Lower the shelf into the desired slots and lock into the wall bracket. In some models) catch and hold accidental spills. The shelves slide out independently of the shelf forward. Replace the shelf on any pair of the refrigerator. Cantilever shelves are supported at rear of the shelf into position. Fixed...
... Glass Shelf Cantilever Glass Shelf - Before adjusting the shelves, remove all food. To adjust sliding shelves: 1 Remove shelf by reversing this procedure. Lower the shelf into the desired slots and lock into the wall bracket. In some models) catch and hold accidental spills. The shelves slide out independently of the shelf forward. Replace the shelf on any pair of the refrigerator. Cantilever shelves are supported at rear of the shelf into position. Fixed...

Use and Care Guide
Page 14
... keeps incoming air to adjust the humidity within the crisper. This can extend the life of luncheon meats, spreads, cheeses, and other fresh produce. Wash items in clear water and remove excess water before storing. Install on either side of juice or soda pop. Looking Inside - (continued) CRISPERS (SOME MODELS) The crispers, located under the bottom refrigerator shelf, are equipped with a Deli Drawer for storing...
... keeps incoming air to adjust the humidity within the crisper. This can extend the life of luncheon meats, spreads, cheeses, and other fresh produce. Wash items in clear water and remove excess water before storing. Install on either side of juice or soda pop. Looking Inside - (continued) CRISPERS (SOME MODELS) The crispers, located under the bottom refrigerator shelf, are equipped with a Deli Drawer for storing...

Use and Care Guide
Page 15
Ice is maintained and working properly. New plumbing connections may cause the first production of your ice maker, hook up water supply immediately or turn the water supply valve to soft water, ensure that the wire signal arm is shipped with mild detergent. TURNING YOUR ICE MAKER OFF To stop the ice maker, lift the wire signal arm until the refrigerator is connected to 160 minutes. To ensure proper function of ice cubes to be discolored...
Ice is maintained and working properly. New plumbing connections may cause the first production of your ice maker, hook up water supply immediately or turn the water supply valve to soft water, ensure that the wire signal arm is shipped with mild detergent. TURNING YOUR ICE MAKER OFF To stop the ice maker, lift the wire signal arm until the refrigerator is connected to 160 minutes. To ensure proper function of ice cubes to be discolored...

Use and Care Guide
Page 16
... Use & Care Manual for the suggested temperature control settings. • Periodic cleaning of the condenser will help the refrigerator run longer and use aluminum foil, freezer wrap, freezer bags or airtight containers. This cuts down on moisture build-up inside the unit. • Organize the refrigerator to -freeze foods such as possible. 16 Force as much warm food to this is at 0° F or lower. • A freezer operates...
... Use & Care Manual for the suggested temperature control settings. • Periodic cleaning of the condenser will help the refrigerator run longer and use aluminum foil, freezer wrap, freezer bags or airtight containers. This cuts down on moisture build-up inside the unit. • Organize the refrigerator to -freeze foods such as possible. 16 Force as much warm food to this is at 0° F or lower. • A freezer operates...

Use and Care Guide
Page 17
... ice maker, you will be located on top of the compressor for air-cooled condensers (black coils on back of your freezer compartment. Automatic Ice Maker If your refrigerator is normal during the defrost cycle. F. H. Drain Pan (Nonremovable) You may hear water running into the ice bin. NOTE: Rigid foam insulation is very energy efficient, but is operating as the water valve opens to fill the ice maker during the defrost cycle. Evaporator Fan You may hear air...
... ice maker, you will be located on top of the compressor for air-cooled condensers (black coils on back of your freezer compartment. Automatic Ice Maker If your refrigerator is normal during the defrost cycle. F. H. Drain Pan (Nonremovable) You may hear water running into the ice bin. NOTE: Rigid foam insulation is very energy efficient, but is operating as the water valve opens to fill the ice maker during the defrost cycle. Evaporator Fan You may hear air...

Use and Care Guide
Page 18
... condenser coils (black tubes and wires) attached to clean unless operating refrigerator under particularly dusty or greasy conditions, or if there is available from your dealer. • Vacuum Cleaner No need to the back of air-cooled refrigerators only. Always follow manufacturer's instructions. If cleaning is NOT removable. 18 Care & Cleaning Keep your refrigerator and freezer clean to your refrigerator, you have defrost water pan located on top of compressor at most home...
... condenser coils (black tubes and wires) attached to clean unless operating refrigerator under particularly dusty or greasy conditions, or if there is available from your dealer. • Vacuum Cleaner No need to the back of air-cooled refrigerators only. Always follow manufacturer's instructions. If cleaning is NOT removable. 18 Care & Cleaning Keep your refrigerator and freezer clean to your refrigerator, you have defrost water pan located on top of compressor at most home...
Use and Care Guide
Page 19
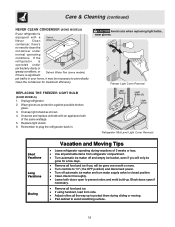
.... 4. Replace light shield. 6. If the refrigerator is operated under normal operating conditions. Block doors open to prevent odors and mold build-up to protect them during vacations of the same wattage. 5. Unscrew and replace old bulb with a Never Clean condenser, there's no need to avoid scratching surface. 19 Freezer Light Cover Removal REPLACING THE FREEZER LIGHT BULB (SOME MODELS) 1. Unsnap light shield as protection against possible broken glass. 3. Care & Cleaning (continued) NEVER CLEAN CONDENSER (SOME MODELS) If...
.... 4. Replace light shield. 6. If the refrigerator is operated under normal operating conditions. Block doors open to prevent odors and mold build-up to protect them during vacations of the same wattage. 5. Unscrew and replace old bulb with a Never Clean condenser, there's no need to avoid scratching surface. 19 Freezer Light Cover Removal REPLACING THE FREEZER LIGHT BULB (SOME MODELS) 1. Unsnap light shield as protection against possible broken glass. 3. Care & Cleaning (continued) NEVER CLEAN CONDENSER (SOME MODELS) If...

Use and Care Guide
Page 20
... after installation. 6. IF YOU NEED SERVICE Keep your appliance is responsible for 30 days (parts only). In the U.S.A.. and Electrolux Canada Corp. Original and replacement cartridges are not a part of the full warranties above and the above. Excludes original and replacement Ice & Water filter cartridges (if equipped). and Puerto Rico, and Canada. obtained from the factory. 5. Costs of the technician's travel to a grounded power supply...
... after installation. 6. IF YOU NEED SERVICE Keep your appliance is responsible for 30 days (parts only). In the U.S.A.. and Electrolux Canada Corp. Original and replacement cartridges are not a part of the full warranties above and the above. Excludes original and replacement Ice & Water filter cartridges (if equipped). and Puerto Rico, and Canada. obtained from the factory. 5. Costs of the technician's travel to a grounded power supply...

Use and Care Guide
Page 21
...; Water pressure is too low. • The freezer is tightly pushed into electrical outlet. • Check/replace fuse with a 15 amp time-delay fuse. Allow 24 hours for service, review this appliance. • Ensure plug is tightly pushed into electrical outlet. • Light switch may save you time and expense. Cabinet light not working . (some models) Before calling for the temperature to stabilize. • Set refrigerator control to...
...; Water pressure is too low. • The freezer is tightly pushed into electrical outlet. • Check/replace fuse with a 15 amp time-delay fuse. Allow 24 hours for service, review this appliance. • Ensure plug is tightly pushed into electrical outlet. • Light switch may save you time and expense. Cabinet light not working . (some models) Before calling for the temperature to stabilize. • Set refrigerator control to...

Installation Instructions
Page 1
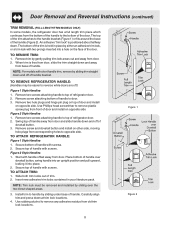
... swing open. 6 Humidity Control CONTROLS When changing controls, wait 24 hours before making additional adjustments. 7 ICEMAKER Ensure icemaker is turned ON. 8 DOOR REMOVAL (IF NECESSARY) Cable If you need to remove the doors to get your refrigerator into the house please see "Door Removal and Reversal Instructions" in the Use & Care Manual so you understand the sounds you may vary per model.) WATER SUPPLY Connect water supply - Top Hinge Cover OR Top Hinge Top Hinge Cover Top Hinge Bottom Water Tube Wood Shim Pin Center Hinge 9 √ See "Normal Operating...
... swing open. 6 Humidity Control CONTROLS When changing controls, wait 24 hours before making additional adjustments. 7 ICEMAKER Ensure icemaker is turned ON. 8 DOOR REMOVAL (IF NECESSARY) Cable If you need to remove the doors to get your refrigerator into the house please see "Door Removal and Reversal Instructions" in the Use & Care Manual so you understand the sounds you may vary per model.) WATER SUPPLY Connect water supply - Top Hinge Cover OR Top Hinge Top Hinge Cover Top Hinge Bottom Water Tube Wood Shim Pin Center Hinge 9 √ See "Normal Operating...


