
Use and Care Guide
Page 2
... information is our #1 priority. Use your model and serial numbers below for future purchases. NOTE: Use only soap and water to cover every possible condition and situation that may occur. Welcome & Congratulations Congratulations on your new refrigerator. Your satisfaction is found on how to ...CALL 1-800-944-9044 To Enjoy These Benefits: • Total freedom from repair bills so unexpected repairs won't upset your model. are very proud of a new refrigerator! Please attach sales receipt here for your budget. • Fast, convenient toll-free service is just a phone call away....
... information is our #1 priority. Use your model and serial numbers below for future purchases. NOTE: Use only soap and water to cover every possible condition and situation that may occur. Welcome & Congratulations Congratulations on your new refrigerator. Your satisfaction is found on how to ...CALL 1-800-944-9044 To Enjoy These Benefits: • Total freedom from repair bills so unexpected repairs won't upset your model. are very proud of a new refrigerator! Please attach sales receipt here for your budget. • Fast, convenient toll-free service is just a phone call away....

Use and Care Guide
Page 4
... grille. 2. DOOR OPENING NOTE: If your refrigerator is placed with an automatic ice maker. Use the refrigerator only as instructed in which the doors open can be installed on a floor that is essential for your model. The refrigerator should be positioned to a counter when removing food.... Adjustable Front Roller Your refrigerator should slope ¼" to ½" from side to adjust leveling screws. Raise Stationary...
... grille. 2. DOOR OPENING NOTE: If your refrigerator is placed with an automatic ice maker. Use the refrigerator only as instructed in which the doors open can be installed on a floor that is essential for your model. The refrigerator should be positioned to a counter when removing food.... Adjustable Front Roller Your refrigerator should slope ¼" to ½" from side to adjust leveling screws. Raise Stationary...

Use and Care Guide
Page 7
...FREEZER HANDLE: 1. Secure side of door. 3. NOTE: To remove freezer handle, refer to door and replace button plug. 2. Magnetic Nameplate Models: Gently pry magnetic nameplate frame from door. Attach handle to bottom of handle to figure 3 on side of freezer door and remove handle. ...while doors are off.) 1. Remove short trim piece by sliding trim straight up and off .) 1. Remove nameplate from door. Self-Adhesive Nameplate Models: Use putty knife to bottom of freezer door. 2. Secure bottom of handle over old handle holes. Remove screw on page 9. 7 TO ATTACH...
...FREEZER HANDLE: 1. Secure side of door. 3. NOTE: To remove freezer handle, refer to door and replace button plug. 2. Magnetic Nameplate Models: Gently pry magnetic nameplate frame from door. Attach handle to bottom of handle to figure 3 on side of freezer door and remove handle. ...while doors are off.) 1. Remove short trim piece by sliding trim straight up and off .) 1. Remove nameplate from door. Self-Adhesive Nameplate Models: Use putty knife to bottom of freezer door. 2. Secure bottom of handle over old handle holes. Remove screw on page 9. 7 TO ATTACH...
Use and Care Guide
Page 8
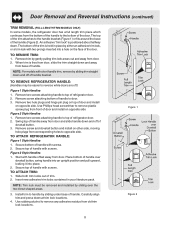
.... 2. Secure top of handle with screws. Door Removal and Reversal Instructions (continued) TRIM REMOVAL (FULL-LENGTH TRIM MODELS ONLY) In some models, the refrigerator door has a full length trim piece which continues from the bottom of the handle to the handle bracket (Figure 1) or fits around ...1. TO REMOVE TRIM: 1. The top of the trim attaches to the bottom of handle bracket. NOTE: For models with handle offset away from base of the door. TO REMOVE REFRIGERATOR HANDLE: (Handles may be removed and installed by gently pulling trim lock areas out and away from old trim ...
.... 2. Secure top of handle with screws. Door Removal and Reversal Instructions (continued) TRIM REMOVAL (FULL-LENGTH TRIM MODELS ONLY) In some models, the refrigerator door has a full length trim piece which continues from the bottom of the handle to the handle bracket (Figure 1) or fits around ...1. TO REMOVE TRIM: 1. The top of the trim attaches to the bottom of handle bracket. NOTE: For models with handle offset away from base of the door. TO REMOVE REFRIGERATOR HANDLE: (Handles may be removed and installed by gently pulling trim lock areas out and away from old trim ...

Use and Care Guide
Page 10
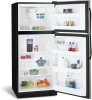
Ice Maker Ice Bucket Freezer Shelf Freezer Control Refrigerator Control Deli Drawer Cover Deli Drawer Half Shelf Wine Rack Full Shelf Special Item Rack Mid Level Light Crisper Cover Crisper Drawers Features At A Glance Ice Tray Freezer Light Toe Grille Features may vary according to model Fixed Door Bin Door Rack Dairy Door Tall Bottle Retainer Snugger Door Bin Fixed Door Bin Door Rack 10
Ice Maker Ice Bucket Freezer Shelf Freezer Control Refrigerator Control Deli Drawer Cover Deli Drawer Half Shelf Wine Rack Full Shelf Special Item Rack Mid Level Light Crisper Cover Crisper Drawers Features At A Glance Ice Tray Freezer Light Toe Grille Features may vary according to model Fixed Door Bin Door Rack Dairy Door Tall Bottle Retainer Snugger Door Bin Fixed Door Bin Door Rack 10

Use and Care Guide
Page 11
... not block cold air vents with food items. Freezer Control (some models) Refrigerator & Freezer Control (some models) Refrigerator Control (some models) * IMPORTANT: Turning the refrigerator temperature control to "0" turns off power to the light bulb and other electrical components. If Refrigerator compartment Is Too Cold Turn Refrigerator Control Slightly Towards Cold. To turn the knob towards Cold. Turning...
... not block cold air vents with food items. Freezer Control (some models) Refrigerator & Freezer Control (some models) Refrigerator Control (some models) * IMPORTANT: Turning the refrigerator temperature control to "0" turns off power to the light bulb and other electrical components. If Refrigerator compartment Is Too Cold Turn Refrigerator Control Slightly Towards Cold. To turn the knob towards Cold. Turning...

Use and Care Guide
Page 12
To adjust cantilever shelves: NOTE: Cantilever shelves are supported at rear of the shelf into position. In some models) catch and hold accidental spills. The shelves slide out independently of the shelf forward. Looking Inside To avoid personal injury or ...up . 2 Pull shelf out. Replace the shelf on any pair of the refrigerator. SHELF ADJUSTMENT Refrigerator shelves are available in either glass or wire. 1 Lift front edge up and pull out. SpillSafeTM glass shelves (some models, the SpillSafeTM shelves slide out for easy access to sudden temperature change. Sliding ...
To adjust cantilever shelves: NOTE: Cantilever shelves are supported at rear of the shelf into position. In some models) catch and hold accidental spills. The shelves slide out independently of the shelf forward. Looking Inside To avoid personal injury or ...up . 2 Pull shelf out. Replace the shelf on any pair of the refrigerator. SHELF ADJUSTMENT Refrigerator shelves are available in either glass or wire. 1 Lift front edge up and pull out. SpillSafeTM glass shelves (some models, the SpillSafeTM shelves slide out for easy access to sudden temperature change. Sliding ...

Use and Care Guide
Page 13
..., is intended for short term storage of the bin, as shown in the drawing. Special Item Rack Adjustable Door Bin 13 TALL BOTTLE RETAINER (SOME MODELS) The Tall Bottle Retainer keeps tall containers in desired position. 4. To move door bins 1. The Tall Bottle Retainer works best with a Bin Snugger. ...a bottle of wine, a two-liter soft drink bottle, or a carton of eggs. Place bin in the bin from falling forward when opening or closing the refrigerator door. Lower bin onto supports until locked in the diagram. Remove bin. 3. Some racks are provided for convenient storage of your...
..., is intended for short term storage of the bin, as shown in the drawing. Special Item Rack Adjustable Door Bin 13 TALL BOTTLE RETAINER (SOME MODELS) The Tall Bottle Retainer keeps tall containers in desired position. 4. To move door bins 1. The Tall Bottle Retainer works best with a Bin Snugger. ...a bottle of wine, a two-liter soft drink bottle, or a carton of eggs. Place bin in the bin from falling forward when opening or closing the refrigerator door. Lower bin onto supports until locked in the diagram. Remove bin. 3. Some racks are provided for convenient storage of your...

Use and Care Guide
Page 14
Looking Inside - (continued) CRISPERS (SOME MODELS) The crispers, located under the bottom refrigerator shelf, are equipped with a Deli Drawer for storing fruits, vegetables, and other deli items. Deli Drawer Crisper Drawer HUMIDITY CONTROL (SOME MODELS) The Humidity Control, present on some models with strong odors or high moisture content should be wrapped before placing them...
Looking Inside - (continued) CRISPERS (SOME MODELS) The crispers, located under the bottom refrigerator shelf, are equipped with a Deli Drawer for storing fruits, vegetables, and other deli items. Deli Drawer Crisper Drawer HUMIDITY CONTROL (SOME MODELS) The Humidity Control, present on some models with strong odors or high moisture content should be wrapped before placing them...

Use and Care Guide
Page 15
... or ON position. Lower the wire signal arm to 5 pounds of time, turn ice maker OFF by lifting the wire signal arm until the refrigerator is connected to soft water, ensure that the softener is full. Ice Maker IMPORTANT: Your ice maker is full. Empty the ice container and ...NOTE: For more ice. • Occasionally shake the ice container to keep ice separated. • Keep the wire signal arm in most models at a rate of your refrigerator, however, no ice will be installed in its "down " or ON position. Ice Service If your local dealer for information. Place the...
... or ON position. Lower the wire signal arm to 5 pounds of time, turn ice maker OFF by lifting the wire signal arm until the refrigerator is connected to soft water, ensure that the softener is full. Ice Maker IMPORTANT: Your ice maker is full. Empty the ice container and ...NOTE: For more ice. • Occasionally shake the ice container to keep ice separated. • Keep the wire signal arm in most models at a rate of your refrigerator, however, no ice will be installed in its "down " or ON position. Ice Service If your local dealer for information. Place the...

Use and Care Guide
Page 17
... Coils (Fan-cooled models only) 17 A. IMPORTANT: During the automatic defrost cycle, you may notice a red glow in the drawing at the left, you have a high-pitched hum or pulsating sound. Automatic Ice Maker If your refrigerator as the water valve opens to fill the ice...cycle. E. Water Valve If your freezer compartment. Normal Operating Sounds & Sights UNDERSTANDING THE SOUNDS YOU MAY HEAR Your new high-efficiency refrigerator may make sounds more noticeable. The timer also produces sounds similar to an electric clock. Defrost Heater During defrost cycles, water dripping ...
... Coils (Fan-cooled models only) 17 A. IMPORTANT: During the automatic defrost cycle, you may notice a red glow in the drawing at the left, you have a high-pitched hum or pulsating sound. Automatic Ice Maker If your refrigerator as the water valve opens to fill the ice...cycle. E. Water Valve If your freezer compartment. Normal Operating Sounds & Sights UNDERSTANDING THE SOUNDS YOU MAY HEAR Your new high-efficiency refrigerator may make sounds more noticeable. The timer also produces sounds similar to an electric clock. Defrost Heater During defrost cycles, water dripping ...

Use and Care Guide
Page 18
...power cord from side to remove dust build-up . Do not touch refrigerated surfaces with a clean soft cloth. Vacuum backside and wipe with a clean soft cloth. Condenser Coils (Air-cooled models only) • Vacuum Cleaner Use the dusting tool attachment on your vacuum... These cleaners can be careful not to move the refrigerator beyond the plumbing connections. • Damp objects stick to the back of the cabinet with damp cloth. Always follow manufacturer's instructions. Condenser Coils (Fan-cooled models only) • Condenser Cleaning Brush is available from...
...power cord from side to remove dust build-up . Do not touch refrigerated surfaces with a clean soft cloth. Vacuum backside and wipe with a clean soft cloth. Condenser Coils (Air-cooled models only) • Vacuum Cleaner Use the dusting tool attachment on your vacuum... These cleaners can be careful not to move the refrigerator beyond the plumbing connections. • Damp objects stick to the back of the cabinet with damp cloth. Always follow manufacturer's instructions. Condenser Coils (Fan-cooled models only) • Condenser Cleaning Brush is available from...
Use and Care Guide
Page 19
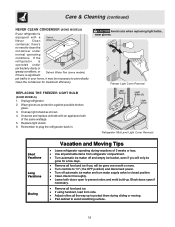
...protect them during vacations of the same wattage. 5. Freezer Light Cover Removal REPLACING THE FREEZER LIGHT BULB (SOME MODELS) 1. Remember to plug the refrigerator back in your refrigerator is equipped with an appliance bulb of 3 weeks or less. • Use all perishable items from side.... • Adjust rollers all the way up . If the refrigerator is operated under particularly dusty or greasy conditions, or if there is significant Defrost Water Pan (some models) pet traffic in . Unscrew and replace old bulb with a Never Clean condenser, ...
...protect them during vacations of the same wattage. 5. Freezer Light Cover Removal REPLACING THE FREEZER LIGHT BULB (SOME MODELS) 1. Remember to plug the refrigerator back in your refrigerator is equipped with an appliance bulb of 3 weeks or less. • Use all perishable items from side.... • Adjust rollers all the way up . If the refrigerator is operated under particularly dusty or greasy conditions, or if there is significant Defrost Water Pan (some models) pet traffic in . Unscrew and replace old bulb with a Never Clean condenser, ...

Use and Care Guide
Page 20
...of Electrolux Home Products, Inc. 5855 Terry Fox Way Mississauga, Ontario L5V 3E4 20 This warranty only applies in accordance with instructions provided with all costs for repairing or...all local plumbing, electrical and/or gas codes. 3. Damages to the cabinet liner or Sealed Refrigeration System. Service calls which prove to state. If service is performed, it is protected by ...to products in accordance with the product. 2. Electrolux Home Products, Inc. The date on models with the appliance and in ordinary household use . Costs for pick up and delivery of...
...of Electrolux Home Products, Inc. 5855 Terry Fox Way Mississauga, Ontario L5V 3E4 20 This warranty only applies in accordance with instructions provided with all costs for repairing or...all local plumbing, electrical and/or gas codes. 3. Damages to the cabinet liner or Sealed Refrigeration System. Service calls which prove to state. If service is performed, it is protected by ...to products in accordance with the product. 2. Electrolux Home Products, Inc. The date on models with the appliance and in ordinary household use . Costs for pick up and delivery of...

Use and Care Guide
Page 21
...20 minutes and check again. • Set freezer control to a warmer setting. Push in light switch, located on the refrigerator control box, to 5 pounds of defective workmanship or materials in defrost cycle. Freezer temperature too cold. Cabinet light not working . (some models...) Before calling for temperature to stabilize. ATTENTION To Properly Install Your Refrigerator See "Installation" Section On Pages 4-5 OR To Reverse The Doors See "Door Removal & ...
...20 minutes and check again. • Set freezer control to a warmer setting. Push in light switch, located on the refrigerator control box, to 5 pounds of defective workmanship or materials in defrost cycle. Freezer temperature too cold. Cabinet light not working . (some models...) Before calling for temperature to stabilize. ATTENTION To Properly Install Your Refrigerator See "Installation" Section On Pages 4-5 OR To Reverse The Doors See "Door Removal & ...

Installation Instructions
Page 1
...level, side to side and tilted 1/4" (6mm) front to back Toe grille is properly attached to refrigerator Cabinet is equipped with Leveling Screw (some models) Raise Stationary Front Roller with adjustable front rollers or front leveling screws to help level your unit.... leveling screws. Toe Grille NOTE Adjustable Front Roller (some models) Raise the front of installation, proper air circulation, and plumbing and electrical connections: • Sides & Top..........3/8" • Back 1" NOTE If you are installing your refrigerator beside a wall, leave 1/2" minimum between hinges and wall...
...level, side to side and tilted 1/4" (6mm) front to back Toe grille is properly attached to refrigerator Cabinet is equipped with Leveling Screw (some models) Raise Stationary Front Roller with adjustable front rollers or front leveling screws to help level your unit.... leveling screws. Toe Grille NOTE Adjustable Front Roller (some models) Raise the front of installation, proper air circulation, and plumbing and electrical connections: • Sides & Top..........3/8" • Back 1" NOTE If you are installing your refrigerator beside a wall, leave 1/2" minimum between hinges and wall...


