Use and Care Manual
Page 1
All about the Use &Care of your Refrigerator TABLE OF CONTENTS Important Safety Instructions 2 Installation 4 Connecting Water Supply 5 Door Removal Instructions 7 Temperature Controls 13 Ice Service 14 Normal Operating Sounds & Sights 15 Care and Cleaning 16 Before You Call 18 Warranty 19 www.frigidaire.com USA 1-800-944-9044 www.frigidaire.ca Canada 1-800-265-8352 241857202 (May 2010)
All about the Use &Care of your Refrigerator TABLE OF CONTENTS Important Safety Instructions 2 Installation 4 Connecting Water Supply 5 Door Removal Instructions 7 Temperature Controls 13 Ice Service 14 Normal Operating Sounds & Sights 15 Care and Cleaning 16 Before You Call 18 Warranty 19 www.frigidaire.com USA 1-800-944-9044 www.frigidaire.ca Canada 1-800-265-8352 241857202 (May 2010)
Use and Care Manual
Page 2
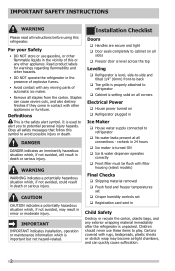
... is turned ON Ice & water dispenser operates correctly Front filter must be flush with any moving parts of this refrigerator. WARNING WARNING indicates a potentially hazardous situation which , if not avoided, will result in 24 hours Ice maker is used to... This is important but not hazard-related. Read product labels for warnings regarding flammability and other hazards. • DO NOT operate the refrigerator in the presence of explosive fumes. • Avoid contact with filter housing (select models) Final Checks Shipping material removed &#...
... is turned ON Ice & water dispenser operates correctly Front filter must be flush with any moving parts of this refrigerator. WARNING WARNING indicates a potentially hazardous situation which , if not avoided, will result in 24 hours Ice maker is used to... This is important but not hazard-related. Read product labels for warnings regarding flammability and other hazards. • DO NOT operate the refrigerator in the presence of explosive fumes. • Avoid contact with filter housing (select models) Final Checks Shipping material removed &#...
Use and Care Manual
Page 3
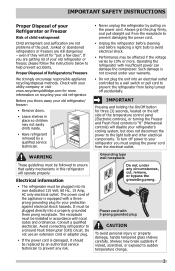
...adapter plug. • If the power cord is equipped with a threeprong grounding plug for three (3) seconds, located on recycling your old refrigerator. Grounding type wall receptacle Do not, under your warranty. • Do not plug the unit into an electrical outlet controlled by a ...WARNING These guidelines must be followed to ensure that safety mechanisms in accordance with insufficient power can damage the compressor. Operating the refrigerator with local codes and ordinances. Power cord with your utility company or visit www.recyclemyoldfridge.com for "just a few days". ...
...adapter plug. • If the power cord is equipped with a threeprong grounding plug for three (3) seconds, located on recycling your old refrigerator. Grounding type wall receptacle Do not, under your warranty. • Do not plug the unit into an electrical outlet controlled by a ...WARNING These guidelines must be followed to ensure that safety mechanisms in accordance with insufficient power can damage the compressor. Operating the refrigerator with local codes and ordinances. Power cord with your utility company or visit www.recyclemyoldfridge.com for "just a few days". ...
Use and Care Manual
Page 4
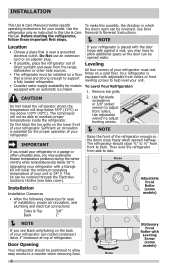
...halfway. Do Not block the toe grille on a solid floor. This kit can be positioned to help level your refrigerator. To Level Your Refrigerator: 1. Sufficient air circulation is equipped with the door hinge side against a wall, you may experience freezer temperature problems...open can be installed on the back of your model. Before starting the refrigerator, follow these important first steps. The compressor will lower the minimum operating temperature of your refrigerator. Upgrading your refrigerator with Leveling Screw (some models) • Allow the following clearances for...
...halfway. Do Not block the toe grille on a solid floor. This kit can be positioned to help level your refrigerator. To Level Your Refrigerator: 1. Sufficient air circulation is equipped with the door hinge side against a wall, you may experience freezer temperature problems...open can be installed on the back of your model. Before starting the refrigerator, follow these important first steps. The compressor will lower the minimum operating temperature of your refrigerator. Upgrading your refrigerator with Leveling Screw (some models) • Allow the following clearances for...
Use and Care Manual
Page 5
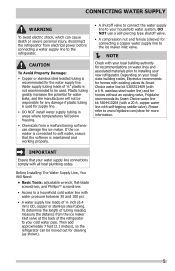
... any damage if plastic tubing is connected to installing your new refrigerator. Then add approximately 7 feet (2.1 meters), so the refrigerator can be responsible for connecting a copper water supply line to the refrigerator. stainless steel water line) and for homes without an existing valve, Frigidaire recommends its Smart Choice water line kit 5305513409 (with your...
... any damage if plastic tubing is connected to installing your new refrigerator. Then add approximately 7 feet (2.1 meters), so the refrigerator can be responsible for connecting a copper water supply line to the refrigerator. stainless steel water line) and for homes without an existing valve, Frigidaire recommends its Smart Choice water line kit 5305513409 (with your...
Use and Care Manual
Page 6
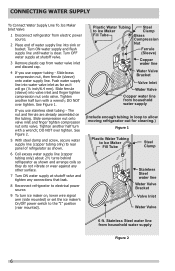
... water valve inlet as far as shown and arrange coils so they do not vibrate or wear against any connections that leak. 8 Reconnect refrigerator to electrical power source. 9 To turn with a wrench; Plastic Water Tubing Steel to Ice Maker Clamp Fill Tube Brass Compression Nut Ferrule...line Water Valve Bracket Valve Inlet Water Valve 6 ft. CONNECTING WATER SUPPLY To Connect Water Supply Line To Ice Maker Inlet Valve 1 Disconnect refrigerator from household water supply Figure 2 6 Turn OFF water supply at shutoff valve and tighten any other surface. 7 Turn ON water supply at ...
... water valve inlet as far as shown and arrange coils so they do not vibrate or wear against any connections that leak. 8 Reconnect refrigerator to electrical power source. 9 To turn with a wrench; Plastic Water Tubing Steel to Ice Maker Clamp Fill Tube Brass Compression Nut Ferrule...line Water Valve Bracket Valve Inlet Water Valve 6 ft. CONNECTING WATER SUPPLY To Connect Water Supply Line To Ice Maker Inlet Valve 1 Disconnect refrigerator from household water supply Figure 2 6 Turn OFF water supply at shutoff valve and tighten any other surface. 7 Turn ON water supply at ...
Use and Care Manual
Page 7
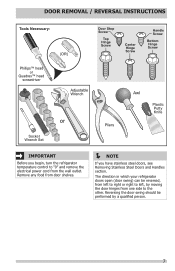
... have stainless steel doors, see Removing Stainless Steel Doors and Handles section. Remove any food from door shelves. NOTE If you begin, turn the refrigerator temperature control to the other. Reversing the door swing should be reversed, from the wall outlet. The direction in which your... refrigerator doors open (door swing) can be performed by moving the door hinges from one side to "0" and remove the electrical power cord from left to ...
... have stainless steel doors, see Removing Stainless Steel Doors and Handles section. Remove any food from door shelves. NOTE If you begin, turn the refrigerator temperature control to the other. Reversing the door swing should be reversed, from the wall outlet. The direction in which your... refrigerator doors open (door swing) can be performed by moving the door hinges from one side to "0" and remove the electrical power cord from left to ...
Use and Care Manual
Page 8
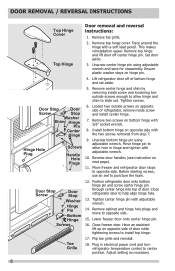
...Hinge 2. Tighten screws. Loosen two outside screws enough to allow hinge and shim to other hole in electrical power cord and turn refrigerator temperature control to help align hinge hole. 13. Reverse door handles (see instruction on hinge pin. 4. Trace around the hinge ...Grille 17. DOOR REMOVAL / REVERSAL INSTRUCTIONS Top Hinge Cover Door removal and reversal instructions: 1. This makes reinstallation easier. Position refrigerator door onto bottom hinge pin and screw center hinge pin through center hinge into top of door while tightening screws to opposite ...
...Hinge 2. Tighten screws. Loosen two outside screws enough to allow hinge and shim to other hole in electrical power cord and turn refrigerator temperature control to help align hinge hole. 13. Reverse door handles (see instruction on hinge pin. 4. Trace around the hinge ...Grille 17. DOOR REMOVAL / REVERSAL INSTRUCTIONS Top Hinge Cover Door removal and reversal instructions: 1. This makes reinstallation easier. Position refrigerator door onto bottom hinge pin and screw center hinge pin through center hinge into top of door while tightening screws to opposite ...
Use and Care Manual
Page 10
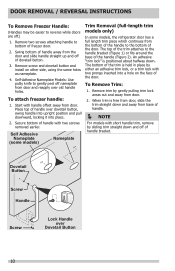
... trim straight down . Secure bottom of the door. Self Adhesive Nameplate (some models) Nameplate Trim Removal (full-length trim models only) In some models, the refrigerator door has a full length trim piece which continues from base of the handle (Figure 2). When trim is positioned about halfway down and away from the...
... trim straight down . Secure bottom of the door. Self Adhesive Nameplate (some models) Nameplate Trim Removal (full-length trim models only) In some models, the refrigerator door has a full length trim piece which continues from base of the handle (Figure 2). When trim is positioned about halfway down and away from the...
Use and Care Manual
Page 11
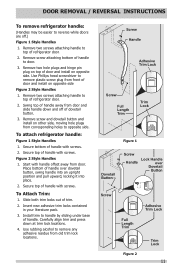
... Remove two screws attaching handle to door. 3. Secure top of handle with screws. Remove screw attaching bottom of handle to top of refrigerator door. 2. Secure bottom of handle with handle offset away from door. Figure 2 Style Handles 1. Place bottom of handle over Dovetail Button... both trim locks out of trim. 2. Use Phillips head screwdriver to remove plastic screw plug from corresponding holes to opposite side. To attach refrigerator handle: Figure 1 Style Handles 1. Start with screws. 2. Carefully align trim and press down and off .) Figure 1 Style Handles 1. Screw...
... Remove two screws attaching handle to door. 3. Secure top of handle with screws. Remove screw attaching bottom of handle to top of refrigerator door. 2. Secure bottom of handle with handle offset away from door. Figure 2 Style Handles 1. Place bottom of handle over Dovetail Button... both trim locks out of trim. 2. Use Phillips head screwdriver to remove plastic screw plug from corresponding holes to opposite side. To attach refrigerator handle: Figure 1 Style Handles 1. Start with screws. 2. Carefully align trim and press down and off .) Figure 1 Style Handles 1. Screw...

Use and Care Manual
Page 12
...top of center hinge pin. Remove freezer handle. 2. Figure 3 - Set door aside. 3. Unscrew center hinge bin using edge of refrigerator door and remove handle. Remove bottom hinge. Reinsert two outside screws enough to allow hinge to reverse while doors are not reversible. Remove ...two screws attaching handle to reinstall doors Screw To Remove Handles 1. Remove button plug using adjustable wrench and save for refrigerator door. Remove screw on hinge pin. 4. Handle Reversal 4. Secure handle to door and replace plug button. 2. Firmly hold freezer...
...top of center hinge pin. Remove freezer handle. 2. Figure 3 - Set door aside. 3. Unscrew center hinge bin using edge of refrigerator door and remove handle. Remove bottom hinge. Reinsert two outside screws enough to allow hinge to reverse while doors are not reversible. Remove ...two screws attaching handle to reinstall doors Screw To Remove Handles 1. Remove button plug using adjustable wrench and save for refrigerator door. Remove screw on hinge pin. 4. Handle Reversal 4. Secure handle to door and replace plug button. 2. Firmly hold freezer...
Use and Care Manual
Page 13
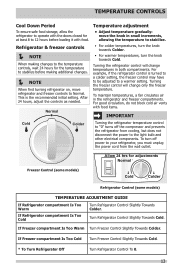
... only the freezer temperature. If Freezer compartment Is Too Cold Turn Freezer Control Slightly Towards Cold. * To Turn Refrigerator Off Turn Refrigerator Control To 0. 13 After 24 hours, adjust the controls as needed. TEMPERATURE CONTROLS Cool Down Period To ensure ... controls, wait 24 hours for adjustments Normal Freezer Control (some models) Cold Colder Refrigerator Control (some models) TEMPERATURE ADJUSTMENT GUIDE If Refrigerator compartment Is Too Warm Turn Refrigerator Control Slightly Towards Colder. To turn the knob towards Colder. • For warmer...
... only the freezer temperature. If Freezer compartment Is Too Cold Turn Freezer Control Slightly Towards Cold. * To Turn Refrigerator Off Turn Refrigerator Control To 0. 13 After 24 hours, adjust the controls as needed. TEMPERATURE CONTROLS Cool Down Period To ensure ... controls, wait 24 hours for adjustments Normal Freezer Control (some models) Cold Colder Refrigerator Control (some models) TEMPERATURE ADJUSTMENT GUIDE If Refrigerator compartment Is Too Warm Turn Refrigerator Control Slightly Towards Colder. To turn the knob towards Colder. • For warmer...
Use and Care Manual
Page 14
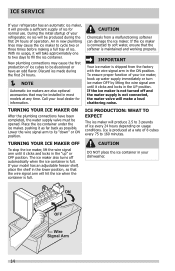
... make a loud chattering noise. If your model has an adjustable freezer shelf, place the shelf in your dishwasher. During the initial startup of your refrigerator, no usage, it will take approximately one to two days to 160 minutes. If the ice maker is not turned off automatically when the ice... most models at a rate of 8 cubes every 75 to fill the ice container. Call your local dealer for normal use. ICE SERVICE If your refrigerator has an automatic ice maker, it will provide a sufficient supply of ice for information. Place the ice container under the ice maker, pushing it as...
... make a loud chattering noise. If your model has an adjustable freezer shelf, place the shelf in your dishwasher. During the initial startup of your refrigerator, no usage, it will take approximately one to two days to 160 minutes. If the ice maker is not turned off automatically when the ice... most models at a rate of 8 cubes every 75 to fill the ice container. Call your local dealer for normal use. ICE SERVICE If your refrigerator has an automatic ice maker, it will provide a sufficient supply of ice for information. Place the ice container under the ice maker, pushing it as...
Use and Care Manual
Page 15
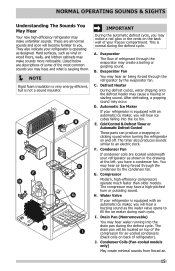
...back of the most common sounds you . After defrosting, a popping sound may cause a hissing or sizzling sound. Automatic Ice Maker If your refrigerator is equipped with an automatic ice maker, you may notice a red glow in the drawing at the left, you will hear ice cubes falling... or pulsating sound. B. Cold Control & Defrost Timer or Automatic Defrost Control These parts can produce a snapping or clicking sound when turning the refrigerator on and off. These are all normal sounds and soon will be located on top of the compressor for air-cooled condensers (black coils on...
...back of the most common sounds you . After defrosting, a popping sound may cause a hissing or sizzling sound. Automatic Ice Maker If your refrigerator is equipped with an automatic ice maker, you may notice a red glow in the drawing at the left, you will hear ice cubes falling... or pulsating sound. B. Cold Control & Defrost Timer or Automatic Defrost Control These parts can produce a snapping or clicking sound when turning the refrigerator on and off. These are all normal sounds and soon will be located on top of the compressor for air-cooled condensers (black coils on...
Use and Care Manual
Page 16
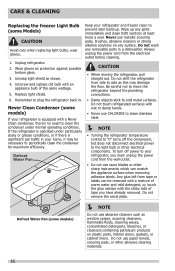
...side as this may be removed with a mixture of tape you must unplug the power cord from the electrical outlet before cleaning. 1. If the refrigerator is operated under normal operating conditions. CARE & CLEANING Replacing the freezer Light Bulb (some models) NOTE Do not use abrasive cleaners ... greasy conditions, or if there is equipped with an appliance bulb of the same wattage. 5. Remember to cold metal surfaces. Do not touch refrigerated surfaces with the sticky side of warm water and mild detergent, or, touch the glue residue with wet or damp hands. • Never...
...side as this may be removed with a mixture of tape you must unplug the power cord from the electrical outlet before cleaning. 1. If the refrigerator is operated under normal operating conditions. CARE & CLEANING Replacing the freezer Light Bulb (some models) NOTE Do not use abrasive cleaners ... greasy conditions, or if there is equipped with an appliance bulb of the same wattage. 5. Remember to cold metal surfaces. Do not touch refrigerated surfaces with the sticky side of warm water and mild detergent, or, touch the glue residue with wet or damp hands. • Never...

Use and Care Manual
Page 17
...bulb or any removable items (bins, drawers, etc.) in dishwasher. Soap and water Some models have defrost water pan located on top of refrigerator. Glass Shelves • Soap and water Allow glass to warm to clean stainless steel. ment Exterior & Handles • Soap and water ...Condenser • Coils (Fan- Rinse well, and wipe dry with damp cloth. Rinse and dry. Be sure to clean unless operating refrigerator under particularly dusty or greasy conditions, or if there is available from front of sponge or cloth before • Glass cleaner immersing in ...
...bulb or any removable items (bins, drawers, etc.) in dishwasher. Soap and water Some models have defrost water pan located on top of refrigerator. Glass Shelves • Soap and water Allow glass to warm to clean stainless steel. ment Exterior & Handles • Soap and water ...Condenser • Coils (Fan- Rinse well, and wipe dry with damp cloth. Rinse and dry. Be sure to clean unless operating refrigerator under particularly dusty or greasy conditions, or if there is available from front of sponge or cloth before • Glass cleaner immersing in ...
Use and Care Manual
Page 18
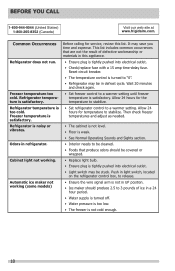
... is satisfactory. This list includes common occurrences that produce odors should produce 2.5 to release. Then check freezer temperatures and adjust as needed. Refrigerator does not run. • Ensure plug is not in UP position. • Ice maker should be cleaned. • Foods that are.... BEFORE YOU CALL 1-800-944-9044 (United States) 1-800-265-8352 (Canada) Visit our web site at www.frigidaire.com. Freezer temperature too cold. Refrigerator temperature is weak. • See Normal Operating Sounds and Sights section. Allow 24 hours for temperature to "0". •...
... is satisfactory. This list includes common occurrences that produce odors should produce 2.5 to release. Then check freezer temperatures and adjust as needed. Refrigerator does not run. • Ensure plug is not in UP position. • Ice maker should be cleaned. • Foods that are.... BEFORE YOU CALL 1-800-944-9044 (United States) 1-800-265-8352 (Canada) Visit our web site at www.frigidaire.com. Freezer temperature too cold. Refrigerator temperature is weak. • See Normal Operating Sounds and Sights section. Allow 24 hours for temperature to "0". •...
Use and Care Manual
Page 19
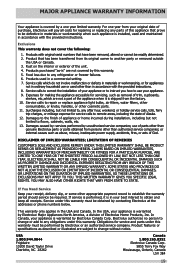
... another party or removed outside the USA or Canada. 3. Obligations for appliances not in a commercial setting. 7. USA 1.800.944.9044 Frigidaire 10200 David Taylor Drive Charlotte, NC 28262 Canada 1.800.265.8352 Electrolux Canada Corp. 5855 Terry Fox Way Mississauga, Ontario, Canada L5V .... 10. DISCLAIMER OF IMPLIED WARRANTIES; For one year limited warranty. Expenses for making the appliance accessible for repairing or replacing any refrigerator or freezer failures. 6. If service is performed, it is shipped from your best interest to establish the warranty period should service ...
... another party or removed outside the USA or Canada. 3. Obligations for appliances not in a commercial setting. 7. USA 1.800.944.9044 Frigidaire 10200 David Taylor Drive Charlotte, NC 28262 Canada 1.800.265.8352 Electrolux Canada Corp. 5855 Terry Fox Way Mississauga, Ontario, Canada L5V .... 10. DISCLAIMER OF IMPLIED WARRANTIES; For one year limited warranty. Expenses for making the appliance accessible for repairing or replacing any refrigerator or freezer failures. 6. If service is performed, it is shipped from your best interest to establish the warranty period should service ...


