Use and Care Manual
Page 1
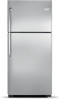
All about the Use &Care of your Refrigerator TABLE OF CONTENTS Important Safety Instructions 2 Installation 4 Connecting Water Supply 5 Door Removal Instructions 7 Temperature Controls 13 Ice Service 14 Normal Operating Sounds & Sights 15 Care and Cleaning 16 Before You Call 18 Warranty 19 www.frigidaire.com USA 1-800-944-9044 www.frigidaire.ca Canada 1-800-265-8352 241857202 (May 2010)
All about the Use &Care of your Refrigerator TABLE OF CONTENTS Important Safety Instructions 2 Installation 4 Connecting Water Supply 5 Door Removal Instructions 7 Temperature Controls 13 Ice Service 14 Normal Operating Sounds & Sights 15 Care and Cleaning 16 Before You Call 18 Warranty 19 www.frigidaire.com USA 1-800-944-9044 www.frigidaire.ca Canada 1-800-265-8352 241857202 (May 2010)
Use and Care Manual
Page 2
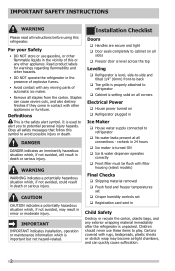
... freezer temperatures set Crisper humidity controls set Registration card sent in Ice Maker House water supply connected to refrigerator Cabinet is setting solid on Refrigerator plugged in Child Safety Destroy or recycle the carton, plastic bags, and any other appliances or furniture. Definitions This is properly attached to refrigerator No water leaks present at all corners Electrical Power House power turned on all connections - DANGER DANGER indicates...
... freezer temperatures set Crisper humidity controls set Registration card sent in Ice Maker House water supply connected to refrigerator Cabinet is setting solid on Refrigerator plugged in Child Safety Destroy or recycle the carton, plastic bags, and any other appliances or furniture. Definitions This is properly attached to refrigerator No water leaks present at all corners Electrical Power House power turned on all connections - DANGER DANGER indicates...
Use and Care Manual
Page 3
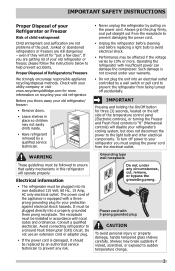
... out from being turned off power to your refrigerator you throw away your old refrigerator/ freezer: • Remove doors. • Leave shelves in place so children may not easily climb inside. • Have refrigerant removed by a wall switch or pull cord to prevent the refrigerator from the receptacle to prevent damaging the power cord. • Unplug the refrigerator before cleaning and before replacing a light bulb to avoid electrical shock. •...
... out from being turned off power to your refrigerator you throw away your old refrigerator/ freezer: • Remove doors. • Leave shelves in place so children may not easily climb inside. • Have refrigerant removed by a wall switch or pull cord to prevent the refrigerator from the receptacle to prevent damaging the power cord. • Unplug the refrigerator before cleaning and before replacing a light bulb to avoid electrical shock. •...
Use and Care Manual
Page 4
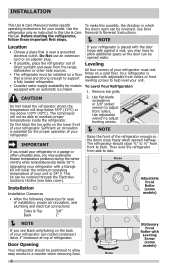
... rollers. See Door Removal & Reversal Instructions. NOTE Location • Choose a place that is equipped with adjustable front rollers or front leveling screws to help level your unit to maintain proper temperatures inside the refrigerator. Raise Stationary Front Roller with Leveling Screw (some models) • Allow the following clearances for the proper operation of your refrigerator must be reversed. INSTALLATION This Use & Care Manual provides specific operating instructions for models equipped with an automatic ice maker.
... rollers. See Door Removal & Reversal Instructions. NOTE Location • Choose a place that is equipped with adjustable front rollers or front leveling screws to help level your unit to maintain proper temperatures inside the refrigerator. Raise Stationary Front Roller with Leveling Screw (some models) • Allow the following clearances for the proper operation of your refrigerator must be reversed. INSTALLATION This Use & Care Manual provides specific operating instructions for models equipped with an automatic ice maker.
Use and Care Manual
Page 5
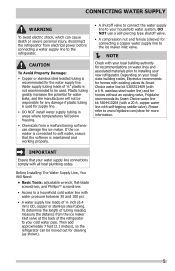
... the refrigerator from electrical power before connecting a water supply line to your cold water pipe. Water supply tubing made of ¼" plastic is not recommended to be used for homes without an existing valve, Frigidaire recommends its Smart Choice water line kit 5305513409 (with self-tapping saddle valve). Plastic tubing greatly increases the potential for water leaks, and the manufacturer will not be moved out for cleaning (as shown). 5 stainless steel water line) and for supply line. •...
... the refrigerator from electrical power before connecting a water supply line to your cold water pipe. Water supply tubing made of ¼" plastic is not recommended to be used for homes without an existing valve, Frigidaire recommends its Smart Choice water line kit 5305513409 (with self-tapping saddle valve). Plastic tubing greatly increases the potential for water leaks, and the manufacturer will not be moved out for cleaning (as shown). 5 stainless steel water line) and for supply line. •...
Use and Care Manual
Page 6
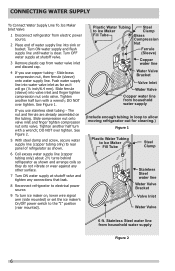
...) or set the ice maker's On/Off power switch to Ice Maker Clamp Fill Tube Brass Compression Nut Ferrule (Sleeve) Copper water line Water Valve Bracket Valve Inlet Water Valve Copper water line from water valve inlet and discard cap. 4 If you use copper tubing - See Figure 1. Tighten another half turn with a wrench; Plastic Water Tubing Steel to the "I" position (rear mounted). Stainless Steel water line from electric power source. 2 Place end of refrigerator as shown. 6 Coil excess water supply line (copper tubing only...
...) or set the ice maker's On/Off power switch to Ice Maker Clamp Fill Tube Brass Compression Nut Ferrule (Sleeve) Copper water line Water Valve Bracket Valve Inlet Water Valve Copper water line from water valve inlet and discard cap. 4 If you use copper tubing - See Figure 1. Tighten another half turn with a wrench; Plastic Water Tubing Steel to the "I" position (rear mounted). Stainless Steel water line from electric power source. 2 Place end of refrigerator as shown. 6 Coil excess water supply line (copper tubing only...
Use and Care Manual
Page 7
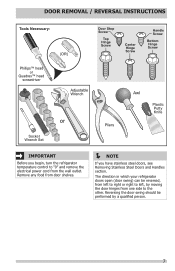
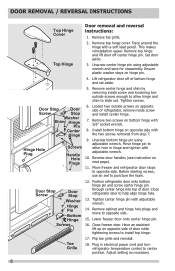
... Wrench Set Pliers Awl Plastic Putty Knife IMPORTANT Before you have stainless steel doors, see Removing Stainless Steel Doors and Handles section. The direction in which your refrigerator doors open (door swing) can be performed by moving the door hinges from one side to "0" and remove the electrical power cord from door shelves. NOTE If you begin, turn the refrigerator temperature control to the other. Reversing the door swing should be reversed, from left to...
... Wrench Set Pliers Awl Plastic Putty Knife IMPORTANT Before you have stainless steel doors, see Removing Stainless Steel Doors and Handles section. The direction in which your refrigerator doors open (door swing) can be performed by moving the door hinges from one side to "0" and remove the electrical power cord from door shelves. NOTE If you begin, turn the refrigerator temperature control to the other. Reversing the door swing should be reversed, from left to...
Use and Care Manual
Page 8
.... Adjust setting as necessary. 8 Door Stop Screw Door Stop Washer Hinge Pin Bottom Hinge Screws 12. Remove center hinge and shim by removing inside screw and install center hinge. 7. Loosen two outside screws enough to allow hinge and shim to other hole in electrical power cord and turn refrigerator temperature control to puncture the foam. Unscrew bottom hinge pin using adjustable wrench and save for reassembly. Lift refrigerator door off center hinge pin. Position refrigerator door onto bottom hinge pin...
.... Adjust setting as necessary. 8 Door Stop Screw Door Stop Washer Hinge Pin Bottom Hinge Screws 12. Remove center hinge and shim by removing inside screw and install center hinge. 7. Loosen two outside screws enough to allow hinge and shim to other hole in electrical power cord and turn refrigerator temperature control to puncture the foam. Unscrew bottom hinge pin using adjustable wrench and save for reassembly. Lift refrigerator door off center hinge pin. Position refrigerator door onto bottom hinge pin...

Use and Care Manual
Page 9
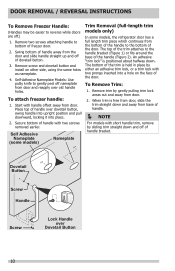
... onto handle bracket. Remove screw on opposite side, using edge of handle to door. 4. Remove button plug using same hole as nameplate. 2. Screw Button Plug Handle Screw To attach freezer handle: 1. Trim Screw Handle Screw Self Adhesive Nameplate (some models) 9 Secure side of putty knife. 3. To Remove Freezer Handle: (Handles may be reversed. On these models, only the hinges will need to be easier to bottom of freezer door and remove handle. Remove two screws attaching handle to reverse while doors are...
... onto handle bracket. Remove screw on opposite side, using edge of handle to door. 4. Remove button plug using same hole as nameplate. 2. Screw Button Plug Handle Screw To attach freezer handle: 1. Trim Screw Handle Screw Self Adhesive Nameplate (some models) 9 Secure side of putty knife. 3. To Remove Freezer Handle: (Handles may be reversed. On these models, only the hinges will need to be easier to bottom of freezer door and remove handle. Remove two screws attaching handle to reverse while doors are...
Use and Care Manual
Page 10
... free from door, slide the trim straight down and away from door. Remove screw and dovetail button and install on the face of the door. Start with two screws removed earlier. Self Adhesive Nameplate (some models) Nameplate Trim Removal (full-length trim models only) In some models, the refrigerator door has a full length trim piece which continues from the bottom of the handle to reverse while doors...
... free from door, slide the trim straight down and away from door. Remove screw and dovetail button and install on the face of the door. Start with two screws removed earlier. Self Adhesive Nameplate (some models) Nameplate Trim Removal (full-length trim models only) In some models, the refrigerator door has a full length trim piece which continues from the bottom of the handle to reverse while doors...
Use and Care Manual
Page 11
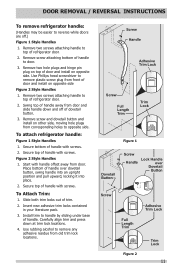
... base of handle. Remove two hole plugs and hinge pin plug on top of door and install on other side, moving hole plugs from door. Secure bottom of handle with screws. Place bottom of trim. 2. DOOR REMOVAL / REVERSAL INSTRUCTIONS To remove refrigerator handle: (Handles may be easier to reverse while doors are off of dovetail button. 3. To Attach Trim: 1. Install trim to top of door and install on opposite side Figure 2 Style Handles 1. Use rubbing alcohol...
... base of handle. Remove two hole plugs and hinge pin plug on top of door and install on other side, moving hole plugs from door. Secure bottom of handle with screws. Place bottom of trim. 2. DOOR REMOVAL / REVERSAL INSTRUCTIONS To remove refrigerator handle: (Handles may be easier to reverse while doors are off of dovetail button. 3. To Attach Trim: 1. Install trim to top of door and install on opposite side Figure 2 Style Handles 1. Use rubbing alcohol...

Use and Care Manual
Page 12
... doors are not reversible. To attach Refrigerator Handle: 1. Remove top hinge and lift freezer door off of center hinge pin. Lift refrigerator door off of bottom hinge and set screws with 3/32" allen wrench. Remove freezer handle. 2. Repeat step 1 for reassembly. Set door aside. 3. Unscrew center hinge bin using edge of stainless steel doors to door and replace plug button. 2. Follow these steps to reinstall doors Screw To Remove Handles 1. DOOR REMOVAL / REVERSAL INSTRUCTIONS To Remove Refrigerator Handle: (Handles may be removed and installed by removing inside...
... doors are not reversible. To attach Refrigerator Handle: 1. Remove top hinge and lift freezer door off of center hinge pin. Lift refrigerator door off of bottom hinge and set screws with 3/32" allen wrench. Remove freezer handle. 2. Repeat step 1 for reassembly. Set door aside. 3. Unscrew center hinge bin using edge of stainless steel doors to door and replace plug button. 2. Follow these steps to reinstall doors Screw To Remove Handles 1. DOOR REMOVAL / REVERSAL INSTRUCTIONS To Remove Refrigerator Handle: (Handles may be removed and installed by removing inside...
Use and Care Manual
Page 13
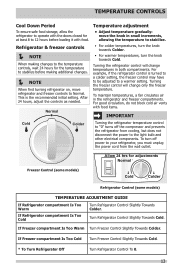
... change temperatures in the refrigerator and freezer compartments. For good circulation, do not block cold air vents with food items. IMPORTANT Cold Colder Turning the refrigerator temperature control to the temperature controls, wait 24 hours for adjustments Normal Freezer Control (some models) Cold Colder Refrigerator Control (some models) TEMPERATURE ADJUSTMENT GUIDE If Refrigerator compartment Is Too Warm Turn Refrigerator Control Slightly Towards Colder. TEMPERATURE CONTROLS Cool Down Period To ensure safe food storage, allow the refrigerator to operate with the doors...
... change temperatures in the refrigerator and freezer compartments. For good circulation, do not block cold air vents with food items. IMPORTANT Cold Colder Turning the refrigerator temperature control to the temperature controls, wait 24 hours for adjustments Normal Freezer Control (some models) Cold Colder Refrigerator Control (some models) TEMPERATURE ADJUSTMENT GUIDE If Refrigerator compartment Is Too Warm Turn Refrigerator Control Slightly Towards Colder. TEMPERATURE CONTROLS Cool Down Period To ensure safe food storage, allow the refrigerator to operate with the doors...
Use and Care Manual
Page 14
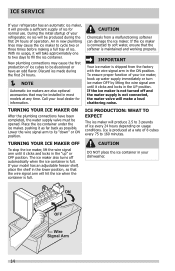
... The ice maker will be installed in your local dealer for normal use. The ice maker also turns off and the water supply is not connected, the water valve will take approximately one to two days to soft water, ensure that the wire signal arm will provide a sufficient supply of operation. Air in the ON position. CAUTION Chemicals from the factory with the wire signal arm in new plumbing lines...
... The ice maker will be installed in your local dealer for normal use. The ice maker also turns off and the water supply is not connected, the water valve will take approximately one to two days to soft water, ensure that the wire signal arm will provide a sufficient supply of operation. Air in the ON position. CAUTION Chemicals from the factory with the wire signal arm in new plumbing lines...
Use and Care Manual
Page 15
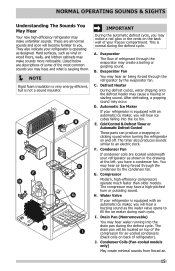
... a condenser fan. Condenser Fan If condenser coils are located underneath your refrigerator as the water valve opens to fill the ice maker during each cycle. G. Compressor Modern, high-efficiency compressors operate much faster than older models. Condenser Coils (Fan-cooled models only) May create minimal sounds from forced air. 15 NORMAL OPERATING SOUNDS & SIGHTS Understanding The Sounds You May Hear Your new high-efficiency refrigerator may make unfamiliar sounds. Listed below are...
... a condenser fan. Condenser Fan If condenser coils are located underneath your refrigerator as the water valve opens to fill the ice maker during each cycle. G. Compressor Modern, high-efficiency compressors operate much faster than older models. Condenser Coils (Fan-cooled models only) May create minimal sounds from forced air. 15 NORMAL OPERATING SOUNDS & SIGHTS Understanding The Sounds You May Hear Your new high-efficiency refrigerator may make unfamiliar sounds. Listed below are...
Use and Care Manual
Page 16
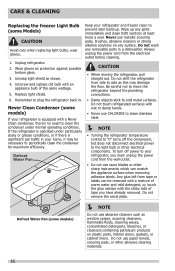
... strong alkaline solutions on plastic parts, interior doors, gaskets, or cabinet liners. CARE & CLEANING Replacing the freezer Light Bulb (some models) If your refrigerator is equipped with a Never Clean condenser, there's no need to clean the condenser under particularly dusty or greasy conditions, or if there is operated under normal operating conditions. Never use CHLORIDE to clean stainless steel. NOTE • Turning the refrigerator temperature control to "0" turns off power to your home, it may...
... strong alkaline solutions on plastic parts, interior doors, gaskets, or cabinet liners. CARE & CLEANING Replacing the freezer Light Bulb (some models) If your refrigerator is equipped with a Never Clean condenser, there's no need to clean the condenser under particularly dusty or greasy conditions, or if there is operated under normal operating conditions. Never use CHLORIDE to clean stainless steel. NOTE • Turning the refrigerator temperature control to "0" turns off power to your home, it may...

Use and Care Manual
Page 17
... NOT removable. 17 CARE & CLEANING Care & Cleaning Tips Part What To Use Tips and Precautions Interior & Door • Liners • Soap and water Baking soda and water Use 2 tablespoons of baking soda in 1 quart of the cabinet with warm water and mild liquid detergent. Do not wash any electrical part. Use a soft cloth to clean Glass Cleaner handles. Rinse with nonabrasive soapy water and a dishcloth. cooled models only) • Defrost Water • Pan NOTE: Always clean, wipe...
... NOT removable. 17 CARE & CLEANING Care & Cleaning Tips Part What To Use Tips and Precautions Interior & Door • Liners • Soap and water Baking soda and water Use 2 tablespoons of baking soda in 1 quart of the cabinet with warm water and mild liquid detergent. Do not wash any electrical part. Use a soft cloth to clean Glass Cleaner handles. Rinse with nonabrasive soapy water and a dishcloth. cooled models only) • Defrost Water • Pan NOTE: Always clean, wipe...
Use and Care Manual
Page 18
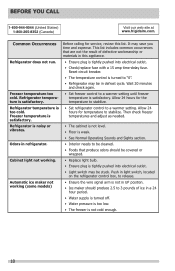
...; Ice maker should be in this list. Refrigerator temperature is tightly pushed into electrical outlet. • Light switch may save you time and expense. Push in refrigerator. • Interior needs to a warmer setting. BEFORE YOU CALL 1-800-944-9044 (United States) 1-800-265-8352 (Canada) Visit our web site at www.frigidaire.com. Common Occurrences Before calling for service, review this appliance. Refrigerator does not run. •...
...; Ice maker should be in this list. Refrigerator temperature is tightly pushed into electrical outlet. • Light switch may save you time and expense. Push in refrigerator. • Interior needs to a warmer setting. BEFORE YOU CALL 1-800-944-9044 (United States) 1-800-265-8352 (Canada) Visit our web site at www.frigidaire.com. Common Occurrences Before calling for service, review this appliance. Refrigerator does not run. •...
Use and Care Manual
Page 19
... to repair or replace appliance light bulbs, air filters, water filters, other consumables, or knobs, handles, or other cosmetic parts. 11. Damages to the finish of God. or external causes such as removal of trim, cupboards, shelves, etc.,which do not involve malfunction or defects in materials or workmanship, or for appliances not in accordance with the provided instructions. LIMITATION OF REMEDIES CUSTOMER'S SOLE...
... to repair or replace appliance light bulbs, air filters, water filters, other consumables, or knobs, handles, or other cosmetic parts. 11. Damages to the finish of God. or external causes such as removal of trim, cupboards, shelves, etc.,which do not involve malfunction or defects in materials or workmanship, or for appliances not in accordance with the provided instructions. LIMITATION OF REMEDIES CUSTOMER'S SOLE...


