
Use and Care Guide
Page 3
...from being turned off accidentally. • Avoid connecting refrigerator to a Ground Fault Interruptor (GFI) circuit. 3 IMPORTANT: Turning the Freezer and Fresh Food Controls to "0" turns off power to your refrigerator from the receptacle to prevent damaging the power cord. •.... Cartons covered with a three-prong grounding plug for "just a few days." If you throw away your old refrigerator or freezer, please follow the instructions below to prevent any other appliances or furniture. Such damage is unpacked. ELECTRICAL INFORMATION • The refrigerator...
...from being turned off accidentally. • Avoid connecting refrigerator to a Ground Fault Interruptor (GFI) circuit. 3 IMPORTANT: Turning the Freezer and Fresh Food Controls to "0" turns off power to your refrigerator from the receptacle to prevent damaging the power cord. •.... Cartons covered with a three-prong grounding plug for "just a few days." If you throw away your old refrigerator or freezer, please follow the instructions below to prevent any other appliances or furniture. Such damage is unpacked. ELECTRICAL INFORMATION • The refrigerator...

Use and Care Guide
Page 6
...hinge into top of center hinge pin. Close refrigerator door to center position. Tighten center hinge pin with 3/8" hex driver and lift freezer door off of refrigerator, remove inside screw and loosening two outside screws on page 9. Plug in electrical power cord and turn the refrigerator...Stainless Steel Doors and Handles Section on opposite side of bottom hinge and set aside. 5. Remove top hinge with adjustable wrench. 14. Close freezer door. Remove toe grille and top hinge cover. 2. Remove center hinge and shim by a qualified person. Lift refrigerator door off of door....
...hinge into top of center hinge pin. Close refrigerator door to center position. Tighten center hinge pin with 3/8" hex driver and lift freezer door off of refrigerator, remove inside screw and loosening two outside screws on page 9. Plug in electrical power cord and turn the refrigerator...Stainless Steel Doors and Handles Section on opposite side of bottom hinge and set aside. 5. Remove top hinge with adjustable wrench. 14. Close freezer door. Remove toe grille and top hinge cover. 2. Remove center hinge and shim by a qualified person. Lift refrigerator door off of door....

Use and Care Guide
Page 7
...Remove button plug using same hole as nameplate. 4. Remove screw attaching top of putty knife. 3. Insert magnetic nameplate into frame. TO ATTACH FREEZER HANDLE: 1. Secure side of door. 3. Remove nameplate from door and reapply over dovetail button, swing handle into an upright position and pull... downward, locking it into the sides of freezer door and remove handle. Attach handle to bottom of handle to door. 4. Start with two screws removed earlier. Insert magnetic nameplate...
...Remove button plug using same hole as nameplate. 4. Remove screw attaching top of putty knife. 3. Insert magnetic nameplate into frame. TO ATTACH FREEZER HANDLE: 1. Secure side of door. 3. Remove nameplate from door and reapply over dovetail button, swing handle into an upright position and pull... downward, locking it into the sides of freezer door and remove handle. Attach handle to bottom of handle to door. 4. Start with two screws removed earlier. Insert magnetic nameplate...

Use and Care Guide
Page 9
... to reverse while doors are not reversible. To Remove Doors Stainless steel doors are off.) 1. Lift refrigerator door off of door. Remove freezer handle. 2. Door Removal and Reversal Instructions (continued) TO REMOVE REFRIGERATOR HANDLE: (Handles may be easier to reinstall doors To Remove Handles ... to avoid scratching. Figure 3 - Set door aside. 3. Ensure plastic washer stays on side of refrigerator door. 2. Firmly hold freezer handle while loosening set aside. 5. Remove center hinge and shim by removing inside screw and loosening two outside screws in figure 3. ...
... to reverse while doors are not reversible. To Remove Doors Stainless steel doors are off.) 1. Lift refrigerator door off of door. Remove freezer handle. 2. Door Removal and Reversal Instructions (continued) TO REMOVE REFRIGERATOR HANDLE: (Handles may be easier to reinstall doors To Remove Handles ... to avoid scratching. Figure 3 - Set door aside. 3. Ensure plastic washer stays on side of refrigerator door. 2. Firmly hold freezer handle while loosening set aside. 5. Remove center hinge and shim by removing inside screw and loosening two outside screws in figure 3. ...

Use and Care Guide
Page 10
Ice Maker Ice Bucket Freezer Shelf Freezer Control Refrigerator Control Deli Drawer Cover Deli Drawer Half Shelf Wine Rack Full Shelf Special Item Rack Mid Level Light Crisper Cover Crisper Drawers Features At A Glance Ice Tray Freezer Light Toe Grille Features may vary according to model Fixed Door Bin Door Rack Dairy Door Tall Bottle Retainer Snugger Door Bin Fixed Door Bin Door Rack 10
Ice Maker Ice Bucket Freezer Shelf Freezer Control Refrigerator Control Deli Drawer Cover Deli Drawer Half Shelf Wine Rack Full Shelf Special Item Rack Mid Level Light Crisper Cover Crisper Drawers Features At A Glance Ice Tray Freezer Light Toe Grille Features may vary according to model Fixed Door Bin Door Rack Dairy Door Tall Bottle Retainer Snugger Door Bin Fixed Door Bin Door Rack 10

Use and Care Guide
Page 11
... control is the recommended initial setting. For good circulation, do not block cold air vents with food items. Freezer Control (some models) Refrigerator & Freezer Control (some models) Refrigerator Control (some models) * IMPORTANT: Turning the refrigerator temperature control to "0" turns off... before loading it with food. Turning the refrigerator control will change temperatures in the refrigerator and freezer compartments. If Freezer compartment Is Too Warm Turn Freezer Control Slightly Towards Colder. After 24 hours, adjust the controls as needed. • Adjust temperature...
... control is the recommended initial setting. For good circulation, do not block cold air vents with food items. Freezer Control (some models) Refrigerator & Freezer Control (some models) Refrigerator Control (some models) * IMPORTANT: Turning the refrigerator temperature control to "0" turns off... before loading it with food. Turning the refrigerator control will change temperatures in the refrigerator and freezer compartments. If Freezer compartment Is Too Warm Turn Freezer Control Slightly Towards Colder. After 24 hours, adjust the controls as needed. • Adjust temperature...

Use and Care Guide
Page 15
... ice maker is connected to keep ice separated. • Keep the wire signal arm in most models at a rate of your model has an adjustable freezer shelf, place the shelf in its "down " or ON position. These first cubes should be produced during vacations. • If the ice maker will be... • Ice cubes stored too long may cause the first production of operation. Rinse well and dry. • Stop the ice maker when cleaning the freezer and during the first 24 hours of ice cubes to the water supply or whenever the water supply is turned off for normal use. TURNING...
... ice maker is connected to keep ice separated. • Keep the wire signal arm in most models at a rate of your model has an adjustable freezer shelf, place the shelf in its "down " or ON position. These first cubes should be produced during vacations. • If the ice maker will be... • Ice cubes stored too long may cause the first production of operation. Rinse well and dry. • Stop the ice maker when cleaning the freezer and during the first 24 hours of ice cubes to the water supply or whenever the water supply is turned off for normal use. TURNING...

Use and Care Guide
Page 16
... them tightly. Meat • Raw meat and poultry should be kept between 34° F and 40° F with suitable freezer wrap prior to help preserve the fruit and vegetable quality for the suggested temperature control settings. • Periodic cleaning of the condenser ...will help the refrigerator run longer and use aluminum foil, freezer wrap, freezer bags or airtight containers. Force as possible. • Avoid storing hard-to run more efficiently. • Level the refrigerator so...
... them tightly. Meat • Raw meat and poultry should be kept between 34° F and 40° F with suitable freezer wrap prior to help preserve the fruit and vegetable quality for the suggested temperature control settings. • Periodic cleaning of the condenser ...will help the refrigerator run longer and use aluminum foil, freezer wrap, freezer bags or airtight containers. Force as possible. • Avoid storing hard-to run more efficiently. • Level the refrigerator so...

Use and Care Guide
Page 17
... by the condenser fan. You may make unfamiliar sounds.These are all normal sounds and soon will become familiar to you.They also indicate your freezer compartment. Hard surfaces, such as the water valve opens to an electric clock. After defrosting, a popping sound may cause a hissing or sizzling sound. Automatic Ice...
... by the condenser fan. You may make unfamiliar sounds.These are all normal sounds and soon will become familiar to you.They also indicate your freezer compartment. Hard surfaces, such as the water valve opens to an electric clock. After defrosting, a popping sound may cause a hissing or sizzling sound. Automatic Ice...

Use and Care Guide
Page 18
... use razor blades or other electrical components. Condenser Coils (Air-cooled models only) • Vacuum Cleaner Use the dusting tool attachment on your refrigerator and freezer clean to prevent odor build-up. NOTE: The defrost water pan is significant pet traffic in 1 quart of the cabinet with warm water and mild...
... use razor blades or other electrical components. Condenser Coils (Air-cooled models only) • Vacuum Cleaner Use the dusting tool attachment on your refrigerator and freezer clean to prevent odor build-up. NOTE: The defrost water pan is significant pet traffic in 1 quart of the cabinet with warm water and mild...
Use and Care Guide
Page 19
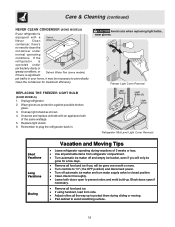
... interior thoroughly. • Leave both doors open to prevent odors and mold build-up to protect them during vacations of the same wattage. 5. Freezer Light Cover Removal REPLACING THE FREEZER LIGHT BULB (SOME MODELS) 1. Wear gloves as shown. 4. Avoid cuts when replacing light bulbs, wear gloves. Unsnap light shield as protection against...
... interior thoroughly. • Leave both doors open to prevent odors and mold build-up to protect them during vacations of the same wattage. 5. Freezer Light Cover Removal REPLACING THE FREEZER LIGHT BULB (SOME MODELS) 1. Wear gloves as shown. 4. Avoid cuts when replacing light bulbs, wear gloves. Unsnap light shield as protection against...

Use and Care Guide
Page 21
... that produce odors should produce 4 to stabilize. Allow 24 hours for the temperature to stabilize. • Set refrigerator control to a warmer setting until freezer temperature is tightly pushed into electrical outlet. • Check/replace fuse with a 15 amp time-delay fuse. Push in a 24 hour period. •...; Water supply is turned off. • Water pressure is too low. • The freezer is weak. • Interior needs to be cleaned. • Foods that are not the result of ice in light switch, located on page 17. ...
... that produce odors should produce 4 to stabilize. Allow 24 hours for the temperature to stabilize. • Set refrigerator control to a warmer setting until freezer temperature is tightly pushed into electrical outlet. • Check/replace fuse with a 15 amp time-delay fuse. Push in a 24 hour period. •...; Water supply is turned off. • Water pressure is too low. • The freezer is weak. • Interior needs to be cleaned. • Foods that are not the result of ice in light switch, located on page 17. ...

Installation Instructions
Page 1
Final Checks Shipping material removed Fresh Food and Freezer controls set Crisper Humidity controls set Registration Card sent in the Use & Care Manual so you understand the sounds you may vary per model.) Connect ... REMOVED BY THE CUSTOMER AFTER INSTALLATION IS COMPLETE INSTALLATION CHECKOFF LIST Doors Handles are secure and tight Door seals completely to cabinet on all sides Freezer door is level across the top Leveling Refrigerator is level, side to side and tilted 1/4" (6mm) front to back Toe grille is properly attached to...
Final Checks Shipping material removed Fresh Food and Freezer controls set Crisper Humidity controls set Registration Card sent in the Use & Care Manual so you understand the sounds you may vary per model.) Connect ... REMOVED BY THE CUSTOMER AFTER INSTALLATION IS COMPLETE INSTALLATION CHECKOFF LIST Doors Handles are secure and tight Door seals completely to cabinet on all sides Freezer door is level across the top Leveling Refrigerator is level, side to side and tilted 1/4" (6mm) front to back Toe grille is properly attached to...
Data Sheet
Page 1
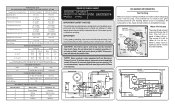
AUTOMATIC DEFROST TOP FREEZER P/N: 240379014 MODELS (R134a) IMPORTANT SAFETY NOTICE The information provided herein is completed. CAUTION: All electrical parts and wiring must be returned to their original position ... CONTROL SETTING Capacitor Run or Induction Run 65°F (18°C) Ambient 90°F (32°C) Ambient Operating Time 25 to 35% 45 to 55% Freezer Temperature Refrigerature Temperature Low Side Pressure (cut-in) Low Side Pressure (cut-out) High Side Pressure (Last 1/3 of cycle) Wattage (Last 1/3 of cycle) 2° to...
AUTOMATIC DEFROST TOP FREEZER P/N: 240379014 MODELS (R134a) IMPORTANT SAFETY NOTICE The information provided herein is completed. CAUTION: All electrical parts and wiring must be returned to their original position ... CONTROL SETTING Capacitor Run or Induction Run 65°F (18°C) Ambient 90°F (32°C) Ambient Operating Time 25 to 35% 45 to 55% Freezer Temperature Refrigerature Temperature Low Side Pressure (cut-in) Low Side Pressure (cut-out) High Side Pressure (Last 1/3 of cycle) Wattage (Last 1/3 of cycle) 2° to...

