
Use and Care Guide
Page 2
... serial numbers below for choosing our product. Please read this manual. NOTE: Use only soap and water to properly maintain your serial plate located inside the refrigerator compartment. Your satisfaction is found on your new refrigerator. We hope you can rest assured your new refrigerator and Thank You for future reference.This information is our #1 priority. PLEASE READ AND SAVE THESE INSTRUCTIONS This Use & Care Manual provides specific operating instructions...
... serial numbers below for choosing our product. Please read this manual. NOTE: Use only soap and water to properly maintain your serial plate located inside the refrigerator compartment. Your satisfaction is found on your new refrigerator. We hope you can rest assured your new refrigerator and Thank You for future reference.This information is our #1 priority. PLEASE READ AND SAVE THESE INSTRUCTIONS This Use & Care Manual provides specific operating instructions...

Use and Care Guide
Page 3
... avoid electrical shock. • Performance may not easily climb inside. • Have refrigerant removed by a wall switch or pull cord to prevent the refrigerator from cooling, but does not disconnect the power to help prevent accidents. These Guidelines Must Be Followed To Ensure That Safety Mechanisms In This Refrigerator Will Operate Properly. To turn off the compressor and prevents your old refrigerator/ freezer: • Remove doors...
... avoid electrical shock. • Performance may not easily climb inside. • Have refrigerant removed by a wall switch or pull cord to prevent the refrigerator from cooling, but does not disconnect the power to help prevent accidents. These Guidelines Must Be Followed To Ensure That Safety Mechanisms In This Refrigerator Will Operate Properly. To turn off the compressor and prevents your old refrigerator/ freezer: • Remove doors...

Use and Care Guide
Page 4
... temperatures inside the refrigerator. Before starting the refrigerator, follow these important first steps. The refrigerator should be installed on page 6. Use the refrigerator only as instructed in this possible, the direction in which the doors open can be reversed. DOOR OPENING NOTE: If your refrigerator is placed with adjustable front rollers or front leveling screws to a counter when removing food. Raise Stationary Front Roller with an automatic ice maker. Installation This Use & Care Manual...
... temperatures inside the refrigerator. Before starting the refrigerator, follow these important first steps. The refrigerator should be installed on page 6. Use the refrigerator only as instructed in this possible, the direction in which the doors open can be reversed. DOOR OPENING NOTE: If your refrigerator is placed with adjustable front rollers or front leveling screws to a counter when removing food. Raise Stationary Front Roller with an automatic ice maker. Installation This Use & Care Manual...

Use and Care Guide
Page 5
... turn ice maker on, lower wire signal arm (see ice maker front cover for cleaning (as it greatly increases the potential for the ice maker to the refrigerator. New plumbing may cause ice maker to cycle two or three times before connecting a water supply line to begin producing ice. To determine the length of the refrigerator to electrical power source. 10. To Avoid Property Damage: • Copper tubing is clear. To Connect Water Supply Line To Ice Maker Inlet Valve...
... turn ice maker on, lower wire signal arm (see ice maker front cover for cleaning (as it greatly increases the potential for the ice maker to the refrigerator. New plumbing may cause ice maker to cycle two or three times before connecting a water supply line to begin producing ice. To determine the length of the refrigerator to electrical power source. 10. To Avoid Property Damage: • Copper tubing is clear. To Connect Water Supply Line To Ice Maker Inlet Valve...

Use and Care Guide
Page 6
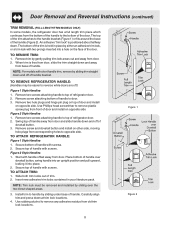
... driver and lift freezer door off of door. Replace toe grille and top hinge cover. 18. Lift refrigerator door off of door while tightening screws to slide out. Door Removal and Reversal Instructions DOOR REMOVAL AND REVERSAL INSTRUCTIONS: NOTE: If you begin, turn refrigerator temperature control to other . Remove toe grille and top hinge cover. 2. Have an assistant lift up on page 9. Plug in electrical power cord and turn the refrigerator temperature control to opposite side. Close refrigerator door to the Removing Stainless Steel Doors and Handles Section...
... driver and lift freezer door off of door. Replace toe grille and top hinge cover. 18. Lift refrigerator door off of door while tightening screws to slide out. Door Removal and Reversal Instructions DOOR REMOVAL AND REVERSAL INSTRUCTIONS: NOTE: If you begin, turn refrigerator temperature control to other . Remove toe grille and top hinge cover. 2. Have an assistant lift up on page 9. Plug in electrical power cord and turn the refrigerator temperature control to opposite side. Close refrigerator door to the Removing Stainless Steel Doors and Handles Section...
Use and Care Guide
Page 8
... remove plastic screw plug from front of refrigerator door. 2. Secure top of handle to door. 3. Use rubbing alcohol to remove any adhesive residue from door. Remove screw attaching bottom of handle with handle offset away from old trim lock locations. Install trim to handle by sliding trim straight down and away from base of the door. Carefully align trim and press down . An adhesive "trim lock" is free...
... remove plastic screw plug from front of refrigerator door. 2. Secure top of handle to door. 3. Use rubbing alcohol to remove any adhesive residue from door. Remove screw attaching bottom of handle with handle offset away from old trim lock locations. Install trim to handle by sliding trim straight down and away from base of the door. Carefully align trim and press down . An adhesive "trim lock" is free...

Use and Care Guide
Page 9
... top hinge cover. 2. Remove top hinge and lift freezer door off of door. Remove two screws attaching handle to top of center hinge pin. Remove center hinge and shim by removing inside screw and loosening two outside screws in figure 3. Remove screw on hinge pin. 4. Typical Handle 9 Handle Reversal REMOVING STAINLESS STEEL DOORS AND HANDLES Use care when using adjustable wrench and save for refrigerator door. Firmly hold freezer handle while loosening set aside. 5. Door Removal and Reversal Instructions (continued) TO REMOVE REFRIGERATOR HANDLE: (Handles may...
... top hinge cover. 2. Remove top hinge and lift freezer door off of door. Remove two screws attaching handle to top of center hinge pin. Remove center hinge and shim by removing inside screw and loosening two outside screws in figure 3. Remove screw on hinge pin. 4. Typical Handle 9 Handle Reversal REMOVING STAINLESS STEEL DOORS AND HANDLES Use care when using adjustable wrench and save for refrigerator door. Firmly hold freezer handle while loosening set aside. 5. Door Removal and Reversal Instructions (continued) TO REMOVE REFRIGERATOR HANDLE: (Handles may...

Use and Care Guide
Page 11
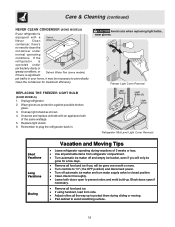
...light bulb and other electrical components. After 24 hours, adjust the controls as needed. • Adjust temperature gradually: move refrigerator and freezer controls to stabilize. • For colder temperatures, turn the knob towards Cold. REFRIGERATOR & FREEZER CONTROLS NOTE: When changing control settings, wait 24 hours before loading it with food. Turning the freezer control will change only the freezer temperature. To maintain temperatures, a fan circulates air in both compartments. TEMPERATURE ADJUSTMENT GUIDE If Refrigerator compartment Is Too Warm Turn Refrigerator...
...light bulb and other electrical components. After 24 hours, adjust the controls as needed. • Adjust temperature gradually: move refrigerator and freezer controls to stabilize. • For colder temperatures, turn the knob towards Cold. REFRIGERATOR & FREEZER CONTROLS NOTE: When changing control settings, wait 24 hours before loading it with food. Turning the freezer control will change only the freezer temperature. To maintain temperatures, a fan circulates air in both compartments. TEMPERATURE ADJUSTMENT GUIDE If Refrigerator compartment Is Too Warm Turn Refrigerator...

Use and Care Guide
Page 12
... Inside To avoid personal injury or property damage, handle tempered glass shelves carefully. Shelves may break suddenly if nicked, scratched, or exposed to food and for fast cleaning. Lower the shelf into the desired slots and lock into the wall bracket. Before adjusting the shelves, remove all food. Cantilever shelves are easily adjusted to stop position. 2 Lift front edge up . 2 Pull shelf out. Replace the shelf by...
... Inside To avoid personal injury or property damage, handle tempered glass shelves carefully. Shelves may break suddenly if nicked, scratched, or exposed to food and for fast cleaning. Lower the shelf into the desired slots and lock into the wall bracket. Before adjusting the shelves, remove all food. Cantilever shelves are easily adjusted to stop position. 2 Lift front edge up . 2 Pull shelf out. Replace the shelf by...

Use and Care Guide
Page 14
... in. This keeps incoming air to adjust the humidity within the crisper. NOTE: Leafy vegetables keep best in high humidity. To remove, slide the Wine Rack out. DELI DRAWER (SOME MODELS) Some models are designed for storage of juice or soda pop. Looking Inside - (continued) CRISPERS (SOME MODELS) The crispers, located under the bottom refrigerator shelf, are equipped with a Deli Drawer for storing fruits, vegetables...
... in. This keeps incoming air to adjust the humidity within the crisper. NOTE: Leafy vegetables keep best in high humidity. To remove, slide the Wine Rack out. DELI DRAWER (SOME MODELS) Some models are designed for storage of juice or soda pop. Looking Inside - (continued) CRISPERS (SOME MODELS) The crispers, located under the bottom refrigerator shelf, are equipped with a Deli Drawer for storing fruits, vegetables...

Use and Care Guide
Page 15
... ice when the container is full. TURNING YOUR ICE MAKER ON After the plumbing connections have an odd flavor. If your model has an adjustable freezer shelf, place the shelf in your ice maker, hook up " or OFF position. Chemicals from tray • Ice dropping into ice container • Running water • Water valve opening or closing NOTE: For more ice. • Occasionally shake the ice container to keep ice separated. • Keep the wire...
... ice when the container is full. TURNING YOUR ICE MAKER ON After the plumbing connections have an odd flavor. If your model has an adjustable freezer shelf, place the shelf in your ice maker, hook up " or OFF position. Chemicals from tray • Ice dropping into ice container • Running water • Water valve opening or closing NOTE: For more ice. • Occasionally shake the ice container to keep ice separated. • Keep the wire...

Use and Care Guide
Page 16
.... This reduces the circulation of air around the food and results in the freezer interior where the temperature varies less. Fruits and Vegetables • Storage in the crisper drawers traps moisture to reduce door openings. See the Care and Cleaning Chart on moisture build-up inside the unit. • Organize the refrigerator to help the refrigerator operate more energy. • Cover foods and wipe containers dry...
.... This reduces the circulation of air around the food and results in the freezer interior where the temperature varies less. Fruits and Vegetables • Storage in the crisper drawers traps moisture to reduce door openings. See the Care and Cleaning Chart on moisture build-up inside the unit. • Organize the refrigerator to help the refrigerator operate more energy. • Cover foods and wipe containers dry...

Use and Care Guide
Page 17
.... Compressor Modern, high-efficiency compressors operate much faster than older models. The compressor may have a condenser fan. Condenser Coils (Fan-cooled models only) 17 B. Automatic Ice Maker If your refrigerator is operating as the water valve opens to an electric clock. E. You may hear air being forced through the condenser by the evaporator fan. The drain pan will hear ice cubes falling into the drain pan during the defrost cycle. A. This is equipped with an automatic ice maker...
.... Compressor Modern, high-efficiency compressors operate much faster than older models. The compressor may have a condenser fan. Condenser Coils (Fan-cooled models only) 17 B. Automatic Ice Maker If your refrigerator is operating as the water valve opens to an electric clock. E. You may hear air being forced through the condenser by the evaporator fan. The drain pan will hear ice cubes falling into the drain pan during the defrost cycle. A. This is equipped with an automatic ice maker...

Use and Care Guide
Page 18
... wash any electrical part. Always unplug the electrical power cord from the wall outlet. • Do not use CHLORIDE to clean handles. Do not touch refrigerated surfaces with non-abrasive soapy water and a (Stainless Steel dishcloth. NOTES: • Turning the refrigerator temperature control to "0" turns off power to your refrigerator, you have defrost water pan located on top of compressor at bottom rear of refrigerator (see item "J" in warm water. Do not remove the serial plate. Wipe...
... wash any electrical part. Always unplug the electrical power cord from the wall outlet. • Do not use CHLORIDE to clean handles. Do not touch refrigerated surfaces with non-abrasive soapy water and a (Stainless Steel dishcloth. NOTES: • Turning the refrigerator temperature control to "0" turns off power to your refrigerator, you have defrost water pan located on top of compressor at bottom rear of refrigerator (see item "J" in warm water. Do not remove the serial plate. Wipe...
Use and Care Guide
Page 19
... perishable items from refrigerator compartment. • Turn automatic ice maker off and empty ice bucket, even if you will be gone one month or more. • Turn controls to "O" ( the OFF position) and disconnect power. • Turn off automatic ice maker and turn water supply valve to closed position. • Clean interior thoroughly. • Leave both doors open if necessary. • Remove all food and ice. • If using handcart, load from...
... perishable items from refrigerator compartment. • Turn automatic ice maker off and empty ice bucket, even if you will be gone one month or more. • Turn controls to "O" ( the OFF position) and disconnect power. • Turn off automatic ice maker and turn water supply valve to closed position. • Clean interior thoroughly. • Leave both doors open if necessary. • Remove all food and ice. • If using handcart, load from...

Use and Care Guide
Page 20
... authorized servicers; and Puerto Rico, and Canada. use . Warranty Information REFRIGERATOR WARRANTY Your refrigerator is protected by Electrolux Major Appliances North America, a division of Electrolux Home Products, Inc. Proper installation by contacting Electrolux. USA 800-944-9044 Electrolux Major Appliances North America, a division of the U.S.A. Excludes original and replacement Ice & Water filter cartridges (if equipped). and Electrolux Canada Corp. Expenses for making the...
... authorized servicers; and Puerto Rico, and Canada. use . Warranty Information REFRIGERATOR WARRANTY Your refrigerator is protected by Electrolux Major Appliances North America, a division of Electrolux Home Products, Inc. Proper installation by contacting Electrolux. USA 800-944-9044 Electrolux Major Appliances North America, a division of the U.S.A. Excludes original and replacement Ice & Water filter cartridges (if equipped). and Electrolux Canada Corp. Expenses for making the...

Use and Care Guide
Page 21
... refrigerator control box, to release. • Ensure the Wire Signal Arm is satisfactory. Reset circuit breaker. • The temperature control is turned to a warmer setting until freezer temperature is not in UP position. • Ice maker should be covered or wrapped. • Replace light bulb. • Ensure plug is tightly pushed into electrical outlet. • Light switch may be in this list. Wait 20 minutes and check again. • Set freezer control to "O". • Refrigerator...
... refrigerator control box, to release. • Ensure the Wire Signal Arm is satisfactory. Reset circuit breaker. • The temperature control is turned to a warmer setting until freezer temperature is not in UP position. • Ice maker should be covered or wrapped. • Replace light bulb. • Ensure plug is tightly pushed into electrical outlet. • Light switch may be in this list. Wait 20 minutes and check again. • Set freezer control to "O". • Refrigerator...

Installation Instructions
Page 1
... removed Fresh Food and Freezer controls set Crisper Humidity controls set Registration Card sent in Ice Maker House water supply connected to refrigerator No water leaks present at all corners Electrical Power House power turned on Refrigerator plugged in Refer to your Owner’s Use and Care Manual for the door to swing open. 7 8 Remove Shipping material. (Features may hear once your refrigerator beside a wall, leave 1/2" minimum between hinges and wall to become aware of installation, proper air circulation, and plumbing and electrical connections...
... removed Fresh Food and Freezer controls set Crisper Humidity controls set Registration Card sent in Ice Maker House water supply connected to refrigerator No water leaks present at all corners Electrical Power House power turned on Refrigerator plugged in Refer to your Owner’s Use and Care Manual for the door to swing open. 7 8 Remove Shipping material. (Features may hear once your refrigerator beside a wall, leave 1/2" minimum between hinges and wall to become aware of installation, proper air circulation, and plumbing and electrical connections...
Data Sheet
Page 1
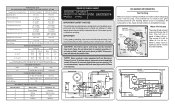
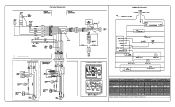
... (Last 1/3 of cycle) Wattage (Last 1/3 of Compressor Run Time CONDENSER FAN MOTOR Watts RPM Amps 2.3 1100 CW Opposite Shaft .15 Running Electrical Thermostat Heater Wattage ICE MAKER SPECIFICATIONS 115 VAC (127 VAC Max) Opens at 48°F (9°C) 165 60 Hertz Closes at 15°F (-9°C) ICE MAKER CONNECTOR PLUG CONNECTIONS Wire Number Wire Color Connects to: 1 Green/Yellow Ground 2 Yellow Water Valve 3 Black Line 4 Lt. Defrost 30 Minutes Every 10 Hours of Compressor Run Time Electronic Timer (ADC...
... (Last 1/3 of cycle) Wattage (Last 1/3 of Compressor Run Time CONDENSER FAN MOTOR Watts RPM Amps 2.3 1100 CW Opposite Shaft .15 Running Electrical Thermostat Heater Wattage ICE MAKER SPECIFICATIONS 115 VAC (127 VAC Max) Opens at 48°F (9°C) 165 60 Hertz Closes at 15°F (-9°C) ICE MAKER CONNECTOR PLUG CONNECTIONS Wire Number Wire Color Connects to: 1 Green/Yellow Ground 2 Yellow Water Valve 3 Black Line 4 Lt. Defrost 30 Minutes Every 10 Hours of Compressor Run Time Electronic Timer (ADC...
Data Sheet
Page 2
Pictorial Schematic Ladder Schematic NOTE DENOTES NOT ON ALL MODELS COMPRESSOR WIRING Induction Run Compressor with Relay SERVICE PARTS Compressor / Kit * Starter/PTC/TSD * Run Capacitor * Relay Overload Temperature Control Timer (if applicable) ADC (if applicable) Defrost Heater Kit Defrost Thermostat Kit Evaporator Fan Motor Condenser Fan Motor 15 & 17 CUBIC FOOT STATIC DYNAM I C E-S T AR 5303918264 5303918264 5303918299 218721120 218721120 241527802 218909913 218909913 218909915 N/A N/A N/A N/A N/A N/A 5304421256 5304421256 5304421256 215846606 215846606 215846606 N/A ...
Pictorial Schematic Ladder Schematic NOTE DENOTES NOT ON ALL MODELS COMPRESSOR WIRING Induction Run Compressor with Relay SERVICE PARTS Compressor / Kit * Starter/PTC/TSD * Run Capacitor * Relay Overload Temperature Control Timer (if applicable) ADC (if applicable) Defrost Heater Kit Defrost Thermostat Kit Evaporator Fan Motor Condenser Fan Motor 15 & 17 CUBIC FOOT STATIC DYNAM I C E-S T AR 5303918264 5303918264 5303918299 218721120 218721120 241527802 218909913 218909913 218909915 N/A N/A N/A N/A N/A N/A 5304421256 5304421256 5304421256 215846606 215846606 215846606 N/A ...


