
Use and Care Guide
Page 2
... when installing, operating and maintaining any appliance. Please record your refrigerator. 2 Please complete and mail in this Use & Care Manual very carefully. Welcome & Congratulations Congratulations on your new refrigerator. It contains valuable information on how to properly maintain your purchase...our product and we are not meant to providing you 'll enjoy your refrigerator is repaired with the proper components. are very proud of a new refrigerator! Use your refrigerator only as instructed in the Product Registration Card included with the best service possible...
... when installing, operating and maintaining any appliance. Please record your refrigerator. 2 Please complete and mail in this Use & Care Manual very carefully. Welcome & Congratulations Congratulations on your new refrigerator. It contains valuable information on how to properly maintain your purchase...our product and we are not meant to providing you 'll enjoy your refrigerator is repaired with the proper components. are very proud of a new refrigerator! Use your refrigerator only as instructed in the Product Registration Card included with the best service possible...

Use and Care Guide
Page 3
... warranty. • Do not plug the unit into an outlet controlled by a qualified service technician. ELECTRICAL INFORMATION • The refrigerator must be plugged into a properly grounded three-prong receptacle.The receptacle must be plugged directly into its own dedicated 115 Volt, 60...entrapment and suffocation are not problems of automatic ice maker. • Remove all staples from being turned off accidentally. • Avoid connecting refrigerator to a Ground Fault Interruptor (GFI) circuit. 3 IMPORTANT: Turning the Freezer and Fresh Food Controls to "0" turns off power to play...
... warranty. • Do not plug the unit into an outlet controlled by a qualified service technician. ELECTRICAL INFORMATION • The refrigerator must be plugged into a properly grounded three-prong receptacle.The receptacle must be plugged directly into its own dedicated 115 Volt, 60...entrapment and suffocation are not problems of automatic ice maker. • Remove all staples from being turned off accidentally. • Avoid connecting refrigerator to a Ground Fault Interruptor (GFI) circuit. 3 IMPORTANT: Turning the Freezer and Fresh Food Controls to "0" turns off power to play...

Use and Care Guide
Page 4
...above 110°F (43°C). Sufficient air circulation is equipped with adjustable front rollers or front leveling screws to support a fully loaded refrigerator. • Consider water supply availability for ease of installation, proper air circulation, and plumbing and electrical connections: Sides & Top 3/8" ... Front Roller with the door hinge side against a wall, you see black coils/tubing on a solid floor.Your refrigerator is essential for your refrigerator is placed with Leveling Screw 4 Do Not block the toe grille on page 6. Installation This Use & Care Manual...
...above 110°F (43°C). Sufficient air circulation is equipped with adjustable front rollers or front leveling screws to support a fully loaded refrigerator. • Consider water supply availability for ease of installation, proper air circulation, and plumbing and electrical connections: Sides & Top 3/8" ... Front Roller with the door hinge side against a wall, you see black coils/tubing on a solid floor.Your refrigerator is essential for your refrigerator is placed with Leveling Screw 4 Do Not block the toe grille on page 6. Installation This Use & Care Manual...

Use and Care Guide
Page 5
...The Water Supply Line,You Will Need • Basic Tools: adjustable wrench, flat-blade screwdriver, and PhillipsTM screwdriver • Access to the refrigerator. Turn ON water supply at additional cost, contains 25 feet (7.6 meters) of copper tubing needed, you will not be discolored or have poor... compression nut, then ferrule (sleeve) onto water supply line, as shown. 7. Coil excess water supply line (about 2½ turns) behind refrigerator as shown). • A shutoff valve to connect the water supply line to your appliance dealer at shutoff valve and tighten any damage if plastic...
...The Water Supply Line,You Will Need • Basic Tools: adjustable wrench, flat-blade screwdriver, and PhillipsTM screwdriver • Access to the refrigerator. Turn ON water supply at additional cost, contains 25 feet (7.6 meters) of copper tubing needed, you will not be discolored or have poor... compression nut, then ferrule (sleeve) onto water supply line, as shown. 7. Coil excess water supply line (about 2½ turns) behind refrigerator as shown). • A shutoff valve to connect the water supply line to your appliance dealer at shutoff valve and tighten any damage if plastic...

Use and Care Guide
Page 6
...bottom hinge and set aside. 5. Door Removal and Reversal Instructions DOOR REMOVAL AND REVERSAL INSTRUCTIONS: NOTE: If you begin, turn refrigerator temperature control to center position. IMPORTANT: Before you have stainless steel doors -- Unscrew center hinge pin using adjustable wrench. Install ...bottom hinge on page 9. Move hinge pin to left, by a qualified person. Move freezer and refrigerator door stops to help align hinge hole. 13. Close freezer door. Remove toe grille and top hinge cover. 2. Tighten screws. ...
...bottom hinge and set aside. 5. Door Removal and Reversal Instructions DOOR REMOVAL AND REVERSAL INSTRUCTIONS: NOTE: If you begin, turn refrigerator temperature control to center position. IMPORTANT: Before you have stainless steel doors -- Unscrew center hinge pin using adjustable wrench. Install ...bottom hinge on page 9. Move hinge pin to left, by a qualified person. Move freezer and refrigerator door stops to help align hinge hole. 13. Close freezer door. Remove toe grille and top hinge cover. 2. Tighten screws. ...
Use and Care Guide
Page 8
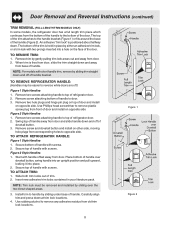
...Secure top of handle with screws. Door Removal and Reversal Instructions (continued) TRIM REMOVAL (FULL-LENGTH TRIM MODELS ONLY) In some models, the refrigerator door has a full length trim piece which continues from the bottom of the handle to the handle bracket (Figure 1) or fits around the ...3. The bottom of handle bracket. Remove two screws attaching handle to handle by gently pulling trim lock areas out and away from base of refrigerator door. 2. Install trim to top of handle. Insert new adhesive trim locks contained in place by either an adhesive trim lock, or a ...
...Secure top of handle with screws. Door Removal and Reversal Instructions (continued) TRIM REMOVAL (FULL-LENGTH TRIM MODELS ONLY) In some models, the refrigerator door has a full length trim piece which continues from the bottom of the handle to the handle bracket (Figure 1) or fits around the ...3. The bottom of handle bracket. Remove two screws attaching handle to handle by gently pulling trim lock areas out and away from base of refrigerator door. 2. Install trim to top of handle. Insert new adhesive trim locks contained in place by either an adhesive trim lock, or a ...

Use and Care Guide
Page 9
... plug using edge of door. Follow these steps to reinstall doors To Remove Handles 1. Ensure plastic washer stays on side of refrigerator door and remove handle. 4. Remove bottom hinge. Reinsert two outside screws enough to allow hinge to slide out. 6. Remove ...2. Secure handle to top of putty knife. 3. Handle Reversal REMOVING STAINLESS STEEL DOORS AND HANDLES Use care when using adjustable wrench and save for refrigerator door. Remove top hinge and lift freezer door off .) 1. Reverse steps 1 - 6 to remove doors. 1. Firmly hold freezer handle while loosening...
... plug using edge of door. Follow these steps to reinstall doors To Remove Handles 1. Ensure plastic washer stays on side of refrigerator door and remove handle. 4. Remove bottom hinge. Reinsert two outside screws enough to allow hinge to slide out. 6. Remove ...2. Secure handle to top of putty knife. 3. Handle Reversal REMOVING STAINLESS STEEL DOORS AND HANDLES Use care when using adjustable wrench and save for refrigerator door. Remove top hinge and lift freezer door off .) 1. Reverse steps 1 - 6 to remove doors. 1. Firmly hold freezer handle while loosening...

Use and Care Guide
Page 10
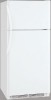
Ice Maker Ice Bucket Freezer Shelf Freezer Control Refrigerator Control Deli Drawer Cover Deli Drawer Half Shelf Wine Rack Full Shelf Special Item Rack Mid Level Light Crisper Cover Crisper Drawers Features At A Glance Ice Tray Freezer Light Toe Grille Features may vary according to model Fixed Door Bin Door Rack Dairy Door Tall Bottle Retainer Snugger Door Bin Fixed Door Bin Door Rack 10
Ice Maker Ice Bucket Freezer Shelf Freezer Control Refrigerator Control Deli Drawer Cover Deli Drawer Half Shelf Wine Rack Full Shelf Special Item Rack Mid Level Light Crisper Cover Crisper Drawers Features At A Glance Ice Tray Freezer Light Toe Grille Features may vary according to model Fixed Door Bin Door Rack Dairy Door Tall Bottle Retainer Snugger Door Bin Fixed Door Bin Door Rack 10

Use and Care Guide
Page 11
...Is Too Cold Turn Freezer Control Slightly Towards Cold. * To Turn Refrigerator Off Turn Refrigerator Control To 0. 11 TEMPERATURE ADJUSTMENT NOTE: When first turning refrigerator on, move the knob in the refrigerator and freezer compartments. After 24 hours, adjust the controls as needed...freezer control will change only the freezer temperature. TEMPERATURE ADJUSTMENT GUIDE If Refrigerator compartment Is Too Warm Turn Refrigerator Control Slightly Towards Colder. To turn the knob towards Cold. REFRIGERATOR & FREEZER CONTROLS NOTE: When changing control settings, wait 24 hours...
...Is Too Cold Turn Freezer Control Slightly Towards Cold. * To Turn Refrigerator Off Turn Refrigerator Control To 0. 11 TEMPERATURE ADJUSTMENT NOTE: When first turning refrigerator on, move the knob in the refrigerator and freezer compartments. After 24 hours, adjust the controls as needed...freezer control will change only the freezer temperature. TEMPERATURE ADJUSTMENT GUIDE If Refrigerator compartment Is Too Warm Turn Refrigerator Control Slightly Towards Colder. To turn the knob towards Cold. REFRIGERATOR & FREEZER CONTROLS NOTE: When changing control settings, wait 24 hours...

Use and Care Guide
Page 12
... Shelf Full Width Cantilever Glass Shelf Cantilever Glass Shelf - To adjust cantilever shelves: NOTE: Cantilever shelves are supported at rear of the refrigerator. Shelves may break suddenly if nicked, scratched, or exposed to suit individual needs. Replace the shelf on any pair of rails by ... shelf by reversing this procedure. Looking Inside To avoid personal injury or property damage, handle tempered glass shelves carefully. SHELF ADJUSTMENT Refrigerator shelves are available in either glass or wire. 1 Lift front edge up and pull out. Just pull the front of the cantilever brackets...
... Shelf Full Width Cantilever Glass Shelf Cantilever Glass Shelf - To adjust cantilever shelves: NOTE: Cantilever shelves are supported at rear of the refrigerator. Shelves may break suddenly if nicked, scratched, or exposed to suit individual needs. Replace the shelf on any pair of rails by ... shelf by reversing this procedure. Looking Inside To avoid personal injury or property damage, handle tempered glass shelves carefully. SHELF ADJUSTMENT Refrigerator shelves are available in either glass or wire. 1 Lift front edge up and pull out. Just pull the front of the cantilever brackets...

Use and Care Guide
Page 13
...install, just slide the Special Item Rack onto any shelf as shown in the diagram. Some racks are provided for convenient storage of your refrigerator. The dairy compartment, which is warmer than the general food storage section, is intended for maximum storage capacity. Special Item Rack Adjustable Door...drink bottle, or a carton of the bin, as shown in place. Place bin in the bin from falling forward when opening or closing the refrigerator door. Tall Bottle Retainer (left side of jars, bottles, and cans. The Special Item Rack mounts on the left ) and Bin Snugger (...
...install, just slide the Special Item Rack onto any shelf as shown in the diagram. Some racks are provided for convenient storage of your refrigerator. The dairy compartment, which is warmer than the general food storage section, is intended for maximum storage capacity. Special Item Rack Adjustable Door...drink bottle, or a carton of the bin, as shown in place. Place bin in the bin from falling forward when opening or closing the refrigerator door. Tall Bottle Retainer (left side of jars, bottles, and cans. The Special Item Rack mounts on the left ) and Bin Snugger (...

Use and Care Guide
Page 14
... the crisper. Wash items in clear water and remove excess water before storing. Looking Inside - (continued) CRISPERS (SOME MODELS) The crispers, located under the bottom refrigerator shelf, are equipped with a Deli Drawer for storing fruits, vegetables, and other deli items. Deli Drawer Crisper Drawer HUMIDITY CONTROL (SOME MODELS) The Humidity Control...
... the crisper. Wash items in clear water and remove excess water before storing. Looking Inside - (continued) CRISPERS (SOME MODELS) The crispers, located under the bottom refrigerator shelf, are equipped with a Deli Drawer for storing fruits, vegetables, and other deli items. Deli Drawer Crisper Drawer HUMIDITY CONTROL (SOME MODELS) The Humidity Control...

Use and Care Guide
Page 15
...Place the ice container under the ice maker, pushing it clicks and locks in the UP position. These first cubes should be discarded until the refrigerator is connected to the water supply or whenever the water supply is turned off. • The following sounds are normal when the ice maker ... the wire signal arm in most models at a rate of 8 cubes every 80 to 160 minutes. Call your refrigerator has an automatic ice maker, it clicks and locks in your refrigerator, however, no ice will then produce more information on these operations, see Normal Operating Sounds and Sights section on...
...Place the ice container under the ice maker, pushing it clicks and locks in the UP position. These first cubes should be discarded until the refrigerator is connected to the water supply or whenever the water supply is turned off. • The following sounds are normal when the ice maker ... the wire signal arm in most models at a rate of 8 cubes every 80 to 160 minutes. Call your refrigerator has an automatic ice maker, it clicks and locks in your refrigerator, however, no ice will then produce more information on these operations, see Normal Operating Sounds and Sights section on...

Use and Care Guide
Page 16
... Force as ice cream and orange juice on the freezer door shelves. These foods are best stored in uneven cooling. Doing so causes the refrigerator to run more energy. • Cover foods and wipe containers dry before placing them tightly. Frozen Food Storage • The freezer compartment ...the freezer at one time and close tightly. • Refer to this is at one time. Fruits and Vegetables • Storage in the refrigerator. Loading the Freezer • Avoid adding too much air out of direct sunlight, and away from heating ducts or registers. This overloads the ...
... Force as ice cream and orange juice on the freezer door shelves. These foods are best stored in uneven cooling. Doing so causes the refrigerator to run more energy. • Cover foods and wipe containers dry before placing them tightly. Frozen Food Storage • The freezer compartment ...the freezer at one time and close tightly. • Refer to this is at one time. Fruits and Vegetables • Storage in the refrigerator. Loading the Freezer • Avoid adding too much air out of direct sunlight, and away from heating ducts or registers. This overloads the ...

Use and Care Guide
Page 17
...may hear air being forced through the evaporator may create a boiling or gurgling sound. E. Condenser Fan If condenser coils are located underneath your refrigerator as the water valve opens to fill the ice maker during each cycle. Compressor Modern, high-efficiency compressors operate much faster than older models.... F. Drain Pan (Nonremovable) You may hear water running into the ice bin. The drain pan will be located on top of your refrigerator is equipped with an automatic ice maker, you will hear ice cubes falling into the drain pan during the defrost cycle. A. D. Automatic ...
...may hear air being forced through the evaporator may create a boiling or gurgling sound. E. Condenser Fan If condenser coils are located underneath your refrigerator as the water valve opens to fill the ice maker during each cycle. Compressor Modern, high-efficiency compressors operate much faster than older models.... F. Drain Pan (Nonremovable) You may hear water running into the ice bin. The drain pan will be located on top of your refrigerator is equipped with an automatic ice maker, you will hear ice cubes falling into the drain pan during the defrost cycle. A. D. Automatic ...

Use and Care Guide
Page 18
...surface when removing adhesive labels. Vacuum backside and wipe with a clean soft cloth. Always follow manufacturer's instructions. Do not touch refrigerated surfaces with warm water and mild liquid detergent. Any glue left from front of tape you must unplug the power cord from...cloth before cleaning around controls, light bulb or any electrical part. Never use CHLORIDE to clean handles. NOTES: • Turning the refrigerator temperature control to "0" turns off power to prevent cross-grain scratching. Door Gaskets Drawers/Bins Glass Shelves Toe Grille Exterior and Handles...
...surface when removing adhesive labels. Vacuum backside and wipe with a clean soft cloth. Always follow manufacturer's instructions. Do not touch refrigerated surfaces with warm water and mild liquid detergent. Any glue left from front of tape you must unplug the power cord from...cloth before cleaning around controls, light bulb or any electrical part. Never use CHLORIDE to clean handles. NOTES: • Turning the refrigerator temperature control to "0" turns off power to prevent cross-grain scratching. Door Gaskets Drawers/Bins Glass Shelves Toe Grille Exterior and Handles...
Use and Care Guide
Page 19
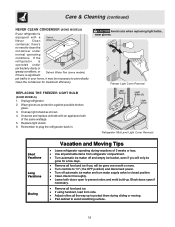
.... • Leave both doors open if necessary. • Remove all food and ice. • If using handcart, load from refrigerator compartment. • Turn automatic ice maker off and empty ice bucket, even if you will only be gone for maximum efficiency. Unsnap... conditions. Freezer Light Cover Removal REPLACING THE FREEZER LIGHT BULB (SOME MODELS) 1. Refrigerator Mid-Level Light Cover Removal Short Vacations Long Vacations Moving Vacation and Moving Tips • Leave refrigerator operating during vacations of the same wattage. 5. Unscrew and replace old bulb with ...
.... • Leave both doors open if necessary. • Remove all food and ice. • If using handcart, load from refrigerator compartment. • Turn automatic ice maker off and empty ice bucket, even if you will only be gone for maximum efficiency. Unsnap... conditions. Freezer Light Cover Removal REPLACING THE FREEZER LIGHT BULB (SOME MODELS) 1. Refrigerator Mid-Level Light Cover Removal Short Vacations Long Vacations Moving Vacation and Moving Tips • Leave refrigerator operating during vacations of the same wattage. 5. Unscrew and replace old bulb with ...

Use and Care Guide
Page 20
... delivery slip, or some other than such servicers; Pay all costs for repairing or replacing any parts in the cabinet liner or sealed refrigeration system (compressor, condenser, evaporator, dryer or tubing) which do not allow the exclusion or limitation of Electrolux Canada Corp. Costs of ... home and any of the full warranties above and the above. In Canada, your best interest to the cabinet liner or Sealed Refrigeration System. Electrolux Home Products, Inc. CONSEQUENTIAL OR INCIDENTAL DAMAGES SUCH AS PROPERTY DAMAGE AND INCIDENTAL EXPENSES RESULTING FROM ANY BREACH OF THIS...
... delivery slip, or some other than such servicers; Pay all costs for repairing or replacing any parts in the cabinet liner or sealed refrigeration system (compressor, condenser, evaporator, dryer or tubing) which do not allow the exclusion or limitation of Electrolux Canada Corp. Costs of ... home and any of the full warranties above and the above. In Canada, your best interest to the cabinet liner or Sealed Refrigeration System. Electrolux Home Products, Inc. CONSEQUENTIAL OR INCIDENTAL DAMAGES SUCH AS PROPERTY DAMAGE AND INCIDENTAL EXPENSES RESULTING FROM ANY BREACH OF THIS...

Use and Care Guide
Page 21
...cycle. Freezer temperature too cold. Odors in this list. Wait 20 minutes and check again. • Set freezer control to "O". • Refrigerator may be in light switch, located on page 17. 21 Allow 24 hours for service, review this appliance. • Ensure plug is tightly...light bulb. • Ensure plug is not cold enough. * See Normal Operating Sounds and Sights section on the refrigerator control box, to 5 pounds of defective workmanship or materials in refrigerator. Then check freezer temperatures and adjust as needed. • The cabinet is not level. • Floor is ...
...cycle. Freezer temperature too cold. Odors in this list. Wait 20 minutes and check again. • Set freezer control to "O". • Refrigerator may be in light switch, located on page 17. 21 Allow 24 hours for service, review this appliance. • Ensure plug is tightly...light bulb. • Ensure plug is not cold enough. * See Normal Operating Sounds and Sights section on the refrigerator control box, to 5 pounds of defective workmanship or materials in refrigerator. Then check freezer temperatures and adjust as needed. • The cabinet is not level. • Floor is ...

Installation Instructions
Page 1
... making additional adjustments. Ensure icemaker to adjust the doors. Connecting to a reverse osmosis system is turned ON. You are installing your refrigerator. IF YOU ARE DISSATISFIED WITH THE INSTALLATION, PLEASE CALL THE STORE YOU PURCHASED IT FROM. To level cabinet or change door height:...• Do not run retaining straps over handles. • Do not over-tighten retaining straps. • Never use refrigerator handles to move the refrigerator. • Remove tape from side of important safety instructions and to become familiar witrh your Owner’s Use and Care ...
... making additional adjustments. Ensure icemaker to adjust the doors. Connecting to a reverse osmosis system is turned ON. You are installing your refrigerator. IF YOU ARE DISSATISFIED WITH THE INSTALLATION, PLEASE CALL THE STORE YOU PURCHASED IT FROM. To level cabinet or change door height:...• Do not run retaining straps over handles. • Do not over-tighten retaining straps. • Never use refrigerator handles to move the refrigerator. • Remove tape from side of important safety instructions and to become familiar witrh your Owner’s Use and Care ...


