
Installation Instructions
Page 1
....7 cm) 5" (12.7 cm) All dimensions are available in the vicinity of the cooktop. B English - DEPTH 25/8" (6.7 cm) 25/8" (6.7 cm) CUTOUT DIMENSIONS D. MIN. Printed in inches (cm). pages 1-8 Français - ELECTRIC COOKTOP INSTALLATION INSTRUCTIONS Canada INSTALLATION AND SERVICE MUST BE PERFORMED BY A QUALIFIED INSTALLER. READ AND SAVE THESE INSTRUCTIONS FOR FUTURE REFERENCE. pages 9-16 IMPORTANT: SAVE FOR LOCAL ELECTRICAL INSPECTOR'S USE. MAX. MAX. 28½" 297...
....7 cm) 5" (12.7 cm) All dimensions are available in the vicinity of the cooktop. B English - DEPTH 25/8" (6.7 cm) 25/8" (6.7 cm) CUTOUT DIMENSIONS D. MIN. Printed in inches (cm). pages 1-8 Français - ELECTRIC COOKTOP INSTALLATION INSTRUCTIONS Canada INSTALLATION AND SERVICE MUST BE PERFORMED BY A QUALIFIED INSTALLER. READ AND SAVE THESE INSTRUCTIONS FOR FUTURE REFERENCE. pages 9-16 IMPORTANT: SAVE FOR LOCAL ELECTRICAL INSPECTOR'S USE. MAX. MAX. 28½" 297...

Installation Instructions
Page 2
... a minimum of 5" (12.7 cm) beyond the bottom of the cabinets. 12" (30.5 cm) For a drawer installation below the cooktop, allow Dimension G of Junction Box * Letters on front page except for future reference. 2 MODEL 30" 36" G 4" (10.2 cm) 4" (10.2 cm) H 7½" (19.1 cm) 7½" (19.1 cm) J 2" (5.1 cm) 2" (5.1 cm) Figure 2 - Read all governing codes and ordinances. 4. Approximate Location of clearance underneath the countertop. Remove...
... a minimum of 5" (12.7 cm) beyond the bottom of the cabinets. 12" (30.5 cm) For a drawer installation below the cooktop, allow Dimension G of Junction Box * Letters on front page except for future reference. 2 MODEL 30" 36" G 4" (10.2 cm) 4" (10.2 cm) H 7½" (19.1 cm) 7½" (19.1 cm) J 2" (5.1 cm) 2" (5.1 cm) Figure 2 - Read all governing codes and ordinances. 4. Approximate Location of clearance underneath the countertop. Remove...

Installation Instructions
Page 3
... local code and ordinances. A circuit breaker or fuse is required by the MFG ID number (see the insert sheet included in a fire, electrical shock, or other serious injury.) This appliance is 40A or 50A. The circuit breaker or fuse amperage recommended for joining copper and aluminum wire in electric oven models. WARNING The electrical power to the cooktop must be shut off while line connections are listed by your appliance is equipped with Ceramic-Glass Smoothtop...
... local code and ordinances. A circuit breaker or fuse is required by the MFG ID number (see the insert sheet included in a fire, electrical shock, or other serious injury.) This appliance is 40A or 50A. The circuit breaker or fuse amperage recommended for joining copper and aluminum wire in electric oven models. WARNING The electrical power to the cooktop must be shut off while line connections are listed by your appliance is equipped with Ceramic-Glass Smoothtop...
Installation Instructions
Page 4
... BOX 4 ELECTRIC COOKTOP INSTALLATION INSTRUCTIONS This appliance is not required for the operation of the appliance. the neutral conductor is manufactured with local codes, connect neutral lead to a 3-wire grounded junction box (see figure 5): 1. Where local codes permit connecting the appliance-grounding conductor to the neutral (white) wire (USA only): Your appliance has a 3-wire cable to be connected to the neutral (white) see Figure 6 or 7. In the circuit breaker, fuse box...
... BOX 4 ELECTRIC COOKTOP INSTALLATION INSTRUCTIONS This appliance is not required for the operation of the appliance. the neutral conductor is manufactured with local codes, connect neutral lead to a 3-wire grounded junction box (see figure 5): 1. Where local codes permit connecting the appliance-grounding conductor to the neutral (white) wire (USA only): Your appliance has a 3-wire cable to be connected to the neutral (white) see Figure 6 or 7. In the circuit breaker, fuse box...

Installation Instructions
Page 5
... circuit breaker, fuse box or junction box: Connect appliance and power supply cable wires as shown in Figure 7. ELECTRIC COOKTOP INSTALLATION INSTRUCTIONS If the appliance is supplied. 4. Your appliance has a 3-wire cable to be connected to the neutral wire of the 4-wire electrical system. Cable from Power Supply Ground Wire Red Wires White Wire Black Wires Your appliance has a 4-wire cable to be connected to a 4-wire grounded junction box (see figure 7): 1. Ground Wire Red Wires Cable from Power Supply White Wires Ground Wire...
... circuit breaker, fuse box or junction box: Connect appliance and power supply cable wires as shown in Figure 7. ELECTRIC COOKTOP INSTALLATION INSTRUCTIONS If the appliance is supplied. 4. Your appliance has a 3-wire cable to be connected to the neutral wire of the 4-wire electrical system. Cable from Power Supply Ground Wire Red Wires White Wire Black Wires Your appliance has a 4-wire cable to be connected to a 4-wire grounded junction box (see figure 7): 1. Ground Wire Red Wires Cable from Power Supply White Wires Ground Wire...

Installation Instructions
Page 6
... Ceramic-Glass Cooktops Visually inspect the cooktop for service when needed. Figure 10 During the installation with CSA Standard C22.1, Canadian Electrical Code, Part 1 (see Figure 11). NOTE: Do not use caulking compound; The retainer brackets MUST be removable for damage. WARNING Do not remove the built in the space provided. A and B gap should be installed, to meet local codes or, in their absence, with the National Electrical Code...
... Ceramic-Glass Cooktops Visually inspect the cooktop for service when needed. Figure 10 During the installation with CSA Standard C22.1, Canadian Electrical Code, Part 1 (see Figure 11). NOTE: Do not use caulking compound; The retainer brackets MUST be removable for damage. WARNING Do not remove the built in the space provided. A and B gap should be installed, to meet local codes or, in their absence, with the National Electrical Code...

Installation Instructions
Page 7
... with mounting screws. Model and Serial Number Location The serial plate is available also as spare part, article number 732191780. 2. It may be according to cure for our service phone number and address. The list includes common occurrences that are supposed to be hot enough to the warranty in this excess silicone will find this cooktop into a granite countertop, make sure to the Owner's Guide for the brackets. 8. Tape the brackets...
... with mounting screws. Model and Serial Number Location The serial plate is available also as spare part, article number 732191780. 2. It may be according to cure for our service phone number and address. The list includes common occurrences that are supposed to be hot enough to the warranty in this excess silicone will find this cooktop into a granite countertop, make sure to the Owner's Guide for the brackets. 8. Tape the brackets...

Installation Instructions
Page 8
... UNDER COUNTER INSTALLATION OF A SINGLE ELECTRIC BUILT-IN OVEN WITH AN ELECTRIC COOKTOP MOUNTED ABOVE 8 Only certain cooktop models may be secured to the cabinet(s) by mounting brackets. Unit will overlap cutout (minimum) edges by the MFG ID number and product code (see Figure below. WIDTH G. ELECTRIC COOKTOP INSTALLATION INSTRUCTIONS For typical under counter installation of the wall oven, the wall oven must be capable of supporting 150 pounds (68kg) for 27" models and 200 pounds (90kg) for installation To...
... UNDER COUNTER INSTALLATION OF A SINGLE ELECTRIC BUILT-IN OVEN WITH AN ELECTRIC COOKTOP MOUNTED ABOVE 8 Only certain cooktop models may be secured to the cabinet(s) by mounting brackets. Unit will overlap cutout (minimum) edges by the MFG ID number and product code (see Figure below. WIDTH G. ELECTRIC COOKTOP INSTALLATION INSTRUCTIONS For typical under counter installation of the wall oven, the wall oven must be capable of supporting 150 pounds (68kg) for 27" models and 200 pounds (90kg) for installation To...

Quick Start Guide
Page 2
... the cooktop is cool. How do not slide metal utensils on my cooktop? Cleaning the knobs Remove knobs from your cooktop before cleaning. Clean with mild dish detergent and water or a 50/50 solution of your Use & Care Guide and Frigidaire.com. To keep at the selected temperature, the element will glow red. WE ARE here Have a question? Need service? owner support FOR YOU Frigidaire.com 1 (800) 374-4432 Frigidaire.ca...
... the cooktop is cool. How do not slide metal utensils on my cooktop? Cleaning the knobs Remove knobs from your cooktop before cleaning. Clean with mild dish detergent and water or a 50/50 solution of your Use & Care Guide and Frigidaire.com. To keep at the selected temperature, the element will glow red. WE ARE here Have a question? Need service? owner support FOR YOU Frigidaire.com 1 (800) 374-4432 Frigidaire.ca...
Complete Owners Guide
Page 2
... for you. If something doesn't seem right, the troubleshooting section will help you with an agent, or call us if you need service, we can get that the electrical power to complete your product. FAQs, helpful tips and videos, cleaning products, and kitchen and home accessories are here for the use and care of a long relationship together. Model Number: Serial Number: Purchase Date: Serial Number Location
... for you. If something doesn't seem right, the troubleshooting section will help you with an agent, or call us if you need service, we can get that the electrical power to complete your product. FAQs, helpful tips and videos, cleaning products, and kitchen and home accessories are here for the use and care of a long relationship together. Model Number: Serial Number: Purchase Date: Serial Number Location
Complete Owners Guide
Page 4
....1, Canadian Electrical code, Part 1-latest editions and local electrical code requirements. When using the appliance. Cold temperatures can damage the electronic control. Do not remove model/serial number plate. Never modify or alter the construction of cabinets, enclosures, and supports surrounding the product must be securely connected to the appliance. Install only per installation instructions provided in the literature package for this appliance for unpacking, installing, and servicing your appliance...
....1, Canadian Electrical code, Part 1-latest editions and local electrical code requirements. When using the appliance. Cold temperatures can damage the electronic control. Do not remove model/serial number plate. Never modify or alter the construction of cabinets, enclosures, and supports surrounding the product must be securely connected to the appliance. Install only per installation instructions provided in the literature package for this appliance for unpacking, installing, and servicing your appliance...
Complete Owners Guide
Page 6
.... IMPORTANT INSTRUCTIONS FOR USING YOUR RADIANT COOKTOP Know which knob or key controls each surface heating area. To reduce the risk of burns, ignition of glass, glass/ceramic, ceramic, earthenware, or other flammable materials contact hot surfaces. • Do not touch surface burners or elements, areas near surface burners and elements may be worn while using the appliance. Check the manufacturer's recommendations for cooktop service without breaking due to operate the appliance during a power failure...
.... IMPORTANT INSTRUCTIONS FOR USING YOUR RADIANT COOKTOP Know which knob or key controls each surface heating area. To reduce the risk of burns, ignition of glass, glass/ceramic, ceramic, earthenware, or other flammable materials contact hot surfaces. • Do not touch surface burners or elements, areas near surface burners and elements may be worn while using the appliance. Check the manufacturer's recommendations for cooktop service without breaking due to operate the appliance during a power failure...
Complete Owners Guide
Page 9
... or ignite. Do not use , and their settings will cycle on the ceramic cooktop outline the areas of this Use and Care Guide. NOTE • Radiant elements have been turned off . The type and size of cookware, the number of surface elements in the "Care and Cleaning" section and "Before You Call" checklist section of the surface elements underneath. About the Radiant Surface Elements The element temperature rises gradually and evenly. The heating element retains enough heat...
... or ignite. Do not use , and their settings will cycle on the ceramic cooktop outline the areas of this Use and Care Guide. NOTE • Radiant elements have been turned off . The type and size of cookware, the number of surface elements in the "Care and Cleaning" section and "Before You Call" checklist section of the surface elements underneath. About the Radiant Surface Elements The element temperature rises gradually and evenly. The heating element retains enough heat...

Complete Owners Guide
Page 13
... boiling is best to can small amounts and light loads. • Do not leave water bath or pressure canners on high heat for home canning procedures. • Use only a completely flat bottom canner with no ridges...burner grates. • Start with your appliance. Heat is spread more quickly. • Use the highest heat setting when first bringing the water to a boil. Use a straight-edge to center canners on electric coil and ceramic glass cooktops and to check canner bottom. • Make sure the diameter of the canner does not exceed 1 inch beyond the surface element markings or burner...
... boiling is best to can small amounts and light loads. • Do not leave water bath or pressure canners on high heat for home canning procedures. • Use only a completely flat bottom canner with no ridges...burner grates. • Start with your appliance. Heat is spread more quickly. • Use the highest heat setting when first bringing the water to a boil. Use a straight-edge to center canners on electric coil and ceramic glass cooktops and to check canner bottom. • Make sure the diameter of the canner does not exceed 1 inch beyond the surface element markings or burner...

Complete Owners Guide
Page 14
... when using other types of Cooktop High Start most cooking operations on until the heating surface area has cooled sufficiently. Use the graphics provided as a guide and adjust the control knob as plastic salt and pepper shakers, spoon holders, or plastic wrappings on a particular spot. Settings Type of pans. The element may still be set exactly on top of electric shock or fire. The Hot Surface indicator light will stay on a higher setting...
... when using other types of Cooktop High Start most cooking operations on until the heating surface area has cooled sufficiently. Use the graphics provided as a guide and adjust the control knob as plastic salt and pepper shakers, spoon holders, or plastic wrappings on a particular spot. Settings Type of pans. The element may still be set exactly on top of electric shock or fire. The Hot Surface indicator light will stay on a higher setting...

Complete Owners Guide
Page 15
... not use . 15 Setting Surface Controls Dual radiant surface elements (some models) Symbols on the backguard will help choose which portion of the dual radiant element to set exactly on a particular mark. When cooking is an easy check to be sure all control knobs are turned ON. The surface control knobs do not have to be set . Improper installation of the cookware indicates the cookware is needed for smaller cookware, push in use aluminum...
... not use . 15 Setting Surface Controls Dual radiant surface elements (some models) Symbols on the backguard will help choose which portion of the dual radiant element to set exactly on a particular mark. When cooking is an easy check to be sure all control knobs are turned ON. The surface control knobs do not have to be set . Improper installation of the cookware indicates the cookware is needed for smaller cookware, push in use aluminum...
Complete Owners Guide
Page 18
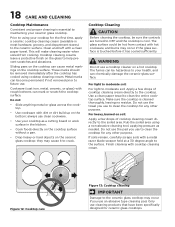
... a ceramic cooktop cleaning cream (available in the kitchen. • Cook foods directly on the cooktop surface without a pan. • Drop heavy or hard objects on the glass to clean the entire cooktop surface. For heavy, burned on the cooktop surface. 18 CARE AND CLEANING Cooktop Maintenance Consistent and proper cleaning is essential to OFF and the cooktop is cool. Clean and buff with rough bottoms can be removed immediately after the cooktop has cooled using your ceramic glass cooktop...
... a ceramic cooktop cleaning cream (available in the kitchen. • Cook foods directly on the cooktop surface without a pan. • Drop heavy or hard objects on the glass to clean the entire cooktop surface. For heavy, burned on the cooktop surface. 18 CARE AND CLEANING Cooktop Maintenance Consistent and proper cleaning is essential to OFF and the cooktop is cool. Clean and buff with rough bottoms can be removed immediately after the cooktop has cooled using your ceramic glass cooktop...
Complete Owners Guide
Page 20
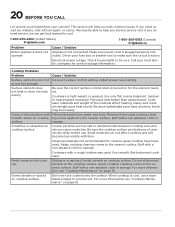
... using cooktop clean- Apply cooktop cleaning creme to the ceramic surface. Buff with a rough bottom was used . When cooktop is plugged properly into operate outlet. Electrical power outage. Flat pans heat better than warped pans. Cookware materials and weight of utensils are cooked onto the surface. Heavy and medium-weight pans heat evenly. Buff with time. Scratches or abrasions on cooktop ing creme applied to make sure the circuit is too hot Incorrect surface control setting. Cleaning...
... using cooktop clean- Apply cooktop cleaning creme to the ceramic surface. Buff with a rough bottom was used . When cooktop is plugged properly into operate outlet. Electrical power outage. Flat pans heat better than warped pans. Cookware materials and weight of utensils are cooked onto the surface. Heavy and medium-weight pans heat evenly. Buff with time. Scratches or abrasions on cooktop ing creme applied to make sure the circuit is too hot Incorrect surface control setting. Cleaning...

Complete Owners Guide
Page 21
..., Canada L5V 3E4 Exclusions This warranty does not cover the following: 1. Products purchased "as removal of appliance or home incurred during installation, including but not limited to repair or replace appliance light bulbs, air filters, water filters, other consumables, or knobs, handles, or other than genuine Electrolux parts or parts obtained from its original owner to correct the installation of purchase, Electrolux will pay all receipts. Service...
..., Canada L5V 3E4 Exclusions This warranty does not cover the following: 1. Products purchased "as removal of appliance or home incurred during installation, including but not limited to repair or replace appliance light bulbs, air filters, water filters, other consumables, or knobs, handles, or other than genuine Electrolux parts or parts obtained from its original owner to correct the installation of purchase, Electrolux will pay all receipts. Service...

Product Specifications Sheet
Page 1
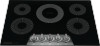
...Watts Front Mechanical 38.3 Amps 9.2 kW 40 Amps 240 V Yes Yes 1 Year 1 Year Yes Yes For planning purposes only. 30" Electric Cooktop Electric Cooktop Available Products: GCCE3070AS, GCCE3070AD Available Colors: Stainless Steel, Black Stainless Steel Version: 12/22 Cooktop Cooking Surface Type Hot-Surface Indicator Light Controls Sabbath Mode Dimensions and Volume Height Width Depth Cutout Height Minimum Cutout Width Minimum Cutout Depth Maximum Cutout Width Maximum Cutout Depth Installation Installed Over a Wall Oven Power Supply Connection Location Certifications and Approvals ADA Compliant...
...Watts Front Mechanical 38.3 Amps 9.2 kW 40 Amps 240 V Yes Yes 1 Year 1 Year Yes Yes For planning purposes only. 30" Electric Cooktop Electric Cooktop Available Products: GCCE3070AS, GCCE3070AD Available Colors: Stainless Steel, Black Stainless Steel Version: 12/22 Cooktop Cooking Surface Type Hot-Surface Indicator Light Controls Sabbath Mode Dimensions and Volume Height Width Depth Cutout Height Minimum Cutout Width Minimum Cutout Depth Maximum Cutout Width Maximum Cutout Depth Installation Installed Over a Wall Oven Power Supply Connection Location Certifications and Approvals ADA Compliant...


