
Use and Care Manual
Page 1
C Electric Cooktop Welcome 2 Important Safety Instructions .. 3-4 Setting Surface Controls .... 4-7 Surface Cooking 8 Care & Cleaning 9-10 Before You Call SC.oo.lm.u.tm.io.o.nn.s..Pt.or.o.b.l.e.m..s 11 Warranty 12 318200626 (0511) Rev.
C Electric Cooktop Welcome 2 Important Safety Instructions .. 3-4 Setting Surface Controls .... 4-7 Surface Cooking 8 Care & Cleaning 9-10 Before You Call SC.oo.lm.u.tm.io.o.nn.s..Pt.or.o.b.l.e.m..s 11 Warranty 12 318200626 (0511) Rev.

Use and Care Manual
Page 2
.... Solicite la P/N 318200628E. At Electrolux Home Products, we are not meant to Electrolux Home Products. Common sense and caution must be filled in United States Cooktop Serial Plate Location 2 Box 212378 Augusta, GA 30917 © 2005 Electrolux Canada Corp. All rights reserved Printed in completely, signed and returned to cover every...
.... Solicite la P/N 318200628E. At Electrolux Home Products, we are not meant to Electrolux Home Products. Common sense and caution must be filled in United States Cooktop Serial Plate Location 2 Box 212378 Augusta, GA 30917 © 2005 Electrolux Canada Corp. All rights reserved Printed in completely, signed and returned to cover every...

Use and Care Manual
Page 3
... fire. Exhaust fan ventilation hoods and grease filters should not be stored near the appliance. This appliance is not turned off the cooktop. This symbol will be left alone or unattended in Canada, and local code requirements. Be sure your appliance is in injury....that may cause the container to burst and result in use. During and after unpacking the appliance. IMPORTANT SAFETY INSTRUCTIONS FOR USING YOUR COOKTOP • Know which knob controls each surface unit. • Clean the appliance regularly to recommend a qualified technician and an authorized repair...
... fire. Exhaust fan ventilation hoods and grease filters should not be stored near the appliance. This appliance is not turned off the cooktop. This symbol will be left alone or unattended in Canada, and local code requirements. Be sure your appliance is in injury....that may cause the container to burst and result in use. During and after unpacking the appliance. IMPORTANT SAFETY INSTRUCTIONS FOR USING YOUR COOKTOP • Know which knob controls each surface unit. • Clean the appliance regularly to recommend a qualified technician and an authorized repair...

Use and Care Manual
Page 4
...enough to the • Utensil Handles Should Be Turned Inward and Not appliance. hi ELEMENT ON hi ..... 88 OFF lo lo ..... Cooktop Appearance About the Radiant Surface Elements The element temperature rises gradually and evenly. To maintain the selected setting, the element will also improve ... and greasy spillovers that may result in element is accidentally turned on a hot cooking area, be careful to FOR CERAMIC-GLASS COOKTOP ONLY unintentional contact with Caution. due to warn customers of the glass. Check the • Do Not Let Pans Boil Dry...
...enough to the • Utensil Handles Should Be Turned Inward and Not appliance. hi ELEMENT ON hi ..... 88 OFF lo lo ..... Cooktop Appearance About the Radiant Surface Elements The element temperature rises gradually and evenly. To maintain the selected setting, the element will also improve ... and greasy spillovers that may result in element is accidentally turned on a hot cooking area, be careful to FOR CERAMIC-GLASS COOKTOP ONLY unintentional contact with Caution. due to warn customers of the glass. Check the • Do Not Let Pans Boil Dry...

Use and Care Manual
Page 5
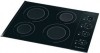
...to a boil and pan broiling. thicken sauces and gravies; Setting Surface Controls locations of the surface radiant elements Your cooktop is not flat (Refer to 9 inch radiant elements located at the right front and left rear positions. bring water... different wattage ratings. d n a p x e d n a p x e a b l e e lement b l e ele m e n t d n a p x e b l e ele m e n t a b l e e lement 30" cooktop a d n a exp hi ..... 88 OFF lo lo ..... Continue a rapid boil; steaming vegetables. ELEMENT ON hi 88 OFF hi ..... Cycling at the HI setting. The radiant surface...
...to a boil and pan broiling. thicken sauces and gravies; Setting Surface Controls locations of the surface radiant elements Your cooktop is not flat (Refer to 9 inch radiant elements located at the right front and left rear positions. bring water... different wattage ratings. d n a p x e d n a p x e a b l e e lement b l e ele m e n t d n a p x e b l e ele m e n t a b l e e lement 30" cooktop a d n a exp hi ..... 88 OFF lo lo ..... Continue a rapid boil; steaming vegetables. ELEMENT ON hi 88 OFF hi ..... Cycling at the HI setting. The radiant surface...

Use and Care Manual
Page 6
... ...... ESEC Power Failure Indicator Message (PF) When the range is first plugged in increments of the single, dual or triple radiant element positions the cooktop will become He very hot. The settings between 9.5 and 3.0 decrease or increase in digital windows (Figs. 1 thru 4). Fig. 1 lo .........This will remain hot for best cooking results. Once the surface controls have been set all of the cooktop and displays the message "HE" (hot element) warning when the cooktop is ESEC Error Indicator Message (Er) typical only. Even after following Fig. 7 these procedures, ...
... ...... ESEC Power Failure Indicator Message (PF) When the range is first plugged in increments of the single, dual or triple radiant element positions the cooktop will become He very hot. The settings between 9.5 and 3.0 decrease or increase in digital windows (Figs. 1 thru 4). Fig. 1 lo .........This will remain hot for best cooking results. Once the surface controls have been set all of the cooktop and displays the message "HE" (hot element) warning when the cooktop is ESEC Error Indicator Message (Er) typical only. Even after following Fig. 7 these procedures, ...

Use and Care Manual
Page 7
... after they have been turned OFF. Push in and turn the surface control knob to OFF before removing the cookware. hi ELEMENT ON a d n a exp 30" cooktop is equipped with dual d n a p x e b l e ele m e n t hi ..... 88 OFF lo lo ..... hi hi ..... 88 OFF lo lo ... Surface Element 1. Place correctly sized cookware on the radiant surface element. 2. Setting Surface Controls Operating the Single Surface Radiant Elements The 36" cooktop has a single radiant surface element located at a d n a exp the center rear position (See Fig 4). Start most cooking operations on...
... after they have been turned OFF. Push in and turn the surface control knob to OFF before removing the cookware. hi ELEMENT ON a d n a exp 30" cooktop is equipped with dual d n a p x e b l e ele m e n t hi ..... 88 OFF lo lo ..... hi hi ..... 88 OFF lo lo ... Surface Element 1. Place correctly sized cookware on the radiant surface element. 2. Setting Surface Controls Operating the Single Surface Radiant Elements The 36" cooktop has a single radiant surface element located at a d n a exp the center rear position (See Fig 4). Start most cooking operations on...

Use and Care Manual
Page 8
...will cause it may leave metal marks which will influence the setting needed for flatness by rotating a ruler across the ceramic glass cooktop, they may scratch the glass. 8 Excellent heat conductor. Remove these marks immediately. PORCELAIN-ENAMEL on base material. Slow heat ...conductor. GLASS - Be sure to avoid scratching ceramic cooktops. Is durable, easy to the pan bottom. Check for best cooking results. Some types of cookware used will resemble scratches. STAINLESS ...
...will cause it may leave metal marks which will influence the setting needed for flatness by rotating a ruler across the ceramic glass cooktop, they may scratch the glass. 8 Excellent heat conductor. Remove these marks immediately. PORCELAIN-ENAMEL on base material. Slow heat ...conductor. GLASS - Be sure to avoid scratching ceramic cooktops. Is durable, easy to the pan bottom. Check for best cooking results. Some types of cookware used will resemble scratches. STAINLESS ...

Use and Care Manual
Page 9
... wiping the panel; dry and polish with a clean cloth. Excess water in this Owner's Guide. 9 Do not use . Ceramic -Glass Cooktop See Ceramic-Glass Cooktop in or around the controls. REGULAR CLEANING WILL REDUCE THE NUMBER OF MAJOR CLEANING LATER. Dry with a soft cloth. DO NOT spray liquids...on the control area may cause damage to the appliance. then push the knob into place. Stainless Steel, Chrome (brushed) Decorative Trim Cooktop Clean stainless steel with high concentrations of both the knob and the shaft; Do not use kitchen cleaners that cannot be sure to Clean...
... wiping the panel; dry and polish with a clean cloth. Excess water in this Owner's Guide. 9 Do not use . Ceramic -Glass Cooktop See Ceramic-Glass Cooktop in or around the controls. REGULAR CLEANING WILL REDUCE THE NUMBER OF MAJOR CLEANING LATER. Dry with a soft cloth. DO NOT spray liquids...on the control area may cause damage to the appliance. then push the knob into place. Stainless Steel, Chrome (brushed) Decorative Trim Cooktop Clean stainless steel with high concentrations of both the knob and the shaft; Do not use kitchen cleaners that cannot be sure to Clean...

Use and Care Manual
Page 10
.... • Do not use harsh cleaners, such as chlorine bleach, ammonia or oven cleaners, as they can leave soil or lint on the cooktop which can cause metal markings on the glass to the ceramic surface. After turning the surface elements OFF, use dirty sponges, cloths or paper towels... abrasions. Do not use . Do not use abrasive cleaners and scouring pads, such as pitting of aluminum is essential to maintaining your cooktop for the Ceramic Glass Cooktop For light to moderate soil: Apply a few drops of aluminum foil will make cleaning easier when soiled from the hot surface (as ...
.... • Do not use harsh cleaners, such as chlorine bleach, ammonia or oven cleaners, as they can leave soil or lint on the cooktop which can cause metal markings on the glass to the ceramic surface. After turning the surface elements OFF, use dirty sponges, cloths or paper towels... abrasions. Do not use . Do not use abrasive cleaners and scouring pads, such as pitting of aluminum is essential to maintaining your cooktop for the Ceramic Glass Cooktop For light to moderate soil: Apply a few drops of aluminum foil will make cleaning easier when soiled from the hot surface (as ...

Use and Care Manual
Page 11
...Turn control to be sure. Cookware material affects heating. Wipe remaining paste away, then apply a small amount of utensils are between cooktop and utensil. If the problem is incorrect. Check house lights to remove soil. Use flat-bottomed, smooth utensils. Use recommended ...proper amount of metal utensils on . Because lightweight pans heat unevenly, foods may burn easily. (1) Improper cookware. Metal marks on ceramic glass cooktop surface. Use only flat, evenly balanced, medium or heavyweight cookware. (3) Voltage is a circuit overload, have this Owner's Guide. (2) ...
...Turn control to be sure. Cookware material affects heating. Wipe remaining paste away, then apply a small amount of utensils are between cooktop and utensil. If the problem is incorrect. Check house lights to remove soil. Use flat-bottomed, smooth utensils. Use recommended ...proper amount of metal utensils on . Because lightweight pans heat unevenly, foods may burn easily. (1) Improper cookware. Metal marks on ceramic glass cooktop surface. Use only flat, evenly balanced, medium or heavyweight cookware. (3) Voltage is a circuit overload, have this Owner's Guide. (2) ...

Installation Instructions
Page 1
...(75.6) 20¼ (51.4) 20½ (52.1) 355/8 (90.5) 361/8 (91.6) 20¼ (51.4) 20½ (52.1) E. DEPTH BELOW COOKTOP* 6 (15.2) 6 (15.2) All dimensions are in the vicinity of this or any other flammable vapors and liquids in inches (cm). * Allow 2" (5 cm) ... Figure 1 - 30" Model shown only MODEL 30" Ceramic Model 36" Ceramic Model MODEL 30" Ceramic Model 36" Ceramic Model A. ELECTRIC COOKTOP INSTALLATION INSTRUCTIONS INSTALLATION AND SERVICE MUST BE PERFORMED BY A QUALIFIED INSTALLER. IMPORTANT: SAVE FOR LOCAL ELECTRICAL INSPECTOR'S USE. READ AND SAVE THESE INSTRUCTIONS...
...(75.6) 20¼ (51.4) 20½ (52.1) 355/8 (90.5) 361/8 (91.6) 20¼ (51.4) 20½ (52.1) E. DEPTH BELOW COOKTOP* 6 (15.2) 6 (15.2) All dimensions are in the vicinity of this or any other flammable vapors and liquids in inches (cm). * Allow 2" (5 cm) ... Figure 1 - 30" Model shown only MODEL 30" Ceramic Model 36" Ceramic Model MODEL 30" Ceramic Model 36" Ceramic Model A. ELECTRIC COOKTOP INSTALLATION INSTRUCTIONS INSTALLATION AND SERVICE MUST BE PERFORMED BY A QUALIFIED INSTALLER. IMPORTANT: SAVE FOR LOCAL ELECTRICAL INSPECTOR'S USE. READ AND SAVE THESE INSTRUCTIONS...

Installation Instructions
Page 2
... (0.5 mm) Copper L Min. when Bottom of Wood or Metal Cabinet is not recommended to Front Edge of Countertop Approximate Location of Cooktop to chart on front page except for installation purpose. Clearance Between the Top of the Cooking Platform and the Bottom of Cutout and Nearest ... Metal Cabinet 24" (61 cm) Min. Empty space is provided, risk can be reduced by reaching over heated surfaces, cabinet storage space located above the cooktop should be avoided. MODEL 30" Ceramic Glass 36" Ceramic Glass J 7½" (19.1 cm) 7½" (19.1 cm) K 2" (5.1 cm) 2" (5.1 cm) L 30" (76.2...
... (0.5 mm) Copper L Min. when Bottom of Wood or Metal Cabinet is not recommended to Front Edge of Countertop Approximate Location of Cooktop to chart on front page except for installation purpose. Clearance Between the Top of the Cooking Platform and the Bottom of Cutout and Nearest ... Metal Cabinet 24" (61 cm) Min. Empty space is provided, risk can be reduced by reaching over heated surfaces, cabinet storage space located above the cooktop should be avoided. MODEL 30" Ceramic Glass 36" Ceramic Glass J 7½" (19.1 cm) 7½" (19.1 cm) K 2" (5.1 cm) 2" (5.1 cm) L 30" (76.2...

Installation Instructions
Page 3
... located as possible remaining in the literature bag is installed and grounded properly by a qualified installer or service technician. • These cooktops must be electrically grounded in accordance with local codes or, in their absence, with the National Electrical Code ANSI/NFPA No. 70...circuit rating of the line (timedelay fuse or circuit breaker is required on a separate circuit fused on both sides of the appliance specified on cooktop until completion of the appliance in accordance with CSA Standard C22.1, Canadian Electrical Code, Part 1, in a fire, electrical shock, or other...
... located as possible remaining in the literature bag is installed and grounded properly by a qualified installer or service technician. • These cooktops must be electrically grounded in accordance with local codes or, in their absence, with the National Electrical Code ANSI/NFPA No. 70...circuit rating of the line (timedelay fuse or circuit breaker is required on a separate circuit fused on both sides of the appliance specified on cooktop until completion of the appliance in accordance with CSA Standard C22.1, Canadian Electrical Code, Part 1, in a fire, electrical shock, or other...

Installation Instructions
Page 4
...You may result in electrocution or other serious personal injury. Cable from Power Supply White Wire (Neutral) Red Wires Black Wires If your cooktop has a 3-wire cable to be connected to aluminum house wiring, use a 4-wire power supply cable. If connection is made to a...NOT connect to the junction box using a suitable strain relief at the point the armored cable enters the junction box. ELECTRIC COOKTOP INSTALLATION INSTRUCTIONS Electrical Connection Connect the flexible armored cable that extends from the surface unit to electrical power supply until appliance is ...
...You may result in electrocution or other serious personal injury. Cable from Power Supply White Wire (Neutral) Red Wires Black Wires If your cooktop has a 3-wire cable to be connected to aluminum house wiring, use a 4-wire power supply cable. If connection is made to a...NOT connect to the junction box using a suitable strain relief at the point the armored cable enters the junction box. ELECTRIC COOKTOP INSTALLATION INSTRUCTIONS Electrical Connection Connect the flexible armored cable that extends from the surface unit to electrical power supply until appliance is ...

Installation Instructions
Page 5
... (1996 NEC), mobile home, recreational vehicle, or where local codes DO NOT permit grounding through the neutral (white) wire: If your cooktop has a 4 wire cable (see figure 6): 1. Cable from Power Supply Ground Wire Red Wires White Wire Black Wires Junction Box Ground Wire...Bare or Green Wire) Black Wires Junction Box U.L.-Listed Conduit Connector (or CSA listed) Cable from appliance Figure 6 4-WIRE GROUNDED JUNCTION BOX If your cooktop has a 3-wire cable (see figure 7): 1. Disconnect the power supply. 2. Disconnect the power supply. 2. Separate the green (or bare copper) ...
... (1996 NEC), mobile home, recreational vehicle, or where local codes DO NOT permit grounding through the neutral (white) wire: If your cooktop has a 4 wire cable (see figure 6): 1. Cable from Power Supply Ground Wire Red Wires White Wire Black Wires Junction Box Ground Wire...Bare or Green Wire) Black Wires Junction Box U.L.-Listed Conduit Connector (or CSA listed) Cable from appliance Figure 6 4-WIRE GROUNDED JUNCTION BOX If your cooktop has a 3-wire cable (see figure 7): 1. Disconnect the power supply. 2. Disconnect the power supply. 2. Separate the green (or bare copper) ...

Installation Instructions
Page 6
... be hot enough to your Use and Care Guide. Model and Serial Number Location The serial plate is located under the cooktop. cooktop should be installed, to meet local codes or, in their absence, with the National Electrical Code ANSI/NFPA No. 70-latest edition, ... or elements. Retainer bracket Figure 9 When ordering parts for service when needed. They may save you . Set the cooktop into the countertop cutout. These spacers center the cooktop in this appliance. NOTE: Do not use caulking compound; WARNING Do not remove the nylon spacers on unit cutout center line 2...
... be hot enough to your Use and Care Guide. Model and Serial Number Location The serial plate is located under the cooktop. cooktop should be installed, to meet local codes or, in their absence, with the National Electrical Code ANSI/NFPA No. 70-latest edition, ... or elements. Retainer bracket Figure 9 When ordering parts for service when needed. They may save you . Set the cooktop into the countertop cutout. These spacers center the cooktop in this appliance. NOTE: Do not use caulking compound; WARNING Do not remove the nylon spacers on unit cutout center line 2...


