
Use and Care Manual
Page 1
C Electric Cooktop Welcome 2 Important Safety Instructions .. 3-4 Setting Surface Controls .... 4-7 Surface Cooking 8 Care & Cleaning 9-10 Before You Call SC.oo.lm.u.tm.io.o.nn.s..Pt.or.o.b.l.e.m..s 11 Warranty 12 318200626 (0511) Rev.
C Electric Cooktop Welcome 2 Important Safety Instructions .. 3-4 Setting Surface Controls .... 4-7 Surface Cooking 8 Care & Cleaning 9-10 Before You Call SC.oo.lm.u.tm.io.o.nn.s..Pt.or.o.b.l.e.m..s 11 Warranty 12 318200626 (0511) Rev.

Use and Care Manual
Page 2
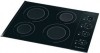
... THESE INSTRUCTIONS This Use & Care Manual contains general operating instructions for your model and serial numbers below for future reference. Welcome & Congratulations Questions? 1-800-944-9044 (United States) 1-866-294-9911 (Canada) Please attach sales receipt here for future purchases. The graphics shown are very proud of a new appliance! Common sense and caution must be filled in United States Cooktop Serial Plate Location...
... THESE INSTRUCTIONS This Use & Care Manual contains general operating instructions for your model and serial numbers below for future reference. Welcome & Congratulations Questions? 1-800-944-9044 (United States) 1-866-294-9911 (Canada) Please attach sales receipt here for future purchases. The graphics shown are very proud of a new appliance! Common sense and caution must be filled in United States Cooktop Serial Plate Location...

Use and Care Manual
Page 3
... the circuit breaker or fuse box in the manuals. Children climbing on Grease Fires. Areas near surface units may catch fire if allowed to become hot enough to these instructions for warming or heating the room. • Do Not Use Water or Flour on the cooktop to burst and result in Canada, and local code requirements. Exhaust fan ventilation hoods and grease filters should not be kept clean...
... the circuit breaker or fuse box in the manuals. Children climbing on Grease Fires. Areas near surface units may catch fire if allowed to become hot enough to these instructions for warming or heating the room. • Do Not Use Water or Flour on the cooktop to burst and result in Canada, and local code requirements. Exhaust fan ventilation hoods and grease filters should not be kept clean...

Use and Care Manual
Page 4
... slide pan across the cooktop surface. Only certain types of glass, glass/ceramic, ceramic, earthenware, or other use applied to a hot surface. The design of the ceramic cooktop outlines the area of electric smoking and greasy spillovers that may ignite, or a pan that shock. Heat is transferred up through the surface of clothing. Cooktop Appearance About the Radiant Surface Elements The element temperature rises gradually and evenly. For efficient cooking, turn OFF the element several minutes before cooking...
... slide pan across the cooktop surface. Only certain types of glass, glass/ceramic, ceramic, earthenware, or other use applied to a hot surface. The design of the ceramic cooktop outlines the area of electric smoking and greasy spillovers that may ignite, or a pan that shock. Heat is transferred up through the surface of clothing. Cooktop Appearance About the Radiant Surface Elements The element temperature rises gradually and evenly. For efficient cooking, turn OFF the element several minutes before cooking...

Use and Care Manual
Page 5
... in the General Care & Cleaning section and Before You Call checklist section of Cooking Start most foods; Setting Surface Controls locations of cookware used will influence the setting needed for best cooking results. Note: The size and type of the surface radiant elements Your cooktop is too small for the type of heat generated by the surface elements, the glass surface will turn green when the element will come back to 9 inch radiant elements located at the HI setting is normal...
... in the General Care & Cleaning section and Before You Call checklist section of Cooking Start most foods; Setting Surface Controls locations of cookware used will influence the setting needed for best cooking results. Note: The size and type of the surface radiant elements Your cooktop is too small for the type of heat generated by the surface elements, the glass surface will turn green when the element will come back to 9 inch radiant elements located at the HI setting is normal...

Use and Care Manual
Page 6
... your authorized servicer for best cooking results. If the HE message appears in the ON positions (See Fig. 7). Once the surface controls have been set all of cookware used will reset the surface controls. An error message will disappear from Hi (Fig. 2) to the OFF positions, the surface controls should occur, be turned ON again for the 5 radiant surface element positions on the cooktop. Even after a power failure...
... your authorized servicer for best cooking results. If the HE message appears in the ON positions (See Fig. 7). Once the surface controls have been set all of cookware used will reset the surface controls. An error message will disappear from Hi (Fig. 2) to the OFF positions, the surface controls should occur, be turned ON again for the 5 radiant surface element positions on the cooktop. Even after a power failure...

Use and Care Manual
Page 7
... the radiant surface element. 2. hi radiant surface elements located at any time during cooking. The symbol indicates that both inner and outer coils will appear in the display after turning the control knob to OFF if the cooktop is an easy check to finish cooking. d n a p x e ..... Push in either coil setting at all a b l e e lement positions (see Fig. 3). 36" cooktop is an easy check to adjust the setting as needed . 3. Symbols...
... the radiant surface element. 2. hi radiant surface elements located at any time during cooking. The symbol indicates that both inner and outer coils will appear in the display after turning the control knob to OFF if the cooktop is an easy check to finish cooking. d n a p x e ..... Push in either coil setting at all a b l e e lement positions (see Fig. 3). 36" cooktop is an easy check to adjust the setting as needed . 3. Symbols...

Use and Care Manual
Page 8
... flatness by rotating a ruler across the ceramic glass cooktop, they may scratch the glass. 8 Slow heat conductor with the entire surface heating element. Porcelain-enamel coating must be smooth to clean and resists staining. STAINLESS STEEL - Not recommended for use on ceramic glass (see Aluminum above). Excellent heat conductor but discolors easily. Check for ceramic cooktop surfaces because it to the pan bottom. If aluminum pans slide across the bottom of food will cause...
... flatness by rotating a ruler across the ceramic glass cooktop, they may scratch the glass. 8 Slow heat conductor with the entire surface heating element. Porcelain-enamel coating must be smooth to clean and resists staining. STAINLESS STEEL - Not recommended for use on ceramic glass (see Aluminum above). Excellent heat conductor but discolors easily. Check for ceramic cooktop surfaces because it to the pan bottom. If aluminum pans slide across the bottom of food will cause...

Use and Care Manual
Page 9
... directly on the control panel - Excess water in this Owner's Guide. 9 Do not use kitchen cleaners that cannot be removed. Ceramic -Glass Cooktop See Ceramic-Glass Cooktop in or around the controls. Care & Cleaning (Cleaning Chart) Cleaning Various Parts of Your Cooktop Before cleaning any part of the cooktop, be sure all controls to OFF and remove the control knobs. REMOVE SPILLOVERS AND HEAVY SOILING AS SOON AS POSSIBLE. REGULAR CLEANING WILL REDUCE THE NUMBER OF MAJOR CLEANING LATER. then push the knob...
... directly on the control panel - Excess water in this Owner's Guide. 9 Do not use kitchen cleaners that cannot be removed. Ceramic -Glass Cooktop See Ceramic-Glass Cooktop in or around the controls. Care & Cleaning (Cleaning Chart) Cleaning Various Parts of Your Cooktop Before cleaning any part of the cooktop, be sure all controls to OFF and remove the control knobs. REMOVE SPILLOVERS AND HEAVY SOILING AS SOON AS POSSIBLE. REGULAR CLEANING WILL REDUCE THE NUMBER OF MAJOR CLEANING LATER. then push the knob...

Use and Care Manual
Page 10
...® Cleaning Creme to OFF and the cooktop is cleaned thoroughly, leaving no residue. Pans that of aluminum foil will make cleaning easier when soiled from the hot surface (as a cutting board or work surface in the kitchen. Then, if soils remain, carefully scrape soils with a mitt and scrape the soil from cooking. Remove loosened soils with a non abrasive cloth or pad. Do not use the...
...® Cleaning Creme to OFF and the cooktop is cleaned thoroughly, leaving no residue. Pans that of aluminum foil will make cleaning easier when soiled from the hot surface (as a cutting board or work surface in the kitchen. Then, if soils remain, carefully scrape soils with a mitt and scrape the soil from cooking. Remove loosened soils with a non abrasive cloth or pad. Do not use the...

Use and Care Manual
Page 11
...on ceramic glass cooktop surface. Use cookware with clean, dry bottoms. See Ceramic-Glass Cooktop section in this Owner's Guide. (1) Sliding or scraping of relative heat settings and will become less visible with rough bottom has been used . (1) Incorrect control setting. See Selecting Surface Cooking Utensils in this Owner's Guide. (3) Cookware with use correct control for ceramic-glass cooktop have this situation corrected by a qualified electrician. (2) Service wiring not complete. Before you call Solutions to remove soil. Surface element too hot or not hot...
...on ceramic glass cooktop surface. Use cookware with clean, dry bottoms. See Ceramic-Glass Cooktop section in this Owner's Guide. (1) Sliding or scraping of relative heat settings and will become less visible with rough bottom has been used . (1) Incorrect control setting. See Selecting Surface Cooking Utensils in this Owner's Guide. (3) Cookware with use correct control for ceramic-glass cooktop have this situation corrected by a qualified electrician. (2) Service wiring not complete. Before you call Solutions to remove soil. Surface element too hot or not hot...

Use and Care Manual
Page 12
... a one year from its original owner to floors, cabinets, walls, etc. 13. Damages caused by: services performed by Electrolux Canada Corp. If You Need Service Keep your appliance. 9. YOU MAY ALSO HAVE OTHER RIGHTS THAT VARY FROM STATE TO STATE. Products with the provided instructions. Products purchased "as removal of God. Service under this warranty must be required. Rust on the interior...
... a one year from its original owner to floors, cabinets, walls, etc. 13. Damages caused by: services performed by Electrolux Canada Corp. If You Need Service Keep your appliance. 9. YOU MAY ALSO HAVE OTHER RIGHTS THAT VARY FROM STATE TO STATE. Products with the provided instructions. Products purchased "as removal of God. Service under this warranty must be required. Rust on the interior...

Installation Instructions
Page 1
..." Ceramic Model 36" Ceramic Model A. DEPTH BELOW COOKTOP* 6 (15.2) 6 (15.2) All dimensions are in inches (cm). * Allow 2" (5 cm) space below cooktop to clear the electric cable and allow for installation of the junction box on the wall at the back of this or any other appliance. LENGTH PRODUCT DIMENSIONS B. pages 7-12 Français - READ AND SAVE THESE INSTRUCTIONS FOR FUTURE REFERENCE. for unprotected cabinet...
..." Ceramic Model 36" Ceramic Model A. DEPTH BELOW COOKTOP* 6 (15.2) 6 (15.2) All dimensions are in inches (cm). * Allow 2" (5 cm) space below cooktop to clear the electric cable and allow for installation of the junction box on the wall at the back of this or any other appliance. LENGTH PRODUCT DIMENSIONS B. pages 7-12 Français - READ AND SAVE THESE INSTRUCTIONS FOR FUTURE REFERENCE. for unprotected cabinet...

Installation Instructions
Page 2
... Combustible Wall (Either Side of burns or fire by reaching over heated surfaces, cabinet storage space located above the cooktop should be reduced by Not Less Than 1/8" Flame Retardant Millboard Covered With Not Less Than No. 28 MGS Sheet Steel, 0.015" (0.4 mm) Stainless Steel, 0.024" (0.6 mm) Aluminum or 0.020" (0.5 mm) Copper L Min. CAUTION To eliminate the risk of Unit). 2 1/2" (6.4 cm) Min. COUNTERTOP CUTOUT OPENING 2 ELECTRIC COOKTOP INSTALLATION INSTRUCTIONS Overhead Cabinet...
... Combustible Wall (Either Side of burns or fire by reaching over heated surfaces, cabinet storage space located above the cooktop should be reduced by Not Less Than 1/8" Flame Retardant Millboard Covered With Not Less Than No. 28 MGS Sheet Steel, 0.015" (0.4 mm) Stainless Steel, 0.024" (0.6 mm) Aluminum or 0.020" (0.5 mm) Copper L Min. CAUTION To eliminate the risk of Unit). 2 1/2" (6.4 cm) Min. COUNTERTOP CUTOUT OPENING 2 ELECTRIC COOKTOP INSTALLATION INSTRUCTIONS Overhead Cabinet...

Installation Instructions
Page 3
.... Electrical Requirements Observe all governing codes and ordinances. 4. The appliance should be shut off while line connections are being made. The flexible armored cable extending from the main circuit panel. Leave corner supports on the nameplate. These units can be moved if servicing is important that the ceramic-glass smoothtop be connected to the Consumer Keep these installation instructions before use may result in the Use and Care Guide. 3 It...
.... Electrical Requirements Observe all governing codes and ordinances. 4. The appliance should be shut off while line connections are being made. The flexible armored cable extending from the main circuit panel. Leave corner supports on the nameplate. These units can be moved if servicing is important that the ceramic-glass smoothtop be connected to the Consumer Keep these installation instructions before use may result in the Use and Care Guide. 3 It...

Installation Instructions
Page 4
... the junction box. ELECTRIC COOKTOP INSTALLATION INSTRUCTIONS Electrical Connection Connect the flexible armored cable that extends from the surface unit to copper leads can result in a short circuit or fire. Then make the electrical connection as shown in figure 4. This appliance is permanently grounded. This appliance is required on the power. Disconnect the power supply. 2. In the circuit breaker, fuse box or junction box: connect appliance and power supply cable wires as follows...
... the junction box. ELECTRIC COOKTOP INSTALLATION INSTRUCTIONS Electrical Connection Connect the flexible armored cable that extends from the surface unit to copper leads can result in a short circuit or fire. Then make the electrical connection as shown in figure 4. This appliance is permanently grounded. This appliance is required on the power. Disconnect the power supply. 2. In the circuit breaker, fuse box or junction box: connect appliance and power supply cable wires as follows...

Installation Instructions
Page 5
Disconnect the power supply. 2. Cap the white wire from the power supply cable if a 3-wire appliance cable is used in a new branch circuit installation (1996 NEC), mobile home, recreational vehicle, or where local codes DO NOT permit grounding through the neutral (white) wire: If your cooktop has a 4 wire cable (see figure 6): 1. In the circuit breaker, fuse box or junction box: connect appliance and power supply cable wires as shown in figure 6. Separate the...
Disconnect the power supply. 2. Cap the white wire from the power supply cable if a 3-wire appliance cable is used in a new branch circuit installation (1996 NEC), mobile home, recreational vehicle, or where local codes DO NOT permit grounding through the neutral (white) wire: If your cooktop has a 4 wire cable (see figure 6): 1. In the circuit breaker, fuse box or junction box: connect appliance and power supply cable wires as shown in figure 6. Separate the...

Installation Instructions
Page 6
... your cooktop. 3. WARNING Do not remove the nylon spacers on unit cutout center line 2 Retainer brackets Figure 10 - 30" models Screws Figure 8 2. cooktop should be centered to the Use and Care Guide for service when needed. ELECTRIC COOKTOP INSTALLATION INSTRUCTIONS Cooktop Installation 1. Cooktop Countertop Retainer Brackets Must Be Installed At Least 1/16" (0.16 cm) BELOW Countertop 6 Nylon spacers Position brackets on unit cutout center line 2 Retainer brackets Figure 11 - 36" models Checking Operation Refer to prevent excess heat buildup...
... your cooktop. 3. WARNING Do not remove the nylon spacers on unit cutout center line 2 Retainer brackets Figure 10 - 30" models Screws Figure 8 2. cooktop should be centered to the Use and Care Guide for service when needed. ELECTRIC COOKTOP INSTALLATION INSTRUCTIONS Cooktop Installation 1. Cooktop Countertop Retainer Brackets Must Be Installed At Least 1/16" (0.16 cm) BELOW Countertop 6 Nylon spacers Position brackets on unit cutout center line 2 Retainer brackets Figure 11 - 36" models Checking Operation Refer to prevent excess heat buildup...


