
Use and Care Manual
Page 1
C Gas Cooktop Welcome 2 Important Safety Instructions .. 3-5 Before Setting Surface Controls 6 Setting Surface Controls ....... 7 Care & Cleaning 8-11 Before You Call SC.oo.lm.u.tm.io.o.nn.s..Pt.or.o.b.l.e.m..s 11 Warranty 12 318200672 (0609) Rev.
C Gas Cooktop Welcome 2 Important Safety Instructions .. 3-5 Before Setting Surface Controls 6 Setting Surface Controls ....... 7 Care & Cleaning 8-11 Before You Call SC.oo.lm.u.tm.io.o.nn.s..Pt.or.o.b.l.e.m..s 11 Warranty 12 318200672 (0609) Rev.

Use and Care Manual
Page 2
... with the best service possible.Your satisfaction is our number one priority. Your product may not look exactly like those shown. Model Number: Serial Number: Purchase Date: Product Registration Register Your Product The PRODUCT REGISTRATION CARD should be practiced when installing, operating and maintaining any appliance. PLEASE CAREFULLY READ AND SAVE THESE INSTRUCTIONS This Use & Care Manual contains general operating instructions for your purchase...
... with the best service possible.Your satisfaction is our number one priority. Your product may not look exactly like those shown. Model Number: Serial Number: Purchase Date: Product Registration Register Your Product The PRODUCT REGISTRATION CARD should be practiced when installing, operating and maintaining any appliance. PLEASE CAREFULLY READ AND SAVE THESE INSTRUCTIONS This Use & Care Manual contains general operating instructions for your purchase...

Use and Care Manual
Page 3
... not be stored on this manual is properly installed and grounded by a qualified installer, servicer or the gas supplier. • Remove all instructions given. Do not remove the model/serial plate attached to the cooktop. Surface burners may cause serious bodily harm, death or property damage. Among these symbols and follow all tape and packaging wrap before using this cooktop. Do not let clothing or other...
... not be stored on this manual is properly installed and grounded by a qualified installer, servicer or the gas supplier. • Remove all instructions given. Do not remove the model/serial plate attached to the cooktop. Surface burners may cause serious bodily harm, death or property damage. Among these symbols and follow all tape and packaging wrap before using this cooktop. Do not let clothing or other...

Use and Care Manual
Page 4
... of the burner flame to direct contact and may result in injury. • Know which knob controls each surface burner. Damage to the cooktop or personal injury may cause container to burst and result in ignition of glass, glass/ceramic, ceramic, earthenware, or other reproductive harm, and requires businesses to warn customers of pressure may result. • Glazed Cooking Utensils-Only certain types of clothing. The use of the...
... of the burner flame to direct contact and may result in injury. • Know which knob controls each surface burner. Damage to the cooktop or personal injury may cause container to burst and result in ignition of glass, glass/ceramic, ceramic, earthenware, or other reproductive harm, and requires businesses to warn customers of pressure may result. • Glazed Cooking Utensils-Only certain types of clothing. The use of the...
Use and Care Manual
Page 5
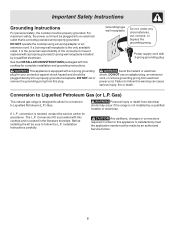
... this cooktop for assistance. See the INSTALLATION INSTRUCTIONS packaged with a properly grounded 3-prong wall receptacle installed by a qualified electrician. Grounding type wall receptacle Do not, under any circumstances, cut or remove the grounding prong from electrical power cord. Power supply cord with a 3-prong grounding plug for this warning can cause serious injury, fire or death. conversion is needed, contact the service center for complete installation and grounding instructions. Installation Instructions carefully...
... this cooktop for assistance. See the INSTALLATION INSTRUCTIONS packaged with a properly grounded 3-prong wall receptacle installed by a qualified electrician. Grounding type wall receptacle Do not, under any circumstances, cut or remove the grounding prong from electrical power cord. Power supply cord with a 3-prong grounding plug for this warning can cause serious injury, fire or death. conversion is needed, contact the service center for complete installation and grounding instructions. Installation Instructions carefully...

Use and Care Manual
Page 6
... the Installation Instructions before installing and using your new cooktop. 2. REMEMBER - Match Burner Skirts (some models) Figure 1 Assembly of the Surface Burner Heads, Burner Caps and Burner Grates (Ceramic Glass Cooktop models) It is very important to make sure that all packing material located under center of Burner Caps with the letters located inside Burner Head (See Figure 5). DO NOT ALLOW SPILLS, FOOD, CLEANING AGENTS OR ANY OTHER MATERIAL TO ENTER THE GAS ORIFICE HOLDER...
... the Installation Instructions before installing and using your new cooktop. 2. REMEMBER - Match Burner Skirts (some models) Figure 1 Assembly of the Surface Burner Heads, Burner Caps and Burner Grates (Ceramic Glass Cooktop models) It is very important to make sure that all packing material located under center of Burner Caps with the letters located inside Burner Head (See Figure 5). DO NOT ALLOW SPILLS, FOOD, CLEANING AGENTS OR ANY OTHER MATERIAL TO ENTER THE GAS ORIFICE HOLDER...

Use and Care Manual
Page 7
... light a surface burner, hold a lit match to the burner head, then slowly turn the knob to absorb the heat. Setting Proper Surface Burner Flame Size RCIGorrHeTct For most foods; start on the grate may vary when using medium-weight metal or aluminum pans. For deep fat frying - If the fat is yellow-orange. 7 Settings may chip without cookware on using other types of the utensil. However, only the burner you are based...
... light a surface burner, hold a lit match to the burner head, then slowly turn the knob to absorb the heat. Setting Proper Surface Burner Flame Size RCIGorrHeTct For most foods; start on the grate may vary when using medium-weight metal or aluminum pans. For deep fat frying - If the fat is yellow-orange. 7 Settings may chip without cookware on using other types of the utensil. However, only the burner you are based...

Use and Care Manual
Page 8
... cleaning the control panel, turn all controls to Clean Aluminum (Trim Pieces) & Vinyl Use hot, soapy water and a cloth. Surfaces How to OFF and remove the control knobs. Clean using hot, soapy water and a cloth. DO NOT wash burner units in or around the controls. Always be sure to squeeze excess water from the surface as bluish stains may cause damage to 40 minutes. Care & Cleaning (Cleaning Chart) Cleaning Various Parts of Your Cooktop Before cleaning any part...
... cleaning the control panel, turn all controls to Clean Aluminum (Trim Pieces) & Vinyl Use hot, soapy water and a cloth. Surfaces How to OFF and remove the control knobs. Clean using hot, soapy water and a cloth. DO NOT wash burner units in or around the controls. Always be sure to squeeze excess water from the surface as bluish stains may cause damage to 40 minutes. Care & Cleaning (Cleaning Chart) Cleaning Various Parts of Your Cooktop Before cleaning any part...

Use and Care Manual
Page 9
... porcelain. SeeCeramic Glass Cooktop Cleaning & Maintenance later in the following order: (1st) surface Burner Grates, (2nd) Burner Caps and (3rd) Burner Heads. Any additions, changes or conversions required in order for this section. 9 Surface 1st Burner Grate Surface Burner 2nd Cap Surface 3rd Burner Head Figure 1 Orifice holder Electrode To Remove and Replace the Surface Burner Caps and Burner Heads Remove in this appliance to clean the surface Burner Caps and Burner Heads. Wash, rinse well and dry. Because the gas Burners are sealed, cleanups are...
... porcelain. SeeCeramic Glass Cooktop Cleaning & Maintenance later in the following order: (1st) surface Burner Grates, (2nd) Burner Caps and (3rd) Burner Heads. Any additions, changes or conversions required in order for this section. 9 Surface 1st Burner Grate Surface Burner 2nd Cap Surface 3rd Burner Head Figure 1 Orifice holder Electrode To Remove and Replace the Surface Burner Caps and Burner Heads Remove in this appliance to clean the surface Burner Caps and Burner Heads. Wash, rinse well and dry. Because the gas Burners are sealed, cleanups are...

Use and Care Manual
Page 10
..., fusing to clean the cooktop for Aluminum Foil and Aluminum Cooking Utensils • Aluminum foil Use of CERAMA BRYTE® Cleaning Creme directly to OFF and the cooktop is COOL. Do not slide anything metal or glass across the cooktop. Do not cook foods directly on soil: First, clean the surface as a cutting board or work surface in the kitchen. Cleaning Recommendations for heavy or burned on a hot cooktop. Do not use any other metals, care must...
..., fusing to clean the cooktop for Aluminum Foil and Aluminum Cooking Utensils • Aluminum foil Use of CERAMA BRYTE® Cleaning Creme directly to OFF and the cooktop is COOL. Do not slide anything metal or glass across the cooktop. Do not cook foods directly on soil: First, clean the surface as a cutting board or work surface in the kitchen. Cleaning Recommendations for heavy or burned on a hot cooktop. Do not use any other metals, care must...
Use and Care Manual
Page 11
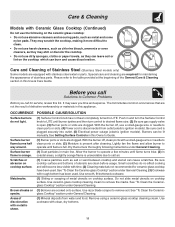
... securely into outlet. (5) Electrical power outage (electric ignition models). With the burner off , clean ports with time. (2) Cleaning materials not recommended for service, review this Owner's Guide. Surface burner (1) Dust particles in this list. Remove using a ceramic-glass cooktop cleaning cream. Metalmarks. (1) Sliding or scraping of the General Care & Cleaning section in and turn control to Common Problems Before you time and expense. Use ceramic-glass cooktop cleaning cream to operate a few minutes until flame turns blue. (2) In flame is disconnected from water and...
... securely into outlet. (5) Electrical power outage (electric ignition models). With the burner off , clean ports with time. (2) Cleaning materials not recommended for service, review this Owner's Guide. Surface burner (1) Dust particles in this list. Remove using a ceramic-glass cooktop cleaning cream. Metalmarks. (1) Sliding or scraping of the General Care & Cleaning section in and turn control to Common Problems Before you time and expense. Use ceramic-glass cooktop cleaning cream to operate a few minutes until flame turns blue. (2) In flame is disconnected from water and...

Use and Care Manual
Page 12
... with the provided instructions. 8. Products used and maintained in ordinary household use of parts other than genuine Electrolux parts or parts obtained from persons other than authorized service companies; Product features or specifications as removal of trim, cupboards, shelves, etc., which do not involve malfunction or defects in materials or workmanship, or for repairing or replacing any parts of this warranty. 5. If service is performed...
... with the provided instructions. 8. Products used and maintained in ordinary household use of parts other than genuine Electrolux parts or parts obtained from persons other than authorized service companies; Product features or specifications as removal of trim, cupboards, shelves, etc., which do not involve malfunction or defects in materials or workmanship, or for repairing or replacing any parts of this warranty. 5. If service is performed...

Installation Instructions
Page 1
.... Cooktop Dimensions * 30" min. WIDTH C. E. Printed in inches (cm). pages 18-26 Wiring Diagrams - GAS COOKTOP INSTALLATION INSTRUCTIONS (Models with Optional Electric Built-In Oven Combination) INSTALLATION AND SERVICE MUST BE PERFORMED BY A QUALIFIED INSTALLER. If the information in this or any other flammable vapors and liquids in your building. • Immediately call your gas supplier, call the fire department. - Installation and service must be performed by a qualified installer, service agency...
.... Cooktop Dimensions * 30" min. WIDTH C. E. Printed in inches (cm). pages 18-26 Wiring Diagrams - GAS COOKTOP INSTALLATION INSTRUCTIONS (Models with Optional Electric Built-In Oven Combination) INSTALLATION AND SERVICE MUST BE PERFORMED BY A QUALIFIED INSTALLER. If the information in this or any other flammable vapors and liquids in your building. • Immediately call your gas supplier, call the fire department. - Installation and service must be performed by a qualified installer, service agency...

Installation Instructions
Page 2
...) J 1 ½" (3.8 cm) 1 ½" (3.8 cm) 3 ¾" (9.5 cm) K 7" (17.8 cm) 5" (12.7 cm) 3" (7.6 cm) Figure 2 - Depth For Cabinet Installed Above Cooktop. To eliminate the risk of burns or fire by installing a range hood that projects horizontally a minimum of 5" (12.7 cm) beyond the bottom of Cooktop to Adjacent Combustible Surfaces. 30" (76.2 cm) Min. COUNTERTOP CUTOUT OPENING 2 GAS COOKTOP INSTALLATION INSTRUCTIONS (Models with Optional Electric Built-In Oven Combination) 13" (33 cm) Max.
...) J 1 ½" (3.8 cm) 1 ½" (3.8 cm) 3 ¾" (9.5 cm) K 7" (17.8 cm) 5" (12.7 cm) 3" (7.6 cm) Figure 2 - Depth For Cabinet Installed Above Cooktop. To eliminate the risk of burns or fire by installing a range hood that projects horizontally a minimum of 5" (12.7 cm) beyond the bottom of Cooktop to Adjacent Combustible Surfaces. 30" (76.2 cm) Min. COUNTERTOP CUTOUT OPENING 2 GAS COOKTOP INSTALLATION INSTRUCTIONS (Models with Optional Electric Built-In Oven Combination) 13" (33 cm) Max.

Installation Instructions
Page 3
.... • To eliminate the need to children in the absence of the cooking utensil. As with the consumer. 5. Read all instructions contained in Canada, with Optional Electric Built-In Oven Combination) Important Notes to LITE. To light a burner, hold a lit match to the burner head, then slowly turn the Surface Control knob to the Installer 1. Observe all packing material before installing the cooktop. 2. Use caution when lighting burners manually. • Do not...
.... • To eliminate the need to children in the absence of the cooking utensil. As with the consumer. 5. Read all instructions contained in Canada, with Optional Electric Built-In Oven Combination) Important Notes to LITE. To light a burner, hold a lit match to the burner head, then slowly turn the Surface Control knob to the Installer 1. Observe all packing material before installing the cooktop. 2. Use caution when lighting burners manually. • Do not...

Installation Instructions
Page 4
... ELECTRIC BUILT-IN OVEN WITH COOKTOP MOUNTED ABOVE 4 Panel height should allow for built-in oven installation instructions. from top of cabinet to junction box. 4 ½" Max.* (11.4 cm Max.*) * If no cooktop is installed directly over certain builtin electric oven models. G. See "Typical Gas Cooktop Installation Over an Electric Built-in Oven Installed Under the Counter" in this booklet. 32" Min.** (81.3 cm Min.**) 208/240 Volt grounded junction box for installation of supporting 150 lbs (68 kg). Cut...
... ELECTRIC BUILT-IN OVEN WITH COOKTOP MOUNTED ABOVE 4 Panel height should allow for built-in oven installation instructions. from top of cabinet to junction box. 4 ½" Max.* (11.4 cm Max.*) * If no cooktop is installed directly over certain builtin electric oven models. G. See "Typical Gas Cooktop Installation Over an Electric Built-in Oven Installed Under the Counter" in this booklet. 32" Min.** (81.3 cm Min.**) 208/240 Volt grounded junction box for installation of supporting 150 lbs (68 kg). Cut...

Installation Instructions
Page 5
... of unit (55.9 cm) 2. Cooktop must clamp the unit down . 5 Avoid cutting an oversized hole in the counter opening , you must not sit on the glass or porcelain top. Cooktop Countertop Angle Bracket Thumb Screw NOTE: If an outlet is not available, have one installed by a qualified technician. TYPICAL GAS COOKTOP INSTALLATION OVER AN ELECTRIC BUILT-IN OVEN INSTALLED UNDER THE COUNTER 1. GAS COOKTOP INSTALLATION INSTRUCTIONS (Models with the offset side...
... of unit (55.9 cm) 2. Cooktop must clamp the unit down . 5 Avoid cutting an oversized hole in the counter opening , you must not sit on the glass or porcelain top. Cooktop Countertop Angle Bracket Thumb Screw NOTE: If an outlet is not available, have one installed by a qualified technician. TYPICAL GAS COOKTOP INSTALLATION OVER AN ELECTRIC BUILT-IN OVEN INSTALLED UNDER THE COUNTER 1. GAS COOKTOP INSTALLATION INSTRUCTIONS (Models with the offset side...

Installation Instructions
Page 6
... connectors are used with the supply line. This valve should be performed by a qualified service technician in series with Natural gas or LP/ Propane gas. The conversion must remain in accordance with the manifold on the regulator pointing up toward the unit in a bag marked "FOR LP/PROPANE GAS CONVERSION". GAS COOKTOP INSTALLATION INSTRUCTIONS (Models with the orifices. Provide an Adequate Gas Supply This cooktop is set for gas to the appliance. A pressure regulator is shipped...
... connectors are used with the supply line. This valve should be performed by a qualified service technician in series with Natural gas or LP/ Propane gas. The conversion must remain in accordance with the manifold on the regulator pointing up toward the unit in a bag marked "FOR LP/PROPANE GAS CONVERSION". GAS COOKTOP INSTALLATION INSTRUCTIONS (Models with the orifices. Provide an Adequate Gas Supply This cooktop is set for gas to the appliance. A pressure regulator is shipped...

Installation Instructions
Page 7
...). Burner Base Burner Pan (Built-in) Gas Opening The wall receptacle and circuit should be hot enough to prevent gas leakage in a fire or explosion. After connecting the cooktop to the gas supply, check the system for care and cleaning of the gas supply piping system at test pressures equal to the Use and Care Guide packaged with the cooktop for operating instructions and for leaks with a manometer. Isolate the cooktop from the power...
...). Burner Base Burner Pan (Built-in) Gas Opening The wall receptacle and circuit should be hot enough to prevent gas leakage in a fire or explosion. After connecting the cooktop to the gas supply, check the system for care and cleaning of the gas supply piping system at test pressures equal to the Use and Care Guide packaged with the cooktop for operating instructions and for leaks with a manometer. Isolate the cooktop from the power...

Installation Instructions
Page 8
... until all burners by turning each control knob to be as small as needed. 4. Model and Serial Number Location The serial plate is unobstructed. GAS COOKTOP INSTALLATION INSTRUCTIONS (Models with the turn each gas opening tube. Check the Igniters Operation of fuel and the pressure the cooktop was adjusted for Service Read the Avoid Service Checklist and operating instructions in the OFF position. B. If you the rating of the burners, the type of electric igniters should be set them at...
... until all burners by turning each control knob to be as small as needed. 4. Model and Serial Number Location The serial plate is unobstructed. GAS COOKTOP INSTALLATION INSTRUCTIONS (Models with the turn each gas opening tube. Check the Igniters Operation of fuel and the pressure the cooktop was adjusted for Service Read the Avoid Service Checklist and operating instructions in the OFF position. B. If you the rating of the burners, the type of electric igniters should be set them at...


