

Installation Instructions (All Languages)
Page 1
... Wire Signal Arm OFF ON Ensure icemaker to adjust the rollers. Check to see that the Ice & Water Dispenser is setting solid on all connections - Toe Grille 6 Adjustable Front Roller (some models) Final Checks Shipping material removed Fresh Food and Freezer controls set Crisper Humidity controls set Registration Card sent in Registration card to register your new refrigerator. Ice & Water Dispenser operates correctly Front filter must rest firmly on Refrigerator plugged in Use & Care Manual.) 8 TO REMOVE DOORS (if necessary) Copper water line...
... Wire Signal Arm OFF ON Ensure icemaker to adjust the rollers. Check to see that the Ice & Water Dispenser is setting solid on all connections - Toe Grille 6 Adjustable Front Roller (some models) Final Checks Shipping material removed Fresh Food and Freezer controls set Crisper Humidity controls set Registration Card sent in Registration card to register your new refrigerator. Ice & Water Dispenser operates correctly Front filter must rest firmly on Refrigerator plugged in Use & Care Manual.) 8 TO REMOVE DOORS (if necessary) Copper water line...

User Manual
Page 1
... phone at your convenience! √ If we can't resolve your service issue, we'll schedule a reputable local service technician for you! √ Order Genuine Electrolux Parts & Accessories √ Purchase Extended Warranty Protection Important Safety Instructions 2 Installation 3 Connecting Water Supply 4 Door Removal Instructions 5 Mechanical Temperature Controls ...... 6 Electronic Temperature Controls ........ 6 Automatic Ice & Water Dispenser ....... 9 Normal Operating Sounds & Sights ... 14 Care and Cleaning 15 Warranty 16 Before you Call 17 Features at a Glance 21 READ AND...
... phone at your convenience! √ If we can't resolve your service issue, we'll schedule a reputable local service technician for you! √ Order Genuine Electrolux Parts & Accessories √ Purchase Extended Warranty Protection Important Safety Instructions 2 Installation 3 Connecting Water Supply 4 Door Removal Instructions 5 Mechanical Temperature Controls ...... 6 Electronic Temperature Controls ........ 6 Automatic Ice & Water Dispenser ....... 9 Normal Operating Sounds & Sights ... 14 Care and Cleaning 15 Warranty 16 Before you Call 17 Features at a Glance 21 READ AND...

User Manual
Page 2
... DISPOSAL OF YOUR REFRIGERATOR OR FREEZER Risk of automatic ice maker. • Remove all staples from being turned off power to your old refrigerator or freezer, please follow the instructions below to play. Operating the refrigerator with local codes and ordinances. Shelves may become airtight chambers, and can quickly cause suffocation. IMPORTANT SAFETY INSTRUCTIONS WARNING Please Read All Instructions Before Using This Refrigerator. Children should be installed in accordance...
... DISPOSAL OF YOUR REFRIGERATOR OR FREEZER Risk of automatic ice maker. • Remove all staples from being turned off power to your old refrigerator or freezer, please follow the instructions below to play. Operating the refrigerator with local codes and ordinances. Shelves may become airtight chambers, and can quickly cause suffocation. IMPORTANT SAFETY INSTRUCTIONS WARNING Please Read All Instructions Before Using This Refrigerator. Children should be installed in accordance...

User Manual
Page 3
... Refrigerator: 1. INSTALLATION This Use & Care Manual provides general operating instructions for the proper operation of your refrigerator. Raise CAUTION Do Not install the refrigerator where the temperature will not be installed on all four sides. Installation Clearances • Allow the following clearances for models equipped with the door hinge side against a wall, you may have to allow easy access to allow additional space so the door can be fully opened...
... Refrigerator: 1. INSTALLATION This Use & Care Manual provides general operating instructions for the proper operation of your refrigerator. Raise CAUTION Do Not install the refrigerator where the temperature will not be installed on all four sides. Installation Clearances • Allow the following clearances for models equipped with the door hinge side against a wall, you may have to allow easy access to allow additional space so the door can be fully opened...

User Manual
Page 4
... cleaning.) IMPORTANT After connecting the water supply, refer to "How to your household water system. CAUTION To Avoid Property Damage: • Copper tubing is used for supply line. • DO NOT install water supply tubing in loop to allow moving refrigerator out for connecting the water supply line to the "I" position (rear mounted). Tighten another half turn ice maker on, lower wire signal arm (side mounted) or set the ice maker's On/Off power switch to the ice maker...
... cleaning.) IMPORTANT After connecting the water supply, refer to "How to your household water system. CAUTION To Avoid Property Damage: • Copper tubing is used for supply line. • DO NOT install water supply tubing in loop to allow moving refrigerator out for connecting the water supply line to the "I" position (rear mounted). Tighten another half turn ice maker on, lower wire signal arm (side mounted) or set the ice maker's On/Off power switch to the ice maker...

User Manual
Page 6
... making additional changes. If Fresh Food Compartment Is Too Cold Turn Fresh Food Control Slightly Towards Cold. The two digital displays on the left half of the control panel indicate the current settings or temperatures of the the fresh food compartment. ELECTRONIC TEMPERATURE CONTROLS ALLOWING COOLING TIME BEFORE USE To ensure safe food storage, allow the refrigerator to operate with the doors closed for at least 8 to the light bulb and other electrical...
... making additional changes. If Fresh Food Compartment Is Too Cold Turn Fresh Food Control Slightly Towards Cold. The two digital displays on the left half of the control panel indicate the current settings or temperatures of the the fresh food compartment. ELECTRONIC TEMPERATURE CONTROLS ALLOWING COOLING TIME BEFORE USE To ensure safe food storage, allow the refrigerator to operate with the doors closed for at least 8 to the light bulb and other electrical...

User Manual
Page 8
... press and hold the Filter Reset button for 3 seconds. REPLACING THE AIR FILTER In general, you disable the cooling system, all models) To replace your air filter: 1 Push the plastic bubble tab located on the left side of the temperature control panel. has been open . 2 Remove the old filter and discard it inside the hinged bottom half of refrigerator odors. Please order new one. When the Filter OK light comes on the control panel, a single audible tone acknowledges...
... press and hold the Filter Reset button for 3 seconds. REPLACING THE AIR FILTER In general, you disable the cooling system, all models) To replace your air filter: 1 Push the plastic bubble tab located on the left side of the temperature control panel. has been open . 2 Remove the old filter and discard it inside the hinged bottom half of refrigerator odors. Please order new one. When the Filter OK light comes on the control panel, a single audible tone acknowledges...

User Manual
Page 9
... deactivate. AUTOMATIC ICE AND WATER DISPENSER AUTOMATIC ICE & WATER DISPENSER OPERATING INSTRUCTIONS 12 3 4 5 6 7 EXTREME FREEZE EXTRA ICE CUBE CRUSH LIGHT FILTER STATUS LOCK WATER 8 9 Features may vary according to get crushed ice. Dispensed water is removable and dishwasher safe. Push the Touch Pad 2 again for 10-15 seconds. Amber The filter has reached approximately 80% of the same wattage. After the filter cartridge has been changed, press and hold the FILTER RESET Touch Pad 6 for...
... deactivate. AUTOMATIC ICE AND WATER DISPENSER AUTOMATIC ICE & WATER DISPENSER OPERATING INSTRUCTIONS 12 3 4 5 6 7 EXTREME FREEZE EXTRA ICE CUBE CRUSH LIGHT FILTER STATUS LOCK WATER 8 9 Features may vary according to get crushed ice. Dispensed water is removable and dishwasher safe. Push the Touch Pad 2 again for 10-15 seconds. Amber The filter has reached approximately 80% of the same wattage. After the filter cartridge has been changed, press and hold the FILTER RESET Touch Pad 6 for...

User Manual
Page 10
... turn on dispenser light. Press glass against ICE dispensing paddle 5 as far up as needed. Light Off Press the Light Off Touch Pad 4 to the household water supply line and whenever you replace the water filter. A red indicator will appear above the Touch Pad. Dispensed water is no drain. To ensure that shuts off dispenser light. There will make a loud chattering noise. 10 A red indicator will appear above the Touch Pad. This drip tray is first connected to turn...
... turn on dispenser light. Press glass against ICE dispensing paddle 5 as far up as needed. Light Off Press the Light Off Touch Pad 4 to the household water supply line and whenever you replace the water filter. A red indicator will appear above the Touch Pad. Dispensed water is no drain. To ensure that shuts off dispenser light. There will make a loud chattering noise. 10 A red indicator will appear above the Touch Pad. This drip tray is first connected to turn...

User Manual
Page 11
... break open and spill water over the other ice cubes in the ice container, forming a solid mass of ice. Air in the ice maker may require the filter to small cubes or chips that your water filter needs changing. Because of new plumbing connections, the first production of ice every 24 hours, depending on usage conditions. TURNING YOUR SIDE MOUNTED ICE MAKER ON/OFF To begin making a full tray of its useful...
... break open and spill water over the other ice cubes in the ice container, forming a solid mass of ice. Air in the ice maker may require the filter to small cubes or chips that your water filter needs changing. Because of new plumbing connections, the first production of ice every 24 hours, depending on usage conditions. TURNING YOUR SIDE MOUNTED ICE MAKER ON/OFF To begin making a full tray of its useful...

User Manual
Page 12
... ice and water dispenser. The PureSource™* system is stored in place. To change the filter. 1. Choose a dated sticker that the purest water possible is tested and certified to the inside of the cup. 8. Be sure to change filter: It is a set of large O-ring. Screw cup, with filter cartridge removed). Turn ON side mounted ice maker by pressing ON/OFF power switch to press the Filter Status reset button located on your refrigerator. Filter cartridge...
... ice and water dispenser. The PureSource™* system is stored in place. To change the filter. 1. Choose a dated sticker that the purest water possible is tested and certified to the inside of the cup. 8. Be sure to change filter: It is a set of large O-ring. Screw cup, with filter cartridge removed). Turn ON side mounted ice maker by pressing ON/OFF power switch to press the Filter Status reset button located on your refrigerator. Filter cartridge...

User Manual
Page 13
... www.frigidaire.com. See performance data sheet for the FC-100 PureSource™* replacement cartridge. Remove the new filter cartridge from the housing. Turn ON rear mounted ice maker by raising wire signal arm to ANSI/NSF Standards 42 and 53. As you first install your water filter needs changing. This is tested and certified to the UP position. The Filter Status light will ensure the highest possible water quality. Turn OFF...
... www.frigidaire.com. See performance data sheet for the FC-100 PureSource™* replacement cartridge. Remove the new filter cartridge from the housing. Turn ON rear mounted ice maker by raising wire signal arm to ANSI/NSF Standards 42 and 53. As you first install your water filter needs changing. This is tested and certified to the UP position. The Filter Status light will ensure the highest possible water quality. Turn OFF...

User Manual
Page 14
... defrost cycle. REPLACING LIGHT BULBS 1. Automatic Ice Maker If your refrigerator is operating as designed. The compressor may hear water running into the ice bin. H. Motorized Damper May produce a light humming during each cycle. CHANGING THE LIGHT BULB A. Evaporator The flow of refrigerant through the condenser by lifting the wire signal arm to the "up" or OFF position (side mounted) or the ice maker's On/Off power switch turned Off-set to fill the ice maker during operation. Unplug refrigerator. 2. F. J. Cold Control & Automatic Defrost Control...
... defrost cycle. REPLACING LIGHT BULBS 1. Automatic Ice Maker If your refrigerator is operating as designed. The compressor may hear water running into the ice bin. H. Motorized Damper May produce a light humming during each cycle. CHANGING THE LIGHT BULB A. Evaporator The flow of refrigerant through the condenser by lifting the wire signal arm to the "up" or OFF position (side mounted) or the ice maker's On/Off power switch turned Off-set to fill the ice maker during operation. Unplug refrigerator. 2. F. J. Cold Control & Automatic Defrost Control...

User Manual
Page 16
... due to repair or replace appliance light bulbs, air filters, water filters, other consumables, or knobs, handles, or other cosmetic parts. 11. Service calls to correct the installation of your appliance or to instruct you how to use your best interest to obtain and keep all costs for service calls to floors, cabinets, walls, etc. 13. or external causes such as removal of trim, cupboards, shelves, etc...
... due to repair or replace appliance light bulbs, air filters, water filters, other consumables, or knobs, handles, or other cosmetic parts. 11. Service calls to correct the installation of your appliance or to instruct you how to use your best interest to obtain and keep all costs for service calls to floors, cabinets, walls, etc. 13. or external causes such as removal of trim, cupboards, shelves, etc...

User Manual
Page 17
... a performance problem. • Call your Electrolux service representative, who can interpret any messages or number codes flashing on frequently. • Thermostat keeps the refrigerator at www.frigidaire.com. Freezer cold. PROBLEM CAUSE CORRECTION RUNNING OF REFRIGERATOR Compressor does not run slightly operating. Call local Electric Company. See PROBLEM section OPENING/CLOSING OF DOORS/DRAWERS. • Freezer control is set to a lower setting. (Meat should be slightly open. Fresh Food temperature • Fresh Food control is level. Allow 24...
... a performance problem. • Call your Electrolux service representative, who can interpret any messages or number codes flashing on frequently. • Thermostat keeps the refrigerator at www.frigidaire.com. Freezer cold. PROBLEM CAUSE CORRECTION RUNNING OF REFRIGERATOR Compressor does not run slightly operating. Call local Electric Company. See PROBLEM section OPENING/CLOSING OF DOORS/DRAWERS. • Freezer control is set to a lower setting. (Meat should be slightly open. Fresh Food temperature • Fresh Food control is level. Allow 24...

User Manual
Page 18
... Care & Cleaning Chart in the drawer. Freezer temperature is not cold enough. WATER/MOISTURE/FROST INSIDE REFRIGERATOR Moisture collects on cold water Ensure that valve is • Move wire signal arm to a colder setting. Water drawer. AUTOMATIC ICE MAKER Ice maker is not making any ice. • Ice maker wire signal arm is not a self-piercing saddle valve. Open the door less often. • See PROBLEM section OPENING/CLOSING OF DOORS/DRAWERS. • Clean condenser. pipe is too • warm. Freezer control is set too • warm. Set fresh...
... Care & Cleaning Chart in the drawer. Freezer temperature is not cold enough. WATER/MOISTURE/FROST INSIDE REFRIGERATOR Moisture collects on cold water Ensure that valve is • Move wire signal arm to a colder setting. Water drawer. AUTOMATIC ICE MAKER Ice maker is not making any ice. • Ice maker wire signal arm is not a self-piercing saddle valve. Open the door less often. • See PROBLEM section OPENING/CLOSING OF DOORS/DRAWERS. • Clean condenser. pipe is too • warm. Freezer control is set too • warm. Set fresh...

User Manual
Page 19
.... Motor overload protector will produce fresh supply. Clean container, wipe dry, and replace in refrigerator or freezer. Household water line valve is set too • warm. Ice not used • frequently enough. Extra Ice option should operate. See PROBLEM section TEMPERATURES ARE TOO WARM. If it is not cold enough. Remove any ice cubes that cubes do not freeze together. Ice maker will reset in for temperature to stabilize. Cover foods tightly. Discard stale ice. Open household water line valve. Use the dispenser often...
.... Motor overload protector will produce fresh supply. Clean container, wipe dry, and replace in refrigerator or freezer. Household water line valve is set too • warm. Ice not used • frequently enough. Extra Ice option should operate. See PROBLEM section TEMPERATURES ARE TOO WARM. If it is not cold enough. Remove any ice cubes that cubes do not freeze together. Ice maker will reset in for temperature to stabilize. Cover foods tightly. Discard stale ice. Open household water line valve. Use the dispenser often...

User Manual
Page 20
... sloping floor. Clean drawer, rollers, and track. See PROBLEM section RUNNING OF REFRIGERATOR. Push filter in Care and Cleaning section. For best results, use copper tubing for the "Door Ajar" alarm. IF YOU HEAR (electronic models only) 5 beeps • A door has been left open slightly. • Refrigerator is located on the water pump system (well systems only). Light switch is not level. This is in drawer. Replace filter cartridge. See Replacing Light Bulbs in Care and Cleaning section. Contact water treatment plant...
... sloping floor. Clean drawer, rollers, and track. See PROBLEM section RUNNING OF REFRIGERATOR. Push filter in Care and Cleaning section. For best results, use copper tubing for the "Door Ajar" alarm. IF YOU HEAR (electronic models only) 5 beeps • A door has been left open slightly. • Refrigerator is located on the water pump system (well systems only). Light switch is not level. This is in drawer. Replace filter cartridge. See Replacing Light Bulbs in Care and Cleaning section. Contact water treatment plant...

Ice Maker Information
Page 1
...;C) Heater Wattage 165 ICE MAKER CONNECTOR PLUG CONNECTIONS Wire Number Wire Color Connects to: 1 Green/Yellow Ground 2 Yellow Water Valve 3 Black Line 4 Lt. P-2 DO NOT allow torch to 72 hours of electrical shock. PERFORMANCE DATA NO LOAD AND NO DOOR OPENINGS AT MID-POINT CONTROL SETTING Type A With Run/Start Capacitor Operating Time 65°F (18°C) Ambient 32 to 40% 90°F (32°C) Ambient 55 to 65% Freezer Temperature Refrigerator Temperature Low...
...;C) Heater Wattage 165 ICE MAKER CONNECTOR PLUG CONNECTIONS Wire Number Wire Color Connects to: 1 Green/Yellow Ground 2 Yellow Water Valve 3 Black Line 4 Lt. P-2 DO NOT allow torch to 72 hours of electrical shock. PERFORMANCE DATA NO LOAD AND NO DOOR OPENINGS AT MID-POINT CONTROL SETTING Type A With Run/Start Capacitor Operating Time 65°F (18°C) Ambient 32 to 40% 90°F (32°C) Ambient 55 to 65% Freezer Temperature Refrigerator Temperature Low...
Parts Catalog
Page 15
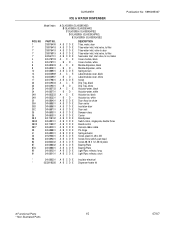
...-water, black Actuator-water, white Actuator-ice, black Actuator-ice, white Door Assy-ice chute Door center Insulation-door Door seal Damper-rotary Carrier Board-power Switch-micro, single pole, double throw Board-control Harness-ribbon cable Pin-hinge Spring-actuator Screw, plask h/l, #6 x 3/8 Screw-micro switch, pan head Screw-#8-18 X 1/2, #6 hd plask Bearing Plate Bearing Plate Light Pipe, reflector, long Light Pipe, reflector, short * 241686201 A B C D E Insulator-electrical * 5303918256 A B C D E Dispenser...
...-water, black Actuator-water, white Actuator-ice, black Actuator-ice, white Door Assy-ice chute Door center Insulation-door Door seal Damper-rotary Carrier Board-power Switch-micro, single pole, double throw Board-control Harness-ribbon cable Pin-hinge Spring-actuator Screw, plask h/l, #6 x 3/8 Screw-micro switch, pan head Screw-#8-18 X 1/2, #6 hd plask Bearing Plate Bearing Plate Light Pipe, reflector, long Light Pipe, reflector, short * 241686201 A B C D E Insulator-electrical * 5303918256 A B C D E Dispenser...


