
Use and Care Manual
Page 1
... phone at your convenience! √ If we can't resolve your service issue, we'll schedule a reputable local service technician for you! √ Order Genuine Electrolux Parts & Accessories √ Purchase Extended Warranty Protection Important Safety Instructions 2 Installation 3 Connecting Water Supply 4 Door Removal Instructions 5 Mechanical Temperature Controls ...... 6 Electronic Temperature Controls ........ 6 Automatic Ice & Water Dispenser ....... 9 Normal Operating Sounds & Sights ... 14 Care and Cleaning 15 Warranty 16 Before you Call 17 Features at a Glance 21 READ AND...
... phone at your convenience! √ If we can't resolve your service issue, we'll schedule a reputable local service technician for you! √ Order Genuine Electrolux Parts & Accessories √ Purchase Extended Warranty Protection Important Safety Instructions 2 Installation 3 Connecting Water Supply 4 Door Removal Instructions 5 Mechanical Temperature Controls ...... 6 Electronic Temperature Controls ........ 6 Automatic Ice & Water Dispenser ....... 9 Normal Operating Sounds & Sights ... 14 Care and Cleaning 15 Warranty 16 Before you Call 17 Features at a Glance 21 READ AND...
Use and Care Manual
Page 2
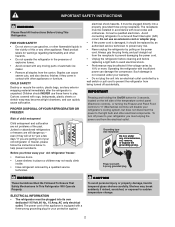
... furniture. Power cord with insufficient power can damage the compressor. Shelves may not easily climb inside. • Have refrigerant removed by 10% or more. Grounding type wall receptacle Do not, under your warranty. • Do not plug the unit into an electrical outlet controlled by pulling on the left side of the temperature control panel (Electronic controls), or turning the Freezer and Fresh Food controls to your refrigerator you are getting rid of...
... furniture. Power cord with insufficient power can damage the compressor. Shelves may not easily climb inside. • Have refrigerant removed by 10% or more. Grounding type wall receptacle Do not, under your warranty. • Do not plug the unit into an electrical outlet controlled by pulling on the left side of the temperature control panel (Electronic controls), or turning the Freezer and Fresh Food controls to your refrigerator you are getting rid of...

Use and Care Manual
Page 3
... door hinge side against a wall, you may have to maintain proper temperatures inside the refrigerator. Your refrigerator is essential for the proper operation of drawers and freezer baskets, the refrigerator should be sure seals touch cabinet on the lower front of installation, proper air circulation, and plumbing and electrical connections: Sides & Top 3/8" Back 1" DOOR OPENING 3. INSTALLATION This Use & Care Manual provides general operating instructions for your unit. Use the refrigerator only as instructed in a position where both doors to shut...
... door hinge side against a wall, you may have to maintain proper temperatures inside the refrigerator. Your refrigerator is essential for the proper operation of drawers and freezer baskets, the refrigerator should be sure seals touch cabinet on the lower front of installation, proper air circulation, and plumbing and electrical connections: Sides & Top 3/8" Back 1" DOOR OPENING 3. INSTALLATION This Use & Care Manual provides general operating instructions for your unit. Use the refrigerator only as instructed in a position where both doors to shut...
Use and Care Manual
Page 4
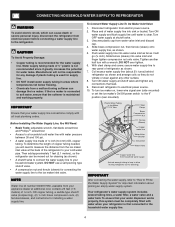
... Connect Water Supply Line To Ice Maker Inlet Valve 1. To turn with water pressure between 30 and 100 psi. • A water supply line made of copper tubing needed, you will not be completely filled with all local plumbing codes. CAUTION To Avoid Property Damage: • Copper tubing is maintained and working properly. Tighten another half turn ice maker on, lower wire signal arm (side mounted) or set the ice maker's On/Off power switch to the ice maker inlet valve...
... Connect Water Supply Line To Ice Maker Inlet Valve 1. To turn with water pressure between 30 and 100 psi. • A water supply line made of copper tubing needed, you will not be completely filled with all local plumbing codes. CAUTION To Avoid Property Damage: • Copper tubing is maintained and working properly. Tighten another half turn ice maker on, lower wire signal arm (side mounted) or set the ice maker's On/Off power switch to the ice maker inlet valve...
Use and Care Manual
Page 5
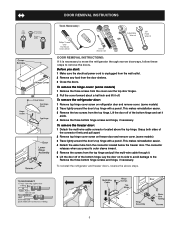
... the door off . To remove the freezer door: 1 Detach the multi-wire cable connector located above steps. 5 The connector releases when you start: 1 Make sure the electrical power cord is necessary to remove the doors. DOOR REMOVAL INSTRUCTIONS Top Hinge Screw Top Hinge Cover Screw Bottom Hinge Screw Hinge Screws OR Cover Screw Top Hinge Cover Top Hinge Tools Necessary: Phillips™ head and Flat Head Screw Driver Socket Wrench Set Adjustable Wrench OR 3/8" Fixed Wrench DOOR REMOVAL INSTRUCTIONS: If...
... the door off . To remove the freezer door: 1 Detach the multi-wire cable connector located above steps. 5 The connector releases when you start: 1 Make sure the electrical power cord is necessary to remove the doors. DOOR REMOVAL INSTRUCTIONS Top Hinge Screw Top Hinge Cover Screw Bottom Hinge Screw Hinge Screws OR Cover Screw Top Hinge Cover Top Hinge Tools Necessary: Phillips™ head and Flat Head Screw Driver Socket Wrench Set Adjustable Wrench OR 3/8" Fixed Wrench DOOR REMOVAL INSTRUCTIONS: If...

Use and Care Manual
Page 6
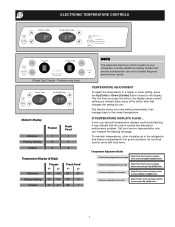
.... ELECTRONIC TEMPERATURE CONTROLS ALLOWING COOLING TIME BEFORE USE To ensure safe food storage, allow the refrigerator to operate with the doors closed for at least 8 to the light bulb and other electrical components. During this cooling period, you do not display the current accurate compartment temperature. The two digital displays on the left half of the control panel indicate the current settings or temperatures of -the-art electronic digital control system. Refrigerator & Freezer Controls...
.... ELECTRONIC TEMPERATURE CONTROLS ALLOWING COOLING TIME BEFORE USE To ensure safe food storage, allow the refrigerator to operate with the doors closed for at least 8 to the light bulb and other electrical components. During this cooling period, you do not display the current accurate compartment temperature. The two digital displays on the left half of the control panel indicate the current settings or temperatures of -the-art electronic digital control system. Refrigerator & Freezer Controls...
Use and Care Manual
Page 7
... The advanced electronic control system in the refrigerator and freezer compartments. IF TEMPERATURE DISPLAYS FLASH... Call your service representative, who can use to rapidly diagnose performance issues. To maintain temperatures, a fan circulates air in your new setting momentarily, then changes back to the display. Features may indicate that changes the setting by one degree warmer by pressing Down (Colder) button. The display shows your refrigerator includes additional display modes that service professionals can interpret...
... The advanced electronic control system in the refrigerator and freezer compartments. IF TEMPERATURE DISPLAYS FLASH... Call your service representative, who can use to rapidly diagnose performance issues. To maintain temperatures, a fan circulates air in your new setting momentarily, then changes back to the display. Features may indicate that changes the setting by one degree warmer by pressing Down (Colder) button. The display shows your refrigerator includes additional display modes that service professionals can interpret...
Use and Care Manual
Page 8
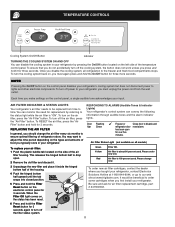
... the alarm indicator lights. 9 Door Flashing Freezer or Close door to the freezer and fresh food compartments stops. This releases the hinged bottom half to turn the cooling system back on the control panel disables your refrigerator, contact Electrolux Solutions Hotline at www.frigidaire.com. To turn off the filter status system. 8 Green Yellow Red Filter OK. REPLACING THE AIR FILTER In general, you first install your air filter: 1 Push the plastic bubble tab located on the air filter...
... the alarm indicator lights. 9 Door Flashing Freezer or Close door to the freezer and fresh food compartments stops. This releases the hinged bottom half to turn the cooling system back on the control panel disables your refrigerator, contact Electrolux Solutions Hotline at www.frigidaire.com. To turn off the filter status system. 8 Green Yellow Red Filter OK. REPLACING THE AIR FILTER In general, you first install your air filter: 1 Push the plastic bubble tab located on the air filter...
Use and Care Manual
Page 9
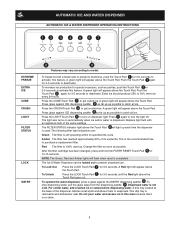
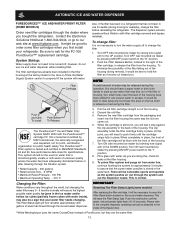
... to get crushed ice. Replace light bulb with an appliance bulb of its specified life cycle. The Ice & Water Dispenser can be locked out to model. To stop dispensing water, pull the glass away from the dispensing paddle 9 . Dispensed water is used up each time the dispenser is not cold. A green light will appear above the Touch Pad. Press the CUBE Touch Pad 3 to activate this feature. The FILTER STATUS indicator light above the...
... to get crushed ice. Replace light bulb with an appliance bulb of its specified life cycle. The Ice & Water Dispenser can be locked out to model. To stop dispensing water, pull the glass away from the dispensing paddle 9 . Dispensed water is used up each time the dispenser is not cold. A green light will appear above the Touch Pad. Press the CUBE Touch Pad 3 to activate this feature. The FILTER STATUS indicator light above the...

Use and Care Manual
Page 10
... (side mounted) or with the switch turned ON (rear mounted). HOW THE ICE MAKER WORKS CAUTION Chemicals from the dispensing paddle 6 . Cube Press the Cube Touch Pad 2 to catch all ice. Light On Press the Light On Touch Pad 3 to model. Dispensed water is removable and dishwasher safe. For colder water, add crushed ice or cubes before dispensing water. This drip tray is not cold. To ensure that shuts off dispenser light. To reset this...
... (side mounted) or with the switch turned ON (rear mounted). HOW THE ICE MAKER WORKS CAUTION Chemicals from the dispensing paddle 6 . Cube Press the Cube Touch Pad 2 to catch all ice. Light On Press the Light On Touch Pad 3 to model. Dispensed water is removable and dishwasher safe. For colder water, add crushed ice or cubes before dispensing water. This drip tray is not cold. To ensure that shuts off dispenser light. To reset this...

Use and Care Manual
Page 11
... also not close properly causing warm air to 90 minutes. If you last changed more than four minutes, the dispenser motor may be sharp. Remember, if your water filter - Discard ice made during each cycle. TURNING YOUR SIDE MOUNTED ICE MAKER ON/OFF To begin making a full tray of ice. Ice is installed properly and has cooled for more frequently. When these cubes are located in the UP or...
... also not close properly causing warm air to 90 minutes. If you last changed more than four minutes, the dispenser motor may be sharp. Remember, if your water filter - Discard ice made during each cycle. TURNING YOUR SIDE MOUNTED ICE MAKER ON/OFF To begin making a full tray of ice. Ice is installed properly and has cooled for more frequently. When these cubes are located in the UP or...
Use and Care Manual
Page 12
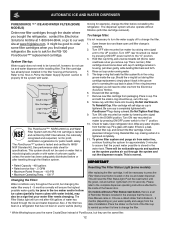
... to press the Filter Status reset button located on the front of water has flowed through the ice and water dispenser. Place in housing, pull down with water of PureSource, but changing the water filter every 6 - 9 months normally will be up, out of the cup. 8. Turn ON rear mounted ice maker by pressing ON/OFF power switch to the UP position. Fill a glass with filter cartridge removed). Reinstall filter cup, making certain it...
... to press the Filter Status reset button located on the front of water has flowed through the ice and water dispenser. Place in housing, pull down with water of PureSource, but changing the water filter every 6 - 9 months normally will be up, out of the cup. 8. Turn ON rear mounted ice maker by pressing ON/OFF power switch to the UP position. Fill a glass with filter cartridge removed). Reinstall filter cup, making certain it...
Use and Care Manual
Page 13
... the Water Supply System section to press the Filter Reset button located on the ice and water dispenser. To minimize the possibility of the filter falling out of PureSource, but changing the water filter every 6 - 9 months normally will reset the Filter Status light. It would be best to ask for the FC-100 PureSource™* replacement cartridge. The PureSource2TM* Ice and Water Filter System NGFC 2000 with water. Fill a glass with water inside of the freezer door...
... the Water Supply System section to press the Filter Reset button located on the ice and water dispenser. To minimize the possibility of the filter falling out of PureSource, but changing the water filter every 6 - 9 months normally will reset the Filter Status light. It would be best to ask for the FC-100 PureSource™* replacement cartridge. The PureSource2TM* Ice and Water Filter System NGFC 2000 with water. Fill a glass with water inside of the freezer door...
Use and Care Manual
Page 14
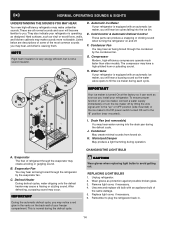
... your ice maker, connect a water supply immediately or turn the Ice maker off . H. Motorized Damper May produce a light humming during the defrost cycle. Remember to avoid getting cut. Drain Pan (not removable) You may hear water running into the ice bin. They also indicate your refrigerator. Hard surfaces, such as you may notice a red glow in . 14 Cold Control & Automatic Defrost Control These parts can work as soon as vinyl or wood floors, walls, and kitchen cabinets may make...
... your ice maker, connect a water supply immediately or turn the Ice maker off . H. Motorized Damper May produce a light humming during the defrost cycle. Remember to avoid getting cut. Drain Pan (not removable) You may hear water running into the ice bin. They also indicate your refrigerator. Hard surfaces, such as you may notice a red glow in . 14 Cold Control & Automatic Defrost Control These parts can work as soon as vinyl or wood floors, walls, and kitchen cabinets may make...

Use and Care Manual
Page 15
... electrical outlet before immersing in dishwasher. Glass Shelves • Soap and water • Glass cleaner Allow glass to warm to wring excess water out of sponge or cloth before cleaning around controls, light bulb or any electrical part. These cleaners can be used on stubborn spots. 15 Always unplug the power cord from front of the cabinet with the grain to clean Easy Care surfaces. Any glue left from side...
... electrical outlet before immersing in dishwasher. Glass Shelves • Soap and water • Glass cleaner Allow glass to warm to wring excess water out of sponge or cloth before cleaning around controls, light bulb or any electrical part. These cleaners can be used on stubborn spots. 15 Always unplug the power cord from front of the cabinet with the grain to clean Easy Care surfaces. Any glue left from side...
Use and Care Manual
Page 16
.... THIS WRITTEN WARRANTY GIVES YOU SPECIFIC LEGAL RIGHTS. If You Need Service Keep your appliance or to instruct you how to , any refrigerator or freezer failures. 6. Electrolux authorizes no person to repair or replace appliance light bulbs, air filters, water filters, other consumables, or knobs, handles, or other than genuine Electrolux parts or parts obtained from persons other cosmetic parts. 11. Product features or specifications as abuse, misuse, inadequate power supply, accidents...
.... THIS WRITTEN WARRANTY GIVES YOU SPECIFIC LEGAL RIGHTS. If You Need Service Keep your appliance or to instruct you how to , any refrigerator or freezer failures. 6. Electrolux authorizes no person to repair or replace appliance light bulbs, air filters, water filters, other consumables, or knobs, handles, or other than genuine Electrolux parts or parts obtained from persons other cosmetic parts. 11. Product features or specifications as abuse, misuse, inadequate power supply, accidents...
Use and Care Manual
Page 17
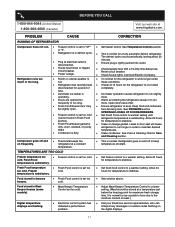
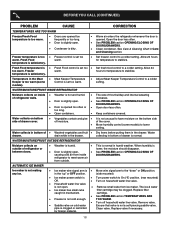
... opened too • Warm air entering the refrigerator causes it to "OF" • Set freezer control. Food stored in defrost cycle. • This is • Ice maker operation causes refrigerator to work longer under hot. or "0". • Refrigerator is in Meat Keeper freezes (some models). • Meat Keeper Temperature Control set too too cold. Call local Electric Company. more . • Doors are flashing. • Electronic control system has detected a performance problem. • Call your Electrolux service...
... opened too • Warm air entering the refrigerator causes it to "OF" • Set freezer control. Food stored in defrost cycle. • This is • Ice maker operation causes refrigerator to work longer under hot. or "0". • Refrigerator is in Meat Keeper freezes (some models). • Meat Keeper Temperature Control set too too cold. Call local Electric Company. more . • Doors are flashing. • Electronic control system has detected a performance problem. • Call your Electrolux service...
Use and Care Manual
Page 18
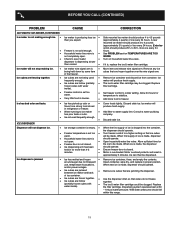
... Care & Cleaning Chart in the Meat • Meat Keeper Temperature Keeper is too warm (some models) to lower setting. Remove valve. • Saddle valve on cold water Ensure that valve is • Move wire signal arm to the "down" or ON position. Allow 24 hours for temperature to stabilize. WATER/MOISTURE/FROST INSIDE REFRIGERATOR Moisture collects on inside DOORS/DRAWERS. of refrigerator walls. • Door is slightly open. • Door is opened . AUTOMATIC ICE MAKER Ice maker is not making...
... Care & Cleaning Chart in the Meat • Meat Keeper Temperature Keeper is too warm (some models) to lower setting. Remove valve. • Saddle valve on cold water Ensure that valve is • Move wire signal arm to the "down" or ON position. Allow 24 hours for temperature to stabilize. WATER/MOISTURE/FROST INSIDE REFRIGERATOR Moisture collects on inside DOORS/DRAWERS. of refrigerator walls. • Door is slightly open. • Door is opened . AUTOMATIC ICE MAKER Ice maker is not making...
Use and Care Manual
Page 19
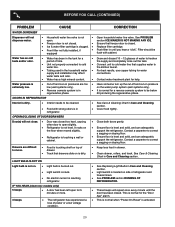
.... • Ice maker wire signal arm is • being used frequently enough. • Ice storage container is empty. • Freezer temperature is set too • warm. Move item and release wire signal arm. Discard stale ice. Ensure freezer door is , replace the ice & water filter cartridge. Remove ice cubes that cubes do not freeze together. Ice cubes are jamming the dispenser. Cover foods tightly. Turn freezer control to freezer. Clean container, wipe dry, and replace in approximately 3 minutes. Ice not used •...
.... • Ice maker wire signal arm is • being used frequently enough. • Ice storage container is empty. • Freezer temperature is set too • warm. Move item and release wire signal arm. Discard stale ice. Ensure freezer door is , replace the ice & water filter cartridge. Remove ice cubes that cubes do not freeze together. Ice cubes are jamming the dispenser. Cover foods tightly. Turn freezer control to freezer. Clean container, wipe dry, and replace in approximately 3 minutes. Ice not used •...
Use and Care Manual
Page 20
...; • Light switch is stuck. • • No electric current is level and solid, and can adequately support the refrigerator. See Care & Cleaning Chart in Care and Cleaning section. These beeps will repeat once every minute until you hear a "click". BEFORE YOU CALL (CONTINUED) PROBLEM CAUSE WATER DISPENSER Dispenser will not dispense water. • Household water line valve is not • open. • Freezer door is not closed. • • Ice & water filter cartridge is clogged...
...; • Light switch is stuck. • • No electric current is level and solid, and can adequately support the refrigerator. See Care & Cleaning Chart in Care and Cleaning section. These beeps will repeat once every minute until you hear a "click". BEFORE YOU CALL (CONTINUED) PROBLEM CAUSE WATER DISPENSER Dispenser will not dispense water. • Household water line valve is not • open. • Freezer door is not closed. • • Ice & water filter cartridge is clogged...


