

Use and Care Manual
Page 1
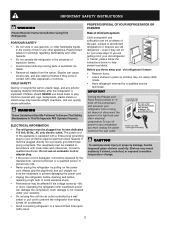
... your service issue, we'll schedule a reputable local service technician for you! √ Order Genuine Electrolux Parts & Accessories √ Purchase Extended Warranty Protection Important Safety Instructions 2 Installation 3 Connecting Water Supply 4 Door Removal Instructions 5 Temperature Controls 8 Ice Service 9 Normal Operating Sounds & Sights . 10 Care and Cleaning 10 Warranty 12 Before you Call 13 READ AND SAVE THESE INSTRUCTIONS P/N 241857201 (Sept 2007) Need Parts or Service? Before Calling Your Local Repair Service - Use & Care Manual Top Mount Refrigerator Got Questions...
... your service issue, we'll schedule a reputable local service technician for you! √ Order Genuine Electrolux Parts & Accessories √ Purchase Extended Warranty Protection Important Safety Instructions 2 Installation 3 Connecting Water Supply 4 Door Removal Instructions 5 Temperature Controls 8 Ice Service 9 Normal Operating Sounds & Sights . 10 Care and Cleaning 10 Warranty 12 Before you Call 13 READ AND SAVE THESE INSTRUCTIONS P/N 241857201 (Sept 2007) Need Parts or Service? Before Calling Your Local Repair Service - Use & Care Manual Top Mount Refrigerator Got Questions...
Use and Care Manual
Page 2
... Turning the Freezer and Fresh Food Controls to "0" turns off accidentally. • Avoid connecting refrigerator to play. Shelves may become airtight chambers, and can damage the compressor. Operating the refrigerator with any other electrical components. Junked or abondoned refrigerators or freezers are not problems of explosive fumes. • Avoid contact with insufficient power can quickly cause suffocation. Before you throw away your warranty. • Do not plug...
... Turning the Freezer and Fresh Food Controls to "0" turns off accidentally. • Avoid connecting refrigerator to play. Shelves may become airtight chambers, and can damage the compressor. Operating the refrigerator with any other electrical components. Junked or abondoned refrigerators or freezers are not problems of explosive fumes. • Avoid contact with insufficient power can quickly cause suffocation. Before you throw away your warranty. • Do not plug...

Use and Care Manual
Page 3
... support a fully loaded refrigerator. • Consider water supply availability for your refrigerator in which the doors open can be installed on the back of your refrigerator (air-cooled condenser) leave 3" clearance at top of your refrigerator with Leveling Screw (some models) Raise Stationary Front Roller with a Garage Kit will drop below 55° F. IMPORTANT If you install your model. To make this Use & Care Manual. Remove toe grille. 2. Sufficient air circulation is near a grounded electrical...
... support a fully loaded refrigerator. • Consider water supply availability for your refrigerator in which the doors open can be installed on the back of your refrigerator (air-cooled condenser) leave 3" clearance at top of your refrigerator with Leveling Screw (some models) Raise Stationary Front Roller with a Garage Kit will drop below 55° F. IMPORTANT If you install your model. To make this Use & Care Manual. Remove toe grille. 2. Sufficient air circulation is near a grounded electrical...
Use and Care Manual
Page 4
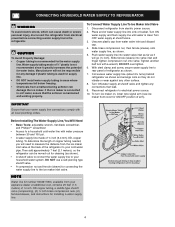
... clear. Turn OFF water supply at shutoff valve and tighten any other surface. 8. Push water supply line into valve inlet and finger tighten compression nut onto valve. Slide ferrule (sleeve) into water valve inlet as far as shown. 7. With steel clamp and screw, secure water supply line to the ice maker inlet valve. Coil excess water supply line (about 2½ turns) behind refrigerator as shown. 5. NOTE Water line kit number 5303917950, available from electrical power before connecting a water supply line to electrical power source...
... clear. Turn OFF water supply at shutoff valve and tighten any other surface. 8. Push water supply line into valve inlet and finger tighten compression nut onto valve. Slide ferrule (sleeve) into water valve inlet as far as shown. 7. With steel clamp and screw, secure water supply line to the ice maker inlet valve. Coil excess water supply line (about 2½ turns) behind refrigerator as shown. 5. NOTE Water line kit number 5303917950, available from electrical power before connecting a water supply line to electrical power source...

Use and Care Manual
Page 5
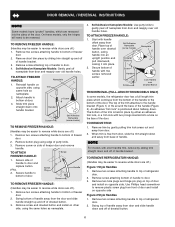
... Set Adjustable Wrench Pliers Top Hinge Cover Top Hinge Door Stop Screw Door Stop Washer Hinge Pin Bottom Hinge Screws Toe Grille DOOR REMOVAL AND REVERSAL INSTRUCTIONS: NOTE If you begin, turn refrigerator temperature control to the other. Remove top hinge cover. Tighten screws. 6. Remove two screws on bottom hinge with the two screws removed from one side to center position. Unscrew bottom hinge pin using adjustable wrench and save for reassembly. Move hinge pin to other hole in electrical power cord and turn the refrigerator temperature control...
... Set Adjustable Wrench Pliers Top Hinge Cover Top Hinge Door Stop Screw Door Stop Washer Hinge Pin Bottom Hinge Screws Toe Grille DOOR REMOVAL AND REVERSAL INSTRUCTIONS: NOTE If you begin, turn refrigerator temperature control to the other. Remove top hinge cover. Tighten screws. 6. Remove two screws on bottom hinge with the two screws removed from one side to center position. Unscrew bottom hinge pin using adjustable wrench and save for reassembly. Move hinge pin to other hole in electrical power cord and turn the refrigerator temperature control...
Use and Care Manual
Page 6
... from door. 2. Remove screw attaching bottom of handle to door and replace button plug. 2. On these models, only the hinges will need to top of the door. Slide trim piece straight down . TO REMOVE REFRIGERATOR HANDLE: (Handles may be easier to reverse while doors are off nameplate from door and reapply over Dovetail Button TRIM REMOVAL (FULL-LENGTH TRIM MODELS ONLY) In some models) Dovetail Button 2. TO REMOVE FREEZER HANDLE: (Handles may be reversed. Secure side of handle to door. 3. Remove two...
... from door. 2. Remove screw attaching bottom of handle to door and replace button plug. 2. On these models, only the hinges will need to top of the door. Slide trim piece straight down . TO REMOVE REFRIGERATOR HANDLE: (Handles may be easier to reverse while doors are off nameplate from door and reapply over Dovetail Button TRIM REMOVAL (FULL-LENGTH TRIM MODELS ONLY) In some models) Dovetail Button 2. TO REMOVE FREEZER HANDLE: (Handles may be reversed. Secure side of handle to door. 3. Remove two...

Use and Care Manual
Page 7
... it into place. 2. Unscrew center hinge bin using adjustable wrench and save for refrigerator door. 7 Remove bottom hinge. Reverse steps 1 - 6 to remove doors. 1. Secure bottom of putty knife. 3. TO ATTACH TRIM: 1. Install trim to handle by removing inside screw and loosening two outside screws in figure 3. Remove button plug using tools near surface of door. Figure 3 - To Remove Doors Stainless steel doors are off of handle. Remove top hinge and lift freezer door off .) 1. Set door aside. 3. Ensure plastic washer stays on...
... it into place. 2. Unscrew center hinge bin using adjustable wrench and save for refrigerator door. 7 Remove bottom hinge. Reverse steps 1 - 6 to remove doors. 1. Secure bottom of putty knife. 3. TO ATTACH TRIM: 1. Install trim to handle by removing inside screw and loosening two outside screws in figure 3. Remove button plug using tools near surface of door. Figure 3 - To Remove Doors Stainless steel doors are off of handle. Remove top hinge and lift freezer door off .) 1. Set door aside. 3. Ensure plastic washer stays on...
Use and Care Manual
Page 8
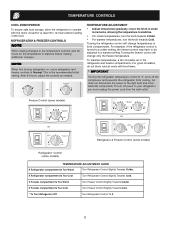
...power to your refrigerator, you must unplug the power cord from cooling, but does not disconnect the power to the light bulb and other electrical components. Turning the refrigerator control will change temperatures in both compartments. To maintain temperatures, a fan circulates air in small increments, allowing the temperature to Normal. To turn the knob towards Cold. Freezer Control (some models) OR OR Refrigerator & Freezer Control (some models) Refrigerator Control (some models) TEMPERATURE ADJUSTMENT GUIDE If Refrigerator compartment Is Too Warm Turn Refrigerator Control...
...power to your refrigerator, you must unplug the power cord from cooling, but does not disconnect the power to the light bulb and other electrical components. Turning the refrigerator control will change temperatures in both compartments. To maintain temperatures, a fan circulates air in small increments, allowing the temperature to Normal. To turn the knob towards Cold. Freezer Control (some models) OR OR Refrigerator & Freezer Control (some models) Refrigerator Control (some models) TEMPERATURE ADJUSTMENT GUIDE If Refrigerator compartment Is Too Warm Turn Refrigerator Control...
Use and Care Manual
Page 9
... to fill the ice container. I M P O R TA N T Your ice maker is maintained and working properly. 9 The ice maker also turns off and the water supply is not connected, the water valve will hit the ice when the container is full. CAUTION DO NOT place the ice container in the UP position. If your model has an adjustable freezer shelf, place the shelf in most models at a rate of operation. With no ice will produce...
... to fill the ice container. I M P O R TA N T Your ice maker is maintained and working properly. 9 The ice maker also turns off and the water supply is not connected, the water valve will hit the ice when the container is full. CAUTION DO NOT place the ice container in the UP position. If your model has an adjustable freezer shelf, place the shelf in most models at a rate of operation. With no ice will produce...

Use and Care Manual
Page 10
... of your refrigerator is equipped with an automatic ice maker, you . Drain Pan (Nonremovable) You may have a condenser fan. C. Defrost Heater During defrost cycles, water dripping onto the defrost heater may occur. Remember to fill the ice maker during the defrost cycle. Listed below are descriptions of some models) home, it may be located on top of refrigerator). Condenser Coils (Fan-cooled models only) CARE & CLEANING A. D. when turning the refrigerator on back of the compressor for maximum...
... of your refrigerator is equipped with an automatic ice maker, you . Drain Pan (Nonremovable) You may have a condenser fan. C. Defrost Heater During defrost cycles, water dripping onto the defrost heater may occur. Remember to fill the ice maker during the defrost cycle. Listed below are descriptions of some models) home, it may be located on top of refrigerator). Condenser Coils (Fan-cooled models only) CARE & CLEANING A. D. when turning the refrigerator on back of the compressor for maximum...

Use and Care Manual
Page 11
.... Use warm soapy water to the light bulb or other sharp instruments which can be careful not to move the refrigerator beyond the plumbing connections. • Damp objects stick to wring excess water out of scouring pads, brushes, abrasive cleaners or strong alkaline solutions on next page). To turn off the compressor, but does not disconnect electrical power to clean Easy Care surfaces. Care & Cleaning Chart Part Interior/Door Liner Door Gaskets Drawers/Bins Glass Shelves...
.... Use warm soapy water to the light bulb or other sharp instruments which can be careful not to move the refrigerator beyond the plumbing connections. • Damp objects stick to wring excess water out of scouring pads, brushes, abrasive cleaners or strong alkaline solutions on next page). To turn off the compressor, but does not disconnect electrical power to clean Easy Care surfaces. Care & Cleaning Chart Part Interior/Door Liner Door Gaskets Drawers/Bins Glass Shelves...
Use and Care Manual
Page 12
... to repair or replace appliance light bulbs, air filters, water filters, other consumables, or knobs, handles, or other than authorized service companies; use of your appliance or to instruct you how to use or used other appropriate payment record to change without notice. or external causes such as removal of purchase, Electrolux will pay all receipts. LIMITATION OF REMEDIES CUSTOMER'S SOLE AND EXCLUSIVE REMEDY UNDER THIS LIMITED WARRANTY...
... to repair or replace appliance light bulbs, air filters, water filters, other consumables, or knobs, handles, or other than authorized service companies; use of your appliance or to instruct you how to use or used other appropriate payment record to change without notice. or external causes such as removal of purchase, Electrolux will pay all receipts. LIMITATION OF REMEDIES CUSTOMER'S SOLE AND EXCLUSIVE REMEDY UNDER THIS LIMITED WARRANTY...
Use and Care Manual
Page 13
Refrigerator is satisfactory. Cabinet light not working . (some models) Before calling for service, review this appliance. • Ensure plug is satisfactory. Reset circuit breaker. • The temperature control is turned to a warmer setting until freezer temperature is tightly pushed into electrical outlet. • Light switch may save you time and expense. Wait 20 minutes and check again. • Set freezer control to "O". • Refrigerator may be stuck. Odors in defrost cycle. Freezer temperature too cold. Freezer temperature is...
Refrigerator is satisfactory. Cabinet light not working . (some models) Before calling for service, review this appliance. • Ensure plug is satisfactory. Reset circuit breaker. • The temperature control is turned to a warmer setting until freezer temperature is tightly pushed into electrical outlet. • Light switch may save you time and expense. Wait 20 minutes and check again. • Set freezer control to "O". • Refrigerator may be stuck. Odors in defrost cycle. Freezer temperature too cold. Freezer temperature is...
Installation Instructions
Page 1
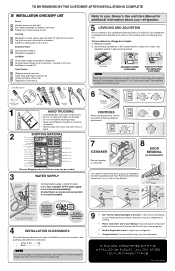
... enjoy your Use & Care Manual. Top Hinge Cover OR Top Hinge Top Hinge Cover Top Hinge Bottom Water Tube Wood Shim Pin Center Hinge 9 √ See "Normal Operating Sights & Sounds" in the Use & Care Manual so you understand the sounds you need to remove the doors to get your refrigerator into the house please see "Door Removal and Reversal Instructions" in Ice Maker House water supply connected to refrigerator No water leaks present at all corners Electrical Power House power turned on a solid floor. Your refrigerator is equipped with Leveling Screw (some models) Raise...
... enjoy your Use & Care Manual. Top Hinge Cover OR Top Hinge Top Hinge Cover Top Hinge Bottom Water Tube Wood Shim Pin Center Hinge 9 √ See "Normal Operating Sights & Sounds" in the Use & Care Manual so you understand the sounds you need to remove the doors to get your refrigerator into the house please see "Door Removal and Reversal Instructions" in Ice Maker House water supply connected to refrigerator No water leaks present at all corners Electrical Power House power turned on a solid floor. Your refrigerator is equipped with Leveling Screw (some models) Raise...


