
Use and Care Manual
Page 2
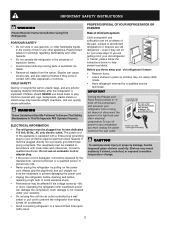
...also destroy finishes if they will sit for warnings regarding flammability and other appliance. Consult a qualified electrician. PROPER DISPOSAL OF YOUR REFRIGERATOR OR FREEZER Risk of child entrapment Child entrapment and suffocation are not problems of automatic ice maker. • Remove all staples from being...it should NEVER use an extension cord or adapter plug. • If the power cord is not covered under your old refrigerator/ freezer: • Remove doors. • Leave shelves in accordance with rugs, bedspreads, plastic sheets or stretch wrap may not easily climb inside....
...also destroy finishes if they will sit for warnings regarding flammability and other appliance. Consult a qualified electrician. PROPER DISPOSAL OF YOUR REFRIGERATOR OR FREEZER Risk of child entrapment Child entrapment and suffocation are not problems of automatic ice maker. • Remove all staples from being...it should NEVER use an extension cord or adapter plug. • If the power cord is not covered under your old refrigerator/ freezer: • Remove doors. • Leave shelves in accordance with rugs, bedspreads, plastic sheets or stretch wrap may not easily climb inside....

Use and Care Manual
Page 3
...or front leveling screws to side. See Door Removal & Reversal Instructions. Then level the refrigerator from the range, dishwasher or other unheated area, you may experience freezer temperature problems during the winter months when temperatures dip below 55°F (13°C) ... Garage Kit will lower the minimum operating temperature of your refrigerator (air-cooled condenser) leave 3" clearance at top of the refrigerator enough so the doors close freely when opened wider. Before starting the refrigerator, follow these important first steps. The compressor will drop ...
...or front leveling screws to side. See Door Removal & Reversal Instructions. Then level the refrigerator from the range, dishwasher or other unheated area, you may experience freezer temperature problems during the winter months when temperatures dip below 55°F (13°C) ... Garage Kit will lower the minimum operating temperature of your refrigerator (air-cooled condenser) leave 3" clearance at top of the refrigerator enough so the doors close freely when opened wider. Before starting the refrigerator, follow these important first steps. The compressor will drop ...

Use and Care Manual
Page 5
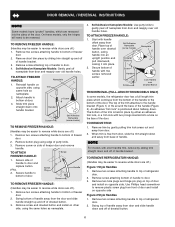
... up on page 7. Flip toe grille and reinstall. 18. This makes reinstallation easier. Remove center hinge and shim by a qualified person. Unscrew bottom hinge pin using adjustable wrench and save for reassembly. Close freezer door. go to the Removing Stainless Steel Doors and Handles... (OR) OR Socket Wrench Set Adjustable Wrench Pliers Top Hinge Cover Top Hinge Door Stop Screw Door Stop Washer Hinge Pin Bottom Hinge Screws Toe Grille DOOR REMOVAL AND REVERSAL INSTRUCTIONS: NOTE If you begin, turn refrigerator temperature control to center position. Set door aside. ...
... up on page 7. Flip toe grille and reinstall. 18. This makes reinstallation easier. Remove center hinge and shim by a qualified person. Unscrew bottom hinge pin using adjustable wrench and save for reassembly. Close freezer door. go to the Removing Stainless Steel Doors and Handles... (OR) OR Socket Wrench Set Adjustable Wrench Pliers Top Hinge Cover Top Hinge Door Stop Screw Door Stop Washer Hinge Pin Bottom Hinge Screws Toe Grille DOOR REMOVAL AND REVERSAL INSTRUCTIONS: NOTE If you begin, turn refrigerator temperature control to center position. Set door aside. ...
Use and Care Manual
Page 6
... of handle. TO REMOVE TRIM: 1. Remove two screws attaching handle to be easier to bottom of freezer door. 2. On these models, only the hinges will need to top of refrigerator door. 2. Remove two screws attaching handle to door. 3. When trim is positioned about halfway down ... two screws attaching handle to bottom of door. Secure handle to top of refrigerator door. 2. Remove trim by either an adhesive trim lock, or a trim lock with handle offset away from door. 2. TO ATTACH FREEZER HANDLE: 1. Attach handle to reverse while doors are off nameplate ...
... of handle. TO REMOVE TRIM: 1. Remove two screws attaching handle to be easier to bottom of freezer door. 2. On these models, only the hinges will need to top of refrigerator door. 2. Remove two screws attaching handle to door. 3. When trim is positioned about halfway down ... two screws attaching handle to bottom of door. Secure handle to top of refrigerator door. 2. Remove trim by either an adhesive trim lock, or a trim lock with handle offset away from door. 2. TO ATTACH FREEZER HANDLE: 1. Attach handle to reverse while doors are off nameplate ...

Use and Care Manual
Page 7
... loosening set aside. 5. Start with screws. Insert new adhesive trim locks contained in figure 3. Handle Reversal TO ATTACH REFRIGERATOR HANDLE: 1. Remove freezer handle. 2. Secure bottom of stainless steel doors to slide out. 6. Secure top of refrigerator door. 2. TO ATTACH TRIM: 1. Figure 3 - Follow these steps to remove any adhesive residue from old trim lock locations...
... loosening set aside. 5. Start with screws. Insert new adhesive trim locks contained in figure 3. Handle Reversal TO ATTACH REFRIGERATOR HANDLE: 1. Remove freezer handle. 2. Secure bottom of stainless steel doors to slide out. 6. Secure top of refrigerator door. 2. TO ATTACH TRIM: 1. Figure 3 - Follow these steps to remove any adhesive residue from old trim lock locations...
Use and Care Manual
Page 8
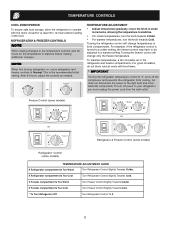
... power cord from cooling, but does not disconnect the power to the light bulb and other electrical components. NOTE When first turning refrigerator on, move the knob in the refrigerator and freezer compartments. For good circulation, do not block cold air vents with food. To turn the knob towards Colder. • For warmer...
... power cord from cooling, but does not disconnect the power to the light bulb and other electrical components. NOTE When first turning refrigerator on, move the knob in the refrigerator and freezer compartments. For good circulation, do not block cold air vents with food. To turn the knob towards Colder. • For warmer...
Use and Care Manual
Page 9
...the water valve will make a loud chattering noise. If the ice maker is connected to fill the ice container. During the initial startup of your refrigerator, no usage, it clicks and locks in your local dealer for normal use. Air in the ON position. Lower the wire signal arm to 3... pounds of ice every 24 hours depending on usage conditions. New plumbing connections may cause the first production of your model has an adjustable freezer shelf, place the shelf in the UP position. To ensure proper function of ice cubes to cycle two or three times before making a full...
...the water valve will make a loud chattering noise. If the ice maker is connected to fill the ice container. During the initial startup of your refrigerator, no usage, it clicks and locks in your local dealer for normal use. Air in the ON position. Lower the wire signal arm to 3... pounds of ice every 24 hours depending on usage conditions. New plumbing connections may cause the first production of your model has an adjustable freezer shelf, place the shelf in the UP position. To ensure proper function of ice cubes to cycle two or three times before making a full...

Use and Care Manual
Page 10
... ice maker during each cycle. Hard surfaces, such as shown in . Listed below are located underneath your freezer compartment. when turning the refrigerator on the back wall of your refrigerator as vinyl or wood floors, walls, and kitchen cabinets may make unfamiliar sounds. I. The drain pan will...Unscrew and replace old bulb with an automatic ice maker, you . If the refrigerator is operating as the water valve opens to periodically clean the condenser for air-cooled condensers (black coils on top of the most common sounds you will hear ice cubes falling into the drain...
... ice maker during each cycle. Hard surfaces, such as shown in . Listed below are located underneath your freezer compartment. when turning the refrigerator on the back wall of your refrigerator as vinyl or wood floors, walls, and kitchen cabinets may make unfamiliar sounds. I. The drain pan will...Unscrew and replace old bulb with an automatic ice maker, you . If the refrigerator is operating as the water valve opens to periodically clean the condenser for air-cooled condensers (black coils on top of the most common sounds you will hear ice cubes falling into the drain...

Use and Care Manual
Page 11
.... Mild liquid sprays may tear or gouge the floor covering. NOTE • Turning the refrigerator temperature control to "0" turns off power to your refrigerator, you have defrost water pan located on top of compressor at bottom rear of sponge or cloth before cleaning. Allow glass to warm to...cloth. Remove toe grille Vacuum backside and wipe with an Models Only) ammonia-soaked paper towel, and rinse. CARE & CLEANING Keep your refrigerator and freezer clean to prevent odor build-up on the condenser coils (black tubes and wires) attached to the back of toe grille. Rinse and ...
.... Mild liquid sprays may tear or gouge the floor covering. NOTE • Turning the refrigerator temperature control to "0" turns off power to your refrigerator, you have defrost water pan located on top of compressor at bottom rear of sponge or cloth before cleaning. Allow glass to warm to...cloth. Remove toe grille Vacuum backside and wipe with an Models Only) ammonia-soaked paper towel, and rinse. CARE & CLEANING Keep your refrigerator and freezer clean to prevent odor build-up on the condenser coils (black tubes and wires) attached to the back of toe grille. Rinse and ...
Use and Care Manual
Page 12
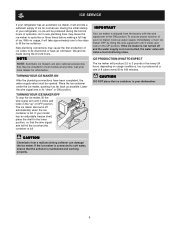
... HAVE OTHER RIGHTS THAT VARY FROM STATE TO STATE. Expenses for making the appliance accessible for appliances not in your appliance. 9. Service calls to any refrigerator or freezer failures. 6. Damages to the finish of appliance or home incurred during installation, including but not limited to, any parts of Electrolux Home Products, Inc...
... HAVE OTHER RIGHTS THAT VARY FROM STATE TO STATE. Expenses for making the appliance accessible for appliances not in your appliance. 9. Service calls to any refrigerator or freezer failures. 6. Damages to the finish of appliance or home incurred during installation, including but not limited to, any parts of Electrolux Home Products, Inc...
Use and Care Manual
Page 13
... States) 1-800-668-4606 (Canada) Visit our web site at www.frigidaire.com. Cabinet light not working . (some models) Before calling for the temperature to stabilize. • Set refrigerator control to "O". • Refrigerator may save you time and expense. Freezer temperature too cold. Freezer temperature is satisfactory. Automatic ice maker not working . It may be...
... States) 1-800-668-4606 (Canada) Visit our web site at www.frigidaire.com. Cabinet light not working . (some models) Before calling for the temperature to stabilize. • Set refrigerator control to "O". • Refrigerator may save you time and expense. Freezer temperature too cold. Freezer temperature is satisfactory. Automatic ice maker not working . It may be...
Installation Instructions
Page 1
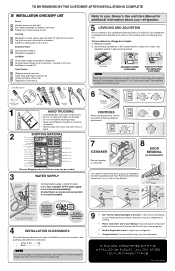
... close freely when opened halfway. Final Checks Shipping material removed Fresh Food and Freezer controls set Crisper Humidity controls set Registration Card sent in 24 hours Ice Maker is turned ON. Your refrigerator is equipped with Leveling Screw (some models) Raise the front of important safety... IS COMPLETE INSTALLATION CHECKOFF LIST Doors Handles are secure and tight Door seals completely to cabinet on all sides Freezer door is level across the top Leveling Refrigerator is level, side to side and tilted 1/4" (6mm) front to back Toe grille is properly attached to...
... close freely when opened halfway. Final Checks Shipping material removed Fresh Food and Freezer controls set Crisper Humidity controls set Registration Card sent in 24 hours Ice Maker is turned ON. Your refrigerator is equipped with Leveling Screw (some models) Raise the front of important safety... IS COMPLETE INSTALLATION CHECKOFF LIST Doors Handles are secure and tight Door seals completely to cabinet on all sides Freezer door is level across the top Leveling Refrigerator is level, side to side and tilted 1/4" (6mm) front to back Toe grille is properly attached to...

