

Use and Care Manual
Page 1
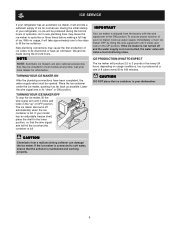
Use & Care Manual Top Mount Refrigerator Got Questions? Need Parts or Service? CALL: Solutions Hotline (United States) 1-800-944-9044 (Canada) 1-800-668-4606 √ Resolve many service issues over the ...
Use & Care Manual Top Mount Refrigerator Got Questions? Need Parts or Service? CALL: Solutions Hotline (United States) 1-800-944-9044 (Canada) 1-800-668-4606 √ Resolve many service issues over the ...
Use and Care Manual
Page 2
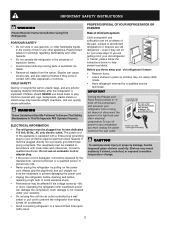
...fumes. • Avoid contact with a three-prong grounding plug for "just a few days." The power cord of your old refrigerator or freezer, please follow the instructions below to sudden temperature change. 2 Consult a qualified electrician. Always grip the plug firmly, and pull straight...by a qualified service technician. Do not use these items to your refrigerator you throw away your protection against electrical shock hazards. Such damage is unpacked. PROPER DISPOSAL OF YOUR REFRIGERATOR OR FREEZER Risk of child entrapment Child entrapment and suffocation are still dangerous -...
...fumes. • Avoid contact with a three-prong grounding plug for "just a few days." The power cord of your old refrigerator or freezer, please follow the instructions below to sudden temperature change. 2 Consult a qualified electrician. Always grip the plug firmly, and pull straight...by a qualified service technician. Do not use these items to your refrigerator you throw away your protection against electrical shock hazards. Such damage is unpacked. PROPER DISPOSAL OF YOUR REFRIGERATOR OR FREEZER Risk of child entrapment Child entrapment and suffocation are still dangerous -...

Use and Care Manual
Page 3
...freezer temperature problems during the winter months when temperatures dip below 55°F (13°C) or rise above 110°F (43°C). NOTE If your unit. Installation Clearances • Allow the following clearances for ease of installation, proper air circulation, and plumbing and electrical connections: Sides & Top... the toe grille on the back of your refrigerator (air-cooled condenser) leave 3" clearance at top of your model. Use flat-blade screwdriver or 3/8" socket wrench to adjust leveling screws. The refrigerator should be positioned to allow additional space so the...
...freezer temperature problems during the winter months when temperatures dip below 55°F (13°C) or rise above 110°F (43°C). NOTE If your unit. Installation Clearances • Allow the following clearances for ease of installation, proper air circulation, and plumbing and electrical connections: Sides & Top... the toe grille on the back of your refrigerator (air-cooled condenser) leave 3" clearance at top of your model. Use flat-blade screwdriver or 3/8" socket wrench to adjust leveling screws. The refrigerator should be positioned to allow additional space so the...
Use and Care Manual
Page 4
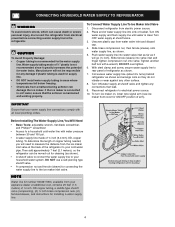
...; A compression nut and ferrule (sleeve) for cleaning (as shown. 7. Water supply tubing made of the refrigerator to your water supply line connections comply with a wrench; Disconnect refrigerator from water valve inlet and discard cap. 4. Place end of arm). To turn with all local plumbing codes...screwdriver • Access to a household cold water line with water pressure between 30 and 100 psi. • A water supply line made of refrigerator as shown). • A shutoff valve to connect the water supply line to your appliance dealer at the back of ¼ inch (6.4 mm...
...; A compression nut and ferrule (sleeve) for cleaning (as shown. 7. Water supply tubing made of the refrigerator to your water supply line connections comply with a wrench; Disconnect refrigerator from water valve inlet and discard cap. 4. Place end of arm). To turn with all local plumbing codes...screwdriver • Access to a household cold water line with water pressure between 30 and 100 psi. • A water supply line made of refrigerator as shown). • A shutoff valve to connect the water supply line to your appliance dealer at the back of ¼ inch (6.4 mm...

Use and Care Manual
Page 5
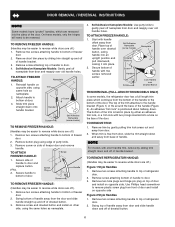
...person. Remove toe grille. 2. Unscrew center hinge pin using adjustable wrench. Close refrigerator door to "0" and remove the electrical power cord from one side to opposite side. Flip toe grille and reinstall. 18. Remove two screws on opposite side of door while tightening screws to other ...to the Removing Stainless Steel Doors and Handles Section on page 7. Tighten screws. 6. Remove top hinge cover. Move freezer and refrigerator door stops to the other hole in which your refrigerator doors open (door swing) can be performed by moving the door hinges from the wall ...
...person. Remove toe grille. 2. Unscrew center hinge pin using adjustable wrench. Close refrigerator door to "0" and remove the electrical power cord from one side to opposite side. Flip toe grille and reinstall. 18. Remove two screws on opposite side of door while tightening screws to other ...to the Removing Stainless Steel Doors and Handles Section on page 7. Tighten screws. 6. Remove top hinge cover. Move freezer and refrigerator door stops to the other hole in which your refrigerator doors open (door swing) can be performed by moving the door hinges from the wall ...
Use and Care Manual
Page 6
...of handle over old handle holes. Remove two screws attaching handle to bottom of refrigerator door. 2. Attach handle to top of door. 3. Remove button plug using edge of handle bracket. 3. TO ATTACH FREEZER HANDLE: 1. Remove trim by sliding trim straight down and away from door, slide... the trim straight down and off of putty knife. 3. TO REMOVE REFRIGERATOR HANDLE: (Handles may be...
...of handle over old handle holes. Remove two screws attaching handle to bottom of refrigerator door. 2. Attach handle to top of door. 3. Remove button plug using edge of handle bracket. 3. TO ATTACH FREEZER HANDLE: 1. Remove trim by sliding trim straight down and away from door, slide... the trim straight down and off of putty knife. 3. TO REMOVE REFRIGERATOR HANDLE: (Handles may be...

Use and Care Manual
Page 7
...enough to allow hinge to slide out. 6. Remove freezer handle. 2. Insert new adhesive trim locks contained in figure 3. Refrigerator Door Without Trim NOTE Trim lock must be easier to opposite side. Remove toe grille and top hinge cover. 2. Remove center hinge and shim by ... aside. 3. Firmly hold freezer handle while loosening set aside. 5. Secure handle to top of handle with 3/32" allen wrench. Remove top hinge and lift freezer door off of door. TO ATTACH REFRIGERATOR HANDLE: Figure 1 Style Handles 1. Remove two screws attaching handle to top of bottom hinge and set...
...enough to allow hinge to slide out. 6. Remove freezer handle. 2. Insert new adhesive trim locks contained in figure 3. Refrigerator Door Without Trim NOTE Trim lock must be easier to opposite side. Remove toe grille and top hinge cover. 2. Remove center hinge and shim by ... aside. 3. Firmly hold freezer handle while loosening set aside. 5. Secure handle to top of handle with 3/32" allen wrench. Remove top hinge and lift freezer door off of door. TO ATTACH REFRIGERATOR HANDLE: Figure 1 Style Handles 1. Remove two screws attaching handle to top of bottom hinge and set...
Use and Care Manual
Page 8
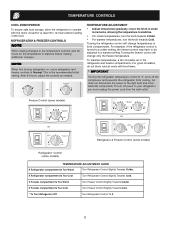
... is the recommended initial setting. To maintain temperatures, a fan circulates air in both compartments. Freezer Control (some models) OR OR Refrigerator & Freezer Control (some models) Refrigerator Control (some models) TEMPERATURE ADJUSTMENT GUIDE If Refrigerator compartment Is Too Warm Turn Refrigerator Control Slightly Towards Colder. TEMPERATURE CONTROLS COOL DOWN PERIOD To ensure safe food storage, allow the...
... is the recommended initial setting. To maintain temperatures, a fan circulates air in both compartments. Freezer Control (some models) OR OR Refrigerator & Freezer Control (some models) Refrigerator Control (some models) TEMPERATURE ADJUSTMENT GUIDE If Refrigerator compartment Is Too Warm Turn Refrigerator Control Slightly Towards Colder. TEMPERATURE CONTROLS COOL DOWN PERIOD To ensure safe food storage, allow the...
Use and Care Manual
Page 9
During the initial startup of your refrigerator, no usage, it will make a loud chattering noise. New plumbing connections may cause the first production of your... position. To ensure proper function of ice cubes to its "down" or ON position. If your model has an adjustable freezer shelf, place the shelf in the ON position. If the ice maker is connected to fill the ice container. The ice... installed in your dishwasher. Air in new plumbing lines may be opened. ICE SERVICE If your refrigerator has an automatic ice maker, it will hit the ice when the container is full.
During the initial startup of your refrigerator, no usage, it will make a loud chattering noise. New plumbing connections may cause the first production of your... position. To ensure proper function of ice cubes to its "down" or ON position. If your model has an adjustable freezer shelf, place the shelf in the ON position. If the ice maker is connected to fill the ice container. The ice... installed in your dishwasher. Air in new plumbing lines may be opened. ICE SERVICE If your refrigerator has an automatic ice maker, it will hit the ice when the container is full.

Use and Care Manual
Page 10
...for air-cooled condensers (black coils on top of the compressor for maximum efficiency. 10 Unsnap light shield as protection against possible broken glass. 3. NEVER CLEAN CONDENSER (SOME MODELS) If your refrigerator is equipped with an automatic ice maker... you have a high-pitched hum or pulsating sound. If the refrigerator is operated under normal operating conditions. H. B. D. Unplug refrigerator. 2. The timer also produces sounds similar to plug the refrigerator back in your freezer compartment. G. I. Replace light shield. 6. F. Compressor Modern, ...
...for air-cooled condensers (black coils on top of the compressor for maximum efficiency. 10 Unsnap light shield as protection against possible broken glass. 3. NEVER CLEAN CONDENSER (SOME MODELS) If your refrigerator is equipped with an automatic ice maker... you have a high-pitched hum or pulsating sound. If the refrigerator is operated under normal operating conditions. H. B. D. Unplug refrigerator. 2. The timer also produces sounds similar to plug the refrigerator back in your freezer compartment. G. I. Replace light shield. 6. F. Compressor Modern, ...

Use and Care Manual
Page 11
... of the cabinet with sudsy cloth or sponge. If cleaning is significant pet traffic in warm water. CARE & CLEANING Keep your refrigerator and freezer clean to prevent odor build-up on the condenser coils (black tubes and wires) attached to the back of air-cooled.... It will remove the protective finish. Do not shift the refrigerator from your home. If the refrigerator has an automatic ice maker, be used on top of compressor at bottom rear of toe grille. NOTE • Turning the refrigerator temperature control to "0" turns off power to room temperature before cleaning...
... of the cabinet with sudsy cloth or sponge. If cleaning is significant pet traffic in warm water. CARE & CLEANING Keep your refrigerator and freezer clean to prevent odor build-up on the condenser coils (black tubes and wires) attached to the back of air-cooled.... It will remove the protective finish. Do not shift the refrigerator from your home. If the refrigerator has an automatic ice maker, be used on top of compressor at bottom rear of toe grille. NOTE • Turning the refrigerator temperature control to "0" turns off power to room temperature before cleaning...
Use and Care Manual
Page 12
... unauthorized service companies; use your best interest to obtain and keep all costs for servicing, such as -is shipped from its original owner to any refrigerator or freezer failures. 6. CLAIMS BASED ON IMPLIED WARRANTIES, INCLUDING WARRANTIES OF MERCHANTABILITY OR FITNESS FOR A PARTICULAR PURPOSE, ARE LIMITED TO ONE YEAR OR THE SHORTEST PERIOD...
... unauthorized service companies; use your best interest to obtain and keep all costs for servicing, such as -is shipped from its original owner to any refrigerator or freezer failures. 6. CLAIMS BASED ON IMPLIED WARRANTIES, INCLUDING WARRANTIES OF MERCHANTABILITY OR FITNESS FOR A PARTICULAR PURPOSE, ARE LIMITED TO ONE YEAR OR THE SHORTEST PERIOD...
Use and Care Manual
Page 13
.... • Water supply is turned off. • Water pressure is too low. • The freezer is turned to a warmer setting. Refrigerator temperature is satisfactory. Then check freezer temperatures and adjust as needed. • The cabinet is not level. • Floor is weak. ...668-4606 (Canada) Visit our web site at www.frigidaire.com. Refrigerator temperature too cold. Automatic ice maker not working . Cabinet light not working . (some models) Before calling for temperature to a warmer setting until freezer temperature is satisfactory. Allow 24 hours for service, ...
.... • Water supply is turned off. • Water pressure is too low. • The freezer is turned to a warmer setting. Refrigerator temperature is satisfactory. Then check freezer temperatures and adjust as needed. • The cabinet is not level. • Floor is weak. ...668-4606 (Canada) Visit our web site at www.frigidaire.com. Refrigerator temperature too cold. Automatic ice maker not working . Cabinet light not working . (some models) Before calling for temperature to a warmer setting until freezer temperature is satisfactory. Allow 24 hours for service, ...
Installation Instructions
Page 1
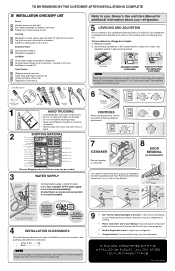
...Checks Shipping material removed Fresh Food and Freezer controls set Crisper Humidity controls set Registration Card sent in Refer to get your refrigerator into the house please see "Door Removal and Reversal Instructions" in place. Top Hinge Cover OR Top Hinge Top Hinge Cover Top Hinge Bottom Water Tube Wood Shim Pin... IS COMPLETE INSTALLATION CHECKOFF LIST Doors Handles are secure and tight Door seals completely to cabinet on all sides Freezer door is level across the top Leveling Refrigerator is level, side to side and tilted 1/4" (6mm) front to back Toe grille is properly attached to...
...Checks Shipping material removed Fresh Food and Freezer controls set Crisper Humidity controls set Registration Card sent in Refer to get your refrigerator into the house please see "Door Removal and Reversal Instructions" in place. Top Hinge Cover OR Top Hinge Top Hinge Cover Top Hinge Bottom Water Tube Wood Shim Pin... IS COMPLETE INSTALLATION CHECKOFF LIST Doors Handles are secure and tight Door seals completely to cabinet on all sides Freezer door is level across the top Leveling Refrigerator is level, side to side and tilted 1/4" (6mm) front to back Toe grille is properly attached to...


