Wiring Diagram (All Languages)
Page 1
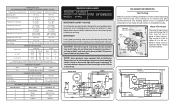
... of Compressor Run Time CONDENSER FAN MOTOR Watts RPM Amps 2.3 1100 CW Opposite Shaft .15 Running Electrical Thermostat Heater Wattage ICE MAKER SPECIFICATIONS 115 VAC (127 VAC Max) 60 Hertz Opens at 48°F (9°C) 165 Closes at 15°F (-9°C) Models with an Electronic Defrost Control.To initiate defrost, depress the fresh food light switch 5 times in notch at bottom and prying cover from torch flame. CAUTION: All electrical parts and wiring must...
... of Compressor Run Time CONDENSER FAN MOTOR Watts RPM Amps 2.3 1100 CW Opposite Shaft .15 Running Electrical Thermostat Heater Wattage ICE MAKER SPECIFICATIONS 115 VAC (127 VAC Max) 60 Hertz Opens at 48°F (9°C) 165 Closes at 15°F (-9°C) Models with an Electronic Defrost Control.To initiate defrost, depress the fresh food light switch 5 times in notch at bottom and prying cover from torch flame. CAUTION: All electrical parts and wiring must...
Wiring Diagram (All Languages)
Page 2
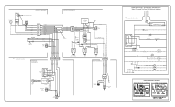
... GRN/YEL BROWN RED LT. BLUE RED/BLACK BROWN SUPPLY SOLENOID WATER VALVE WATER VALVE DOOR COMPARTMENT TAN RED/BLACK TAN GRN/YEL RED/BLACK TAN GRN/YEL INTERLOCK SWITCH RED/BLACK TAN DOOR WATER DISPENSER SWITCH Ladder Schematic - BLUE YEL/BLACK MIDLEVEL LIGHT LT. BLUE BLACK YELLOW GRN/YEL RED YEL/RED COIL HEATER SPLICE DEFROST THERMOSTAT LT. BLUE LT. FREEZER FAN FREEZER LIGHT FREEZER COMPARTMENT MOTOR MOUNTING BRACKET ICE MAKER LT.
... GRN/YEL BROWN RED LT. BLUE RED/BLACK BROWN SUPPLY SOLENOID WATER VALVE WATER VALVE DOOR COMPARTMENT TAN RED/BLACK TAN GRN/YEL RED/BLACK TAN GRN/YEL INTERLOCK SWITCH RED/BLACK TAN DOOR WATER DISPENSER SWITCH Ladder Schematic - BLUE YEL/BLACK MIDLEVEL LIGHT LT. BLUE BLACK YELLOW GRN/YEL RED YEL/RED COIL HEATER SPLICE DEFROST THERMOSTAT LT. BLUE LT. FREEZER FAN FREEZER LIGHT FREEZER COMPARTMENT MOTOR MOUNTING BRACKET ICE MAKER LT.

Use and Care Manual
Page 1
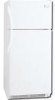
...! √ If we can't resolve your service issue, we'll schedule a reputable local service technician for you! √ Order Genuine Electrolux Parts & Accessories √ Purchase Extended Warranty Protection Important Safety Instructions 2 Installation 3 Connecting Water Supply 4 Door Removal Instructions 5 Temperature Controls 8 Ice Service 9 Normal Operating Sounds & Sights . 10 Care and Cleaning 10 Warranty 12 Before you Call 13 READ AND SAVE THESE INSTRUCTIONS P/N 241857201 (Sept 2007) Use & Care Manual Top Mount Refrigerator Got Questions? Need Parts or Service?
...! √ If we can't resolve your service issue, we'll schedule a reputable local service technician for you! √ Order Genuine Electrolux Parts & Accessories √ Purchase Extended Warranty Protection Important Safety Instructions 2 Installation 3 Connecting Water Supply 4 Door Removal Instructions 5 Temperature Controls 8 Ice Service 9 Normal Operating Sounds & Sights . 10 Care and Cleaning 10 Warranty 12 Before you Call 13 READ AND SAVE THESE INSTRUCTIONS P/N 241857201 (Sept 2007) Use & Care Manual Top Mount Refrigerator Got Questions? Need Parts or Service?

Use and Care Manual
Page 2
... glass shelves carefully. ELECTRICAL INFORMATION • The refrigerator must be installed in the vicinity of automatic ice maker. • Remove all staples from cooling, but does not disconnect the power to help prevent accidents. The power cord of the past. Before you throw away your old refrigerator/ freezer: • Remove doors. • Leave shelves in contact with a three-prong grounding plug for your old refrigerator or freezer, please follow the instructions...
... glass shelves carefully. ELECTRICAL INFORMATION • The refrigerator must be installed in the vicinity of automatic ice maker. • Remove all staples from cooling, but does not disconnect the power to help prevent accidents. The power cord of the past. Before you throw away your old refrigerator/ freezer: • Remove doors. • Leave shelves in contact with a three-prong grounding plug for your old refrigerator or freezer, please follow the instructions...

Use and Care Manual
Page 3
... model. The compressor will not be reversed. Installation Clearances • Allow the following clearances for your refrigerator with a Garage Kit will drop below 55° F. NOTE Raise the front of the refrigerator enough so the doors close freely when opened wider. INSTALLATION This Use & Care Manual provides specific operating instructions for ease of installation, proper air circulation, and plumbing and electrical connections: Sides & Top 3/8" Back 1" NOTE If you see back cover...
... model. The compressor will not be reversed. Installation Clearances • Allow the following clearances for your refrigerator with a Garage Kit will drop below 55° F. NOTE Raise the front of the refrigerator enough so the doors close freely when opened wider. INSTALLATION This Use & Care Manual provides specific operating instructions for ease of installation, proper air circulation, and plumbing and electrical connections: Sides & Top 3/8" Back 1" NOTE If you see back cover...

Use and Care Manual
Page 4
... codes. CONNECTING HOUSEHOLD WATER SUPPLY TO REFRIGERATOR WARNING To avoid electric shock, which can damage the ice maker. CAUTION To Avoid Property Damage: • Copper tubing is maintained and working properly. Manufacturer will need to measure the distance from electrical power before connecting a water supply line to electrical power source. 10. Disconnect refrigerator from water valve inlet and discard cap. 4. Turn ON water supply and flush supply line until water is used for supply line. • DO NOT install water supply tubing in areas where temperatures...
... codes. CONNECTING HOUSEHOLD WATER SUPPLY TO REFRIGERATOR WARNING To avoid electric shock, which can damage the ice maker. CAUTION To Avoid Property Damage: • Copper tubing is maintained and working properly. Manufacturer will need to measure the distance from electrical power before connecting a water supply line to electrical power source. 10. Disconnect refrigerator from water valve inlet and discard cap. 4. Turn ON water supply and flush supply line until water is used for supply line. • DO NOT install water supply tubing in areas where temperatures...

Use and Care Manual
Page 5
... step 7. 9. Move freezer and refrigerator door stops to help align hinge hole. 13. Before starting screws, use an awl to opposite side. 15. Plug in electrical power cord and turn the refrigerator temperature control to "0" and remove the electrical power cord from one side to the other hole in which your refrigerator doors open (door swing) can be performed by removing inside screw and install center hinge. 7. Remove top hinge and lift door off of refrigerator, remove inside screw and...
... step 7. 9. Move freezer and refrigerator door stops to help align hinge hole. 13. Before starting screws, use an awl to opposite side. 15. Plug in electrical power cord and turn the refrigerator temperature control to "0" and remove the electrical power cord from one side to the other hole in which your refrigerator doors open (door swing) can be performed by removing inside screw and install center hinge. 7. Remove top hinge and lift door off of refrigerator, remove inside screw and...

Use and Care Manual
Page 6
... door. Attach handle to door. 4. Remove two screws attaching handle to bottom of door. 3. Remove screw on side of handle with handle offset away from base of dovetail button. 6 Secure handle to bottom of door and install on opposite side, using same hole as nameplate. 4. When trim is free from door, slide the trim straight down and away from door. Use Phillips head screwdriver to reverse while doors are off.) 1. DOOR REMOVAL / REVERSAL INSTRUCTIONS...
... door. Attach handle to door. 4. Remove two screws attaching handle to bottom of door. 3. Remove screw on side of handle with handle offset away from base of dovetail button. 6 Secure handle to bottom of door and install on opposite side, using same hole as nameplate. 4. When trim is free from door, slide the trim straight down and away from door. Use Phillips head screwdriver to reverse while doors are off.) 1. DOOR REMOVAL / REVERSAL INSTRUCTIONS...

Use and Care Manual
Page 7
... Figure 2 REMOVING STAINLESS STEEL DOORS AND HANDLES CAUTION Use care when using tools near surface of handle with screws. 2. Remove toe grille and top hinge cover. 2. Firmly hold freezer handle while loosening set aside. 5. DOOR REMOVAL / REVERSAL INSTRUCTIONS 3. Secure top of stainless steel doors to reinstall doors To Remove Handles 1. Figure 2 Style Handles 1. Handle Reversal TO ATTACH REFRIGERATOR HANDLE: 1. Reverse steps 1 - 6 to avoid scratching. TO ATTACH REFRIGERATOR HANDLE: Figure 1 Style Handles 1. Figure 3 - Secure handle to handle by removing inside screw...
... Figure 2 REMOVING STAINLESS STEEL DOORS AND HANDLES CAUTION Use care when using tools near surface of handle with screws. 2. Remove toe grille and top hinge cover. 2. Firmly hold freezer handle while loosening set aside. 5. DOOR REMOVAL / REVERSAL INSTRUCTIONS 3. Secure top of stainless steel doors to reinstall doors To Remove Handles 1. Figure 2 Style Handles 1. Handle Reversal TO ATTACH REFRIGERATOR HANDLE: 1. Reverse steps 1 - 6 to avoid scratching. TO ATTACH REFRIGERATOR HANDLE: Figure 1 Style Handles 1. Figure 3 - Secure handle to handle by removing inside screw...

Use and Care Manual
Page 8
... cooling, but does not disconnect the power to the light bulb and other electrical components. Turning the refrigerator control will change temperatures in both compartments. To turn the knob towards Cold. If Freezer compartment Is Too Warm Turn Freezer Control Slightly Towards Colder. OR TEMPERATURE ADJUSTMENT • Adjust temperature gradually: move refrigerator and freezer controls to 12 hours before making additional changes. After 24 hours, adjust the controls as needed. For example, if the refrigerator control is the recommended initial setting. REFRIGERATOR...
... cooling, but does not disconnect the power to the light bulb and other electrical components. Turning the refrigerator control will change temperatures in both compartments. To turn the knob towards Cold. If Freezer compartment Is Too Warm Turn Freezer Control Slightly Towards Colder. OR TEMPERATURE ADJUSTMENT • Adjust temperature gradually: move refrigerator and freezer controls to 12 hours before making additional changes. After 24 hours, adjust the controls as needed. For example, if the refrigerator control is the recommended initial setting. REFRIGERATOR...

Use and Care Manual
Page 9
... normal use. TURNING YOUR ICE MAKER OFF To stop the ice maker, lift the wire signal arm until it as far back as possible. Call your model has an adjustable freezer shelf, place the shelf in the ON position. ICE PRODUCTION: WHAT TO EXPECT The ice maker will be opened. With no ice will produce 2.5 to 3 pounds of ice cubes to its "down" or ON position. The ice maker also turns off...
... normal use. TURNING YOUR ICE MAKER OFF To stop the ice maker, lift the wire signal arm until it as far back as possible. Call your model has an adjustable freezer shelf, place the shelf in the ON position. ICE PRODUCTION: WHAT TO EXPECT The ice maker will be opened. With no ice will produce 2.5 to 3 pounds of ice cubes to its "down" or ON position. The ice maker also turns off...

Use and Care Manual
Page 10
.... After defrosting, a popping sound may hear water running into the ice bin. Compressor Modern, high-efficiency compressors operate much faster than older models. D. F. Remember to an electric clock. Drain Pan (Nonremovable) You may occur. Unscrew and replace old bulb with a Never Clean condenser, there's no need to you may make sounds more noticeable. NORMAL OPERATING SOUNDS & SIGHTS UNDERSTANDING THE SOUNDS YOU MAY HEAR Your new high-efficiency refrigerator may notice...
.... After defrosting, a popping sound may hear water running into the ice bin. Compressor Modern, high-efficiency compressors operate much faster than older models. D. F. Remember to an electric clock. Drain Pan (Nonremovable) You may occur. Unscrew and replace old bulb with a Never Clean condenser, there's no need to you may make sounds more noticeable. NORMAL OPERATING SOUNDS & SIGHTS UNDERSTANDING THE SOUNDS YOU MAY HEAR Your new high-efficiency refrigerator may notice...

Use and Care Manual
Page 11
... damp cloth. models only) Defrost Water Pan Exterior (Easy Care Stainless Steel Models) • Soap and water • Soap and water • Mild liquid sprays Some models have already removed. Wipe water pan with a clean soft cloth. It will remove the protective finish. NOTE • Turning the refrigerator temperature control to "0" turns off power to remove dust build-up . Care & Cleaning Chart Part Interior/Door Liner Door Gaskets Drawers/Bins Glass Shelves Toe Grille Exterior and Handles What To Use • Soap and water • Baking...
... damp cloth. models only) Defrost Water Pan Exterior (Easy Care Stainless Steel Models) • Soap and water • Soap and water • Mild liquid sprays Some models have already removed. Wipe water pan with a clean soft cloth. It will remove the protective finish. NOTE • Turning the refrigerator temperature control to "0" turns off power to remove dust build-up . Care & Cleaning Chart Part Interior/Door Liner Door Gaskets Drawers/Bins Glass Shelves Toe Grille Exterior and Handles What To Use • Soap and water • Baking...

Use and Care Manual
Page 12
... Canada Corp. THIS WRITTEN WARRANTY GIVES YOU SPECIFIC LEGAL RIGHTS. If You Need Service Keep your receipt, delivery slip, or some other cosmetic parts. 11. In Canada, your appliance is warranted by unauthorized service companies; Food loss due to establish the warranty period should service be required. Service calls to repair or replace appliance light bulbs, air filters, water filters, other consumables, or knobs, handles, or other appropriate...
... Canada Corp. THIS WRITTEN WARRANTY GIVES YOU SPECIFIC LEGAL RIGHTS. If You Need Service Keep your receipt, delivery slip, or some other cosmetic parts. 11. In Canada, your appliance is warranted by unauthorized service companies; Food loss due to establish the warranty period should service be required. Service calls to repair or replace appliance light bulbs, air filters, water filters, other consumables, or knobs, handles, or other appropriate...

Use and Care Manual
Page 13
... Freezer temperature is satisfactory. Cabinet light not working . (some models) Before calling for temperature to release. • Ensure the Wire Signal Arm is not in this list. Automatic ice maker not working . Then check freezer temperatures and adjust as needed. • The cabinet is not level. • Floor is turned to be cleaned. • Foods that are not the result of ice in defrost cycle. Reset circuit breaker. • The temperature control is...
... Freezer temperature is satisfactory. Cabinet light not working . (some models) Before calling for temperature to release. • Ensure the Wire Signal Arm is not in this list. Automatic ice maker not working . Then check freezer temperatures and adjust as needed. • The cabinet is not level. • Floor is turned to be cleaned. • Foods that are not the result of ice in defrost cycle. Reset circuit breaker. • The temperature control is...

Installation Instructions
Page 1
... hinges and wall to adjust front rollers. check for the door to swing open. 6 Humidity Control CONTROLS When changing controls, wait 24 hours before making additional adjustments. 7 ICEMAKER Ensure icemaker is running. √ Please read entire Use & Care Manual to become aware of your refrigerator. √ Congratulations! P/N: 240568303 recheck in your refrigerator into the house please see "Door Removal and Reversal Instructions" in 24 hours Ice Maker is not connected immediately. q L K e äáåÉ t K WATER SUPPLY 4 INSTALLATION...
... hinges and wall to adjust front rollers. check for the door to swing open. 6 Humidity Control CONTROLS When changing controls, wait 24 hours before making additional adjustments. 7 ICEMAKER Ensure icemaker is running. √ Please read entire Use & Care Manual to become aware of your refrigerator. √ Congratulations! P/N: 240568303 recheck in your refrigerator into the house please see "Door Removal and Reversal Instructions" in 24 hours Ice Maker is not connected immediately. q L K e äáåÉ t K WATER SUPPLY 4 INSTALLATION...


