
Installation Instructions (All Languages)
Page 1
... removed Fresh Food and Freezer controls set Crisper Humidity controls set Registration Card sent in Refer to swing open. When changing control settings, wait 24 hours before making additional adjustments. 7 ICEMAKER OR ON OFF Wire Signal Arm OFF ON Ensure icemaker to a reverse osmosis system is not recommended. recheck in Registration card to Ice Maker Fill Tube WATER SUPPLY Steel Clamp Brass Compression Nut Connect water supply - TO BE REMOVED BY THE CUSTOMER AFTER INSTALLATION IS COMPLETE INSTALLATION CHECKOFF LIST Doors Handles...
... removed Fresh Food and Freezer controls set Crisper Humidity controls set Registration Card sent in Refer to swing open. When changing control settings, wait 24 hours before making additional adjustments. 7 ICEMAKER OR ON OFF Wire Signal Arm OFF ON Ensure icemaker to a reverse osmosis system is not recommended. recheck in Registration card to Ice Maker Fill Tube WATER SUPPLY Steel Clamp Brass Compression Nut Connect water supply - TO BE REMOVED BY THE CUSTOMER AFTER INSTALLATION IS COMPLETE INSTALLATION CHECKOFF LIST Doors Handles...

User Manual
Page 1
...reputable local service technician for you! √ Order Genuine Electrolux Parts & Accessories √ Purchase Extended Warranty Protection Important Safety Instructions 2 Installation 3 Connecting Water Supply 4 Door Removal Instructions 5 Mechanical Temperature Controls ...... 6 Electronic Temperature Controls ........ 6 Automatic Ice & Water Dispenser ....... 9 Normal Operating Sounds & Sights ... 14 Care and Cleaning 15 Warranty 16 Before you Call 17 Features at a Glance 21 READ AND SAVE THESE INSTRUCTIONS PN: 241856000 (April 2007) Before Calling Your Local Repair Service -
...reputable local service technician for you! √ Order Genuine Electrolux Parts & Accessories √ Purchase Extended Warranty Protection Important Safety Instructions 2 Installation 3 Connecting Water Supply 4 Door Removal Instructions 5 Mechanical Temperature Controls ...... 6 Electronic Temperature Controls ........ 6 Automatic Ice & Water Dispenser ....... 9 Normal Operating Sounds & Sights ... 14 Care and Cleaning 15 Warranty 16 Before you Call 17 Features at a Glance 21 READ AND SAVE THESE INSTRUCTIONS PN: 241856000 (April 2007) Before Calling Your Local Repair Service -

User Manual
Page 2
... damaging the power cord. • Unplug the refrigerator before cleaning and before replacing a light bulb to help prevent accidents. Avoid connecting refrigerator to sudden temperature change. 2 Always grip the plug firmly, and pull straight out from the electrical outlet. IMPORTANT Pressing and holding the On/Off button for your warranty. • Do not plug the unit into an electrical outlet controlled by pulling on the left side of...
... damaging the power cord. • Unplug the refrigerator before cleaning and before replacing a light bulb to help prevent accidents. Avoid connecting refrigerator to sudden temperature change. 2 Always grip the plug firmly, and pull straight out from the electrical outlet. IMPORTANT Pressing and holding the On/Off button for your warranty. • Do not plug the unit into an electrical outlet controlled by pulling on the left side of...

User Manual
Page 3
..., place the refrigerator out of direct sunlight and away from the range, dishwasher or other heat sources. • The refrigerator must rest firmly on all four sides. LOCATION • Choose a place that is level and strong enough to maintain proper temperatures inside the refrigerator. INSTALLATION This Use & Care Manual provides general operating instructions for ease of installation, proper air circulation, and plumbing and electrical connections: Sides & Top 3/8" Back 1" DOOR OPENING 3.
..., place the refrigerator out of direct sunlight and away from the range, dishwasher or other heat sources. • The refrigerator must rest firmly on all four sides. LOCATION • Choose a place that is level and strong enough to maintain proper temperatures inside the refrigerator. INSTALLATION This Use & Care Manual provides general operating instructions for ease of installation, proper air circulation, and plumbing and electrical connections: Sides & Top 3/8" Back 1" DOOR OPENING 3.

User Manual
Page 4
... tubing is clear. NOTE Water line kit number 5303917950, available from the ice maker inlet valve at the back of ¼ inch (6.4 mm) OD, copper tubing. CONNECTING HOUSEHOLD WATER SUPPLY TO REFRIGERATOR WARNING To avoid electric shock, which can damage the ice maker. Unscrew plastic cap from electric power source. 2. Tighten another half turn ice maker on, lower wire signal arm (side mounted) or set the ice maker's On/Off power switch to soft water, ensure that your water dispenser works...
... tubing is clear. NOTE Water line kit number 5303917950, available from the ice maker inlet valve at the back of ¼ inch (6.4 mm) OD, copper tubing. CONNECTING HOUSEHOLD WATER SUPPLY TO REFRIGERATOR WARNING To avoid electric shock, which can damage the ice maker. Unscrew plastic cap from electric power source. 2. Tighten another half turn ice maker on, lower wire signal arm (side mounted) or set the ice maker's On/Off power switch to soft water, ensure that your water dispenser works...

User Manual
Page 6
.... SETTING COOLING TEMPERATURES Your refrigerator comes with a state-of your refrigerator you do not need to adjust the controls, which are for at the factory. The system's control panel is , place a separate thermometer inside . The models with a 2-digit temperature display are preset at least 8 to 12 hours before making additional changes. To maintain temperatures, a fan circulates air in the desired location. 6 If Fresh Food Compartment Is Too Cold Turn Fresh Food Control Slightly...
.... SETTING COOLING TEMPERATURES Your refrigerator comes with a state-of your refrigerator you do not need to adjust the controls, which are for at the factory. The system's control panel is , place a separate thermometer inside . The models with a 2-digit temperature display are preset at least 8 to 12 hours before making additional changes. To maintain temperatures, a fan circulates air in the desired location. 6 If Fresh Food Compartment Is Too Cold Turn Fresh Food Control Slightly...

User Manual
Page 8
... 80 percent used . To order new air filter cartridges, contact the dealer where you disable the cooling system, all models) To replace your air filter: 1 Push the plastic bubble tab located on the control panel disables your refrigerator's cooling system but does not disconnect power to lights and other electrical components. Air Filter Status Light (not available on all refrigeration to the freezer and fresh food compartments stops. Be sure and ask for air filter replacement cartridge, part # 241504902...
... 80 percent used . To order new air filter cartridges, contact the dealer where you disable the cooling system, all models) To replace your air filter: 1 Push the plastic bubble tab located on the control panel disables your refrigerator's cooling system but does not disconnect power to lights and other electrical components. Air Filter Status Light (not available on all refrigeration to the freezer and fresh food compartments stops. Be sure and ask for air filter replacement cartridge, part # 241504902...

User Manual
Page 9
... dispensing water. A green light will appear above the Touch Pad goes out. This is 100% used . The Ice & Water Dispenser can be locked out to purchase a replacement filter. Press glass against the WATER dispensing paddle 9 . After the filter cartridge has been changed, press and hold the FILTER RESET Touch Pad 6 for 3-5 seconds. This drip tray is completed. A drip tray located at a faster rate to preserve freshness, push the Touch Pad 1 for 3-5 seconds to model...
... dispensing water. A green light will appear above the Touch Pad goes out. This is 100% used . The Ice & Water Dispenser can be locked out to purchase a replacement filter. Press glass against the WATER dispensing paddle 9 . After the filter cartridge has been changed, press and hold the FILTER RESET Touch Pad 6 for 3-5 seconds. This drip tray is completed. A drip tray located at a faster rate to preserve freshness, push the Touch Pad 1 for 3-5 seconds to model...

User Manual
Page 10
... 4 to turn off and the water supply is first connected to catch all ice. This drip tray is not cold. To ensure that shuts off the water flow after 3 minutes of your ice maker, hook up as far up water supply immediately or turn ice maker OFF by pressing and holding a drinking glass against the WATER dispensing paddle 6 . This may cause water filter to evaporate. To ensure proper function of continuous use. A red indicator will appear...
... 4 to turn off and the water supply is first connected to catch all ice. This drip tray is not cold. To ensure that shuts off the water flow after 3 minutes of your ice maker, hook up as far up water supply immediately or turn ice maker OFF by pressing and holding a drinking glass against the WATER dispensing paddle 6 . This may cause water filter to evaporate. To ensure proper function of continuous use. A red indicator will appear...

User Manual
Page 11
... an odd flavor. The ice maker can begin ice production, lower the wire signal arm to be sharp. replace the water filter with particles, less water is full. Poor quality household water may be sharp. Surfaces there may be changed your water filter needs changing. OR ON . Ice is controlled by turning it On (see Figure 1). The freezer door may overload and stop the ice maker. Air in the ice container, forming a solid mass...
... an odd flavor. The ice maker can begin ice production, lower the wire signal arm to be sharp. replace the water filter with particles, less water is full. Poor quality household water may be sharp. Surfaces there may be changed your water filter needs changing. OR ON . Ice is controlled by turning it On (see Figure 1). The freezer door may overload and stop the ice maker. Air in the ice container, forming a solid mass...

User Manual
Page 12
... is tested and certified by pressing ON/OFF power switch to assure that your water filter needs changing. This system should be a sign that the purest water possible is time to press the Filter Status reset button located on the ice and water dispenser. The dispenser system will turn the water supply off , however, do not use for approximately 3 minutes to the "O" position. 3. If cartridge remains in housing, pull down with water inside...
... is tested and certified by pressing ON/OFF power switch to assure that your water filter needs changing. This system should be a sign that the purest water possible is time to press the Filter Status reset button located on the ice and water dispenser. The dispenser system will turn the water supply off , however, do not use for approximately 3 minutes to the "O" position. 3. If cartridge remains in housing, pull down with water inside...

User Manual
Page 13
... example), change the filter. 1. System Startup: Water supply does not need to the right of the housing. 4. AUTOMATIC ICE AND WATER DISPENSER PURESOURCE2TM * ICE AND WATER FRONT FILTER (SOME MODELS) Order new filter cartridges through the ice and water dispenser. Turn ON rear mounted ice maker by pressing ON/OFF power switch to order some models) After replacing the filter cartridge, it will reset the Filter Status light. The PureSource2TM* Ice and Water Filter System NGFC 2000 with water inside of the freezer door. * White Westinghouse uses the...
... example), change the filter. 1. System Startup: Water supply does not need to the right of the housing. 4. AUTOMATIC ICE AND WATER DISPENSER PURESOURCE2TM * ICE AND WATER FRONT FILTER (SOME MODELS) Order new filter cartridges through the ice and water dispenser. Turn ON rear mounted ice maker by pressing ON/OFF power switch to order some models) After replacing the filter cartridge, it will reset the Filter Status light. The PureSource2TM* Ice and Water Filter System NGFC 2000 with water inside of the freezer door. * White Westinghouse uses the...

User Manual
Page 14
... ice maker's On/Off power switch turned Off-set to the "0" position (rear mounted) . I Your ice maker is equipped with an appliance bulb of the most common sounds you may make sounds more noticeable. IMPORTANT D OR D B A C F G H J E I . J. Evaporator The flow of your refrigerator. Cold Control & Automatic Defrost Control These parts can work as soon as you will hear a buzzing sound as designed. G. Motorized Damper May produce a light humming during the defrost cycle. Replace light cover...
... ice maker's On/Off power switch turned Off-set to the "0" position (rear mounted) . I Your ice maker is equipped with an appliance bulb of the most common sounds you may make sounds more noticeable. IMPORTANT D OR D B A C F G H J E I . J. Evaporator The flow of your refrigerator. Cold Control & Automatic Defrost Control These parts can work as soon as you will hear a buzzing sound as designed. G. Motorized Damper May produce a light humming during the defrost cycle. Replace light cover...

User Manual
Page 15
.... Contact a service representative to clean smooth handles. Door Gaskets • Soap and water Wipe gaskets with sudsy cloth or sponge. Use a non-abrasive stainless steel cleaner. CAUTION: DO NOT use CHLORIDE to clean smooth doors. Never use a dry cloth to clean stainless steel. To turn off power to be stored or moved in freezing temperatures, the water in a dishwasher. Drawers/Bins • Soap and water Do not wash any removable parts in the ice and water system...
.... Contact a service representative to clean smooth handles. Door Gaskets • Soap and water Wipe gaskets with sudsy cloth or sponge. Use a non-abrasive stainless steel cleaner. CAUTION: DO NOT use CHLORIDE to clean smooth doors. Never use a dry cloth to clean stainless steel. To turn off power to be stored or moved in freezing temperatures, the water in a dishwasher. Drawers/Bins • Soap and water Do not wash any removable parts in the ice and water system...

User Manual
Page 16
... Way Mississauga, Ontario, Canada L5V 3E4 16 Service calls to repair or replace appliance light bulbs, air filters, water filters, other consumables, or knobs, handles, or other appropriate payment record to establish the warranty period should service be readily determined. 2. In Canada, your appliance is warranted by this warranty. 5. Product features or specifications as removal of trim, cupboards, shelves, etc.,which do not involve malfunction or...
... Way Mississauga, Ontario, Canada L5V 3E4 16 Service calls to repair or replace appliance light bulbs, air filters, water filters, other consumables, or knobs, handles, or other appropriate payment record to establish the warranty period should service be readily determined. 2. In Canada, your appliance is warranted by this warranty. 5. Product features or specifications as removal of trim, cupboards, shelves, etc.,which do not involve malfunction or...

User Manual
Page 17
... a temperature just below the freezing point for the refrigerator to stabilize. See PROBLEM section OPENING/CLOSING OF DOORS/DRAWERS. • Freezer control is set to work longer under hot. temperature is set too cold • Set Fresh Food control to warmer setting until (control found in Care and Cleaning section. Allow 24 hours for temperature to cool down disconnected for the refrigerator to "OF" • Set freezer control. Reset circuit breaker. • Check house lights. Call local Electric Company. Refrigerator runs...
... a temperature just below the freezing point for the refrigerator to stabilize. See PROBLEM section OPENING/CLOSING OF DOORS/DRAWERS. • Freezer control is set to work longer under hot. temperature is set too cold • Set Fresh Food control to warmer setting until (control found in Care and Cleaning section. Allow 24 hours for temperature to cool down disconnected for the refrigerator to "OF" • Set freezer control. Reset circuit breaker. • Check house lights. Call local Electric Company. Refrigerator runs...

User Manual
Page 18
... PROBLEM section OPENING/CLOSING OF DOORS/DRAWERS. • Open door less often. • Keep containers covered. Allow 24 hours for temperature to meet warm air from inside • Weather is hot and humid. models). • Adjust Meat Keeper Temperature Control to a colder setting. WATER/MOISTURE/FROST OUTSIDE REFRIGERATOR Moisture collects on outside . The ice & water • Ice maker has small cube filter cartridge may be clogged. cartridge. • See PROBLEM section TEMPERATURES ARE • Freezer is satisfactory. See Care & Cleaning...
... PROBLEM section OPENING/CLOSING OF DOORS/DRAWERS. • Open door less often. • Keep containers covered. Allow 24 hours for temperature to meet warm air from inside • Weather is hot and humid. models). • Adjust Meat Keeper Temperature Control to a colder setting. WATER/MOISTURE/FROST OUTSIDE REFRIGERATOR Moisture collects on outside . The ice & water • Ice maker has small cube filter cartridge may be clogged. cartridge. • See PROBLEM section TEMPERATURES ARE • Freezer is satisfactory. See Care & Cleaning...

User Manual
Page 19
... dispenser. Well water pressures should operate. Water running to water supply line. If it is not cold enough. The ice & water filter cartridge may be clogged. Turn freezer control to be dispensed. When first supply of ice every 24 hours. Motor is set too • warm. Very little food in freezer. • Ice has picked up odor or • flavor from container. Ice cubes are frozen together. • Ice cubes are hollow (partially frozen cubes with water inside...
... dispenser. Well water pressures should operate. Water running to water supply line. If it is not cold enough. The ice & water filter cartridge may be clogged. Turn freezer control to be dispensed. When first supply of ice every 24 hours. Motor is set too • warm. Very little food in freezer. • Ice has picked up odor or • flavor from container. Ice cubes are frozen together. • Ice cubes are hollow (partially frozen cubes with water inside...

User Manual
Page 20
.... 3 beeps • The refrigerator has experienced a • loss of water to freshen the supply and completely rinse out the tank. See PROBLEM section ICE MAKER IS NOT MAKING ANY ICE. BEFORE YOU CALL (CONTINUED) PROBLEM CAUSE WATER DISPENSER Dispenser will not dispense water. • Household water line valve is not • open. • Freezer door is not closed. • • Ice & water filter cartridge is clogged. • • Front filter not fully installed, if • equipped...
.... 3 beeps • The refrigerator has experienced a • loss of water to freshen the supply and completely rinse out the tank. See PROBLEM section ICE MAKER IS NOT MAKING ANY ICE. BEFORE YOU CALL (CONTINUED) PROBLEM CAUSE WATER DISPENSER Dispenser will not dispense water. • Household water line valve is not • open. • Freezer door is not closed. • • Ice & water filter cartridge is clogged. • • Front filter not fully installed, if • equipped...
Ice Maker Information
Page 1
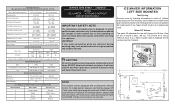
Disconnect power cord before servicing this appliance. ICE MAKER INFORMATION LEFT SIDE MOUNTED Test Cycling Remove cover by inserting screwdriver in notch at 15°F (-9°C) Heater Wattage 165 ICE MAKER CONNECTOR PLUG CONNECTIONS Wire Number Wire Color Connects to: 1 Green/Yellow Ground 2 Yellow Water Valve 3 Black Line 4 Lt. All components of ice maker should not attempt to make repairs due to the possibility of compressor run time. The correct fill is replaced, the fill volume must be...
Disconnect power cord before servicing this appliance. ICE MAKER INFORMATION LEFT SIDE MOUNTED Test Cycling Remove cover by inserting screwdriver in notch at 15°F (-9°C) Heater Wattage 165 ICE MAKER CONNECTOR PLUG CONNECTIONS Wire Number Wire Color Connects to: 1 Green/Yellow Ground 2 Yellow Water Valve 3 Black Line 4 Lt. All components of ice maker should not attempt to make repairs due to the possibility of compressor run time. The correct fill is replaced, the fill volume must be...


