
User Manual
Page 1
...at your convenience! √ If we can't resolve your service issue, we'll schedule a reputable local service technician for you! √ Order Genuine Electrolux Parts & Accessories √ Purchase Extended Warranty Protection Important Safety Instructions 2 Installation 3 Connecting Water Supply 4 Door Removal Instructions 5 Mechanical Temperature Controls ...... 6 Electronic Temperature... 21 READ AND SAVE THESE INSTRUCTIONS PN: 241856000 (April 2007) Before Calling Your Local Repair Service - Need Parts or Service? Use & Care Manual Side by Side Refrigerator Got Questions?
...at your convenience! √ If we can't resolve your service issue, we'll schedule a reputable local service technician for you! √ Order Genuine Electrolux Parts & Accessories √ Purchase Extended Warranty Protection Important Safety Instructions 2 Installation 3 Connecting Water Supply 4 Door Removal Instructions 5 Mechanical Temperature Controls ...... 6 Electronic Temperature... 21 READ AND SAVE THESE INSTRUCTIONS PN: 241856000 (April 2007) Before Calling Your Local Repair Service - Need Parts or Service? Use & Care Manual Side by Side Refrigerator Got Questions?

User Manual
Page 2
... or freezer, please follow the instructions below to the light bulb and other hazards. • Do not operate the refrigerator in contact with any moving parts of the past. CHILD SAFETY Destroy or recycle the carton, plastic bags, and any circumstances, cut, remove, or bypass the grounding prong. If you throw...
... or freezer, please follow the instructions below to the light bulb and other hazards. • Do not operate the refrigerator in contact with any moving parts of the past. CHILD SAFETY Destroy or recycle the carton, plastic bags, and any circumstances, cut, remove, or bypass the grounding prong. If you throw...

User Manual
Page 8
... the temperature control panel. Air filter is "ON". It would be replaced from the wall outlet. Be sure and ask for air filter replacement cartridge, part # 241504902. 6 Press and hold the Filter Reset button on the control panel, a single audible tone acknowledges your input. TEMPERATURE CONTROLS Cooling System On/Off Button... food compartments stops. To order new air filter cartridges, contact the dealer where you typically store in your refrigerator, contact Electrolux Solutions Hotline at www.frigidaire.com.
... the temperature control panel. Air filter is "ON". It would be replaced from the wall outlet. Be sure and ask for air filter replacement cartridge, part # 241504902. 6 Press and hold the Filter Reset button on the control panel, a single audible tone acknowledges your input. TEMPERATURE CONTROLS Cooling System On/Off Button... food compartments stops. To order new air filter cartridges, contact the dealer where you typically store in your refrigerator, contact Electrolux Solutions Hotline at www.frigidaire.com.

User Manual
Page 14
Cold Control & Automatic Defrost Control These parts can work as soon as you install your ice maker, connect a water supply immediately or turn the Ice maker off . G. The compressor may occur. After ...
Cold Control & Automatic Defrost Control These parts can work as soon as you install your ice maker, connect a water supply immediately or turn the Ice maker off . G. The compressor may occur. After ...

User Manual
Page 15
.... Rinse well, and wipe dry with the grain to clean stainless steel. It will remove the protective finish. Do not wash any electrical part. Rinse and dry. Be careful not to move the refrigerator beyond the plumbing connections. • Damp objects stick to perform this may be... cross-grain scratching. To turn off power to wring excess water out of the cabinet with sudsy cloth or sponge. Care & Cleaning Chart Part What To Use Tips and Precautions Interior/Door Liner • Soap and water • Baking soda and water Use 2 tablespoons of tape ...
.... Rinse well, and wipe dry with the grain to clean stainless steel. It will remove the protective finish. Do not wash any electrical part. Rinse and dry. Be careful not to move the refrigerator beyond the plumbing connections. • Damp objects stick to perform this may be... cross-grain scratching. To turn off power to wring excess water out of the cabinet with sudsy cloth or sponge. Care & Cleaning Chart Part What To Use Tips and Precautions Interior/Door Liner • Soap and water • Baking soda and water Use 2 tablespoons of tape ...

User Manual
Page 16
... OF THIS WRITTEN LIMITED WARRANTY OR ANY IMPLIED WARRANTY. If You Need Service Keep your receipt, delivery slip, or some other cosmetic parts. 11. Electrolux authorizes no person to change without notice. USA 1.800.944.9044 Electrolux Major Appliances North America P.O. Products with the... with the provided instructions. 8. Rust on the interior or exterior of the unit. 4. Service calls to use of parts other than genuine Electrolux parts or parts obtained from persons other than authorized service companies; If service is performed, it is shipped from the factory. 10. ...
... OF THIS WRITTEN LIMITED WARRANTY OR ANY IMPLIED WARRANTY. If You Need Service Keep your receipt, delivery slip, or some other cosmetic parts. 11. Electrolux authorizes no person to change without notice. USA 1.800.944.9044 Electrolux Major Appliances North America P.O. Products with the... with the provided instructions. 8. Rust on the interior or exterior of the unit. 4. Service calls to use of parts other than genuine Electrolux parts or parts obtained from persons other than authorized service companies; If service is performed, it is shipped from the factory. 10. ...
Ice Maker Information
Page 1
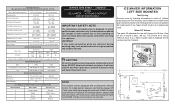
... 130cc (3.4 to rotate motor gear counterclockwise until holding switch circuit is equal to : 1 Green/Yellow Ground 2 Yellow Water Valve 3 Black Line 4 Lt. CAUTION All electrical parts and wiring must be shielded from housing. Excessive heat will change the fill time. To terminate defrost, depress and hold the freezer UP GREEN/YELLOW...
... 130cc (3.4 to rotate motor gear counterclockwise until holding switch circuit is equal to : 1 Green/Yellow Ground 2 Yellow Water Valve 3 Black Line 4 Lt. CAUTION All electrical parts and wiring must be shielded from housing. Excessive heat will change the fill time. To terminate defrost, depress and hold the freezer UP GREEN/YELLOW...


