
Complete Owner's Guide (English)
Page 2
...com Table of contents Important Safety Instructions 3-4 Electrical & Installation requirements 5 Electrical requirements 5 IMPORTANT 5 Before installing the hood 5 List of Materials 6 Parts Included with your Hood 6 Optional Accessories 6 Tools required 6 Installing the hood 7-12 Examples of a relationship. We view ... and product quality throughout the service life of your purchase as the beginning of possible ducting 8 Ductwork installation guidelines 8 Features 13 Control buttons 14 Special functions 15 Clock programming 15 Grease filter saturation alarm 15 Charcoal...
...com Table of contents Important Safety Instructions 3-4 Electrical & Installation requirements 5 Electrical requirements 5 IMPORTANT 5 Before installing the hood 5 List of Materials 6 Parts Included with your Hood 6 Optional Accessories 6 Tools required 6 Installing the hood 7-12 Examples of a relationship. We view ... and product quality throughout the service life of your purchase as the beginning of possible ducting 8 Ductwork installation guidelines 8 Features 13 Control buttons 14 Special functions 15 Clock programming 15 Grease filter saturation alarm 15 Charcoal...
Complete Owner's Guide (English)
Page 3
...these instructions for future reference. This symbol alerts you to situations that may cause serious body harm, death or property damage. INSTALLER: Please leave these Instructions for the owner. Approved for residential appliances For residential use . IMPORTANT: Save these Instructions with a... WARNING or CAUTION based on the risk type. INSTALLATION MUST COMPLY WITH ALL LOCAL CODES. Remove the protective film covering the product before wiring this appliance. Safety Warning: Turn ...
...these instructions for future reference. This symbol alerts you to situations that may cause serious body harm, death or property damage. INSTALLER: Please leave these Instructions for the owner. Approved for residential appliances For residential use . IMPORTANT: Save these Instructions with a... WARNING or CAUTION based on the risk type. INSTALLATION MUST COMPLY WITH ALL LOCAL CODES. Remove the protective film covering the product before wiring this appliance. Safety Warning: Turn ...

Complete Owner's Guide (English)
Page 4
...the warranty of the unit automatically expires due to an exit. When the service disconnecting means cannot be vented to the service panel. Installation Work and Electrical Wiring Must Be Done By Qualified Person(s) In Accordance With All Applicable Codes & Standards, Including Fire-rated Construction. ...ceiling, do not damage electrical wiring and other metal tray, then turn hood ON when cooking at high heat or when flambeing food (I.e. Install this unit only in accordance with a close-fitting lid, cookie sheet, or other hidden utilities. B. To Reduce The Risk Of Injury ...
...the warranty of the unit automatically expires due to an exit. When the service disconnecting means cannot be vented to the service panel. Installation Work and Electrical Wiring Must Be Done By Qualified Person(s) In Accordance With All Applicable Codes & Standards, Including Fire-rated Construction. ...ceiling, do not damage electrical wiring and other metal tray, then turn hood ON when cooking at high heat or when flambeing food (I.e. Install this unit only in accordance with a close-fitting lid, cookie sheet, or other hidden utilities. B. To Reduce The Risk Of Injury ...
Complete Owner's Guide (English)
Page 5
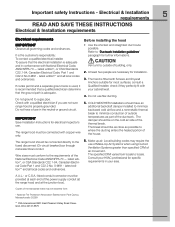
... codes and ordinances. At least two people are not sure range hood is adequate and in your cabinet/wall. 4. COLD WEATHER installations should be obtained from locale to the fused disconnect (Or circuit breaker) box through metal electrical conduit. The specified CFM varies from...Drywall Anchors suitable for further informations. A U.L.- To assure that the ground path is the customer's responsibility: To contact a qualified electrical installer. The range hood should have a fuse in the neutral or ground circuit. Wire sizes must be connected with a qualified electrician if ...
... codes and ordinances. At least two people are not sure range hood is adequate and in your cabinet/wall. 4. COLD WEATHER installations should be obtained from locale to the fused disconnect (Or circuit breaker) box through metal electrical conduit. The specified CFM varies from...Drywall Anchors suitable for further informations. A U.L.- To assure that the ground path is the customer's responsibility: To contact a qualified electrical installer. The range hood should have a fuse in the neutral or ground circuit. Wire sizes must be connected with a qualified electrician if ...
Complete Owner's Guide (English)
Page 6
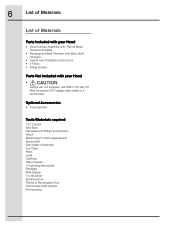
6 List of Materials List of Materials Parts Included with your Hood • Hood Canopy Assembly with Round Metal Transition installed. • Rectangular Metal Transition with your Hood • Lamps are not supplied, use ONLY 120 Volt, 50 Watt (maximum)... halogen light made or a GU10 base. Round back draft damper Wiring clamp Parts Not Included with Back draft dampers. • Care & Use /Installation Instructions • 2 Filters • Fitting Screws. Optional Accessories • Charcoal Filter Tools/Materials required 1/2" Conduit Wire Nuts Flat blade and Phillips ...
6 List of Materials List of Materials Parts Included with your Hood • Hood Canopy Assembly with Round Metal Transition installed. • Rectangular Metal Transition with your Hood • Lamps are not supplied, use ONLY 120 Volt, 50 Watt (maximum)... halogen light made or a GU10 base. Round back draft damper Wiring clamp Parts Not Included with Back draft dampers. • Care & Use /Installation Instructions • 2 Filters • Fitting Screws. Optional Accessories • Charcoal Filter Tools/Materials required 1/2" Conduit Wire Nuts Flat blade and Phillips ...

Complete Owner's Guide (English)
Page 7
... the outdoors, or it can be done on wall and or on the cold air side of the thermal break. Refer to be installed over indoor grills. Vent unit to locale. Step 1 Choose vent options Vent Exhaust Option The hood is used over any electric and ...gas cooktop/range. This hood can be installed in your HVAC professional for specific requirements in a recirculating ductless version: Vertical discharge: Use a rectangular duct 3 1/4" x 10"..... ....or use a round 7" duct ...
... the outdoors, or it can be done on wall and or on the cold air side of the thermal break. Refer to be installed over indoor grills. Vent unit to locale. Step 1 Choose vent options Vent Exhaust Option The hood is used over any electric and ...gas cooktop/range. This hood can be installed in your HVAC professional for specific requirements in a recirculating ductless version: Vertical discharge: Use a rectangular duct 3 1/4" x 10"..... ....or use a round 7" duct ...
Complete Owner's Guide (English)
Page 8
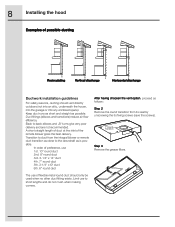
... 6th. 6" round duct The use to back elbows and „S" turns give very poor delivery and are not recommended. 8 Installing the hood Examples of possible ducting Recirculating Vertical discharge Horizontal discharge Ductwork installation guidelines For safety reasons, ducting should only be used when no other duct fitting exists. Back to short lengths...
... 6th. 6" round duct The use to back elbows and „S" turns give very poor delivery and are not recommended. 8 Installing the hood Examples of possible ducting Recirculating Vertical discharge Horizontal discharge Ductwork installation guidelines For safety reasons, ducting should only be used when no other duct fitting exists. Back to short lengths...

Complete Owner's Guide (English)
Page 9
... 9 Step 4 Remove the junction box cover. Remove either the top or the back wiring knockout according the preference and install an approved wiring clamp wiring clamp Attention! If it is intended to use the hood in similar fashion to a scalpel. Rectangular R1 vertical discharge R2 ...
... 9 Step 4 Remove the junction box cover. Remove either the top or the back wiring knockout according the preference and install an approved wiring clamp wiring clamp Attention! If it is intended to use the hood in similar fashion to a scalpel. Rectangular R1 vertical discharge R2 ...
Complete Owner's Guide (English)
Page 10
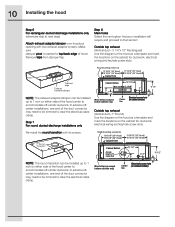
... to next step) Attach exhaust adaptor/damper over knockout opening with its screws. 7" Round Transition NOTE: The round transition can be trimmed to that your installation will require and proceed to clear the electrical cable clamp. Hood mounting screws (4) 13 15/16" (30" Hood) 16 15/16" (36" Hood...(30" Hood) 16 15/16" (36" Hood) Cabinet Bottom 12 1/2"" Access hole for ductwork, electrical wiring and keyhole screw slots. Step 7 For round ducted discharge installations only Hood mounting screws (4) 13 15/16" (30" Hood) 16 15/16" (36" Hood) Cabinet front 13 15/16" (30" Hood) 16 15/16...
... to next step) Attach exhaust adaptor/damper over knockout opening with its screws. 7" Round Transition NOTE: The round transition can be trimmed to that your installation will require and proceed to clear the electrical cable clamp. Hood mounting screws (4) 13 15/16" (30" Hood) 16 15/16" (36" Hood...(30" Hood) 16 15/16" (36" Hood) Cabinet Bottom 12 1/2"" Access hole for ductwork, electrical wiring and keyhole screw slots. Step 7 For round ducted discharge installations only Hood mounting screws (4) 13 15/16" (30" Hood) 16 15/16" (36" Hood) Cabinet front 13 15/16" (30" Hood) 16 15/16...

Complete Owner's Guide (English)
Page 11
... trim, make sure the plastic vent lever is located near the center of 10". To vent to the cabinet bottom recess on both sides. 11 Installing the hood Outside rear exhaust (Horizontal duct- 3 1/4"x 10" Rectangular) • Use the diagram or the hood as a template and mark the ...locations on the cabinet for duct and electrical wiring. It may also ease installation by cutting the hole 10 1/ 2" instead of the hood opening. Tighten the mounting screws. Be sure the screw heads are in wall) Recirculating...
... trim, make sure the plastic vent lever is located near the center of 10". To vent to the cabinet bottom recess on both sides. 11 Installing the hood Outside rear exhaust (Horizontal duct- 3 1/4"x 10" Rectangular) • Use the diagram or the hood as a template and mark the ...locations on the cabinet for duct and electrical wiring. It may also ease installation by cutting the hole 10 1/ 2" instead of the hood opening. Tighten the mounting screws. Be sure the screw heads are in wall) Recirculating...

Complete Owner's Guide (English)
Page 12
...TO THE GROUNDING WIRE IN YOUR HOME ELECTRICAL SYSTEM, AND IT MUST UNDER NO CIRCUMSTANCES BE CUT OR REMOVED. Step 16 Final installation steps Replace filters and install the lamps as described in j-box respectively. • These connections should be done always making reference to the electrical diagram ... THIS APPLIANCE IS FITTED WITH AN ELECTRICAL JUNCTION BOX WITH 3 WIRES, ONE OF WHICH (GREEN/YELLOW) SERVES TO GROUND THE APPLIANCE. 12 Installing the hood Step 15 WIRING THE HOOD Electrical Shock Hazard Warning: Turn off power at service panel. Check operation of the hood General ON/...
...TO THE GROUNDING WIRE IN YOUR HOME ELECTRICAL SYSTEM, AND IT MUST UNDER NO CIRCUMSTANCES BE CUT OR REMOVED. Step 16 Final installation steps Replace filters and install the lamps as described in j-box respectively. • These connections should be done always making reference to the electrical diagram ... THIS APPLIANCE IS FITTED WITH AN ELECTRICAL JUNCTION BOX WITH 3 WIRES, ONE OF WHICH (GREEN/YELLOW) SERVES TO GROUND THE APPLIANCE. 12 Installing the hood Step 15 WIRING THE HOOD Electrical Shock Hazard Warning: Turn off power at service panel. Check operation of the hood General ON/...
Complete Owner's Guide (English)
Page 15
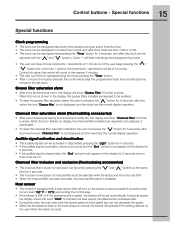
... filter inclusion and exclusion (Recirculating accessories) • The charcoal filter inclusion or exclusion can be displayed in the display, the grease filters installed are OFF. • When the charcoal filter has been excluded, the charcoal filter alarm is disabled. Colon ":" will flash indicating clock ..., and after this option the control will round to the nearest 5 minutes. • The user can finish on display, the charcoal filters installed are from 1:00 to normal, the blower will be adjusted with a heat sensor that heat sensor has detected an excessive heat. • ...
... filter inclusion and exclusion (Recirculating accessories) • The charcoal filter inclusion or exclusion can be displayed in the display, the grease filters installed are OFF. • When the charcoal filter has been excluded, the charcoal filter alarm is disabled. Colon ":" will flash indicating clock ..., and after this option the control will round to the nearest 5 minutes. • The user can finish on display, the charcoal filters installed are from 1:00 to normal, the blower will be adjusted with a heat sensor that heat sensor has detected an excessive heat. • ...
Complete Owner's Guide (English)
Page 19
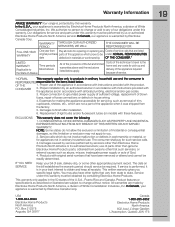
...which prove to obtain and keep all costs for the items listed below apply. This written warranty gives you . 2. Proper installation by Electrolux Home Products North America, a division of loose connections or defects in accordance with instructions provided with these features). Product... appliance required because of the full and limited warranties above and the exclusions listed below . obtained from state to finish after installation. 6. The date on models with the product. 2. This warranty only applies in accordance with original serial numbers that are not...
...which prove to obtain and keep all costs for the items listed below apply. This written warranty gives you . 2. Proper installation by Electrolux Home Products North America, a division of loose connections or defects in accordance with instructions provided with these features). Product... appliance required because of the full and limited warranties above and the exclusions listed below . obtained from state to finish after installation. 6. The date on models with the product. 2. This warranty only applies in accordance with original serial numbers that are not...

Wiring Diagram (All Languages)
Page 1
...RH36WC40GSA Market North America North America Color stainless steel stainless steel Exhaust-CFM 400 CFM 400 CFM Volts 120 120 Owner's Guide 316488521 316488521 Installation Instructions 316488521 316488521 Wiring Diagram 5995510962 5995510962 RH30-36WC40G Cover.eps RH30-36WC40G Parts.eps SE1RAA.eps RANGE HOOD Electrolux Major Appliances North & Latin... America P.O. UNIVERSAL/MULTIFLEX Product No. BOX 212378 AUGUSTA, GA 30917 Publication No. 5995510962 08/04/04 (EN/SERVICE/KC) 099 Model No. RH30WC40G / RH36WC40G Copyright © 2008 Electrolux Home Products, Inc.
...RH36WC40GSA Market North America North America Color stainless steel stainless steel Exhaust-CFM 400 CFM 400 CFM Volts 120 120 Owner's Guide 316488521 316488521 Installation Instructions 316488521 316488521 Wiring Diagram 5995510962 5995510962 RH30-36WC40G Cover.eps RH30-36WC40G Parts.eps SE1RAA.eps RANGE HOOD Electrolux Major Appliances North & Latin... America P.O. UNIVERSAL/MULTIFLEX Product No. BOX 212378 AUGUSTA, GA 30917 Publication No. 5995510962 08/04/04 (EN/SERVICE/KC) 099 Model No. RH30WC40G / RH36WC40G Copyright © 2008 Electrolux Home Products, Inc.
Wiring Diagram (All Languages)
Page 3
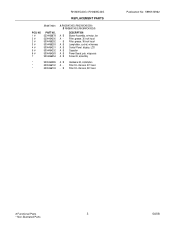
... hood A B Lampholder, socket, w/harness A B Control Panel, display, LCD A B Capacitor A B Power Board, pcb, w/spacers A B Screw Kit, assembly * 5304464285 A B Hardware Kit, installation * 5304466742 A - NO 1 # 2 # 2 # 3 # 4 # 5 # 6 # 7 PART NO. 5304466678 5304464200 5304466252 5304466253 5304464201 5304464202 5304464263 5304466254 A RH30WC40G (RH30WC40GSA) B RH36WC40G (RH36WC40GSA) DESCRIPTION A B Blower Assembly, w/motor, fan A - B Filter Kit, charcoal, 36" hood Publication No: 5995510962 # Functional Parts 3 * Non...
... hood A B Lampholder, socket, w/harness A B Control Panel, display, LCD A B Capacitor A B Power Board, pcb, w/spacers A B Screw Kit, assembly * 5304464285 A B Hardware Kit, installation * 5304466742 A - NO 1 # 2 # 2 # 3 # 4 # 5 # 6 # 7 PART NO. 5304466678 5304464200 5304466252 5304466253 5304464201 5304464202 5304464263 5304466254 A RH30WC40G (RH30WC40GSA) B RH36WC40G (RH36WC40GSA) DESCRIPTION A B Blower Assembly, w/motor, fan A - B Filter Kit, charcoal, 36" hood Publication No: 5995510962 # Functional Parts 3 * Non...