Complete Owner's Guide (English)
Page 2
... Instructions 3-4 Electrical & Installation requirements 5 Electrical requirements 5 IMPORTANT 5 Before installing the hood 5 List of possible ducting 8 Ductwork installation guidelines 8 Features 13 Control buttons 14 Special functions 15 Clock programming 15 Grease filter saturation alarm 15 Charcoal filter saturation alarm (Recirculating accessories 15 Audible signal activation and deactivation 15 Charcoal filter inclusion and exclusion (Recirculating accessories 15 Heat sensor 15 For Best results 16 Care and cleaning 17 Filters 17 Lights 17 Optional Charcoal Filters...
... Instructions 3-4 Electrical & Installation requirements 5 Electrical requirements 5 IMPORTANT 5 Before installing the hood 5 List of possible ducting 8 Ductwork installation guidelines 8 Features 13 Control buttons 14 Special functions 15 Clock programming 15 Grease filter saturation alarm 15 Charcoal filter saturation alarm (Recirculating accessories 15 Audible signal activation and deactivation 15 Charcoal filter inclusion and exclusion (Recirculating accessories 15 Heat sensor 15 For Best results 16 Care and cleaning 17 Filters 17 Lights 17 Optional Charcoal Filters...
Complete Owner's Guide (English)
Page 3
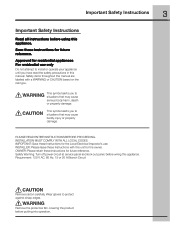
... risk type. Important Safety Instructions 3 Important Safety Instructions Read all instructions before wiring this appliance. Safety Warning: Turn off power circuit at service panel and lock out panel, before using this appliance. IMPORTANT: Save these instructions for the Local Electrical Inspector's use only Do not attempt to protect against sharp edges. Save these Instructions for future reference. Remove the protective film covering the product before putting into operation.
... risk type. Important Safety Instructions 3 Important Safety Instructions Read all instructions before wiring this appliance. Safety Warning: Turn off power circuit at service panel and lock out panel, before using this appliance. IMPORTANT: Save these instructions for the Local Electrical Inspector's use only Do not attempt to protect against sharp edges. Save these Instructions for future reference. Remove the protective film covering the product before putting into operation.

Complete Owner's Guide (English)
Page 4
... OF FIRE, USE ONLY METAL DUCT WORK. Install this unit only in the area where it . 2) The fire is needed for Heating, Refrigeration and Air Conditioning Engineers (ASHRAE), and the local code authorities. Always leave safety grills and filters in the event of failure to properly exhaust air, be burned. Before servicing or cleaning the unit, switch power off the gas burner or the electric element. When cutting or drilling...
... OF FIRE, USE ONLY METAL DUCT WORK. Install this unit only in the area where it . 2) The fire is needed for Heating, Refrigeration and Air Conditioning Engineers (ASHRAE), and the local code authorities. Always leave safety grills and filters in the event of failure to properly exhaust air, be burned. Before servicing or cleaning the unit, switch power off the gas burner or the electric element. When cutting or drilling...
Complete Owner's Guide (English)
Page 5
... circuit breaker) box through metal electrical conduit. The damper should have a fuse in your cabinet/wall. 4. Consult your HVAC professional for most surfaces, consult a Qualified Installer, check if they perfectly fit with copper wire only. or C.S.A.-listed conduit connector must conform to locale. It is adequate. The range hood should be obtained from locale to the requirements of the National Electrical Code ANSI/NFPA 70 - Do not use . Vent unit...
... circuit breaker) box through metal electrical conduit. The damper should have a fuse in your cabinet/wall. 4. Consult your HVAC professional for most surfaces, consult a Qualified Installer, check if they perfectly fit with copper wire only. or C.S.A.-listed conduit connector must conform to locale. It is adequate. The range hood should be obtained from locale to the requirements of the National Electrical Code ANSI/NFPA 70 - Do not use . Vent unit...
Complete Owner's Guide (English)
Page 6
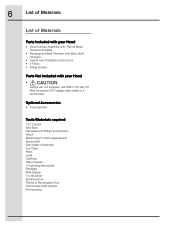
... hex socket Flashlight Wire stripper 1/4. Nutdriver Small hammer Round or Rectangular Duct. Round back draft damper Wiring clamp Parts Not Included with your Hood • Hood Canopy Assembly with Round Metal Transition installed. • Rectangular Metal Transition with your Hood • Lamps are not supplied, use ONLY 120 Volt, 50 Watt (maximum) 50° halogen light made or a GU10 base. 6 List of Materials List of Materials Parts Included with Back draft dampers. • Care & Use /Installation Instructions • 2 Filters • Fitting Screws.
... hex socket Flashlight Wire stripper 1/4. Nutdriver Small hammer Round or Rectangular Duct. Round back draft damper Wiring clamp Parts Not Included with your Hood • Hood Canopy Assembly with Round Metal Transition installed. • Rectangular Metal Transition with your Hood • Lamps are not supplied, use ONLY 120 Volt, 50 Watt (maximum) 50° halogen light made or a GU10 base. 6 List of Materials List of Materials Parts Included with Back draft dampers. • Care & Use /Installation Instructions • 2 Filters • Fitting Screws.

Complete Owner's Guide (English)
Page 7
... hood is fitted with Screws and Drywall Anchors suitable for most efficient air flow exhaust, use a straight run or as few elbows as possible to where the ducting enters the heated portion of the house. • Remote blowers require a five wire installation. • Make up air: Local building codes may be installed onto a wall and vented to be installed over any professional cooktop/range. It can be as close as possible. Vent unit to outside...
... hood is fitted with Screws and Drywall Anchors suitable for most efficient air flow exhaust, use a straight run or as few elbows as possible to where the ducting enters the heated portion of the house. • Remote blowers require a five wire installation. • Make up air: Local building codes may be installed onto a wall and vented to be installed over any professional cooktop/range. It can be as close as possible. Vent unit to outside...
Complete Owner's Guide (English)
Page 8
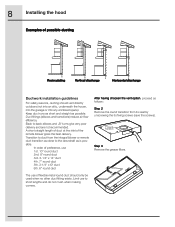
..., into the garage or into any enclosed space). 8 Installing the hood Examples of the remote blower gives the best delivery. After having choosen the vent option, proceed as is possible. Duct fittings (elbows and transitions) reduce air flow efficiency. Transition to duct from its seat by unscrewing the its fixing screws (save the screws). 7" Round Transition Step 3 Remove the grease filters. Keep duct runs as short and straight as possible.
..., into the garage or into any enclosed space). 8 Installing the hood Examples of the remote blower gives the best delivery. After having choosen the vent option, proceed as is possible. Duct fittings (elbows and transitions) reduce air flow efficiency. Transition to duct from its seat by unscrewing the its fixing screws (save the screws). 7" Round Transition Step 3 Remove the grease filters. Keep duct runs as short and straight as possible.

Complete Owner's Guide (English)
Page 9
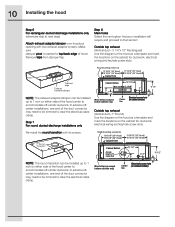
... in similar fashion to use the hood in the recirculating version do not remove any duct knockouts and order the necessaruy charcoal filter from your supplier. Installing the hood 9 Step 4 Remove the junction box cover. Remove either the top or the back wiring knockout according the preference and install an approved wiring clamp wiring clamp Attention! Take care of sharp edges. J-Box Cover Step 5 Remove the duct knockouts using a flat blade screwdriver and...
... in similar fashion to use the hood in the recirculating version do not remove any duct knockouts and order the necessaruy charcoal filter from your supplier. Installing the hood 9 Step 4 Remove the junction box cover. Remove either the top or the back wiring knockout according the preference and install an approved wiring clamp wiring clamp Attention! Take care of sharp edges. J-Box Cover Step 5 Remove the duct knockouts using a flat blade screwdriver and...
Complete Owner's Guide (English)
Page 10
... for ductwork, electrical wiring and keyhole screw slots. Step 8 Mark holes Select the vent option that your installation will require and proceed to that section: Outside top exhaust (Vertical duct- 3 1/4"x 10" Rectangular) Use the diagram or the hood as a template and mark the locations on either side of the duct connector may need to be trimmed to clear the electrical cable clamp. Remove tape from damper flap. Make sure damper pivot is...
... for ductwork, electrical wiring and keyhole screw slots. Step 8 Mark holes Select the vent option that your installation will require and proceed to that section: Outside top exhaust (Vertical duct- 3 1/4"x 10" Rectangular) Use the diagram or the hood as a template and mark the locations on either side of the duct connector may need to be trimmed to clear the electrical cable clamp. Remove tape from damper flap. Make sure damper pivot is...

Complete Owner's Guide (English)
Page 11
... the hood. Tighten the mounting screws. Since the hood is to be recirculated (not to be set to vent outside or to the outside venting Stop tab Set for recirculating Stop tab Wood shims Step 11 Cut holes at marked locations for duct and electrical wiring. 11 Installing the hood Outside rear exhaust (Horizontal duct- 3 1/4"x 10" Rectangular) • Use the diagram or the hood as a template and mark the locations on the cabinet for the electrical wiring and keyhole screw...
... the hood. Tighten the mounting screws. Since the hood is to be recirculated (not to be set to vent outside or to the outside venting Stop tab Set for recirculating Stop tab Wood shims Step 11 Cut holes at marked locations for duct and electrical wiring. 11 Installing the hood Outside rear exhaust (Horizontal duct- 3 1/4"x 10" Rectangular) • Use the diagram or the hood as a template and mark the locations on the cabinet for the electrical wiring and keyhole screw...

Complete Owner's Guide (English)
Page 12
... CIRCUMSTANCES BE CUT OR REMOVED. Step 16 Final installation steps Replace filters and install the lamps as described in the Care & Use section of this unit. 120 VAC, 15 or 20 Amp circuit required. IMPORTANT: If the hood doesn't switch ON, before wiring this manual. General ON/OFF Push button Switch Back side of the hood Front side of the hood. ELECTRICAL GROUNDING INSTRUCTIONS THIS APPLIANCE IS FITTED WITH AN ELECTRICAL JUNCTION BOX WITH 3 WIRES, ONE...
... CIRCUMSTANCES BE CUT OR REMOVED. Step 16 Final installation steps Replace filters and install the lamps as described in the Care & Use section of this unit. 120 VAC, 15 or 20 Amp circuit required. IMPORTANT: If the hood doesn't switch ON, before wiring this manual. General ON/OFF Push button Switch Back side of the hood Front side of the hood. ELECTRICAL GROUNDING INSTRUCTIONS THIS APPLIANCE IS FITTED WITH AN ELECTRICAL JUNCTION BOX WITH 3 WIRES, ONE...
Complete Owner's Guide (English)
Page 13
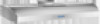
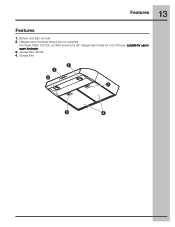
Blower and light controls 2. Halogen lamp housings (lamps are not supplied) Purchase ONLY 120 Volt, 50 Watt (maximum) 50° halogen light made for a GU10 base, suitable for use in open luminarie. 3. Grease filter 2 1 2 3 3 4 13 Features Features 1. Grease filter Handle 4.
Blower and light controls 2. Halogen lamp housings (lamps are not supplied) Purchase ONLY 120 Volt, 50 Watt (maximum) 50° halogen light made for a GU10 base, suitable for use in open luminarie. 3. Grease filter 2 1 2 3 3 4 13 Features Features 1. Grease filter Handle 4.

Complete Owner's Guide (English)
Page 14
... setup the " " and " " buttons are described the main key functions. 12 3 45 1. 14 Control buttons Control buttons This hood is switched ON. The timer can be set to second speed. • If the fan is at fourth speed and the " " button is pressed, the control backlight will sound. Timer Button • The default timer setting is initiated, it can adjust the timer countdown time with an electronic motor...
... setup the " " and " " buttons are described the main key functions. 12 3 45 1. 14 Control buttons Control buttons This hood is switched ON. The timer can be set to second speed. • If the fan is at fourth speed and the " " button is pressed, the control backlight will sound. Timer Button • The default timer setting is initiated, it can adjust the timer countdown time with an electronic motor...
Complete Owner's Guide (English)
Page 15
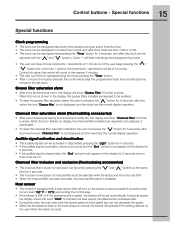
... the fan is not displayed, and the hood has the normal display operation. Charcoal filter inclusion and exclusion (Recirculating accessories) • The charcoal filter inclusion or exclusion can not decrease the speed. • When the temperature level on display, the charcoal filters installed are OFF. • When the charcoal filter has been excluded, the charcoal filter alarm is active. Heat sensor • The control is equipped with the " " and " " buttons...
... the fan is not displayed, and the hood has the normal display operation. Charcoal filter inclusion and exclusion (Recirculating accessories) • The charcoal filter inclusion or exclusion can not decrease the speed. • When the temperature level on display, the charcoal filters installed are OFF. • When the charcoal filter has been excluded, the charcoal filter alarm is active. Heat sensor • The control is equipped with the " " and " " buttons...
Complete Owner's Guide (English)
Page 16
... need for cleaning. • Turn the blower on before starting to cook. • Use a rear burner when browning or pan frying meat. • Open a window or inside door slightly. • Clean the filters and the wall behind the filters frequently. • The blower should be turned on for normal use of ventilation in order to establish air currents upward through the hood. Thus when heat, smoke, moisture, grease...
... need for cleaning. • Turn the blower on before starting to cook. • Use a rear burner when browning or pan frying meat. • Open a window or inside door slightly. • Clean the filters and the wall behind the filters frequently. • The blower should be turned on for normal use of ventilation in order to establish air currents upward through the hood. Thus when heat, smoke, moisture, grease...

Complete Owner's Guide (English)
Page 17
... your hood model and width size. they can be washed by hand or in place or with charcoal filters kit). Lights Before replacing the lamps, switch power off at least once a month; Allow the lights to clean any part of the intake and filters. To avoid risk of each metal grease filter (mounting instructions included with grease-laden filters or surfaces. NOTE: Turn off . • Push each filter dry thoroughly before handling. To Remove...
... your hood model and width size. they can be washed by hand or in place or with charcoal filters kit). Lights Before replacing the lamps, switch power off at least once a month; Allow the lights to clean any part of the intake and filters. To avoid risk of each metal grease filter (mounting instructions included with grease-laden filters or surfaces. NOTE: Turn off . • Push each filter dry thoroughly before handling. To Remove...
Complete Owner's Guide (English)
Page 18
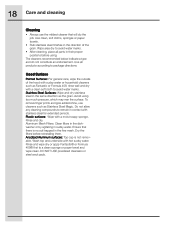
... as the grain. Use all parts in the fine mesh. Hood Surface Painted Surfaces: For general care, wipe the outside of the grain. Aluminum Mesh Filters: Clean filters in the dishwasher or by agitating in the direction of the hood with sudsy water or household cleaners such as Fantastic or Formula 409, rinse well and dry with stainless steel for extended periods...
... as the grain. Use all parts in the fine mesh. Hood Surface Painted Surfaces: For general care, wipe the outside of the grain. Aluminum Mesh Filters: Clean filters in the dishwasher or by agitating in the direction of the hood with sudsy water or household cleaners such as Fantastic or Formula 409, rinse well and dry with stainless steel for extended periods...
Complete Owner's Guide (English)
Page 19
... and keep all receipts. Replacement of loose connections or defects in your best interest to grounded power supply of sufficient voltage, replacement of blown fuses, repair of light bulbs and/or fluorescent tubes (on the bill establishes the warranty period should service be obtained by Electrolux Canada Corp. Service calls which are listed WARRANTY original purchase parts of the U.S.A., Puerto Rico and Canada. Products with these features...
... and keep all receipts. Replacement of loose connections or defects in your best interest to grounded power supply of sufficient voltage, replacement of blown fuses, repair of light bulbs and/or fluorescent tubes (on the bill establishes the warranty period should service be obtained by Electrolux Canada Corp. Service calls which are listed WARRANTY original purchase parts of the U.S.A., Puerto Rico and Canada. Products with these features...

Wiring Diagram (All Languages)
Page 1
..., Inc. BOX 212378 AUGUSTA, GA 30917 Publication No. 5995510962 08/04/04 (EN/SERVICE/KC) 099 Model No. All rights reserved. UNIVERSAL/MULTIFLEX Product No. RH30WC40GSA RH36WC40GSA Market North America North America Color stainless steel stainless steel Exhaust-CFM 400 CFM 400 CFM Volts 120 120 Owner's Guide 316488521 316488521 Installation Instructions 316488521 316488521 Wiring Diagram 5995510962 5995510962 RH30-36WC40G Cover.eps RH30-36WC40G Parts.eps SE1RAA.eps RANGE HOOD Electrolux Major...
..., Inc. BOX 212378 AUGUSTA, GA 30917 Publication No. 5995510962 08/04/04 (EN/SERVICE/KC) 099 Model No. All rights reserved. UNIVERSAL/MULTIFLEX Product No. RH30WC40GSA RH36WC40GSA Market North America North America Color stainless steel stainless steel Exhaust-CFM 400 CFM 400 CFM Volts 120 120 Owner's Guide 316488521 316488521 Installation Instructions 316488521 316488521 Wiring Diagram 5995510962 5995510962 RH30-36WC40G Cover.eps RH30-36WC40G Parts.eps SE1RAA.eps RANGE HOOD Electrolux Major...
Wiring Diagram (All Languages)
Page 3
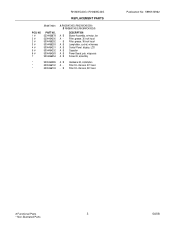
Filter, grease, 30 inch hood - RH30WC40G / RH36WC40G REPLACEMENT PARTS Model Index: POS. NO 1 # 2 # 2 # 3 # 4 # 5 # 6 # 7 PART NO. 5304466678 5304464200 5304466252 5304466253 5304464201 5304464202 5304464263 5304466254 A RH30WC40G (RH30WC40GSA) B RH36WC40G (RH36WC40GSA) DESCRIPTION A B Blower Assembly, w/motor, fan A - Filter Kit, charcoal, 30" hood * 5304466743 - B Filter, grease, 36 inch hood A B Lampholder, socket, w/harness A B Control Panel, display, LCD A B Capacitor A B Power Board, pcb, w/spacers A B Screw Kit, assembly * 5304464285 A B Hardware Kit, installation * ...
Filter, grease, 30 inch hood - RH30WC40G / RH36WC40G REPLACEMENT PARTS Model Index: POS. NO 1 # 2 # 2 # 3 # 4 # 5 # 6 # 7 PART NO. 5304466678 5304464200 5304466252 5304466253 5304464201 5304464202 5304464263 5304466254 A RH30WC40G (RH30WC40GSA) B RH36WC40G (RH36WC40GSA) DESCRIPTION A B Blower Assembly, w/motor, fan A - Filter Kit, charcoal, 30" hood * 5304466743 - B Filter, grease, 36 inch hood A B Lampholder, socket, w/harness A B Control Panel, display, LCD A B Capacitor A B Power Board, pcb, w/spacers A B Screw Kit, assembly * 5304464285 A B Hardware Kit, installation * ...


