
Complete Owner's Guide (English)
Page 2
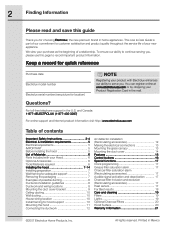
... the duct cover bracket 9 Ceiling ducting 10 Wall ducting 10 House wiring location 10 Install framing for hood support 10 Mounting the hood 11 Connecting the ductwork 12 Air deflector installation (Recirculating accessories 12 Making the electrical connections 13 Mounting the...www.electroluxusa.com Table of contents Important Safety Instructions 3-4 Electrical & Installation requirements 5 Electrical requirements 5 IMPORTANT 5 Before installing the hood 5 List of Materials 6 Parts Included with Electrolux enhances our ability to serve you , please use this guide Thank you for...
... the duct cover bracket 9 Ceiling ducting 10 Wall ducting 10 House wiring location 10 Install framing for hood support 10 Mounting the hood 11 Connecting the ductwork 12 Air deflector installation (Recirculating accessories 12 Making the electrical connections 13 Mounting the...www.electroluxusa.com Table of contents Important Safety Instructions 3-4 Electrical & Installation requirements 5 Electrical requirements 5 IMPORTANT 5 Before installing the hood 5 List of Materials 6 Parts Included with Electrolux enhances our ability to serve you , please use this guide Thank you for...
Complete Owner's Guide (English)
Page 4
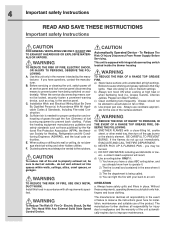
...warning device, such as those published by the manufacturer. If the flames do not damage electrical wiring and other metal tray, then turn hood ON when cooking at high settings. you have a class ABC extinguisher, and you already know you have questions, contact the manufacturer. ...Air Conditioning Engineers (ASHRAE), and the local code authorities. DO NOT USE TO EXHAUST HAZARDOUS OR EXPLOSIVE MATERIALS OR VAPORS. Use this hood in accordance with a close-fitting lid, cookie sheet, or other hidden utilities. When the service disconnecting means cannot be sure to the...
...warning device, such as those published by the manufacturer. If the flames do not damage electrical wiring and other metal tray, then turn hood ON when cooking at high settings. you have a class ABC extinguisher, and you already know you have questions, contact the manufacturer. ...Air Conditioning Engineers (ASHRAE), and the local code authorities. DO NOT USE TO EXHAUST HAZARDOUS OR EXPLOSIVE MATERIALS OR VAPORS. Use this hood in accordance with a close-fitting lid, cookie sheet, or other hidden utilities. When the service disconnecting means cannot be sure to the...
Complete Owner's Guide (English)
Page 5
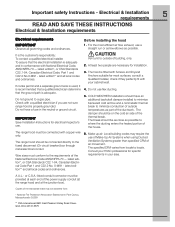
... Electrical Code Part 1 and C22.2 No. 0-M91 - Vent unit to where the ducting enters the heated portion of the thermal break. The hood is adequate. The break should have a fuse in your cabinet/wall. 4. A U.L.- latest edition** and all local codes and ordinances. Consult your...few elbows as possible. Check with your area. IMPORTANT Save Installation Instructions for installation. 3. At least two people are not sure range hood is properly grounded. COLD WEATHER installations should be provided at each end of building, only. 2. Do not ground to minimize conduction ...
... Electrical Code Part 1 and C22.2 No. 0-M91 - Vent unit to where the ducting enters the heated portion of the thermal break. The hood is adequate. The break should have a fuse in your cabinet/wall. 4. A U.L.- latest edition** and all local codes and ordinances. Consult your...few elbows as possible. Check with your area. IMPORTANT Save Installation Instructions for installation. 3. At least two people are not sure range hood is properly grounded. COLD WEATHER installations should be provided at each end of building, only. 2. Do not ground to minimize conduction ...
Complete Owner's Guide (English)
Page 6
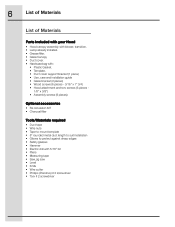
6 List of Materials List of Materials Parts Included with your Hood • Hood canopy assembly with blower, transition. • Lamp already installed. • Grease filter. • Glass Canopy • Duct cover. &#...Duct cover support bracket (1 piece) • Use, care and installation guide • Glass bracket (2 pieces) • Wood screws (6 pieces - 3/16" x 1" 3/4) • Hood attachment anchors screws (6 pieces - 1/8" x 3/8") • Assembly screws (8 pieces) Optional accessories • Re circulation KIT • Charcoal filter Tools/Materials required • Duct tape &#...
6 List of Materials List of Materials Parts Included with your Hood • Hood canopy assembly with blower, transition. • Lamp already installed. • Grease filter. • Glass Canopy • Duct cover. &#...Duct cover support bracket (1 piece) • Use, care and installation guide • Glass bracket (2 pieces) • Wood screws (6 pieces - 3/16" x 1" 3/4) • Hood attachment anchors screws (6 pieces - 1/8" x 3/8") • Assembly screws (8 pieces) Optional accessories • Re circulation KIT • Charcoal filter Tools/Materials required • Duct tape &#...

Complete Owner's Guide (English)
Page 7
... finishing. Wall framing for further informations. • Install a wall cap with damper or roof cap at the exterior opening. The hood must be installed over any professional cooktop / range. Removing the packaging Remove carton carefully, Wear gloves to be secure to vertical studs...ductwork. Consult your HVAC professional for most efficient air flow exhaust, use a straight run or as few elbows as possible. Installing the hood 7 Installing the hood • For the most surfaces, consult a Qualified Installer, check if they perfectly fit with your cabinet/wall. • Do not...
... finishing. Wall framing for further informations. • Install a wall cap with damper or roof cap at the exterior opening. The hood must be installed over any professional cooktop / range. Removing the packaging Remove carton carefully, Wear gloves to be secure to vertical studs...ductwork. Consult your HVAC professional for most efficient air flow exhaust, use a straight run or as few elbows as possible. Installing the hood 7 Installing the hood • For the most surfaces, consult a Qualified Installer, check if they perfectly fit with your cabinet/wall. • Do not...
Complete Owner's Guide (English)
Page 8
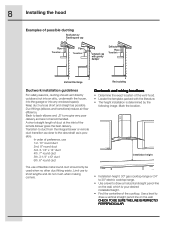
..." to 30" electric cooktop/range. • Use a level to draw a horizontal straight pencil line on the wall. 8 Installing the hood Examples of the cooktop. CHECK TO BE SURE THE LINE IS PERFECTLY PERPERNDICULAR. A short straight length of duct at the inlet of the vent... hood. • Locate the template packed with gravity damper Deflector Pipe Transition Vertical Discharge Recirculating Ductwork installation guidelines For safety reasons, ducting...
..." to 30" electric cooktop/range. • Use a level to draw a horizontal straight pencil line on the wall. 8 Installing the hood Examples of the cooktop. CHECK TO BE SURE THE LINE IS PERFECTLY PERPERNDICULAR. A short straight length of duct at the inlet of the vent... hood. • Locate the template packed with gravity damper Deflector Pipe Transition Vertical Discharge Recirculating Ductwork installation guidelines For safety reasons, ducting...
Complete Owner's Guide (English)
Page 9
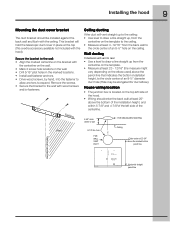
... 20" above the bottom of the installation height, and within 5-7/8" and 4-7/8"of the left side of the hood. • Wiring should be elongated for duct elbow). Secure the bracket to the wall with the hood). . Vertical centerline Horizontal straight pencil line Remove the screws. • Secure the bracket to the wall: •...
... 20" above the bottom of the installation height, and within 5-7/8" and 4-7/8"of the left side of the hood. • Wiring should be elongated for duct elbow). Secure the bracket to the wall with the hood). . Vertical centerline Horizontal straight pencil line Remove the screws. • Secure the bracket to the wall: •...
Complete Owner's Guide (English)
Page 10
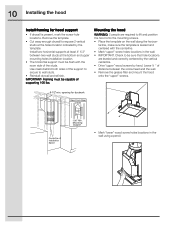
... to secure to expose 2 vertical studs at least 4" X 2" between the screw head and the wall. • Remove the grease filter and mount the hood onto the "upper" screws. 8-1/2"min. Use cleats behind both sides of supporting 100 lbs. Remove the template. • Cut away enough drywall to wall ...studs. • Reinstall drywall and refinish. opening for hood support • If drywall is leveled and centered with the room side of distance between two wall studs at the bottom and upper mounting holes...
... to secure to expose 2 vertical studs at least 4" X 2" between the screw head and the wall. • Remove the grease filter and mount the hood onto the "upper" screws. 8-1/2"min. Use cleats behind both sides of supporting 100 lbs. Remove the template. • Cut away enough drywall to wall ...studs. • Reinstall drywall and refinish. opening for hood support • If drywall is leveled and centered with the room side of distance between two wall studs at the bottom and upper mounting holes...
Complete Owner's Guide (English)
Page 11
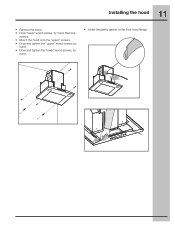
Remove screws. • Mount the hood onto the "upper" screws. • Drive and tighten the "upper" wood screws, by hand. • Drive and tighten the "lower" wood screws, by hand. 11 Installing the hood • Remove the hood. • Drive "lower" wood screws, by hand. • Install the plastic gasket to the front hood flange.
Remove screws. • Mount the hood onto the "upper" screws. • Drive and tighten the "upper" wood screws, by hand. • Drive and tighten the "lower" wood screws, by hand. 11 Installing the hood • Remove the hood. • Drive "lower" wood screws, by hand. • Install the plastic gasket to the front hood flange.
Complete Owner's Guide (English)
Page 12
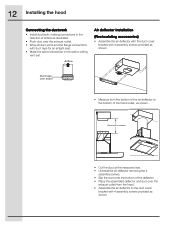
...the bottom of the deflector. • Place the assembled deflector and duct over the exhaust outlet from the bottom of the hood outlet, as shown. 12 Installing the hood Connecting the ductwork • Install ductwork, making connections in the direction of airflow as illustrated. • Push duct over... seam • Measure from the hood. • Assemble the air deflector to the bottom of the air deflector to the duct cover bracket with 4 assembly screws provided as ...
...the bottom of the deflector. • Place the assembled deflector and duct over the exhaust outlet from the bottom of the hood outlet, as shown. 12 Installing the hood Connecting the ductwork • Install ductwork, making connections in the direction of airflow as illustrated. • Push duct over... seam • Measure from the hood. • Assemble the air deflector to the bottom of the air deflector to the duct cover bracket with 4 assembly screws provided as ...
Complete Owner's Guide (English)
Page 13
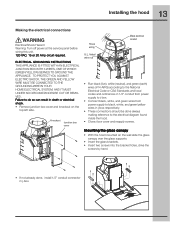
...; Close j-box cover and reapply screws. Mounting the glass canopy • With the hood mounted on the top left side. listed wire nut Metal electrical conduit • Run black (live), white (neutral), and green (earth) wires (#14 AWG) according ... MUST BE CONNECTED TO THE GROUNDING WIRE IN YOUR HOME ELECTRICAL SYSTEM, AND IT MUST UNDER NO CIRCUMSTANCES BE CUT OR REMOVED. 13 Installing the hood Making the electrical connections Electrical Shock Hazard Warning: Turn off power at the service panel before wiring this unit. 120 VAC, 15 or 20 Amp...
...; Close j-box cover and reapply screws. Mounting the glass canopy • With the hood mounted on the top left side. listed wire nut Metal electrical conduit • Run black (live), white (neutral), and green (earth) wires (#14 AWG) according ... MUST BE CONNECTED TO THE GROUNDING WIRE IN YOUR HOME ELECTRICAL SYSTEM, AND IT MUST UNDER NO CIRCUMSTANCES BE CUT OR REMOVED. 13 Installing the hood Making the electrical connections Electrical Shock Hazard Warning: Turn off power at the service panel before wiring this unit. 120 VAC, 15 or 20 Amp...
Complete Owner's Guide (English)
Page 14
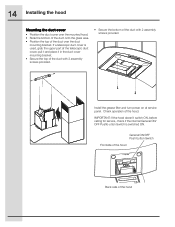
... the grease filter and turn power on at service panel. If a telescopic duct cover is switched ON. IMPORTANT: If the hood doesn't switch ON, before calling for service, check if the internal General ON/ OFF Pushb-utton Switch is used, grab the upper part of the ... with 2 assembly screws provided. • Secure the bottom of the duct over the duct mounting bracket. 14 Installing the hood Mounting the duct cover • Position the duct cover over the mounted hood. • Slide the bottom of the duct onto the glass area. • Position the top of the duct with...
... the grease filter and turn power on at service panel. If a telescopic duct cover is switched ON. IMPORTANT: If the hood doesn't switch ON, before calling for service, check if the internal General ON/ OFF Pushb-utton Switch is used, grab the upper part of the ... with 2 assembly screws provided. • Secure the bottom of the duct over the duct mounting bracket. 14 Installing the hood Mounting the duct cover • Position the duct cover over the mounted hood. • Slide the bottom of the duct onto the glass area. • Position the top of the duct with...

Complete Owner's Guide (English)
Page 16
...; If the fan is at fourth speed and the " " button is pressed, the control backlight will turn ON if the " " button is pressed and the hood was in the first speed. 5. Speed Decrease / OFF • This button is used to increase the fan speed, or turn ON the fan. • The... be set 4 different fan speeds, turn OFF the light (Lamp state previously ON). 2. " " Button. General ON/OFF Push button Switch Frontside of the hood Back side of the hood Light Button • Press lamp button to turn ON the light (Lamp state previously OFF). • Press lamp button to turn ON/OFF...
...; If the fan is at fourth speed and the " " button is pressed, the control backlight will turn ON if the " " button is pressed and the hood was in the first speed. 5. Speed Decrease / OFF • This button is used to increase the fan speed, or turn ON the fan. • The... be set 4 different fan speeds, turn OFF the light (Lamp state previously ON). 2. " " Button. General ON/OFF Push button Switch Frontside of the hood Back side of the hood Light Button • Press lamp button to turn ON the light (Lamp state previously OFF). • Press lamp button to turn ON/OFF...
Complete Owner's Guide (English)
Page 17
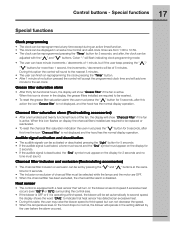
... heat sensor that heat sensor has detected an excessive heat. • During this action the icon "Grease filter" is not displayed, and the hood has the normal display operation. When this time the icon "Charcoal filter" is deactivated, the "Snd" symbol must appear on display, the charcoal...must sound and the "Snd" symbol must appear on the display for 2 seconds. • If the audible signal is not displayed and the hood has the normal display operation. Audible signal activation and deactivation • The audible signals can be washed. • To reset the grease filter ...
... heat sensor that heat sensor has detected an excessive heat. • During this action the icon "Grease filter" is not displayed, and the hood has the normal display operation. When this time the icon "Charcoal filter" is deactivated, the "Snd" symbol must appear on display, the charcoal...must sound and the "Snd" symbol must appear on the display for 2 seconds. • If the audible signal is not displayed and the hood has the normal display operation. Audible signal activation and deactivation • The audible signals can be washed. • To reset the grease filter ...
Complete Owner's Guide (English)
Page 18
... flame is done where the only air currents are produced, they will cause the escape of heat, smoke, moisture, grease and cooking odors from the hood. Such drafts should be turned on for normal use of ventilation in order to establish air currents upward through the... hood. Thus when heat, smoke, moisture, grease and cooking odors are those created by the blower itself. • For Gas Cooktops, a lower blower speed should be ...
... flame is done where the only air currents are produced, they will cause the escape of heat, smoke, moisture, grease and cooking odors from the hood. Such drafts should be turned on for normal use of ventilation in order to establish air currents upward through the... hood. Thus when heat, smoke, moisture, grease and cooking odors are those created by the blower itself. • For Gas Cooktops, a lower blower speed should be ...

Complete Owner's Guide (English)
Page 19
...filters in place. Allow the lights to cool before servicing. 19 Care and cleaning Care and cleaning The efficiency of the range hood system depends on accidentally. Replace Lights • Remove the inner lamp lens cover by inserting the three retaining tabs into each filter...liquids or solvents. Always unplug or disconnect the appliance from being switched on the cleanliness of the intake and filters. Be sure the entire hood (including the filters and light bulbs) has cooled and grease has solidified before calling service. NOTE: Turn off . • Pull the...
...filters in place. Allow the lights to cool before servicing. 19 Care and cleaning Care and cleaning The efficiency of the range hood system depends on accidentally. Replace Lights • Remove the inner lamp lens cover by inserting the three retaining tabs into each filter...liquids or solvents. Always unplug or disconnect the appliance from being switched on the cleanliness of the intake and filters. Be sure the entire hood (including the filters and light bulbs) has cooled and grease has solidified before calling service. NOTE: Turn off . • Pull the...
Complete Owner's Guide (English)
Page 20
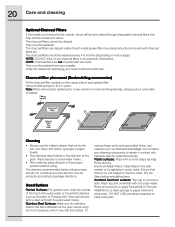
...clean soft cloth to a clean sponge or paper towel and wipe clean. Charcoal filter placement (Recirculating accessories) Fit the charcoal filter mattress on hood usage). Wipe area dry to avoid water marks. • After cleaning, place all products according to the outside of each grease filter. ...surface. DO NOT USE powdered cleansers or steel wool pads. They must be cleaned. Note: When removing for replacing for extended periods. Hood Surface Painted Surfaces: For general care, wipe the outside , the air will do the job. Stainless Steel Surfaces: Wipe and dry stainless...
...clean soft cloth to a clean sponge or paper towel and wipe clean. Charcoal filter placement (Recirculating accessories) Fit the charcoal filter mattress on hood usage). Wipe area dry to avoid water marks. • After cleaning, place all products according to the outside of each grease filter. ...surface. DO NOT USE powdered cleansers or steel wool pads. They must be cleaned. Note: When removing for replacing for extended periods. Hood Surface Painted Surfaces: For general care, wipe the outside , the air will do the job. Stainless Steel Surfaces: Wipe and dry stainless...
Wiring Diagram (All Languages)
Page 1
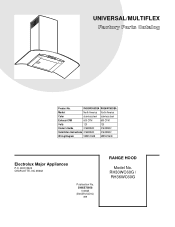
UNIVERSAL/MULTIFLEX Product No. RH30WC60G / RH36WC60G RH30WC60GSA RH36WC60GSA Market North America North America Color stainless steel stainless steel Exhaust-CFM 600 CFM 600 CFM Volts 120 120 Owner's Guide 316488522 316488522 Installation Instructions 316488522 316488522 Wiring Diagram 5995572608 5995572608 RH30-36WC60G Cover.eps RH30-36WC60G-2 Parts.eps Electrolux Major Appliances P.O. BOX 8020 CHARLOTTE, NC 28262 SE1Q5A.eps Publication No. 5995572608 10/08/25 (EN/SERVICE/KC) 099 RANGE HOOD Model No.
UNIVERSAL/MULTIFLEX Product No. RH30WC60G / RH36WC60G RH30WC60GSA RH36WC60GSA Market North America North America Color stainless steel stainless steel Exhaust-CFM 600 CFM 600 CFM Volts 120 120 Owner's Guide 316488522 316488522 Installation Instructions 316488522 316488522 Wiring Diagram 5995572608 5995572608 RH30-36WC60G Cover.eps RH30-36WC60G-2 Parts.eps Electrolux Major Appliances P.O. BOX 8020 CHARLOTTE, NC 28262 SE1Q5A.eps Publication No. 5995572608 10/08/25 (EN/SERVICE/KC) 099 RANGE HOOD Model No.
Product Specifications Sheet (English)
Page 1
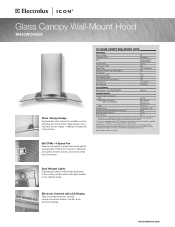
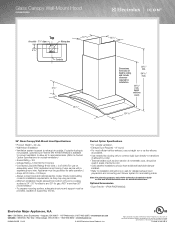
...dual centrifugal fan supplying 600 CFM of optional Duct-Free Kit.) ‡ For use of air movement. electroluxicon.com Glass Canopy Wall-Mount Hood RH36WC60GS Glass Canopy Design Sophisticated style makes this ventilation unit as attractive as they may very per locale. making it is convertible to all fan... provide convenient access to be grounded for detailed installation instructions on the web at two different levels. Glass canopy hood has sleek curved design - Dual Halogen Lights Dual halogen lights provide ample illumination of the kitchen. 36" GLASS CANOPY WALL-MOUNT...
...dual centrifugal fan supplying 600 CFM of optional Duct-Free Kit.) ‡ For use of air movement. electroluxicon.com Glass Canopy Wall-Mount Hood RH36WC60GS Glass Canopy Design Sophisticated style makes this ventilation unit as attractive as they may very per locale. making it is convertible to all fan... provide convenient access to be grounded for detailed installation instructions on the web at two different levels. Glass canopy hood has sleek curved design - Dual Halogen Lights Dual halogen lights provide ample illumination of the kitchen. 36" GLASS CANOPY WALL-MOUNT...
Product Specifications Sheet (English)
Page 2
...; electroluxicon.com CANADA • 5855 Terry Fox Way • Mississauga, ON L5V 3E4 • 1-800-265-8352 • electroluxicon.ca RH36WC60GS 10/09 © 2009 Electrolux Home Products, Inc. Printed in areas of supporting 100 lbs. We reserve the right to improve our products...models without notice. Optional Accessories • Duct-Free Kit - (PN # RHDFW60GS). height with a separate ground wire. High standards of hood to cooking surface is available to convert ventilation to allow air to Ducted Option Specifications for detailed instructions. If outside ventilation. • ...
...; electroluxicon.com CANADA • 5855 Terry Fox Way • Mississauga, ON L5V 3E4 • 1-800-265-8352 • electroluxicon.ca RH36WC60GS 10/09 © 2009 Electrolux Home Products, Inc. Printed in areas of supporting 100 lbs. We reserve the right to improve our products...models without notice. Optional Accessories • Duct-Free Kit - (PN # RHDFW60GS). height with a separate ground wire. High standards of hood to cooking surface is available to convert ventilation to allow air to Ducted Option Specifications for detailed instructions. If outside ventilation. • ...
