
Complete Owner's Guide (English)
Page 2
... support 7 Removing the packaging 7 Examples of possible ducting 8 Ductwork installation guidelines 8 Ductwork and wiring locations 8 Mounting the duct cover bracket 9 Ceiling ducting 10 Wall ducting 10 House wiring location 10 Install framing for hood support 10 Mounting the hood 11 Connecting the ductwork 12 Air deflector installation (Recirculating accessories 12 Making the electrical connections 13 Mounting the glass canopy 13 Mounting the duct cover 14 Features 15 Control buttons 16 Special functions 17 Clock programming 17 Grease filter saturation alarm 17 Charcoal...
... support 7 Removing the packaging 7 Examples of possible ducting 8 Ductwork installation guidelines 8 Ductwork and wiring locations 8 Mounting the duct cover bracket 9 Ceiling ducting 10 Wall ducting 10 House wiring location 10 Install framing for hood support 10 Mounting the hood 11 Connecting the ductwork 12 Air deflector installation (Recirculating accessories 12 Making the electrical connections 13 Mounting the glass canopy 13 Mounting the duct cover 14 Features 15 Control buttons 16 Special functions 17 Clock programming 17 Grease filter saturation alarm 17 Charcoal...
Complete Owner's Guide (English)
Page 3
... this manual. PLEASE READ ENTIRE INSTRUCTIONS BEFORE PROCEEDING. INSTALLER: Please leave these instructions for the owner. Requirement: 120 V AC, 60 Hz. 15 or 20 A Branch Circuit Save these Instructions with a WARNING or CAUTION based on the risk type. Approved for residential appliances For residential use . OWNER: Please retain these Instructions for future reference. Safety Warning: Turn off power circuit at service panel and lock out panel, before using...
... this manual. PLEASE READ ENTIRE INSTRUCTIONS BEFORE PROCEEDING. INSTALLER: Please leave these instructions for the owner. Requirement: 120 V AC, 60 Hz. 15 or 20 A Branch Circuit Save these Instructions with a WARNING or CAUTION based on the risk type. Approved for residential appliances For residential use . OWNER: Please retain these Instructions for future reference. Safety Warning: Turn off power circuit at service panel and lock out panel, before using...
Complete Owner's Guide (English)
Page 4
... is needed for the size of the surface element. When the service disconnecting means cannot be sure to negligence and the warranty of the product. Installation Work and Electrical Wiring Must Be Done By Qualified Person(s) In Accordance With All Applicable Codes & Standards, Including Fire-rated Construction. Ducted systems must always be burned. c) Clean ventilating fans frequently. Install this unit only in place. DO NOT USE TO EXHAUST...
... is needed for the size of the surface element. When the service disconnecting means cannot be sure to negligence and the warranty of the product. Installation Work and Electrical Wiring Must Be Done By Qualified Person(s) In Accordance With All Applicable Codes & Standards, Including Fire-rated Construction. Ducted systems must always be burned. c) Clean ventilating fans frequently. Install this unit only in place. DO NOT USE TO EXHAUST...
Complete Owner's Guide (English)
Page 5
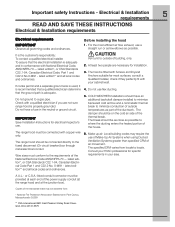
If codes permit and a separate ground wire is used, it is recommended that a qualified electrician determine that the electrical installation is adequate and in conformance with Screws and Drywall Anchors suitable for installation. 3. The range hood must be connected directly to the fused disconnect (Or circuit breaker) box through metal electrical conduit. Vent unit to minimize conduction of outside of building, only. 2. The specified CFM varies from : * National Fire Protection...
If codes permit and a separate ground wire is used, it is recommended that a qualified electrician determine that the electrical installation is adequate and in conformance with Screws and Drywall Anchors suitable for installation. 3. The range hood must be connected directly to the fused disconnect (Or circuit breaker) box through metal electrical conduit. Vent unit to minimize conduction of outside of building, only. 2. The specified CFM varies from : * National Fire Protection...
Complete Owner's Guide (English)
Page 6
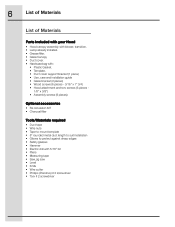
...8226; Lamp already installed. • Grease filter. • Glass Canopy • Duct cover. • Hardware bag with: • Plastic Gasket. • Template. • Duct cover support bracket (1 piece) • Use, care and installation guide • Glass bracket (2 pieces) • Wood screws (6 pieces - 3/16" x 1" 3/4) • Hood attachment anchors screws (6 pieces - 1/8" x 3/8") • Assembly screws (8 pieces) Optional accessories • Re circulation KIT • Charcoal filter Tools/Materials required • Duct tape • Wire nuts • Tape to mount template •...
...8226; Lamp already installed. • Grease filter. • Glass Canopy • Duct cover. • Hardware bag with: • Plastic Gasket. • Template. • Duct cover support bracket (1 piece) • Use, care and installation guide • Glass bracket (2 pieces) • Wood screws (6 pieces - 3/16" x 1" 3/4) • Hood attachment anchors screws (6 pieces - 1/8" x 3/8") • Assembly screws (8 pieces) Optional accessories • Re circulation KIT • Charcoal filter Tools/Materials required • Duct tape • Wire nuts • Tape to mount template •...

Complete Owner's Guide (English)
Page 7
... cabinet/wall. • Do not use of Make-Up Air Systems when using Ducted Ventilation Systems greater than specified CFM of the vent hood. • Plan the route for further informations. • Install a wall cap with damper or roof cap at the exterior opening. The hood must be as close as possible. Removing the packaging Remove carton carefully, Wear gloves to a horizontal support. • The vent hood should be installed over indoor grills. This hood can be installed for specific requirements...
... cabinet/wall. • Do not use of Make-Up Air Systems when using Ducted Ventilation Systems greater than specified CFM of the vent hood. • Plan the route for further informations. • Install a wall cap with damper or roof cap at the exterior opening. The hood must be as close as possible. Removing the packaging Remove carton carefully, Wear gloves to a horizontal support. • The vent hood should be installed over indoor grills. This hood can be installed for specific requirements...
Complete Owner's Guide (English)
Page 8
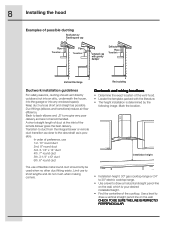
... are not recommended. Transition to duct from the integral blower or remote duct transition as possible. Keep duct runs as short and straight as close to draw a vertical straight pencil line on the wall, which is your desired installationheight. • Find the centerline of the remote blower gives the best delivery. Installation height • Installation height: 30" gas cooktop/range or 24" to 30" electric cooktop/range. • Use a level to draw a horizontal...
... are not recommended. Transition to duct from the integral blower or remote duct transition as possible. Keep duct runs as short and straight as close to draw a vertical straight pencil line on the wall, which is your desired installationheight. • Find the centerline of the remote blower gives the best delivery. Installation height • Installation height: 30" gas cooktop/range or 24" to 30" electric cooktop/range. • Use a level to draw a horizontal...
Complete Owner's Guide (English)
Page 9
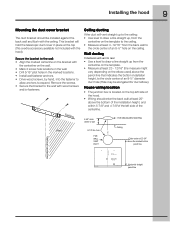
... hood). . Installing the hood 9 Mounting the duct cover bracket The duct bracket should enter the back wall at least 4 -12/16 " from the back wall to the circle center of an 8-½" hole on the ceiling. This bracket will vent to rear: • Use a level to draw a line straight up , from the centerline on the template to the ceiling. • Measure at least 20" above the bottom of the installation height...
... hood). . Installing the hood 9 Mounting the duct cover bracket The duct bracket should enter the back wall at least 4 -12/16 " from the back wall to the circle center of an 8-½" hole on the ceiling. This bracket will vent to rear: • Use a level to draw a line straight up , from the centerline on the template to the ceiling. • Measure at least 20" above the bottom of the installation height...
Complete Owner's Guide (English)
Page 10
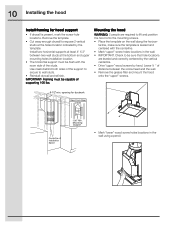
... and position the hood onto the mounting screws. • Place the template on the wall along the horizon- tal line, make sure the template is present, mark the screw hole locations. 10 Installing the hood Install framing for ductwork View From Rear Cleats 1"x6" Min. Install two horizontal supports at least 4" X 2" between the screw head and the wall. • Remove the grease filter and mount the hood onto the "upper" screws. 8-1/2"min.
... and position the hood onto the mounting screws. • Place the template on the wall along the horizon- tal line, make sure the template is present, mark the screw hole locations. 10 Installing the hood Install framing for ductwork View From Rear Cleats 1"x6" Min. Install two horizontal supports at least 4" X 2" between the screw head and the wall. • Remove the grease filter and mount the hood onto the "upper" screws. 8-1/2"min.
Complete Owner's Guide (English)
Page 12
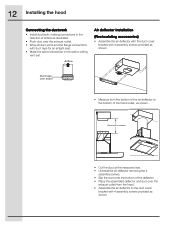
Dimension to measure • Cut the duct at the measured size. • Uninstall the air deflector removing the 4 assembly screws. • Slip the duct onto the bottom of the deflector. • Place the assembled deflector and duct over the exhaust outlet from the bottom of the hood outlet, as shown. 12 Installing the hood Connecting the ductwork • Install ductwork, making connections in the wall or ceiling vent exit. Airflow Air deflector installation (Recirculating accessories) • Assemble the air deflector with the duct cover bracket with duct tape...
Dimension to measure • Cut the duct at the measured size. • Uninstall the air deflector removing the 4 assembly screws. • Slip the duct onto the bottom of the deflector. • Place the assembled deflector and duct over the exhaust outlet from the bottom of the hood outlet, as shown. 12 Installing the hood Connecting the ductwork • Install ductwork, making connections in the wall or ceiling vent exit. Airflow Air deflector installation (Recirculating accessories) • Assemble the air deflector with the duct cover bracket with duct tape...
Complete Owner's Guide (English)
Page 13
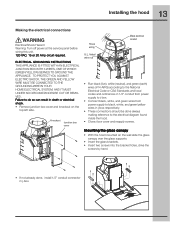
... Installing the hood Making the electrical connections Electrical Shock Hazard Warning: Turn off power at the service panel before wiring this unit. 120 VAC, 15 or 20 Amp circuit required. Knockout Junction box cover House wiring U.L. Mounting the glass canopy • With the hood mounted on the top left side. Failure to the electrical diagram found inside the hood. • Close j-box cover and reapply screws. listed wire nut Metal electrical conduit • Run black (live), white (neutral), and green (earth) wires...
... Installing the hood Making the electrical connections Electrical Shock Hazard Warning: Turn off power at the service panel before wiring this unit. 120 VAC, 15 or 20 Amp circuit required. Knockout Junction box cover House wiring U.L. Mounting the glass canopy • With the hood mounted on the top left side. Failure to the electrical diagram found inside the hood. • Close j-box cover and reapply screws. listed wire nut Metal electrical conduit • Run black (live), white (neutral), and green (earth) wires...
Complete Owner's Guide (English)
Page 14
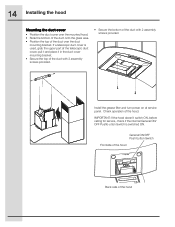
... the duct over the mounted hood. • Slide the bottom of the duct onto the glass area. • Position the top of the duct with 2 assembly screws provided. Install the grease filter and turn power on at service panel. Check operation of the hood General ON/OFF Push button Switch Frontside of the hood Back side of the hood. 14 Installing the hood Mounting the duct cover • Position the duct cover over the duct mounting bracket. If a telescopic duct cover is switched...
... the duct over the mounted hood. • Slide the bottom of the duct onto the glass area. • Position the top of the duct with 2 assembly screws provided. Install the grease filter and turn power on at service panel. Check operation of the hood General ON/OFF Push button Switch Frontside of the hood Back side of the hood. 14 Installing the hood Mounting the duct cover • Position the duct cover over the duct mounting bracket. If a telescopic duct cover is switched...
Complete Owner's Guide (English)
Page 17
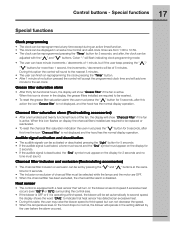
... the icon "Charcoal filter" is not displayed, and the hood has the normal display operation. When this state, the user may raise the blower speed to normal, the blower will show "Grease Filter" if the fan is active. Charcoal filter inclusion and exclusion (Recirculating accessories) • The charcoal filter inclusion or exclusion can not decrease the speed. • When the temperature level on the hood drops to third speed but if...
... the icon "Charcoal filter" is not displayed, and the hood has the normal display operation. When this state, the user may raise the blower speed to normal, the blower will show "Grease Filter" if the fan is active. Charcoal filter inclusion and exclusion (Recirculating accessories) • The charcoal filter inclusion or exclusion can not decrease the speed. • When the temperature level on the hood drops to third speed but if...

Complete Owner's Guide (English)
Page 19
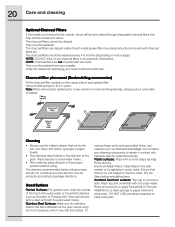
... of cleaning depends on the amount and type of the appliance. Allow the lights to cool before attempting to prevent power from the power supply before calling service. To avoid risk of stainless steel anodized aluminum and are long lasting. Filters The metal grease filters are inserted correctly before servicing. Replace Lights • Remove the inner lamp lens cover by inserting a small flat blade screwdriver into each filter dry...
... of cleaning depends on the amount and type of the appliance. Allow the lights to cool before attempting to prevent power from the power supply before calling service. To avoid risk of stainless steel anodized aluminum and are long lasting. Filters The metal grease filters are inserted correctly before servicing. Replace Lights • Remove the inner lamp lens cover by inserting a small flat blade screwdriver into each filter dry...
Complete Owner's Guide (English)
Page 20
The charcoal filters should be replaced every 4-6 months (depending on the upper side of each metal grease filter (mounting instructions included with charcoal filters kit). NOTE: Charcoal filters are clipped inside of each grease filter. Note: When removing for replacing for extended periods. Use clean, soft cloths, sponges or paper towels. • Rub stainless steel finishes in an automatic dishwasher. The charcoal filters cannot be ordered from your hood model and width size. To remove finger prints...
The charcoal filters should be replaced every 4-6 months (depending on the upper side of each metal grease filter (mounting instructions included with charcoal filters kit). NOTE: Charcoal filters are clipped inside of each grease filter. Note: When removing for replacing for extended periods. Use clean, soft cloths, sponges or paper towels. • Rub stainless steel finishes in an automatic dishwasher. The charcoal filters cannot be ordered from your hood model and width size. To remove finger prints...

Complete Owner's Guide (English)
Page 21
... local plumbing, electrical and/or gas codes. 3. IF YOU NEED SERVICE Keep your best interest to grounded power supply of sufficient voltage, replacement of blown fuses, repair of the U.S.A., Puerto Rico and Canada. The date on models with the product. 2. If service is performed, it was shipped from persons other rights that such servicers; This warranty only applies in the 50 states of loose connections or defects...
... local plumbing, electrical and/or gas codes. 3. IF YOU NEED SERVICE Keep your best interest to grounded power supply of sufficient voltage, replacement of blown fuses, repair of the U.S.A., Puerto Rico and Canada. The date on models with the product. 2. If service is performed, it was shipped from persons other rights that such servicers; This warranty only applies in the 50 states of loose connections or defects...
Wiring Diagram (All Languages)
Page 1
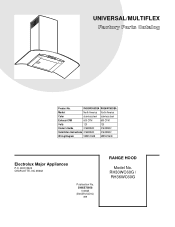
RH30WC60G / RH36WC60G UNIVERSAL/MULTIFLEX Product No. BOX 8020 CHARLOTTE, NC 28262 SE1Q5A.eps Publication No. 5995572608 10/08/25 (EN/SERVICE/KC) 099 RANGE HOOD Model No. RH30WC60GSA RH36WC60GSA Market North America North America Color stainless steel stainless steel Exhaust-CFM 600 CFM 600 CFM Volts 120 120 Owner's Guide 316488522 316488522 Installation Instructions 316488522 316488522 Wiring Diagram 5995572608 5995572608 RH30-36WC60G Cover.eps RH30-36WC60G-2 Parts.eps Electrolux Major Appliances P.O.
RH30WC60G / RH36WC60G UNIVERSAL/MULTIFLEX Product No. BOX 8020 CHARLOTTE, NC 28262 SE1Q5A.eps Publication No. 5995572608 10/08/25 (EN/SERVICE/KC) 099 RANGE HOOD Model No. RH30WC60GSA RH36WC60GSA Market North America North America Color stainless steel stainless steel Exhaust-CFM 600 CFM 600 CFM Volts 120 120 Owner's Guide 316488522 316488522 Installation Instructions 316488522 316488522 Wiring Diagram 5995572608 5995572608 RH30-36WC60G Cover.eps RH30-36WC60G-2 Parts.eps Electrolux Major Appliances P.O.
Wiring Diagram (All Languages)
Page 3
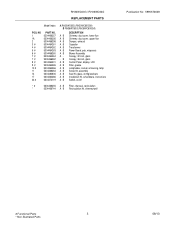
... (RH30WC60GSA) B RH36WC60G (RH36WC60GSA) DESCRIPTION A B Chimney, duct cover, lower flue A B Chimney, duct cover, upper flue A B Damper, exhaust A B Capacitor A B Transformer A B Power Board, pcb, w/spacers A B Blower Assembly A - B Canopy, 36 inch, glass A B Control Panel, display, LCD A B Filter, grease A B Lampholder, socket, w/housing, lamp A B Screw Kit, assembly A B Seal Kit, glass, w/mtg brackets A B Installation Kit, w/hardware, instructions A B Switch, on/off * # 5304466255 A B Filter, charcoal, recirculation * 5304466744 A B Recirculation Kit, chimney/wall Publication No...
... (RH30WC60GSA) B RH36WC60G (RH36WC60GSA) DESCRIPTION A B Chimney, duct cover, lower flue A B Chimney, duct cover, upper flue A B Damper, exhaust A B Capacitor A B Transformer A B Power Board, pcb, w/spacers A B Blower Assembly A - B Canopy, 36 inch, glass A B Control Panel, display, LCD A B Filter, grease A B Lampholder, socket, w/housing, lamp A B Screw Kit, assembly A B Seal Kit, glass, w/mtg brackets A B Installation Kit, w/hardware, instructions A B Switch, on/off * # 5304466255 A B Filter, charcoal, recirculation * 5304466744 A B Recirculation Kit, chimney/wall Publication No...
Product Specifications Sheet (English)
Page 1
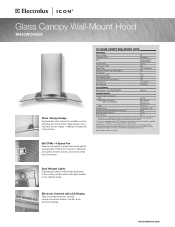
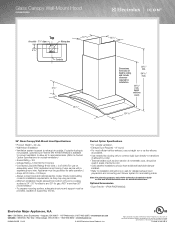
... (CFM) Blower Type Electronic Controls with LCD Display Fan Speeds Sound Level (dBA) Dual Halogen Lights Washable Stainless Steel Filters Exhaust Duct Duct Required 36" Wall Mount Stainless Steel / Glass Canopy Vertical 600 Dual Centrifugal Yes 4 73.8 Yes Yes Convertible* 8" Round ACCESSORIES Duct-Free Kit - NOTE: Always consult local and national electric codes. PN # RHDFW60GS Optional SPECIFICATIONS Overall Exterior Dimensions - Electronic Controls with lights located at www.electroluxicon.com. electroluxicon.com Appliance must be either ducted outside, or recirculated...
... (CFM) Blower Type Electronic Controls with LCD Display Fan Speeds Sound Level (dBA) Dual Halogen Lights Washable Stainless Steel Filters Exhaust Duct Duct Required 36" Wall Mount Stainless Steel / Glass Canopy Vertical 600 Dual Centrifugal Yes 4 73.8 Yes Yes Convertible* 8" Round ACCESSORIES Duct-Free Kit - NOTE: Always consult local and national electric codes. PN # RHDFW60GS Optional SPECIFICATIONS Overall Exterior Dimensions - Electronic Controls with lights located at www.electroluxicon.com. electroluxicon.com Appliance must be either ducted outside, or recirculated...
Product Specifications Sheet (English)
Page 2
... ceiling, and include clearance required for safe operation.) • Amps @ 120 Volts = 3.8 Amps • Always consult local and national electric codes. Check local building codes for installation requirements, as short section of nonmetallic duct, should be used in the U.S.A. Note: For planning purposes only. Wiring box 4 9/16" Controls 10 13/16" 2 9/16" 35 7/8" 13 3/16" Dimensions from bottom of supporting 100 lbs. Ducted Option Specifications • For outside . Refer to exhaust air outside ventilation. • Exhaust Duct Required - 8" round...
... ceiling, and include clearance required for safe operation.) • Amps @ 120 Volts = 3.8 Amps • Always consult local and national electric codes. Check local building codes for installation requirements, as short section of nonmetallic duct, should be used in the U.S.A. Note: For planning purposes only. Wiring box 4 9/16" Controls 10 13/16" 2 9/16" 35 7/8" 13 3/16" Dimensions from bottom of supporting 100 lbs. Ducted Option Specifications • For outside . Refer to exhaust air outside ventilation. • Exhaust Duct Required - 8" round...


