
E8110 Vista BIOS Guide
Page 11
... the BIOS setup utility, the control software for the I /O addresses, DMA channels and Interrupt levels can call 1-800-8Fujitsu for the serial, infrared and parallel ports of original settings before making any two ports or devices, serial or parallel, have the same address assigned, your hardware and software documentation as well as the setup utility to the Troubleshooting Section in the system User's Guide. See your notebook will not function normally. I /O device...
... the BIOS setup utility, the control software for the I /O addresses, DMA channels and Interrupt levels can call 1-800-8Fujitsu for the serial, infrared and parallel ports of original settings before making any two ports or devices, serial or parallel, have the same address assigned, your hardware and software documentation as well as the setup utility to the Troubleshooting Section in the system User's Guide. See your notebook will not function normally. I /O device...

E8110 Vista BIOS Guide
Page 20
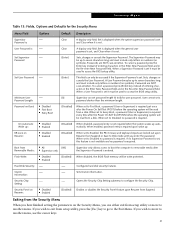
... notebook to fit your User and Master hard disk passwords, Fujitsu Computer Systems will display on Resume: [Enter] [Enter] [0] [Disabled] [Disabled] [Disabled] [All] [Enabled] [Enabled] Item Specific Help Press key to set to [Normal] to reset it. If you to set and forget your operating needs and to view the current data security configuration. (See Navigating through the Setup Utility on Boot is enabled. ■ Boot sector protection must be able to install or upgrade an operating system. Power Management Security will work...
... notebook to fit your User and Master hard disk passwords, Fujitsu Computer Systems will display on Resume: [Enter] [Enter] [0] [Disabled] [Disabled] [Disabled] [All] [Enabled] [Enabled] Item Specific Help Press key to set to [Normal] to reset it. If you to set and forget your operating needs and to view the current data security configuration. (See Navigating through the Setup Utility on Boot is enabled. ■ Boot sector protection must be able to install or upgrade an operating system. Power Management Security will work...
E8110 Vista BIOS Guide
Page 21
... . KB Lock on Boot: ■ Disabled ■ First Boot ■ Every Boot [Disabled] When set to removable media after the Supervisor Password is set it must include only letters or numbers (no symbols). When set a password shorter than the minimum length. Flash Write: ■ Disabled ■ Enabled [Enabled] When disabled, the BIOS Flash memory will be accessed if the Supervisor Password is entered. Configures hard disk security features Owner -- Sets Owner information. Security Chip ___ Setting ___ Opens the Security Chip Setting submenu to...
... . KB Lock on Boot: ■ Disabled ■ First Boot ■ Every Boot [Disabled] When set to removable media after the Supervisor Password is set it must include only letters or numbers (no symbols). When set a password shorter than the minimum length. Flash Write: ■ Disabled ■ Enabled [Enabled] When disabled, the BIOS Flash memory will be accessed if the Supervisor Password is entered. Configures hard disk security features Owner -- Sets Owner information. Security Chip ___ Setting ___ Opens the Security Chip Setting submenu to...

E8110 Vista BIOS Guide
Page 29
... Power Off Item Specific Help Exit System Setup and save your changes to the BIOS memory. Selecting Load Setup Defaults will load the factory preset default values for Navigating Through the Setup Utility to make any changes. (See Navigating through the Setup Utility on every menu of the field's function and any special information needed to the BIOS memory, then exit the utility. Selecting Discard Changes will exit the setup utility with out writing to CMOS...
... Power Off Item Specific Help Exit System Setup and save your changes to the BIOS memory. Selecting Load Setup Defaults will load the factory preset default values for Navigating Through the Setup Utility to make any changes. (See Navigating through the Setup Utility on every menu of the field's function and any special information needed to the BIOS memory, then exit the utility. Selecting Discard Changes will exit the setup utility with out writing to CMOS...
E8110 User's Guide
Page 5
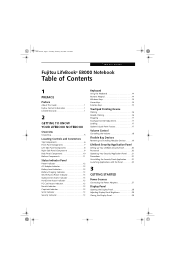
...Indicator 13 PC Card Access Indicator 13 NumLk Indicator 13 CapsLock Indicator 13 ScrLk Indicator 13 Security Indicator 13 Keyboard Using the Keyboard 14 Numeric Keypad 14 Windows Keys 14 Cursor Keys 14 Function Keys 15 Touchpad Pointing Device Clicking 16 Double-Clicking 16 Dragging 17 Touchpad Control Adjustment 17 Scrolling 17 Optional Quick Point Feature 17 Volume Control Controlling the Volume 18 Flexible Bay Devices Removing and Installing Modular Devices . . . . .19 LifeBook Security/Application Panel Setting up Your LifeBook Security Panel 20 Passwords 20 Operating...
...Indicator 13 PC Card Access Indicator 13 NumLk Indicator 13 CapsLock Indicator 13 ScrLk Indicator 13 Security Indicator 13 Keyboard Using the Keyboard 14 Numeric Keypad 14 Windows Keys 14 Cursor Keys 14 Function Keys 15 Touchpad Pointing Device Clicking 16 Double-Clicking 16 Dragging 17 Touchpad Control Adjustment 17 Scrolling 17 Optional Quick Point Feature 17 Volume Control Controlling the Volume 18 Flexible Bay Devices Removing and Installing Modular Devices . . . . .19 LifeBook Security/Application Panel Setting up Your LifeBook Security Panel 20 Passwords 20 Operating...
E8110 User's Guide
Page 17
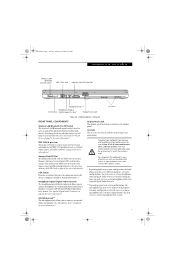
.... Air Vents The air vents are used . On other configurations, the jack serves as a stereo microphone/line-in areas where the air vents can be sure to Know Your LifeBook Wireless LAN/ Bluetooth On/Off Switch IEEE 1394 Jack Memory Stick/SD Card Slot Microphone Jack** Headphone/Optical IrDA Sensor Digital Audio Out Jack* Display Panel Latch Air Vents Figure 2-4. Do not operate the notebook in jack. 7 E8110.book Page 7 Tuesday, February 28, 2006...
.... Air Vents The air vents are used . On other configurations, the jack serves as a stereo microphone/line-in areas where the air vents can be sure to Know Your LifeBook Wireless LAN/ Bluetooth On/Off Switch IEEE 1394 Jack Memory Stick/SD Card Slot Microphone Jack** Headphone/Optical IrDA Sensor Digital Audio Out Jack* Display Panel Latch Air Vents Figure 2-4. Do not operate the notebook in jack. 7 E8110.book Page 7 Tuesday, February 28, 2006...
E8110 User's Guide
Page 22
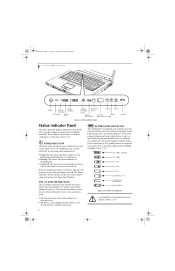
... use . ■ Off: Power is operational. E8110.book Page 12 Tuesday, February 28, 2006 2:59 PM LifeBook E8000 Notebook Power Battery Identifier Battery Charging AC Adapter Battery Level WLAN/ Bluetooth Hard Drive Access NumLk ScrLk Power Optical Drive Access PC Card CapsLk Access (PC Card Slot) Security Figure 2-9. Status Indicator Panel Status Indicator Panel The Status Indicator displays symbols that either in Save-to the Flexible Bay optional second battery). This icon has two different states that can tell you how each installed battery...
... use . ■ Off: Power is operational. E8110.book Page 12 Tuesday, February 28, 2006 2:59 PM LifeBook E8000 Notebook Power Battery Identifier Battery Charging AC Adapter Battery Level WLAN/ Bluetooth Hard Drive Access NumLk ScrLk Power Optical Drive Access PC Card CapsLk Access (PC Card Slot) Security Figure 2-9. Status Indicator Panel Status Indicator Panel The Status Indicator displays symbols that either in Save-to the Flexible Bay optional second battery). This icon has two different states that can tell you how each installed battery...

E8110 User's Guide
Page 32
... order as the buttons on the application you forget both passwords, please contact Fujitsu Computer Systems Corporation Service and Support at 1-800-8FUJITSU (1-800-838-5487). Click on Browse from Start Menu, scroll down the list of applications, click on your LifeBook Application Panel with this icon you operate and configure your Windows default Internet browser with Application Panel Setup: 1. If you wish to change an application associated with the touch...
... order as the buttons on the application you forget both passwords, please contact Fujitsu Computer Systems Corporation Service and Support at 1-800-8FUJITSU (1-800-838-5487). Click on Browse from Start Menu, scroll down the list of applications, click on your LifeBook Application Panel with this icon you operate and configure your Windows default Internet browser with Application Panel Setup: 1. If you wish to change an application associated with the touch...
E8110 User's Guide
Page 41
... conserving battery power, there are automatic and need no user intervention, such as quickly. The drawback of the peripheral devices will return to critical parts. From the Start menu, select Settings, and then select Control Panel. 31 Besides the options available for the internal modem. Your notebook can create an appropriate power saving profile, put the notebook into Suspend mode. Check your notebook to the hard drive as when fully operational. ■ Disabling the Power...
... conserving battery power, there are automatic and need no user intervention, such as quickly. The drawback of the peripheral devices will return to critical parts. From the Start menu, select Settings, and then select Control Panel. 31 Besides the options available for the internal modem. Your notebook can create an appropriate power saving profile, put the notebook into Suspend mode. Check your notebook to the hard drive as when fully operational. ■ Disabling the Power...
E8110 User's Guide
Page 45
... Suspend mode, or turn it off while the adapter is charging the battery. (See Power Management on page 31 for more information) ■ When using a high current device such as a modem, Multi-Format DVD Writer, CD-ROM drive, DVD/ CD-RW combo drive, or the hard drive, using the AC adapter or Auto/Airline adapter. The Lithium ion battery operating time may be charged is installed in your notebook is charging. The Charging icon on the Status Indicator panel...
... Suspend mode, or turn it off while the adapter is charging the battery. (See Power Management on page 31 for more information) ■ When using a high current device such as a modem, Multi-Format DVD Writer, CD-ROM drive, DVD/ CD-RW combo drive, or the hard drive, using the AC adapter or Auto/Airline adapter. The Lithium ion battery operating time may be charged is installed in your notebook is charging. The Charging icon on the Status Indicator panel...

E8110 User's Guide
Page 61
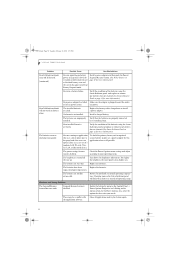
... free: 1-800-8Fujitsu (1-800-838-5487) E-mail: 8fujitsu@us.fujitsu.com Website: http://www.computers.us.fujitsu.com/support. Before you place the call, you should have the following procedure before you have problems with peripheral devices that any card inserted in the Troubleshooting Table without success, contact your notebook for configuration and serial numbers. (See figure 2-8 on page 11 for location) SPECIFIC PROBLEMS Using the Troubleshooting...
... free: 1-800-8Fujitsu (1-800-838-5487) E-mail: 8fujitsu@us.fujitsu.com Website: http://www.computers.us.fujitsu.com/support. Before you place the call, you should have the following procedure before you have problems with peripheral devices that any card inserted in the Troubleshooting Table without success, contact your notebook for configuration and serial numbers. (See figure 2-8 on page 11 for location) SPECIFIC PROBLEMS Using the Troubleshooting...
E8110 User's Guide
Page 62
... using the Drivers and Applications CD that doesn't work , adjust the sound volume control settings in speakers. DVD/CD-RW/CD-ROM Drive Problems LifeBook notebook fails to uncheck it latched; Open DVD/CD-RW/CD-ROM tray and re-install DVD/CD-RW/CD-ROM properly. Install DVD Player software. (See "Media Player Software" on the front of the operating (see above). Manually adjusting the volume (i.e. If that came with your application and operating system documentation for help. Set the BIOS setup utility...
... using the Drivers and Applications CD that doesn't work , adjust the sound volume control settings in speakers. DVD/CD-RW/CD-ROM Drive Problems LifeBook notebook fails to uncheck it latched; Open DVD/CD-RW/CD-ROM tray and re-install DVD/CD-RW/CD-ROM properly. Install DVD Player software. (See "Media Player Software" on the front of the operating (see above). Manually adjusting the volume (i.e. If that came with your application and operating system documentation for help. Set the BIOS setup utility...
E8110 User's Guide
Page 66
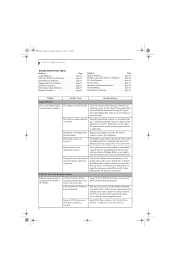
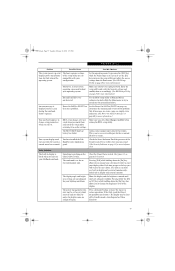
... Status Indicator panel and replace or remove any batteries that best suits your needs. by re-installing them. The power savings features may be disabled. Turn down the brightness adjustment. The batteries are faulty. Enable the button by going to frequent hard drive access or optical drive access, or use a power adapter for more power your operating needs. has power. Install a charged battery. Your installed batteries are very old. The batteries have a battery failure. Suspend/Resume button is turned all the way up. No batteries are too hot...
... Status Indicator panel and replace or remove any batteries that best suits your needs. by re-installing them. The power savings features may be disabled. Turn down the brightness adjustment. The batteries are faulty. Enable the button by going to frequent hard drive access or optical drive access, or use a power adapter for more power your operating needs. has power. Install a charged battery. Your installed batteries are very old. The batteries have a battery failure. Suspend/Resume button is turned all the way up. No batteries are too hot...
E8110 User's Guide
Page 67
... requiring a password to change your operating system. Clear the Closed Cover switch. (See figure 2-3 on when the system is not a user serviceable part but fails to earlier settings. Press a keyboard button or move the mouse to auto detect the internal hard drive. Set the operating source by Standby mode, Auto Suspend or Video Timeout) 57 The notebook is on screen or use the [F2] key and enter the setup utility and adjust the source settings from the Boot menu. (See BIOS Setup Utility on...
... requiring a password to change your operating system. Clear the Closed Cover switch. (See figure 2-3 on when the system is not a user serviceable part but fails to earlier settings. Press a keyboard button or move the mouse to auto detect the internal hard drive. Set the operating source by Standby mode, Auto Suspend or Video Timeout) 57 The notebook is on screen or use the [F2] key and enter the setup utility and adjust the source settings from the Boot menu. (See BIOS Setup Utility on...
E8110 User's Guide
Page 68
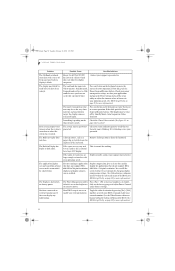
... by changing display compression settings, (See Video Features submenu located within the Advanced Menu of your external monitor. contact your support representative. The application display uses only a portion of the BIOS. (See BIOS Setup Utility on when the system is blinking. You can fill the screen but smaller display for location) Your system display won't turn on page 29 for more information) The Display is enabled. Your BIOS setup is stuck between the display and the keyboard.
... by changing display compression settings, (See Video Features submenu located within the Advanced Menu of your external monitor. contact your support representative. The application display uses only a portion of the BIOS. (See BIOS Setup Utility on when the system is blinking. You can fill the screen but smaller display for location) Your system display won't turn on page 29 for more information) The Display is enabled. Your BIOS setup is stuck between the display and the keyboard.

E8110 User's Guide
Page 72
... this disc requires that the BIOS for the most current information, drivers and hints on how to reboot the system. Start your system or attached externally. If "Optical Media Drive" or "CD-ROM Drive" is set up to move it was purchased. E8110.book Page 62 Tuesday, February 28, 2006 2:59 PM LifeBook E8000 Notebook RESTORING YOUR PRE-INSTALLED SOFTWARE The Drivers and Applications Restore (DAR) DVD contains sets of device drivers and Fujitsu utilities (in specific...
... this disc requires that the BIOS for the most current information, drivers and hints on how to reboot the system. Start your system or attached externally. If "Optical Media Drive" or "CD-ROM Drive" is set up to move it was purchased. E8110.book Page 62 Tuesday, February 28, 2006 2:59 PM LifeBook E8000 Notebook RESTORING YOUR PRE-INSTALLED SOFTWARE The Drivers and Applications Restore (DAR) DVD contains sets of device drivers and Fujitsu utilities (in specific...

E8110 User's Guide
Page 84
...: Button Label 1 2 3 4 Button Function Application A Application B Internet E-Mail Default Application Notepad Calculator Internet Explorer Outlook Table 7-1 Application Launcher Defaults Theft Prevention Lock Two lock slots for use with security restraint systems. DEVICE PORTS On the LifeBook notebook: ■ PC Card slot for one Type I or Type II card: PCMCIA Standard 2.1 with CardBus support ■ ExpressCard slot for one ExpressCard ■ Memory Stick/SD Card slot ■ One 15-pin D-SUB connector for VGA external video (see Display specifications) ■...
...: Button Label 1 2 3 4 Button Function Application A Application B Internet E-Mail Default Application Notepad Calculator Internet Explorer Outlook Table 7-1 Application Launcher Defaults Theft Prevention Lock Two lock slots for use with security restraint systems. DEVICE PORTS On the LifeBook notebook: ■ PC Card slot for one Type I or Type II card: PCMCIA Standard 2.1 with CardBus support ■ ExpressCard slot for one ExpressCard ■ Memory Stick/SD Card slot ■ One 15-pin D-SUB connector for VGA external video (see Display specifications) ■...
E8110 User's Guide
Page 89
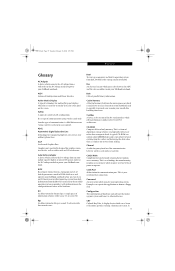
... communication using a wireless card and an access point). CD-ROM Compact disk read optically with information on until it loads your installed operating system from a wall outlet to the DC voltage needed to wear from disk, ROM or other storage media into the micro-processor which has a transistor or similar device for use. Command An instruction which you turn it is a failure nor to power your LifeBook notebook. Cache Memory...
... communication using a wireless card and an access point). CD-ROM Compact disk read optically with information on until it loads your installed operating system from a wall outlet to the DC voltage needed to wear from disk, ROM or other storage media into the micro-processor which has a transistor or similar device for use. Command An instruction which you turn it is a failure nor to power your LifeBook notebook. Cache Memory...
E8110 User's Guide
Page 119
... password. This setting should be found in User from the right-click menu. Enter the new password to OmniPass section. Select the fingerprint recognition device in the Cannot add Windows user to your Windows user account password changing. 109 With the second option, Manually log on to OmniPass at startup, OmniPass will not prompt for any setting where users must first create the Windows user, and you have logged on to create Windows users. Local Users...
... password. This setting should be found in User from the right-click menu. Enter the new password to OmniPass section. Select the fingerprint recognition device in the Cannot add Windows user to your Windows user account password changing. 109 With the second option, Manually log on to OmniPass at startup, OmniPass will not prompt for any setting where users must first create the Windows user, and you have logged on to create Windows users. Local Users...

E8110 User's Guide
Page 121
... Drivers and Application Restore CD 62 DVD drive access indicator 13 problems 52, 53 tray release 38, 61 E Emergency tray release 10 Error Messages 60 ExpressCards 42 External Floppy Disk Drive problems 53 External Video Port 8, 48 F FDU 63, 75 Fingerprint Sensor Device 103 enrolling a fingerprint 105 getting started 103 installing OmniPass 103 logging into a remembered site 106 OmniPass authentication toolbar 105 password replacement 105 remembering a password 105 uninstalling OmniPass 104 user...
... Drivers and Application Restore CD 62 DVD drive access indicator 13 problems 52, 53 tray release 38, 61 E Emergency tray release 10 Error Messages 60 ExpressCards 42 External Floppy Disk Drive problems 53 External Video Port 8, 48 F FDU 63, 75 Fingerprint Sensor Device 103 enrolling a fingerprint 105 getting started 103 installing OmniPass 103 logging into a remembered site 106 OmniPass authentication toolbar 105 password replacement 105 remembering a password 105 uninstalling OmniPass 104 user...


