Operator Manual
Page 26
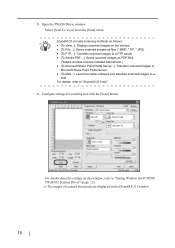
...details about the settings on the [ScandAll 21] window. 10 For details, refer to e- Select [Scan To View] from the [Scan] menu. ScandAll 21 provide scanning methods as follows: HINT • [To View...]: Displays scanned images on the window. • [To File...:]: Saves scanned images ... Mail...]: Launches mailer software and attaches scanned images to "ScandAll 21 Help". 6) Configure settings for FUJITSU TWAIN32 Scanner Driver" (page. 12). ⇒ The images of scanned documents are displayed on this window, refer to "Setting Window for scanning and click the [Scan] button.
...details about the settings on the [ScandAll 21] window. 10 For details, refer to e- Select [Scan To View] from the [Scan] menu. ScandAll 21 provide scanning methods as follows: HINT • [To View...]: Displays scanned images on the window. • [To File...:]: Saves scanned images ... Mail...]: Launches mailer software and attaches scanned images to "ScandAll 21 Help". 6) Configure settings for FUJITSU TWAIN32 Scanner Driver" (page. 12). ⇒ The images of scanned documents are displayed on this window, refer to "Setting Window for scanning and click the [Scan] button.

Operator Manual
Page 33
After the installation of FUJITSU ISIS Scanner Driver" (page. 18). 8) The [Profile Editor] window appears. fi-4120C2 Image Scanner Operator's Guide 17 Click the [OK] button to return to [New batch] dialog. 9) Load the documents on the scanner. 10) Click the [Scan] button. ⇒ Scanned images are displayed on functions and operations of QuickScan. Refer to "Configuration Window of QuickScan, it...
After the installation of FUJITSU ISIS Scanner Driver" (page. 18). 8) The [Profile Editor] window appears. fi-4120C2 Image Scanner Operator's Guide 17 Click the [OK] button to return to [New batch] dialog. 9) Load the documents on the scanner. 10) Click the [Scan] button. ⇒ Scanned images are displayed on functions and operations of QuickScan. Refer to "Configuration Window of QuickScan, it...

Operator Manual
Page 79
4.3 Replacing the Pick Roller 10. Click the [OK] button. Reset the pick counter. • For Windows 98 / Windows Me / Windows 2000 / Windows XP 1) When turning on the power, check that the scanner is displayed. 5) Click the "Device Set" tab. ⇒ The following panel appears. 4 REPLACING ... returns the pick counter to your PC. 2) Open the [Scanners and Cameras] from the control panel of your PC. 3) Open the [Properties] of [fi-4120C2dj] from the [Scanners and Cameras]. 4) The [Properties of fi-4120C2dj] dialogbox is connected to "0". fi-4120C2 Image Scanner Operator's Guide 63
4.3 Replacing the Pick Roller 10. Click the [OK] button. Reset the pick counter. • For Windows 98 / Windows Me / Windows 2000 / Windows XP 1) When turning on the power, check that the scanner is displayed. 5) Click the "Device Set" tab. ⇒ The following panel appears. 4 REPLACING ... returns the pick counter to your PC. 2) Open the [Scanners and Cameras] from the control panel of your PC. 3) Open the [Properties] of [fi-4120C2dj] from the [Scanners and Cameras]. 4) The [Properties of fi-4120C2dj] dialogbox is connected to "0". fi-4120C2 Image Scanner Operator's Guide 63


