

User Manual
Page 8
... Manual removal (emergency removal 60 Removing and replacing the casing cover (ventilation slot cover) to get rid of dust 61 Using the power-management features 62 Memory cards 63 Supported formats 63 Inserting the memory card 63 Removing the memory card 64 ExpressCards 65 Inserting the card 65 Removing the card 66 Loudspeakers and microphones 66 SIM card 67 Inserting the SIM card 67 Removing a SIM card 68 Optional wireless components Wireless LAN / BlueTooth / UMTS 69 Switching the wireless components on and off 69 Setting...
... Manual removal (emergency removal 60 Removing and replacing the casing cover (ventilation slot cover) to get rid of dust 61 Using the power-management features 62 Memory cards 63 Supported formats 63 Inserting the memory card 63 Removing the memory card 64 ExpressCards 65 Inserting the card 65 Removing the card 66 Loudspeakers and microphones 66 SIM card 67 Inserting the SIM card 67 Removing a SIM card 68 Optional wireless components Wireless LAN / BlueTooth / UMTS 69 Switching the wireless components on and off 69 Setting...
User Manual
Page 9
...Changes - save changes and exit BIOS Setup Utility 110 Exit Discarding Changes - F4 93 Switch on the device using SystemLock 94 Start BIOS Setup F2 94 Changing PIN 94 Uninstall SystemLock 94 Error messages 95 Using the security function of the tablet keys 95 Setting the Supervisor password 95 Setting the User password 95 Entering passwords using the tablet buttons 96 Trusted Platform Module (TPM) (device-dependent 96 Enabling TPM 97 Disabling TPM 97 Connecting external devices 98 Connecting an external monitor 99 HDMI port 100 Connecting USB devices 101 How to remove USB...
...Changes - save changes and exit BIOS Setup Utility 110 Exit Discarding Changes - F4 93 Switch on the device using SystemLock 94 Start BIOS Setup F2 94 Changing PIN 94 Uninstall SystemLock 94 Error messages 95 Using the security function of the tablet keys 95 Setting the Supervisor password 95 Setting the User password 95 Entering passwords using the tablet buttons 96 Trusted Platform Module (TPM) (device-dependent 96 Enabling TPM 97 Disabling TPM 97 Connecting external devices 98 Connecting an external monitor 99 HDMI port 100 Connecting USB devices 101 How to remove USB...
User Manual
Page 22
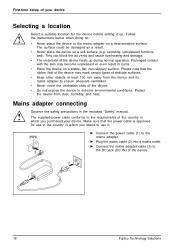
... note that the power cable is approved for the device before setting it . ► Connect the power cable (1) to the mains adapter. ► Plug the mains cable (2) into a mains outlet. ► Connect the mains adapter cable (3) to use it up during normal operation. Make sure that the rubber feet of the device may become unpleasant or even result in the enclosed "Safety" manual. Follow the instructions below when...
... note that the power cable is approved for the device before setting it . ► Connect the power cable (1) to the mains adapter. ► Plug the mains cable (2) into a mains outlet. ► Connect the mains adapter cable (3) to use it up during normal operation. Make sure that the rubber feet of the device may become unpleasant or even result in the enclosed "Safety" manual. Follow the instructions below when...
User Manual
Page 23
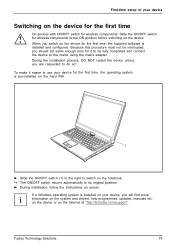
... using the mains adapter. on the device or on the device. First-time setup of your device for the first time, the operating system is pre-installed on the hard disk. 1 ► Slide the ON/OFF switch (1) to the right to switch on the notebook. The ON/OFF switch returns automatically to its original position. ► During installation, follow the instructions on screen. When you should set aside enough time...
... using the mains adapter. on the device or on the device. First-time setup of your device for the first time, the operating system is pre-installed on the hard disk. 1 ► Slide the ON/OFF switch (1) to the right to switch on the notebook. The ON/OFF switch returns automatically to its original position. ► During installation, follow the instructions on screen. When you should set aside enough time...
User Manual
Page 42
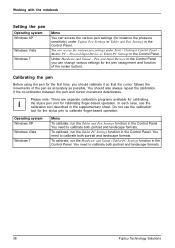
... button). Calibrating the pen Before using the pen for the first time, you can change various settings for the pen (assignment and function of the pen as accurately as possible. You need to calibrate both portrait and landscape formats. 38 Fujitsu Technology Solutions Working with the notebook Setting the pen Operating system Windows XP Windows Vista Windows 7 Menu You can access the various pen settings (for instance the pressure sensitivity) under Start - (Settings) Control Panel - Pen and Input Devices in the Control Panel...
... button). Calibrating the pen Before using the pen for the first time, you can change various settings for the pen (assignment and function of the pen as accurately as possible. You need to calibrate both portrait and landscape formats. 38 Fujitsu Technology Solutions Working with the notebook Setting the pen Operating system Windows XP Windows Vista Windows 7 Menu You can access the various pen settings (for instance the pressure sensitivity) under Start - (Settings) Control Panel - Pen and Input Devices in the Control Panel...
User Manual
Page 52
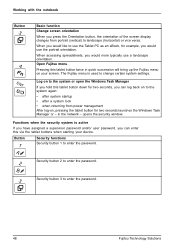
... can log back on your device. When accessing spreadsheets, you press the Orientation button, the orientation of the screen display changes from power management After log-on, pressing the tablet button for two seconds launches the Windows Task Manager or - The Fujitsu menu is active If you have assigned a supervisor password and/or user password, you would like to change certain system settings. A 2 Security button 2 to the system again: •...
... can log back on your device. When accessing spreadsheets, you press the Orientation button, the orientation of the screen display changes from power management After log-on, pressing the tablet button for two seconds launches the Windows Task Manager or - The Fujitsu menu is active If you have assigned a supervisor password and/or user password, you would like to change certain system settings. A 2 Security button 2 to the system again: •...
User Manual
Page 75
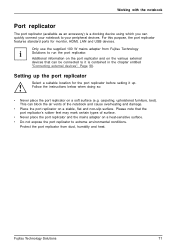
... location for monitor, HDMI, LAN and USB devices. Protect the port replicator from Fujitsu Technology Solutions to your notebook to run the port replicator. Only use the supplied 100 W mains adapter from dust, humidity and heat. carpeting, upholstered furniture, bed). Setting up . Fujitsu Technology Solutions 71 This can quickly connect your peripheral devices. Additional information on the port replicator and on the various external devices that the port...
... location for monitor, HDMI, LAN and USB devices. Protect the port replicator from Fujitsu Technology Solutions to your notebook to run the port replicator. Only use the supplied 100 W mains adapter from dust, humidity and heat. carpeting, upholstered furniture, bed). Setting up . Fujitsu Technology Solutions 71 This can quickly connect your peripheral devices. Additional information on the port replicator and on the various external devices that the port...
User Manual
Page 80
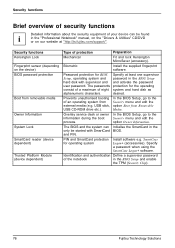
... the "Professional Notebook" manual, on the "Drivers & Utilities" CD/DVD or on the device) BIOS password protection Boot from external media (e.g. In the BIOS Setup, go to the Security menu and edit the option Boot from Removable Media. Security functions Kensington Lock Fingerprint sensor (depending on our website at least one supervisor password in the only be found in the BIOS Setup and enable the TPM (Security Chip). 76 Fujitsu Technology Solutions Password protection for operating system Install software e.g. The BIOS and the...
... the "Professional Notebook" manual, on the "Drivers & Utilities" CD/DVD or on the device) BIOS password protection Boot from external media (e.g. In the BIOS Setup, go to the Security menu and edit the option Boot from Removable Media. Security functions Kensington Lock Fingerprint sensor (depending on our website at least one supervisor password in the only be found in the BIOS Setup and enable the TPM (Security Chip). 76 Fujitsu Technology Solutions Password protection for operating system Install software e.g. The BIOS and the...
User Manual
Page 82
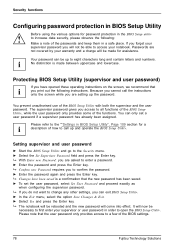
... letters and numbers. Please note that the new password has been saved. ► To set a user password if a supervisor password has already been assigned. Security functions Configuring password protection in BIOS Setup Utility Before using the various options for password protection in the BIOS Setup utility to increase data security, please observe the following instructions. If you forget your warranty and a charge will be rebooted and the new password will be...
... letters and numbers. Please note that the new password has been saved. ► To set a user password if a supervisor password has already been assigned. Security functions Configuring password protection in BIOS Setup Utility Before using the various options for password protection in the BIOS Setup utility to increase data security, please observe the following instructions. If you forget your warranty and a charge will be rebooted and the new password will be...

User Manual
Page 99
... of incorrect PIN entries. Setting the Supervisor password ► Select Start - All Programs. ► Select Security Panel Application - An error has occurred on the screen. Do not switch off the device, insert the "BIOS Flash diskette" instead. Fujitsu Technology Solutions 95 The SmartCard is not a suitable SystemLock SmartCard. Setting the User password ► Select Start - Using the security function of the tablet keys If you have exceeded the maximum allowed number of tablet button presses...
... of incorrect PIN entries. Setting the Supervisor password ► Select Start - All Programs. ► Select Security Panel Application - An error has occurred on the screen. Do not switch off the device, insert the "BIOS Flash diskette" instead. Fujitsu Technology Solutions 95 The SmartCard is not a suitable SystemLock SmartCard. Setting the User password ► Select Start - Using the security function of the tablet keys If you have exceeded the maximum allowed number of tablet button presses...

User Manual
Page 100
... contains the operating system as well as the user data. The condition for identification purposes. BitLocker Drive Encryption (BDE) is that you must activate the TPM in the BIOS Setup before Version 1.2) is installed. 96 Fujitsu Technology Solutions button 2 + button 3 followed by everyone who uses a PKI Smart Security environment for this is a feature of the partition. Options for the storage of the recovery data which...
... contains the operating system as well as the user data. The condition for identification purposes. BitLocker Drive Encryption (BDE) is that you must activate the TPM in the BIOS Setup before Version 1.2) is installed. 96 Fujitsu Technology Solutions button 2 + button 3 followed by everyone who uses a PKI Smart Security environment for this is a feature of the partition. Options for the storage of the recovery data which...
User Manual
Page 108
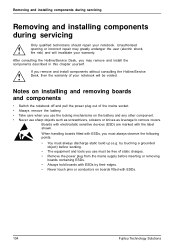
.... • Never touch pins or conductors on the battery and any other component. • Never use must always discharge static build up (e.g. Unauthorised opening or incorrect repair may remove and install the components described in this chapter yourself. Notes on installing and removing boards and components • Switch the notebook off and pull the power plug out of static charges. • Remove the power plug from...
.... • Never touch pins or conductors on the battery and any other component. • Never use must always discharge static build up (e.g. Unauthorised opening or incorrect repair may remove and install the components described in this chapter yourself. Notes on installing and removing boards and components • Switch the notebook off and pull the power plug out of static charges. • Remove the power plug from...
User Manual
Page 113
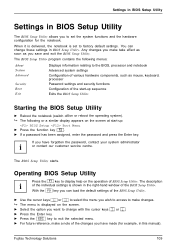
...-hand window of BIOS Setup Utility. The BIOS Setup Utility starts. Fujitsu Technology Solutions 109 The description of the individual settings is displayed on the screen. ► Select the option you save and exit the BIOS Setup Utility. You can load the default settings of the BIOS Setup Utility. ► Use the cursor keys ← or → to select the menu you wish to access to make take effect as soon as mouse, keyboard, processor Password settings and security functions...
...-hand window of BIOS Setup Utility. The BIOS Setup Utility starts. Fujitsu Technology Solutions 109 The description of the individual settings is displayed on the screen. ► Select the option you save and exit the BIOS Setup Utility. You can load the default settings of the BIOS Setup Utility. ► Use the cursor keys ← or → to select the menu you wish to access to make take effect as soon as mouse, keyboard, processor Password settings and security functions...

User Manual
Page 115
... BIOS Setup settings since receiving the notebook. • Your system configuration and all peripheral devices connected to the hardware or software since receiving the notebook. • Any changes you call: • The model name and serial number of any error messages displayed. ► Switch the notebook off. ► Please contact the Hotline/Service Desk. The serial number is possible that considerable effort has been made to your hardware with drivers...
... BIOS Setup settings since receiving the notebook. • Your system configuration and all peripheral devices connected to the hardware or software since receiving the notebook. • Any changes you call: • The model name and serial number of any error messages displayed. ► Switch the notebook off. ► Please contact the Hotline/Service Desk. The serial number is possible that considerable effort has been made to your hardware with drivers...

User Manual
Page 116
... compartment. ► Switch the notebook on your system and the DIFS code. Troubleshooting and tips Help if problems occur Should you at "http://ts.fujitsu.com/support/servicedesk.html"). Battery indicator does not illuminate Cause The battery is fully discharged. Program - Fujitsu - DIFS-Code YXXX123456789123). ► Make a note of the output DIFS code and the identity number of your computer. The notebook's date or time is installed correctly in...
... compartment. ► Switch the notebook on your system and the DIFS code. Troubleshooting and tips Help if problems occur Should you at "http://ts.fujitsu.com/support/servicedesk.html"). Battery indicator does not illuminate Cause The battery is fully discharged. Program - Fujitsu - DIFS-Code YXXX123456789123). ► Make a note of the output DIFS code and the identity number of your computer. The notebook's date or time is installed correctly in...
User Manual
Page 119
... model. Fujitsu Technology Solutions 115 The power adapter is not installed correctly. The battery is dead. Troubleshooting ► If your device is connected correctly to the notebook. ► Switch the notebook on. or ► Insert a charged battery. The battery is dead. or ► If your device is in its compartment. ► Switch the notebook on. ► Charge the battery. Troubleshooting and tips Pen input not working NEnoetergbyosoakving mode Cause Notebook is one which can be operated using the pen, install...
... model. Fujitsu Technology Solutions 115 The power adapter is not installed correctly. The battery is dead. Troubleshooting ► If your device is connected correctly to the notebook. ► Switch the notebook on. or ► Insert a charged battery. The battery is dead. or ► If your device is in its compartment. ► Switch the notebook on. ► Charge the battery. Troubleshooting and tips Pen input not working NEnoetergbyosoakving mode Cause Notebook is one which can be operated using the pen, install...
User Manual
Page 122
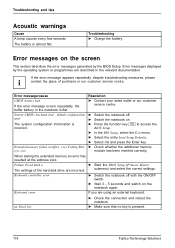
... correct settings. Keyboard error If you are using an external keyboard: nn Stuck key ► Check the connection and reboot the notebook. ► Make sure that no key is flat . Error messages displayed by the BIOS Setup. System CMOS checksum bad - Error messages on the notebook again. Troubleshooting ► Charge the battery. Error message/cause CMOS battery bad If the error message occurs repeatedly, the buffer battery in the relevant documentation. Keyboard controller error ► Switch the notebook off . ► Switch the notebook...
... correct settings. Keyboard error If you are using an external keyboard: nn Stuck key ► Check the connection and reboot the notebook. ► Make sure that no key is flat . Error messages displayed by the BIOS Setup. System CMOS checksum bad - Error messages on the notebook again. Troubleshooting ► Charge the battery. Error message/cause CMOS battery bad If the error message occurs repeatedly, the buffer battery in the relevant documentation. Keyboard controller error ► Switch the notebook off . ► Switch the notebook...
User Manual
Page 134
... password 72 settings 103 Bluetooth Switching off module 63 Switching on module 63 Bluetooth, safety notes 8 Board 98 Buffer battery, load 106 Buttons 36 C Caps Lock 37 CD/DVD indicator 53 CD/DVD: manual emergency removal 54 CE marking 118 Charging capacity, battery 48 Cleaning 10 Components installing / removing 98 Configuration, BIOS Setup Utility 103 Connecting audio devices 96-97 Connecting headphones 97 Crystal View display cleaning 10 130 Cursor control keys 37 Cursor keys 37 D Date...
... password 72 settings 103 Bluetooth Switching off module 63 Switching on module 63 Bluetooth, safety notes 8 Board 98 Buffer battery, load 106 Buttons 36 C Caps Lock 37 CD/DVD indicator 53 CD/DVD: manual emergency removal 54 CE marking 118 Charging capacity, battery 48 Cleaning 10 Components installing / removing 98 Configuration, BIOS Setup Utility 103 Connecting audio devices 96-97 Connecting headphones 97 Crystal View display cleaning 10 130 Cursor control keys 37 Cursor keys 37 D Date...
User Manual
Page 136
... Security functions, SmartCard 75 Select the language: for handwriting recognition and keyboard 26 Select the language: for menu texts 25 Selecting a location 12 Self-discharge, battery 48 Servicing 98 Setup see BIOS Setup Utility 103 Shift 37 Shift key 37 Slot ExpressCard 59 Memory cards 57 SmartCard 77 access rights 78 PIN 78 PUK 78 user groups 79 Start key 37 Status indicators 14 Summer time 106 Supervisor password changing 73 entering 72 removing 73 Suspend/Resume button...
... Security functions, SmartCard 75 Select the language: for handwriting recognition and keyboard 26 Select the language: for menu texts 25 Selecting a location 12 Self-discharge, battery 48 Servicing 98 Setup see BIOS Setup Utility 103 Shift 37 Shift key 37 Slot ExpressCard 59 Memory cards 57 SmartCard 77 access rights 78 PIN 78 PUK 78 user groups 79 Start key 37 Status indicators 14 Summer time 106 Supervisor password changing 73 entering 72 removing 73 Suspend/Resume button...

Brochure
Page 3
... 1 Internal microphones 2 Docking connector for Port Replicator 1 Kensington Lock support 2 Wired communication Modem type LAN Optional: 56 K V.92 modem MDC1.5 Built-in 10/100/1000 MBit/s Intel® 82577 LM Keyboard and pointing devices Spill-resistant keyboard Number of keyboard keys: 85, Keyboard pitch: 19 mm, Keyboard stroke: 2.7 mm Fingerprint sensor Launch keys Status LED Application buttons Tablet Pen Touch-screen Touchpad with two mouse buttons and ergonomic ScrollWheel Fingerprint sensor Launch keys Status LED Application buttons Tablet Pen Touchpad with...
... 1 Internal microphones 2 Docking connector for Port Replicator 1 Kensington Lock support 2 Wired communication Modem type LAN Optional: 56 K V.92 modem MDC1.5 Built-in 10/100/1000 MBit/s Intel® 82577 LM Keyboard and pointing devices Spill-resistant keyboard Number of keyboard keys: 85, Keyboard pitch: 19 mm, Keyboard stroke: 2.7 mm Fingerprint sensor Launch keys Status LED Application buttons Tablet Pen Touch-screen Touchpad with two mouse buttons and ergonomic ScrollWheel Fingerprint sensor Launch keys Status LED Application buttons Tablet Pen Touchpad with...


