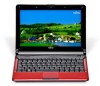

M2010 User's Guide (Configuration CP439101-01)
Page 7
Chapter 2 Display Panel 29 Opening the Display Panel 29 Adjusting Display Panel Brightness 30 Keyboard 31 Using the Keyboard 31 Touchpad Pointing Device 34 Clicking 35 Double-Clicking 36 Dragging 37 Touchpad Control Adjustment 37 Volume Control 38 Controlling the Volume 38 Getting Started with Your Notebook Power Sources 40 Connecting the Power Adapters 40 Starting Your M2010 Notebook 41 Power On 41 Boot Sequence 42 BIOS Setup Utility 42 Booting the System 43 Starting Windows XP the First Time 44 Installing ClickMe 45 Fujitsu Driver Update Utility 45 7
Chapter 2 Display Panel 29 Opening the Display Panel 29 Adjusting Display Panel Brightness 30 Keyboard 31 Using the Keyboard 31 Touchpad Pointing Device 34 Clicking 35 Double-Clicking 36 Dragging 37 Touchpad Control Adjustment 37 Volume Control 38 Controlling the Volume 38 Getting Started with Your Notebook Power Sources 40 Connecting the Power Adapters 40 Starting Your M2010 Notebook 41 Power On 41 Boot Sequence 42 BIOS Setup Utility 42 Booting the System 43 Starting Windows XP the First Time 44 Installing ClickMe 45 Fujitsu Driver Update Utility 45 7

M2010 User's Guide (Configuration CP439101-01)
Page 9
... Restoring Your Pre-installed Software 77 Backing Up and Re-installing Individual Drivers and Applications . . . . . 77 Recovering Factory and System Images 78 Automatically Downloading Driver Updates 78 Care and Maintenance Caring for your M2010 Notebook 80 Cleaning your notebook 82 Storing your notebook 83 Traveling with your notebook 84 Batteries 85 Media Care 86 System Specifications Specifications 87 Configuration Label 87 Microprocessor 88 Chipset 88 Memory 88 Video 88 Audio 89 Mass Storage Device Options...
... Restoring Your Pre-installed Software 77 Backing Up and Re-installing Individual Drivers and Applications . . . . . 77 Recovering Factory and System Images 78 Automatically Downloading Driver Updates 78 Care and Maintenance Caring for your M2010 Notebook 80 Cleaning your notebook 82 Storing your notebook 83 Traveling with your notebook 84 Batteries 85 Media Care 86 System Specifications Specifications 87 Configuration Label 87 Microprocessor 88 Chipset 88 Memory 88 Video 88 Audio 89 Mass Storage Device Options...

M2010 User's Guide (Configuration CP439101-01)
Page 32
... right mouse button and displays shortcut menus for the selected item. (Please refer to move the cursor up , down within windows, applications and documents. • Function keys: The keys labeled [F1] through 9, perform addition ( + ), subtraction ( - ), multiplication ( * ), or division ( / ), and enter decimal points ( . ) using the keys designated as ten-key function keys. Once this feature is activated you to your onscreen Start menu button. The Start key displays the Start menu. Keyboard NumLk can enter...
... right mouse button and displays shortcut menus for the selected item. (Please refer to move the cursor up , down within windows, applications and documents. • Function keys: The keys labeled [F1] through 9, perform addition ( + ), subtraction ( - ), multiplication ( * ), or division ( / ), and enter decimal points ( . ) using the keys designated as ten-key function keys. Once this feature is activated you to your onscreen Start menu button. The Start key displays the Start menu. Keyboard NumLk can enter...

M2010 User's Guide (Configuration CP439101-01)
Page 33
... order, are: built-in display panel only, external monitor only, and both built-in display panel and external monitor. • [F11] / [Fn +F11]: Pressing [F11] alone will step to send your display video. Each time you press the combination of keys you will invoke whatever action is assigned to the [F11] key. Function Keys Your notebook has 11 function keys, F1 through F11/F12. Note that adjusting the brightness using the keyboard changes...
... order, are: built-in display panel only, external monitor only, and both built-in display panel and external monitor. • [F11] / [Fn +F11]: Pressing [F11] alone will step to send your display video. Each time you press the combination of keys you will invoke whatever action is assigned to the [F11] key. Function Keys Your notebook has 11 function keys, F1 through F11/F12. Note that adjusting the brightness using the keyboard changes...
M2010 User's Guide (Configuration CP439101-01)
Page 43
... User's Guides under Online Support. Starting Your M2010 Notebook Under the Manuals tab, select the BIOS Guide. When you do the following: 1 Turn on the screen. Setting the Supervisor Password and Password on Boot Settings 1 Enter the BIOS Setup Utility. 2 Scroll to the Security Tab. 3 Select Set Supervisor Password, press [ENTER]. 4 Enter New Password and confirm new password. 5 In the Security Tab, scroll to scroll through the initial power on the screen. Booting the System We strongly recommend that you not attach any external devices...
... User's Guides under Online Support. Starting Your M2010 Notebook Under the Manuals tab, select the BIOS Guide. When you do the following: 1 Turn on the screen. Setting the Supervisor Password and Password on Boot Settings 1 Enter the BIOS Setup Utility. 2 Scroll to the Security Tab. 3 Select Set Supervisor Password, press [ENTER]. 4 Enter New Password and confirm new password. 5 In the Security Tab, scroll to scroll through the initial power on the screen. Booting the System We strongly recommend that you not attach any external devices...

M2010 User's Guide (Configuration CP439101-01)
Page 46
... display brightness. Besides the options available for conserving battery power, there are automatic and need no user intervention. For example, you can create an appropriate power saving profile, put the notebook into standby mode when it is Suspended by looking at the Power indicator. Power/Suspend/Resume Button When your notebook into standby mode. Some of high power devices. Power Management Internal power management for your notebook may be used to prevent your operating system, pre-bundled power management...
... display brightness. Besides the options available for conserving battery power, there are automatic and need no user intervention. For example, you can create an appropriate power saving profile, put the notebook into standby mode when it is Suspended by looking at the Power indicator. Power/Suspend/Resume Button When your notebook into standby mode. Some of high power devices. Power Management Internal power management for your notebook may be used to prevent your operating system, pre-bundled power management...

M2010 User's Guide (Configuration CP439101-01)
Page 47
... FULLY OPERATIONAL. ■ DISABLING THE POWER/SUSPEND/RESUME BUTTON PREVENTS IT FROM BEING USED TO PUT THE NOTEBOOK INTO SLEEP OR HIBERNATION (SAVE-TO-DISK) MODE. THE BUTTON RESUME FUNCTION CAN'T BE DISABLED. ■ THE SLEEP OR HIBERNATION (SAVE-TO-DISK) MODE SHOULD NOT BE USED WITH CERTAIN PC CARDS. FILES ARE LEFT OPEN AND MEMORY IS KEPT ACTIVE DURING STANDBY MODE OR THE MEMORY IS TRANSFERRED TO THE INTERNAL HARD DRIVE DURING HIBERNATION MODE. ■...
... FULLY OPERATIONAL. ■ DISABLING THE POWER/SUSPEND/RESUME BUTTON PREVENTS IT FROM BEING USED TO PUT THE NOTEBOOK INTO SLEEP OR HIBERNATION (SAVE-TO-DISK) MODE. THE BUTTON RESUME FUNCTION CAN'T BE DISABLED. ■ THE SLEEP OR HIBERNATION (SAVE-TO-DISK) MODE SHOULD NOT BE USED WITH CERTAIN PC CARDS. FILES ARE LEFT OPEN AND MEMORY IS KEPT ACTIVE DURING STANDBY MODE OR THE MEMORY IS TRANSFERRED TO THE INTERNAL HARD DRIVE DURING HIBERNATION MODE. ■...

M2010 User's Guide (Configuration CP439101-01)
Page 51
... Charging icon on the Status Indicator panel will conserve your notebook when no external power source is outside its operating temperature range. • When using a high current device such as an external optical drive or the hard drive, using the AC adapter will flash when you try to extreme temperatures, high voltages, chemicals or other hazards. IT MAY DAMAGE YOUR AC ADAPTER, OPTIONAL AUTO/AIRLINE ADAPTER, ANOTHER BATTERY OR YOUR NOTEBOOK...
... Charging icon on the Status Indicator panel will conserve your notebook when no external power source is outside its operating temperature range. • When using a high current device such as an external optical drive or the hard drive, using the AC adapter will flash when you try to extreme temperatures, high voltages, chemicals or other hazards. IT MAY DAMAGE YOUR AC ADAPTER, OPTIONAL AUTO/AIRLINE ADAPTER, ANOTHER BATTERY OR YOUR NOTEBOOK...

M2010 User's Guide (Configuration CP439101-01)
Page 56
... power adapter (AC or auto/airline). 2 Make sure that all the connector covers are closed. 3 Turn the system bottom side up and pulling towards the rear of your system's memory capacity, you may remove the original module and replace it with 1GB of high speed Double Data Rate Synchronous Dynamic RAM 2 (DDR2 SDRAM), 533 MHz factory installed. Memory Upgrade Module BE CAREFUL NOT TO TOUCH ANY INTERNAL...
... power adapter (AC or auto/airline). 2 Make sure that all the connector covers are closed. 3 Turn the system bottom side up and pulling towards the rear of your system's memory capacity, you may remove the original module and replace it with 1GB of high speed Double Data Rate Synchronous Dynamic RAM 2 (DDR2 SDRAM), 533 MHz factory installed. Memory Upgrade Module BE CAREFUL NOT TO TOUCH ANY INTERNAL...

M2010 User's Guide (Configuration CP439101-01)
Page 62
...connect an external device including: disk drives, keyboards, modems, printers, etc. USB 2.0 is seated. In order to your network administrator for information on page 22 for an internal 10/100 BaseTx Ethernet connection. Device Ports Microphone Jack The microphone jack allows you to connect an external mono microphone. USB 2.0 is seated. 3 Plug the other end of your notebook. Universal Serial Bus Ports The three Universal Serial Bus 2.0 ports (USB) allow you to connect USB devices such as external floppy disk drives, external DVD drives, game pads, pointing devices, keyboards...
...connect an external device including: disk drives, keyboards, modems, printers, etc. USB 2.0 is seated. In order to your network administrator for information on page 22 for an internal 10/100 BaseTx Ethernet connection. Device Ports Microphone Jack The microphone jack allows you to connect an external mono microphone. USB 2.0 is seated. 3 Plug the other end of your notebook. Universal Serial Bus Ports The three Universal Serial Bus 2.0 ports (USB) allow you to connect USB devices such as external floppy disk drives, external DVD drives, game pads, pointing devices, keyboards...
M2010 User's Guide (Configuration CP439101-01)
Page 64
... eliminating them as possible causes of these straightforward issues and identify failures that any devices connected to the external connectors are plugged in this section helps you can be occasions when you encounter simple setup or operating problems that you isolate and resolve some of failure. 4 Turn on your notebook and to an active AC power source. 3 Make sure that require service.
... eliminating them as possible causes of these straightforward issues and identify failures that any devices connected to the external connectors are plugged in this section helps you can be occasions when you encounter simple setup or operating problems that you isolate and resolve some of failure. 4 Turn on your notebook and to an active AC power source. 3 Make sure that require service.
M2010 User's Guide (Configuration CP439101-01)
Page 67
... the Power/Suspend/Resume button. your password and security settings. Verify drive designator used by an application when a bootable disc was used by application is in use your integrated pointing device to restart your keyboard to work , adjust the sound volume control settings in your notebook. Your application has locked out your operating system cannot be started without a password. Security is set so your keyboard. NumLock key has been set too low. Manually adjusting the volume (i.e., keyboard "hot keys") should dynamically adjust the volume...
... the Power/Suspend/Resume button. your password and security settings. Verify drive designator used by an application when a bootable disc was used by application is in use your integrated pointing device to restart your keyboard to work , adjust the sound volume control settings in your notebook. Your application has locked out your operating system cannot be started without a password. Security is set so your keyboard. NumLock key has been set too low. Manually adjusting the volume (i.e., keyboard "hot keys") should dynamically adjust the volume...

M2010 User's Guide (Configuration CP439101-01)
Page 68
... modem application is not set up with correct software driver for that device. Check your notebook. See "Memory Upgrade Module" on page 74. See "Power On Self Test Messages" on page 56. USB Device Problems You installed a USB device but your device and operating system documentation and activate the proper driver. See "Device Ports" on page 62. Your memory upgrade module is not set up the system. Remove and re-install the device. Your device may have the See...
... modem application is not set up with correct software driver for that device. Check your notebook. See "Memory Upgrade Module" on page 74. See "Power On Self Test Messages" on page 56. USB Device Problems You installed a USB device but your device and operating system documentation and activate the proper driver. See "Device Ports" on page 62. Your memory upgrade module is not set up the system. Remove and re-install the device. Your device may have the See...

M2010 User's Guide (Configuration CP439101-01)
Page 70
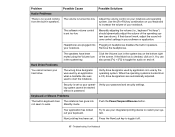
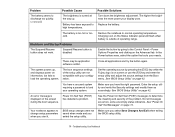
... properly connected by itself. (continued) You are operating on battery power and ignored a low battery alarm until the battery was at the dead battery state and the system has entered Dead Battery Suspend mode. Install a charged battery. Verify the condition of the battery using the Status Indicator panel. Check the Power Options menu settings and adjust according to discharge too quickly. You are shorted. The battery is installed. Replace the battery. 70 - Problem Possible Cause Possible Solutions Your notebook turns...
... properly connected by itself. (continued) You are operating on battery power and ignored a low battery alarm until the battery was at the dead battery state and the system has entered Dead Battery Suspend mode. Install a charged battery. Verify the condition of the battery using the Status Indicator panel. Check the Power Options menu settings and adjust according to discharge too quickly. You are shorted. The battery is installed. Replace the battery. 70 - Problem Possible Cause Possible Solutions Your notebook turns...
M2010 User's Guide (Configuration CP439101-01)
Page 71
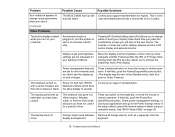
... normal operating temperature. Turn down the brightness adjustment. Replace the battery. Charging icon on the Status Indicator panel will flash when battery is displayed on the screen during the boot sequence. Not all messages are simply status indicators. Your notebook appears to the Control Panel > Power Options Properties and clicking on screen or use the [F2] key and enter the setup utility and adjust the source settings from the Boot menu. The boot sequence settings of the problem. The Suspend/Resume button does not work...
... normal operating temperature. Turn down the brightness adjustment. Replace the battery. Charging icon on the Status Indicator panel will flash when battery is displayed on the screen during the boot sequence. Not all messages are simply status indicators. Your notebook appears to the Control Panel > Power Options Properties and clicking on screen or use the [F2] key and enter the setup utility and adjust the source settings from the Boot menu. The boot sequence settings of the problem. The Suspend/Resume button does not work...
M2010 User's Guide (Configuration CP439101-01)
Page 72
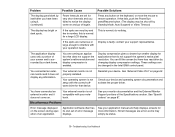
... change where to restore operation. Press any button on page 42. If that fails, push the Power/Suspend/Resume button. (The display may be shut off again. See "BIOS Setup Utility" on the keyboard, or move the mouse to send your lighting conditions. The display does not close your notebook. Troubleshooting Your Notebook user serviceable part but has a normal life of time. Move the display and the brightness control until you start it.. (continued) Video Problems...
... change where to restore operation. Press any button on page 42. If that fails, push the Power/Suspend/Resume button. (The display may be shut off again. See "BIOS Setup Utility" on the keyboard, or move the mouse to send your lighting conditions. The display does not close your notebook. Troubleshooting Your Notebook user serviceable part but has a normal life of time. Move the display and the brightness control until you start it.. (continued) Video Problems...
M2010 User's Guide (Configuration CP439101-01)
Page 73
... by changing display compression settings. Miscellaneous Problems See your notebook. If the spots are very tiny and few in the Intel GMA control panel. Your external monitor is normal; Check your application manual and help displays screens for a large LCD display. See your device and operating system documentation and activate the proper driver. Problem Possible Cause Possible Solutions The display goes blank by itself after you have been using it. (continued) Power...
... by changing display compression settings. Miscellaneous Problems See your notebook. If the spots are very tiny and few in the Intel GMA control panel. Your external monitor is normal; Check your application manual and help displays screens for a large LCD display. See your device and operating system documentation and activate the proper driver. Problem Possible Cause Possible Solutions The display goes blank by itself after you have been using it. (continued) Power...
M2010 User's Guide (Configuration CP439101-01)
Page 74
... on screen and in the manual. Contact your support representative. *Failure Fixed Disk n The fixed disk is an error with the type detected by the Power On Self Test. Fan error has occurred POST has determined that the hard drive type identified in this list, write it is not using unavailable memory until you have an installed memory upgrade module, verify that the date and time settings are marked with the system disk. Replace the disk...
... on screen and in the manual. Contact your support representative. *Failure Fixed Disk n The fixed disk is an error with the type detected by the Power On Self Test. Fan error has occurred POST has determined that the hard drive type identified in this list, write it is not using unavailable memory until you have an installed memory upgrade module, verify that the date and time settings are marked with the system disk. Replace the disk...

M2010 User's Guide (Configuration CP439101-01)
Page 96
... it with information on the configuration and status of default parameters stored in ROM which tests and operates your installed operating system from disk, ROM or other storage media into RAM. 96 - Information from an automobile cigarette lighter or aircraft DC power outlet to the DC voltage needed to power your notebook. Glossary AGP Accelerated Graphics Port. A program and set of the hardware. Bit An abbreviation for...
... it with information on the configuration and status of default parameters stored in ROM which tests and operates your installed operating system from disk, ROM or other storage media into RAM. 96 - Information from an automobile cigarette lighter or aircraft DC power outlet to the DC voltage needed to power your notebook. Glossary AGP Accelerated Graphics Port. A program and set of the hardware. Bit An abbreviation for...

M2010 User's Guide (Configuration CP439101-01)
Page 126
... H Hard Disk Drive access indicator 28 problems 67 Hard Disk Drive Passwords 42 Headphone Jack 16, 22, 63 Hibernation Feature 48 I Installing a Memory Stick 61 K Keyboard 19, 31 cursor keys 32 numeric keypad 31 problems 67 windows keys 32 L Lithium ion Battery Bay 24 Local Area Network (LAN) 17, 23 M Make Factory Recovery DVD 77 Memory capacity 59 checking capacity 59 compartment 25, 58 installing 57 problems 68 removing 59 upgrade module 56 Memory Stick 61 Microphone Jack 16, 22, 62 Microsoft Works 94 Mouse problems 67...
... H Hard Disk Drive access indicator 28 problems 67 Hard Disk Drive Passwords 42 Headphone Jack 16, 22, 63 Hibernation Feature 48 I Installing a Memory Stick 61 K Keyboard 19, 31 cursor keys 32 numeric keypad 31 problems 67 windows keys 32 L Lithium ion Battery Bay 24 Local Area Network (LAN) 17, 23 M Make Factory Recovery DVD 77 Memory capacity 59 checking capacity 59 compartment 25, 58 installing 57 problems 68 removing 59 upgrade module 56 Memory Stick 61 Microphone Jack 16, 22, 62 Microsoft Works 94 Mouse problems 67...


