
Cleaning & Maintenance
Page 20
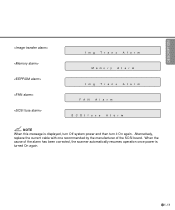
Alternatively, replace the current cable with one recommended by the manufacturer of the alarm has been corrected, the scanner automatically resumes operation once power is displayed, turn Off system power and then turn it On again. DESCRIPTION NOTE When this message is turned On again. 1-11 When the cause of the SCSI board.
Alternatively, replace the current cable with one recommended by the manufacturer of the alarm has been corrected, the scanner automatically resumes operation once power is displayed, turn Off system power and then turn it On again. DESCRIPTION NOTE When this message is turned On again. 1-11 When the cause of the SCSI board.
Cleaning & Maintenance
Page 46
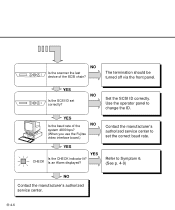
Contact the manufacturer's authorized service center to Symptom 6. (See p. 4-9) NO Contact the manufacturer's authorized service center. 4-6 CHECK Is an Alarm displayed? The termination should be turned off via the front panel. YES Is the baud rate of the SCSI chain? Refer to set correctly? NO Set the SCSI ID correctly. NO Is the scanner the last device of the NO system 4800 bps? (When you use the Fujitsu video interface board.) YES YES Is the CHECK indicator lit? YES Is the SCSI ID set the correct baud rate. Use the operator panel to change the ID.
Contact the manufacturer's authorized service center to Symptom 6. (See p. 4-9) NO Contact the manufacturer's authorized service center. 4-6 CHECK Is an Alarm displayed? The termination should be turned off via the front panel. YES Is the baud rate of the SCSI chain? Refer to set correctly? NO Set the SCSI ID correctly. NO Is the scanner the last device of the NO system 4800 bps? (When you use the Fujitsu video interface board.) YES YES Is the CHECK indicator lit? YES Is the SCSI ID set the correct baud rate. Use the operator panel to change the ID.

Datasheet
Page 2
... ppm (portrait)/67 ppm (landscape) 90 ipm (portrait)/114 ipm (landscape) Flatbed and automatic document feeder (ADF) 100 Sheets (letter/A4, 17 lb.) A8 (2.1 in . x 17 in. 11.7 in . SCSI-2 (video option) ISIS® and TWAIN driver included (Win 98/2000/Me/XP), Kofax Adrenaline® 100... and capabilities boost productivity. With up to incorporate the benefits of 800 dpi (400 dpi, optical), standard image processing (upgradable with Fujitsu service The M4097D scanner includes a 90-day, on -site1 In-Warranty Upgrade - Its maximum resolution of image capture. What's more, it offers ...
... ppm (portrait)/67 ppm (landscape) 90 ipm (portrait)/114 ipm (landscape) Flatbed and automatic document feeder (ADF) 100 Sheets (letter/A4, 17 lb.) A8 (2.1 in . x 17 in. 11.7 in . SCSI-2 (video option) ISIS® and TWAIN driver included (Win 98/2000/Me/XP), Kofax Adrenaline® 100... and capabilities boost productivity. With up to incorporate the benefits of 800 dpi (400 dpi, optical), standard image processing (upgradable with Fujitsu service The M4097D scanner includes a 90-day, on -site1 In-Warranty Upgrade - Its maximum resolution of image capture. What's more, it offers ...
Operator's Guide
Page 9
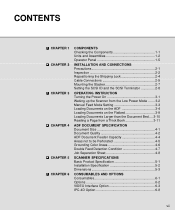
... the Shipping Lock 2-4 Cable Connections 2-5 Mounting the Stacker 2-7 Setting the SCSI ID and the SCSI Terminator 2-8 OPERATING INSTRUCTION Turning the Power On 3-1 Waking up the Scanner ...from the Low Power Mode ....... 3-2 Manual Feed Mode Setting 3-3 Loading Documents on the ADF 3-4 Loading Documents on the Flatbed 3-9 Loading Documents Larger than the Document Bed .... 3-10 Reading a Page from a Thick Book 3-11 ADF DOCUMENT SPECIFICATION Document Size 4-1 Document Quality 4-2 ADF...
... the Shipping Lock 2-4 Cable Connections 2-5 Mounting the Stacker 2-7 Setting the SCSI ID and the SCSI Terminator 2-8 OPERATING INSTRUCTION Turning the Power On 3-1 Waking up the Scanner ...from the Low Power Mode ....... 3-2 Manual Feed Mode Setting 3-3 Loading Documents on the ADF 3-4 Loading Documents on the Flatbed 3-9 Loading Documents Larger than the Document Bed .... 3-10 Reading a Page from a Thick Book 3-11 ADF DOCUMENT SPECIFICATION Document Size 4-1 Document Quality 4-2 ADF...

Operator's Guide
Page 25
Precautions Inspection Repositioning the Shipping Lock Cable Connections Mounting the Stacker Setting the SCSI ID and the SCSI Terminator CHAPTER 2 INSTALLATION AND CONNECTIONS The chapter describes how to install and connect the scanner.
Precautions Inspection Repositioning the Shipping Lock Cable Connections Mounting the Stacker Setting the SCSI ID and the SCSI Terminator CHAPTER 2 INSTALLATION AND CONNECTIONS The chapter describes how to install and connect the scanner.
Operator's Guide
Page 31
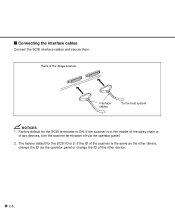
If the ID of the scanner is ON. Factory default for the SCSI ID is in the middle of the daisy chain or of two devices, turn the scanner termination off via the operator panel or change the ID via the operator panel. 2. Connecting the interface cables Connect the SCSI interface cables and secure them. The factory default for the SCSI terminator is the same as the other device. 2-6 Back of the other device, change the ID of the image scanner Interface cables To the host system NOTICES 1. If the scanner is 5.
If the ID of the scanner is ON. Factory default for the SCSI ID is in the middle of the daisy chain or of two devices, turn the scanner termination off via the operator panel or change the ID via the operator panel. 2. Connecting the interface cables Connect the SCSI interface cables and secure them. The factory default for the SCSI terminator is the same as the other device. 2-6 Back of the other device, change the ID of the image scanner Interface cables To the host system NOTICES 1. If the scanner is 5.

Operator's Guide
Page 33
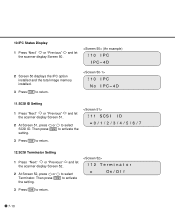
...to change terminator. The scanner displays the following: 5 Press the "Next" button around times, then the scanner displays "SCSI ID" on the lower line of the power switch (see Figure 1.1). The SCSI ID is 5. The scanner displays "Scanner Ready" on the upper line of the LCD. 6 Select the wished...be changed. 2-8 The procedure to change the SCSI ID is as follows: 1 Turn the power ON by pressing the " "or " " button, and press "Enter". (the SCSI ID is ready. 4 Then press the "Enter" button several times. Setting the SCSI ID and the SCSI Terminator The default of the operator panel. The...
...to change terminator. The scanner displays the following: 5 Press the "Next" button around times, then the scanner displays "SCSI ID" on the lower line of the power switch (see Figure 1.1). The SCSI ID is 5. The scanner displays "Scanner Ready" on the upper line of the LCD. 6 Select the wished...be changed. 2-8 The procedure to change the SCSI ID is as follows: 1 Turn the power ON by pressing the " "or " " button, and press "Enter". (the SCSI ID is ready. 4 Then press the "Enter" button several times. Setting the SCSI ID and the SCSI Terminator The default of the operator panel. The...

Operator's Guide
Page 34
The factory default is turned on again. 8 Press "Next" , then the scanner displays "Terminator" on and off from the operator panel of the LCD. NOTICE The new ID does not take effect until the system power is "On." 9 Press "Exit" to return to the "Scanner Ready" state. 2-9 Select "On" or "Off" by pressing or , then press "Enter". NOTICE The scanner includes a SCSI terminator that can be turned on the upper line of the scanner.
The factory default is turned on again. 8 Press "Next" , then the scanner displays "Terminator" on and off from the operator panel of the LCD. NOTICE The new ID does not take effect until the system power is "On." 9 Press "Exit" to return to the "Scanner Ready" state. 2-9 Select "On" or "Off" by pressing or , then press "Enter". NOTICE The scanner includes a SCSI terminator that can be turned on the upper line of the scanner.
Operator's Guide
Page 59
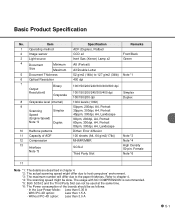
.../Back Green Note *1 100/150/200/240/300/400/600 dpi 100/150/200/240/300/400 dpi 100/150/200 dpi 1024 levels (10bit) 50ppm, 200dpi, A4, Portrait 35ppm, 300dpi, A4, Portrait 45ppm, 300dpi, A4, Landscape 90ipm, 200dpi, A4, Portrait 60ipm, 300dpi, A4, Portrait 80ipm, 300dpi, A4,... The usage with NO COMPRESSION is recommended. *5: Both SCSI-2 and the Third Party Slot can not be used at the same time. *6: The Power consumption of ADF 12 Compression 13 Interface Note *5 Specification ADF (Duplex), Flatbed CCD x2 Inert Gas (Xenon) Lamp x2 A8 (Portrait) A3/Double Letter 52 g/m2 (14lb) to the paper...
.../Back Green Note *1 100/150/200/240/300/400/600 dpi 100/150/200/240/300/400 dpi 100/150/200 dpi 1024 levels (10bit) 50ppm, 200dpi, A4, Portrait 35ppm, 300dpi, A4, Portrait 45ppm, 300dpi, A4, Landscape 90ipm, 200dpi, A4, Portrait 60ipm, 300dpi, A4, Portrait 80ipm, 300dpi, A4,... The usage with NO COMPRESSION is recommended. *5: Both SCSI-2 and the Third Party Slot can not be used at the same time. *6: The Power consumption of ADF 12 Compression 13 Interface Note *5 Specification ADF (Duplex), Flatbed CCD x2 Inert Gas (Xenon) Lamp x2 A8 (Portrait) A3/Double Letter 52 g/m2 (14lb) to the paper...

Operator's Guide
Page 75
.... ** Some restrictions apply to 60 min. On/Off Change the default setting of a double feed. 7-3 Default 5 On 15 min. Auto/SCSI/Tps Display the ID number of the board in the third party Slot. Select the interface when the scanner has a board in the third party...Slot. for power save. to the detection of the duration 5 min. Selectable parameters SCSI ID: 0/1/2/3/4/5/6/7 Switch the SCSI terminator On/Off. (Continued) No Item 10 IPC status display 11 SCSI ID setting 12 SCSI terminator setting 13 Low Power Mode setting 14 Select Interface 15 Display TPS Board ID ...
.... ** Some restrictions apply to 60 min. On/Off Change the default setting of a double feed. 7-3 Default 5 On 15 min. Auto/SCSI/Tps Display the ID number of the board in the third party Slot. Select the interface when the scanner has a board in the third party...Slot. for power save. to the detection of the duration 5 min. Selectable parameters SCSI ID: 0/1/2/3/4/5/6/7 Switch the SCSI terminator On/Off. (Continued) No Item 10 IPC status display 11 SCSI ID setting 12 SCSI terminator setting 13 Low Power Mode setting 14 Select Interface 15 Display TPS Board ID ...
Operator's Guide
Page 82
... let the scanner display Screen 50. (An example) 2 Screen 50 displays the IPC option installed and the total image memory installed. 3 Press to return. 11.SCSI ID Setting 1 Press "Next" or "Previous" and let the scanner display Screen 51. 2 At Screen 51, press or to return. 7-10 and let 2 At Screen...
... let the scanner display Screen 50. (An example) 2 Screen 50 displays the IPC option installed and the total image memory installed. 3 Press to return. 11.SCSI ID Setting 1 Press "Next" or "Previous" and let the scanner display Screen 51. 2 At Screen 51, press or to return. 7-10 and let 2 At Screen...

Operator's Guide
Page 84
...third party slot. Normally, this setting does not have to be changed . 3. The selected interface is Auto. 3 Press to forcibly change the setting. The SCSI interface and the board installed in the third party slot cannot be used at the same time. 4. 14.Select Interface 1 Press "Next" or "Previous" and... the interface type. When an appropriate board is installed in the third party slot of the scanner, the scanner automatically turns off the SCSI interface, activating the board in the third party slot. 2 At Screen 54, press or to change the selected interface. NOTICES 1.
...third party slot. Normally, this setting does not have to be changed . 3. The selected interface is Auto. 3 Press to forcibly change the setting. The SCSI interface and the board installed in the third party slot cannot be used at the same time. 4. 14.Select Interface 1 Press "Next" or "Previous" and... the interface type. When an appropriate board is installed in the third party slot of the scanner, the scanner automatically turns off the SCSI interface, activating the board in the third party slot. 2 At Screen 54, press or to change the selected interface. NOTICES 1.
Operator's Guide
Page 92
... networking environments, where the scanner may be used for example. Smoothing A process that eliminates "jaggies" from start of function in off-line. SCSI-ID Used to specify a particular SCSI device when the initiator selects a target or the target reconnects to the reading operation including Simplex reading and Duplex reading. Information is transferred...
... networking environments, where the scanner may be used for example. Smoothing A process that eliminates "jaggies" from start of function in off-line. SCSI-ID Used to specify a particular SCSI device when the initiator selects a target or the target reconnects to the reading operation including Simplex reading and Duplex reading. Information is transferred...
Operator's Guide
Page 93
... devices are daisy-chained. Temporary Error An error correctable by a third party can be installed and used. Third Party Interface Optional board provided by Fujitsu or interface board provided by the operator. Terminator Devices with a SCSI interface can be daisy-chained. A resistor that includes terminal circuits needs to provide those terminal circits.
... devices are daisy-chained. Temporary Error An error correctable by a third party can be installed and used. Third Party Interface Optional board provided by Fujitsu or interface board provided by the operator. Terminator Devices with a SCSI interface can be daisy-chained. A resistor that includes terminal circuits needs to provide those terminal circits.

Operator's Guide
Page 96
... button 1-6 R Reading mode 3-2 face 3-2 Resetting abrasion counter 6-6 Resolution 3-3 Reviewing the IPC/Memory Status 6-9 S Scanner 1-1 Setting double feed detection 6-3 IPC preset mode 6-4 Offset 6-7 picking start time 6-6 SCSI-ID 6-9 time-out limit 6-7 Setup mode 6-1, 6-2 Simplex 3-2 Size 3-3 Specifications 5-1 Stacker 1-2, 2-7 Start button 1-5, 1-6 Stop button 1-5, 1-6 T Terminator 1-1 Temporary error 1-9 Third party slot 1-2, 1-3 Turning the power on 3-1 the...
... button 1-6 R Reading mode 3-2 face 3-2 Resetting abrasion counter 6-6 Resolution 3-3 Reviewing the IPC/Memory Status 6-9 S Scanner 1-1 Setting double feed detection 6-3 IPC preset mode 6-4 Offset 6-7 picking start time 6-6 SCSI-ID 6-9 time-out limit 6-7 Setup mode 6-1, 6-2 Simplex 3-2 Size 3-3 Specifications 5-1 Stacker 1-2, 2-7 Start button 1-5, 1-6 Stop button 1-5, 1-6 T Terminator 1-1 Temporary error 1-9 Third party slot 1-2, 1-3 Turning the power on 3-1 the...
