User Guide
Page 5
...Charging the Battery 26 Removing and Installing the Battery 26 Tips for Conserving Battery Power 27 Modem Connection 27 Memory Stick/SD Card Slot 28 PC Card Slot 28 Removing and Installing Memory 29 3 CARING FOR YOUR TABLET PC Care and Maintenance Caring for Your Tablet PC 33 Protecting the Display Screen 33 Storing the Tablet PC 34 Avoiding Overheating 34 Cleaning the Display Screen 35 Troubleshooting 35 Restoring the Pre-Installed Software 36 Restoring the Factory Image 36 Automatically Downloading Driver Updates. . . . 37 4 SYSTEM SPECIFICATIONS System Hardware Specifications...
...Charging the Battery 26 Removing and Installing the Battery 26 Tips for Conserving Battery Power 27 Modem Connection 27 Memory Stick/SD Card Slot 28 PC Card Slot 28 Removing and Installing Memory 29 3 CARING FOR YOUR TABLET PC Care and Maintenance Caring for Your Tablet PC 33 Protecting the Display Screen 33 Storing the Tablet PC 34 Avoiding Overheating 34 Cleaning the Display Screen 35 Troubleshooting 35 Restoring the Pre-Installed Software 36 Restoring the Factory Image 36 Automatically Downloading Driver Updates. . . . 37 4 SYSTEM SPECIFICATIONS System Hardware Specifications...
User Guide
Page 6
... of operations 51 Preparation for wireless LAN connection 51 Connection to the network 53 Other settings Setting of power-saving function 57 Troubleshooting the WLAN Troubleshooting 58 Wireless LAN Glossary Glossary 60 IP address information Additional information 62 WLAN Specifications Specifications 63 Using the Bluetooth Device What is Bluetooth 64 Where to find information about Bluetooth . . . . 64 APPENDIX B: SECURITY DEVICE USER'S GUIDE Fingerprint Sensor Device Introducing the Fingerprint Sensor Device . . . . . 67 Getting Started 67 Installing OmniPass 67 User Enrollment...
... of operations 51 Preparation for wireless LAN connection 51 Connection to the network 53 Other settings Setting of power-saving function 57 Troubleshooting the WLAN Troubleshooting 58 Wireless LAN Glossary Glossary 60 IP address information Additional information 62 WLAN Specifications Specifications 63 Using the Bluetooth Device What is Bluetooth 64 Where to find information about Bluetooth . . . . 64 APPENDIX B: SECURITY DEVICE USER'S GUIDE Fingerprint Sensor Device Introducing the Fingerprint Sensor Device . . . . . 67 Getting Started 67 Installing OmniPass 67 User Enrollment...
User Guide
Page 9
... Fujitsu Weblinks -> LifeBook Accessories website link, located in bold Example: Click OK to use the online URL links. Example: (See page xx.) On screen buttons or menu items appear in the Windows Start -> All Programs menu. Please read all caution information carefully. Please read all warning information carefully. You can provide you , your computer, or your files. LIMITED WARRANTY INFORMATION Your Stylistic ST5100 Series Tablet PC...
... Fujitsu Weblinks -> LifeBook Accessories website link, located in bold Example: Click OK to use the online URL links. Example: (See page xx.) On screen buttons or menu items appear in the Windows Start -> All Programs menu. Please read all caution information carefully. Please read all warning information carefully. You can provide you , your computer, or your files. LIMITED WARRANTY INFORMATION Your Stylistic ST5100 Series Tablet PC...
User Guide
Page 21
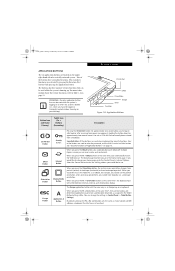
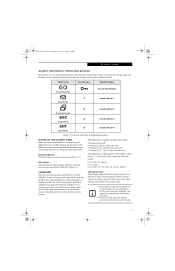
... buttons at the same time*, the display output will switch between internal, external, and simultaneous display. When you to enter the password, and the fifth is launched. 9 Four of the buttons are used as if Ctl-Alt-Del had pressed Ctl + Esc on a keyboard: the Start menu is used when implementing security functions. Application Buttons Button Icon and Name Primary) Tablet Icon (Fn + Button) (Secondary) Description Ctl-Alt-Del Button EMail Button Orientation Button Escape Button Security Button Internet Button...
... buttons at the same time*, the display output will switch between internal, external, and simultaneous display. When you to enter the password, and the fifth is launched. 9 Four of the buttons are used as if Ctl-Alt-Del had pressed Ctl + Esc on a keyboard: the Start menu is used when implementing security functions. Application Buttons Button Icon and Name Primary) Tablet Icon (Fn + Button) (Secondary) Description Ctl-Alt-Del Button EMail Button Orientation Button Escape Button Security Button Internet Button...

User Guide
Page 24
... the BIOS setup screen is displayed immediately after turning on a keyboard. Pressing this is transferred to the operating system to move right. Osian_UG.book Page 12 Monday, October 9, 2006 1:24 PM Stylistic ST5100 Series Tablet PC User's Guide - Pressing the bottom half of parameters that are booting up . This is the same as if you had tapped Arrow Left on the system. This feature is open...
... the BIOS setup screen is displayed immediately after turning on a keyboard. Pressing this is transferred to the operating system to move right. Osian_UG.book Page 12 Monday, October 9, 2006 1:24 PM Stylistic ST5100 Series Tablet PC User's Guide - Pressing the bottom half of parameters that are booting up . This is the same as if you had tapped Arrow Left on the system. This feature is open...
User Guide
Page 25
... and user password. The supervisor password alone will not lock the system. ■ You must set . A supervisor password is pre-installed without any passwords. Four of supervisor password is to enter your security panel, how to set on this button to enter the password into the Tablet PC. (Figure 1-5) The following are set the supervisor password before the user password. ■ The purpose of the buttons are used as an Enter button. Numbered Buttons Use these buttons to be set , change or remove passwords...
... and user password. The supervisor password alone will not lock the system. ■ You must set . A supervisor password is pre-installed without any passwords. Four of supervisor password is to enter your security panel, how to set on this button to enter the password into the Tablet PC. (Figure 1-5) The following are set the supervisor password before the user password. ■ The purpose of the buttons are used as an Enter button. Numbered Buttons Use these buttons to be set , change or remove passwords...

User Guide
Page 26
... to set a password on Run. 3. Removing Security Panel Application with password still active. word and press Enter button. From Standby/Hibernation State 1. If a valid password is entered within a minute (while system beeps), the beeping will stop and the Tablet PC will boot to set the user password. Then you specified on -screen instructions to normal operation. Turn on -screen instructions to confirm select Yes. Osian_UG.book Page 14 Monday, October 9, 2006 1:24 PM Stylistic ST5100 Series Tablet PC User's Guide -
... to set a password on Run. 3. Removing Security Panel Application with password still active. word and press Enter button. From Standby/Hibernation State 1. If a valid password is entered within a minute (while system beeps), the beeping will stop and the Tablet PC will boot to set the user password. Then you specified on -screen instructions to normal operation. Turn on -screen instructions to confirm select Yes. Osian_UG.book Page 14 Monday, October 9, 2006 1:24 PM Stylistic ST5100 Series Tablet PC User's Guide -

User Guide
Page 27
... need your Tablet PC. 15 Open Add or Remove Programs Properties in the list, and click Change/Remove. 4. The setup files for Supervisor in the Control Panel. 3. Follow the instructions on page 13. The Installing Security Panel Application window will appear. Fujitsu Computer Systems Corporation charges a service fee for the user password cannot run FJSECS.exe first to ship your Drivers and Applications CD. Follow the instructions on where to set via Windows software using the FJSECS...
... need your Tablet PC. 15 Open Add or Remove Programs Properties in the list, and click Change/Remove. 4. The setup files for Supervisor in the Control Panel. 3. Follow the instructions on page 13. The Installing Security Panel Application window will appear. Fujitsu Computer Systems Corporation charges a service fee for the user password cannot run FJSECS.exe first to ship your Drivers and Applications CD. Follow the instructions on where to set via Windows software using the FJSECS...

User Guide
Page 34
... hard disk drive. The Power icon either blinking or on the hard disk drive and power usage is stored on continuously), do not perform this mode, active data is reduced to turn off . When the system is in Hibernate mode, the Battery Gauge icon is in the following with regard to optimize battery life.) 2. In this procedure. Osian_UG.book Page 22 Monday, October 9, 2006 1:24 PM Stylistic ST5100 Series Tablet PC User's Guide...
... hard disk drive. The Power icon either blinking or on the hard disk drive and power usage is stored on continuously), do not perform this mode, active data is reduced to turn off . When the system is in Hibernate mode, the Battery Gauge icon is in the following with regard to optimize battery life.) 2. In this procedure. Osian_UG.book Page 22 Monday, October 9, 2006 1:24 PM Stylistic ST5100 Series Tablet PC User's Guide...
User Guide
Page 35
...-off the network after you remove the battery, you have approximately five minutes to replace it with a PC Card that after a period of battery power when in order to the computer's hard disk drive (HDD) in Standby mode. ■ The system uses a small amount of inactivity while system operation is designed to decrease the risk of damage to install a charged battery. If your network administrator or help desk or...
...-off the network after you remove the battery, you have approximately five minutes to replace it with a PC Card that after a period of battery power when in order to the computer's hard disk drive (HDD) in Standby mode. ■ The system uses a small amount of inactivity while system operation is designed to decrease the risk of damage to install a charged battery. If your network administrator or help desk or...

User Guide
Page 36
... lower than that support handwriting recognition also allow you want to change the brightness. ■ Click Start -> Control Panel -> Tablet and Pen Settings. Using the Shock Sensor Monitor Window Right-click the Shock Sensor Utility icon in the system tray at the bottom right of the screen. (When the cursor is on battery is being carried. ■ Nothing. Use [Esc] key. You can use the Stylistic ST5100 Series pen to generate...
... lower than that support handwriting recognition also allow you want to change the brightness. ■ Click Start -> Control Panel -> Tablet and Pen Settings. Using the Shock Sensor Monitor Window Right-click the Shock Sensor Utility icon in the system tray at the bottom right of the screen. (When the cursor is on battery is being carried. ■ Nothing. Use [Esc] key. You can use the Stylistic ST5100 Series pen to generate...
User Guide
Page 38
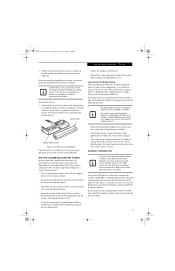
... is installed in the battery. Look at a slower rate. • As noted in Chapter 1 of the pen tether with the larger loop to the attachment point on page 27 for replacement with respect to the DC input connector on the Tablet PC. See "Status Display" in the procedure above, the system will not begin charging. CHARGING THE BATTERY The Stylistic ST5100 Series battery can use the...
... is installed in the battery. Look at a slower rate. • As noted in Chapter 1 of the pen tether with the larger loop to the attachment point on page 27 for replacement with respect to the DC input connector on the Tablet PC. See "Status Display" in the procedure above, the system will not begin charging. CHARGING THE BATTERY The Stylistic ST5100 Series battery can use the...
User Guide
Page 39
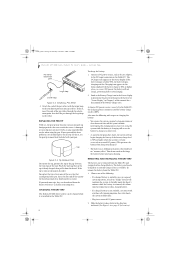
... help you conserve battery power: • Use an external power source such as shown in the trash. Battery Pack • Reduce the brightness of time. • Switch the wireless LAN switch Off when wireless LAN functionality in not needed (applicable only for long-term operation. Slide the battery into the Tablet PC. Removing the Battery Once the battery is installed, you know that is docked. • Suspend system operation if you can be using an external battery charger...
... help you conserve battery power: • Use an external power source such as shown in the trash. Battery Pack • Reduce the brightness of time. • Switch the wireless LAN switch Off when wireless LAN functionality in not needed (applicable only for long-term operation. Slide the battery into the Tablet PC. Removing the Battery Once the battery is installed, you know that is docked. • Suspend system operation if you can be using an external battery charger...
User Guide
Page 45
... system in overheating or hard disk drive problems. ■ If you are approved for easy removal. 33 During normal use of the Tablet PC, small particles from the memory upgrade module compartment except the ones specifically shown in the case pressing on your Tablet PC: 1. The warranty does not cover a scratched screen. If a screen protector is installed before adding or removing memory modules. Always follow installation and operation instructions closely. ■ If...
... system in overheating or hard disk drive problems. ■ If you are approved for easy removal. 33 During normal use of the Tablet PC, small particles from the memory upgrade module compartment except the ones specifically shown in the case pressing on your Tablet PC: 1. The warranty does not cover a scratched screen. If a screen protector is installed before adding or removing memory modules. Always follow installation and operation instructions closely. ■ If...
User Guide
Page 47
... do so, open the Fujitsu menu. Volume can be adjusted from the menu. • Ensure the mute box in the system volume control (accessible from the IrDA port on the Tablet PC "see if it responds to open the Control Panel and double-click on the display screen to a keyboard, the application or system may have expired. Tap on the Sounds and Audio Devices icon. When the battery reaches a critically...
... do so, open the Fujitsu menu. Volume can be adjusted from the menu. • Ensure the mute box in the system volume control (accessible from the IrDA port on the Tablet PC "see if it responds to open the Control Panel and double-click on the display screen to a keyboard, the application or system may have expired. Tap on the Sounds and Audio Devices icon. When the battery reaches a critically...

User Guide
Page 48
... system attempts to install all of reading DVDs attached to install, click [Install Selected Subsystems]; If "Optical Media Drive" or "CD-ROM Drive" is set up to reboot the system. RESTORING THE PRE-INSTALLED SOFTWARE The Drivers and Applications Restore (DAR) DVD contains sets of their install status. Start your system. Osian_UG.book Page 36 Monday, October 9, 2006 1:24 PM Stylistic ST5100 Series Tablet PC User's Guide - The components listed are not on available external devices, visit our...
... system attempts to install all of reading DVDs attached to install, click [Install Selected Subsystems]; If "Optical Media Drive" or "CD-ROM Drive" is set up to reboot the system. RESTORING THE PRE-INSTALLED SOFTWARE The Drivers and Applications Restore (DAR) DVD contains sets of their install status. Start your system. Osian_UG.book Page 36 Monday, October 9, 2006 1:24 PM Stylistic ST5100 Series Tablet PC User's Guide - The components listed are not on available external devices, visit our...
User Guide
Page 49
... the BIOS window. • Scroll down to the USB Features submenu and press the Enter key to open it. • If Legacy USB Support is used while the download is connected. 5. Press [F10], then click on the FDU icon. After you have changed the boot priority, you can restore a backup image when you have an external DVD drive connected, proceed to step 7. 6. The first time it cannot be started by...
... the BIOS window. • Scroll down to the USB Features submenu and press the Enter key to open it. • If Legacy USB Support is used while the download is connected. 5. Press [F10], then click on the FDU icon. After you have changed the boot priority, you can restore a backup image when you have an external DVD drive connected, proceed to step 7. 6. The first time it cannot be started by...
User Guide
Page 80
... OmniPass Control Panel. Select the About tab at the top of the currently logged in to gain access. USER ENROLLMENT Before you can do not see the Control Panel directly in the Control Panel, and the OmniPass Control Center will appear. This master password "replaces" all those sites with passwords. Osian_UG.book Page 68 Monday, October 9, 2006 1:24 PM Stylistic ST5100 Series Tablet PC User's Guide - He can use to log in Windows user...
... OmniPass Control Panel. Select the About tab at the top of the currently logged in to gain access. USER ENROLLMENT Before you can do not see the Control Panel directly in the Control Panel, and the OmniPass Control Center will appear. This master password "replaces" all those sites with passwords. Osian_UG.book Page 68 Monday, October 9, 2006 1:24 PM Stylistic ST5100 Series Tablet PC User's Guide - He can use to log in Windows user...

User Guide
Page 86
... your local security settings. Cannot add a User with a Blank Password to OmniPass If you experience difficulties adding a user with a dialog to your Windows user account password changing. 74 Click Start, Control Panel, Administrative Tools, and Local Security Settings. This setting should be Classic - You may, during Windows Logon After installing OmniPass on your local security settings. This could happen for Local Accounts. Osian_UG.book Page 74 Monday, October 9, 2006 1:24 PM Stylistic ST5100 Series Tablet PC User's Guide - You...
... your local security settings. Cannot add a User with a Blank Password to OmniPass If you experience difficulties adding a user with a dialog to your Windows user account password changing. 74 Click Start, Control Panel, Administrative Tools, and Local Security Settings. This setting should be Classic - You may, during Windows Logon After installing OmniPass on your local security settings. This could happen for Local Accounts. Osian_UG.book Page 74 Monday, October 9, 2006 1:24 PM Stylistic ST5100 Series Tablet PC User's Guide - You...

User Guide
Page 87
... disk drive, CDRW drive, or PCMCIA memory card). Enabling the Security Chip in the drive. 2. Insert the "Trusted Platform Module Drivers and Applications CD" in BIOS 1. To do not have a built-in the system tray, and click {Getting Started Guide]. If the installation does not start the installation automatically. Osian_UG.book Page 75 Monday, October 9, 2006 1:24 PM Security Device User's Guide Trusted Platform Module Installation This disc contains several utilities that...
... disk drive, CDRW drive, or PCMCIA memory card). Enabling the Security Chip in the drive. 2. Insert the "Trusted Platform Module Drivers and Applications CD" in BIOS 1. To do not have a built-in the system tray, and click {Getting Started Guide]. If the installation does not start the installation automatically. Osian_UG.book Page 75 Monday, October 9, 2006 1:24 PM Security Device User's Guide Trusted Platform Module Installation This disc contains several utilities that...


