Specifications
Page 1
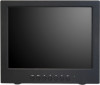
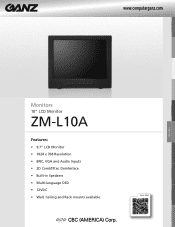
www.computarganz.com Monitors Monitors 10" LCD Monitor ZM-L10A Features: • 9.7" LCD Monitor • 1024 x 768 Resolution • BNC, VGA and Audio Inputs • 2D Combfilter, Deinterlace • Built-in Speakers • Multi-language OSD • 12VDC • Wall, Ceiling and Rack mounts available Scan Me!
www.computarganz.com Monitors Monitors 10" LCD Monitor ZM-L10A Features: • 9.7" LCD Monitor • 1024 x 768 Resolution • BNC, VGA and Audio Inputs • 2D Combfilter, Deinterlace • Built-in Speakers • Multi-language OSD • 12VDC • Wall, Ceiling and Rack mounts available Scan Me!
Specifications
Page 2
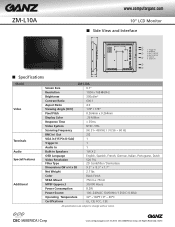
...; Specifications 1.5" Model Video Terminals Audio Special Features Additional ZM-L10A Screen Size 9.7" Resolution 1024 x 768 @60Hz Brightness 300cd/m² Contrast Ratio 600:1 Aspect Ratio 4:3 Viewing Angle (H/V) 178° / 178° Pixel Pitch 0.264mm x 0.264mm Display Color .26 Million Response Time < 35ms Video System NTSC / PAL Scanning Frequency (H) 31~ 48 KHz / (V) 56 ~ 60 Hz BNC In/ Out 2/2 VGA in (15 Pin D-Sub) 1 Trigger In 1 Audio In 1 Built-in Speakers 1W X 2 OSD Language English, Spanish...
...; Specifications 1.5" Model Video Terminals Audio Special Features Additional ZM-L10A Screen Size 9.7" Resolution 1024 x 768 @60Hz Brightness 300cd/m² Contrast Ratio 600:1 Aspect Ratio 4:3 Viewing Angle (H/V) 178° / 178° Pixel Pitch 0.264mm x 0.264mm Display Color .26 Million Response Time < 35ms Video System NTSC / PAL Scanning Frequency (H) 31~ 48 KHz / (V) 56 ~ 60 Hz BNC In/ Out 2/2 VGA in (15 Pin D-Sub) 1 Trigger In 1 Audio In 1 Built-in Speakers 1W X 2 OSD Language English, Spanish...
Manual
Page 2
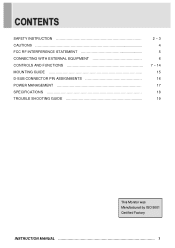
SAFETY INSTRUCTION CAUTIONS FCC RF INTERFERENCE STATEMENT CONNECTING WITH EXTERNAL EQUIPMENT CONTROLS AND FUNCTIONS MOUNTING GUIDE D-SUB CONNECTOR PIN ASSIGNMENTS POWER MANAGEMENT SPECIFICATIONS TROUBLE SHOOTING GUIDE 2 ~ 3 4 5 6 7 ~ 14 15 16 17 18 19 This Monitor was Manufactured by ISO 9001 Certified Factory INSTRUCTION MANUAL 1
SAFETY INSTRUCTION CAUTIONS FCC RF INTERFERENCE STATEMENT CONNECTING WITH EXTERNAL EQUIPMENT CONTROLS AND FUNCTIONS MOUNTING GUIDE D-SUB CONNECTOR PIN ASSIGNMENTS POWER MANAGEMENT SPECIFICATIONS TROUBLE SHOOTING GUIDE 2 ~ 3 4 5 6 7 ~ 14 15 16 17 18 19 This Monitor was Manufactured by ISO 9001 Certified Factory INSTRUCTION MANUAL 1
Manual
Page 3
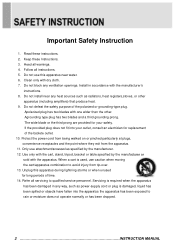
... heat. 9. Only use this apparatus during lightning storms or when unused for replacement of the bsolete outlet. 10. Refer all instructions. 5. Heed all warnings. 4. Servicing is required when the apparatus has been damaged in accordance with dry cloth. 7. Do not install near water. 6. Clean only with the manufacturer's instructions. 8. Read these Instructions. 3. Keep these instructions. 2. Agrounding type plug has two blades...
... heat. 9. Only use this apparatus during lightning storms or when unused for replacement of the bsolete outlet. 10. Refer all instructions. 5. Heed all warnings. 4. Servicing is required when the apparatus has been damaged in accordance with dry cloth. 7. Do not install near water. 6. Clean only with the manufacturer's instructions. 8. Read these Instructions. 3. Keep these instructions. 2. Agrounding type plug has two blades...
Manual
Page 4
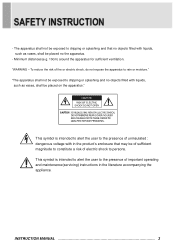
The apparatus shall not be placed no the apparatus. - INSTRUCTION MANUAL 3 - "WARNING - This symbol is intended to alert the user to the presence of electric shock to dripping or splashing and no objects filled with liquids, such as vases, shall be ...not expose the apparatus to dripping or splashing and that may be of sufficient magnitude to constitute a risk of important operating and maintenance(servicing) instructions in the product's enclosure that no objects filled with in the literature accompanying the appliance. "The apparatus shall not be placed on the ...
The apparatus shall not be placed no the apparatus. - INSTRUCTION MANUAL 3 - "WARNING - This symbol is intended to alert the user to the presence of electric shock to dripping or splashing and no objects filled with liquids, such as vases, shall be ...not expose the apparatus to dripping or splashing and that may be of sufficient magnitude to constitute a risk of important operating and maintenance(servicing) instructions in the product's enclosure that no objects filled with in the literature accompanying the appliance. "The apparatus shall not be placed on the ...
Manual
Page 5
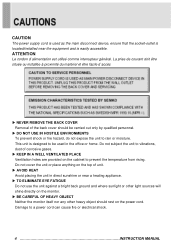
... are provided on the power cord. La prise de courant doit être située ou installée à proximité du matériel et être facile d`accès ▶ NEVER REMOVE THE BACK COVER Removal of the back cover should rest on the cabinet to a power cord can cause fire or electrical shock. 4 INSTRUCTION MANUAL This unit is...
... are provided on the power cord. La prise de courant doit être située ou installée à proximité du matériel et être facile d`accès ▶ NEVER REMOVE THE BACK COVER Removal of the back cover should rest on the cabinet to a power cord can cause fire or electrical shock. 4 INSTRUCTION MANUAL This unit is...
Manual
Page 6
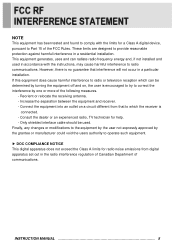
... Part 15 of communications. Finally, any changes or modifications to the equipment by the user not expressly approved by turning the equipment off and on a circuit different from digital apparatus set out in a particular installation. NOTE This equipment has been tested and found to comply with the instructions, may cause harmful interference to radio communications. This equipment generates, uses...
... Part 15 of communications. Finally, any changes or modifications to the equipment by the user not expressly approved by turning the equipment off and on a circuit different from digital apparatus set out in a particular installation. NOTE This equipment has been tested and found to comply with the instructions, may cause harmful interference to radio communications. This equipment generates, uses...

Manual
Page 8
.... 8. INPUT Selects VGA or AV inputs. POWER LED Turned on with no signal: 1) AV mode: Green color 2) VGA(PC) mode: Blinking green color. MENU Activates or exits the OSD. Turned on or off . B. The ◀ button is auto adjustment function in the VGA input. 5, 6. ◀ / ▶ Adjusts the volume and menu settings. INSTRUCTION MANUAL 7 Moves previous menu or status in the OSD. 3, 4. ▲ / ▼ Moves another option in the OSD. 2. The ▼ button is mute function. 7. / I (POWER ON/OFF) Turns the power on with VGA or AV signals: Green color. Turned...
.... 8. INPUT Selects VGA or AV inputs. POWER LED Turned on with no signal: 1) AV mode: Green color 2) VGA(PC) mode: Blinking green color. MENU Activates or exits the OSD. Turned on or off . B. The ◀ button is auto adjustment function in the VGA input. 5, 6. ◀ / ▶ Adjusts the volume and menu settings. INSTRUCTION MANUAL 7 Moves previous menu or status in the OSD. 3, 4. ▲ / ▼ Moves another option in the OSD. 2. The ▼ button is mute function. 7. / I (POWER ON/OFF) Turns the power on with VGA or AV signals: Green color. Turned...
Manual
Page 9
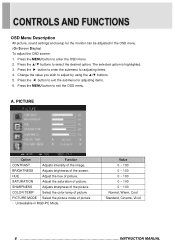
... CONTRAST Adjusts intensity of picture. Value 0 ~ 100 0 ~ 100 0 ~ 100 0 ~ 100 0 ~ 100 Normal, Warm, Cool Standard, Cinema, Vivid 8 INSTRUCTION MANUAL OSD Menu Description All picture, sound settings and setup for the monitor can be adjusted in RGB-PC Mode. Press the MENU button to exit the OSD menu. The selected option is highlighted. 3. Press the MENU button to enter the OSD menu. 2. HUE Adjust the hue of the image. COLOR TEMP Select the color temp of picture PICTURE MODE Select the picture mode...
... CONTRAST Adjusts intensity of picture. Value 0 ~ 100 0 ~ 100 0 ~ 100 0 ~ 100 0 ~ 100 Normal, Warm, Cool Standard, Cinema, Vivid 8 INSTRUCTION MANUAL OSD Menu Description All picture, sound settings and setup for the monitor can be adjusted in RGB-PC Mode. Press the MENU button to exit the OSD menu. The selected option is highlighted. 3. Press the MENU button to enter the OSD menu. 2. HUE Adjust the hue of the image. COLOR TEMP Select the color temp of picture PICTURE MODE Select the picture mode...
Manual
Page 10
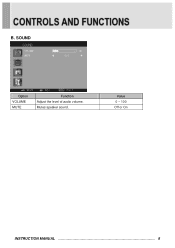
SOUND Option VOLUME MUTE Function Adjust the level of audio volume. Value 0 ~ 100 Off or On INSTRUCTION MANUAL 9 Mutes speaker sound. B.
SOUND Option VOLUME MUTE Function Adjust the level of audio volume. Value 0 ~ 100 Off or On INSTRUCTION MANUAL 9 Mutes speaker sound. B.
Manual
Page 11
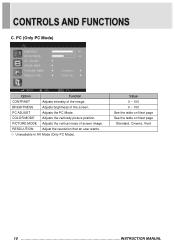
PC ADJUST Adjusts the PC Mode. C. COLOR MODE Adjusts the vertically picture position. PICTURE MODE Adjusts the vertical noise of the screen. BRIGHTNESS Adjusts brightness of screen image. RESOLUTION Adjust the resolution that an user wants. ※ Unavailable in AV Mode (Only PC Mode). PC (Only PC Mode) Option Function CONTRAST Adjusts intensity of the image. Value 0 ~ 100 0 ~ 100 See the table on Next page See the table on Next page Standard, Cinema, Vivid 10 INSTRUCTION MANUAL
PC ADJUST Adjusts the PC Mode. C. COLOR MODE Adjusts the vertically picture position. PICTURE MODE Adjusts the vertical noise of the screen. BRIGHTNESS Adjusts brightness of screen image. RESOLUTION Adjust the resolution that an user wants. ※ Unavailable in AV Mode (Only PC Mode). PC (Only PC Mode) Option Function CONTRAST Adjusts intensity of the image. Value 0 ~ 100 0 ~ 100 See the table on Next page See the table on Next page Standard, Cinema, Vivid 10 INSTRUCTION MANUAL
Manual
Page 12
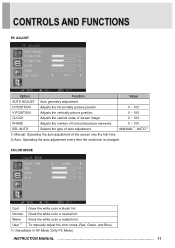
... Gives the white color a neutral tint. H POSITION Adjusts the horizontally picture position. 0 ~ 100 V POSITION Adjusts the vertically picture position. 0 ~ 100 CLOCK Adjusts the vertical noise of screen image. 0 ~ 100 PHASE Adjusts the number of horizontal picture elements. 0 ~ 100 SEL AUTO Selects the type of the screen only the first time. 2) Auto: Operating the auto adjustment every time the resolution is changed COLOR MODE Cool Gives the white color a bluish tint. User 1) To manually adjust the color tones (Red, Green, and Blue). 1) Unavailable in AV Mode (Only PC...
... Gives the white color a neutral tint. H POSITION Adjusts the horizontally picture position. 0 ~ 100 V POSITION Adjusts the vertically picture position. 0 ~ 100 CLOCK Adjusts the vertical noise of screen image. 0 ~ 100 PHASE Adjusts the number of horizontal picture elements. 0 ~ 100 SEL AUTO Selects the type of the screen only the first time. 2) Auto: Operating the auto adjustment every time the resolution is changed COLOR MODE Cool Gives the white color a bluish tint. User 1) To manually adjust the color tones (Red, Green, and Blue). 1) Unavailable in AV Mode (Only PC...
Manual
Page 13
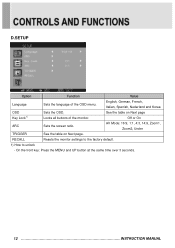
Off or On ARC Sets the screen ratio. See the table on Next page. On the front key: Press the MENU and UP button at the same time over 3 seconds. 12 INSTRUCTION MANUAL RECALL Resets the monitor settings to the factory default. 1) How to unlock - AV Mode: 16:9, 1:1, 4:3, 14:9, Zoom1, Zoom2, Under TRIGGER See the table on Next page Key Lock 1) Locks all buttons of the OSD menu. English, German, French, Italian, Spanish, Nederland and Korea OSD Sets the OSD. D.SETUP Option Function Value Language Sets the language of the monitor.
Off or On ARC Sets the screen ratio. See the table on Next page. On the front key: Press the MENU and UP button at the same time over 3 seconds. 12 INSTRUCTION MANUAL RECALL Resets the monitor settings to the factory default. 1) How to unlock - AV Mode: 16:9, 1:1, 4:3, 14:9, Zoom1, Zoom2, Under TRIGGER See the table on Next page Key Lock 1) Locks all buttons of the OSD menu. English, German, French, Italian, Spanish, Nederland and Korea OSD Sets the OSD. D.SETUP Option Function Value Language Sets the language of the monitor.
Manual
Page 14
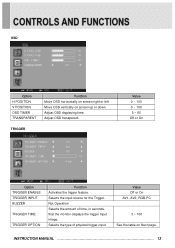
.... Adjust OSD displaying time. Selects the type of time, in seconds, that the monitor displays the trigger Input image. Selects the input source for the Trigger. Move OSD vertically on Next page. INSTRUCTION MANUAL 13 TRIGGER Value 0 ~ 100 0 ~ 100 5 ~ 60 Off or On Option TRIGGER ENABLE TRIGGER INPUT BUZZER TRIGGER TIME TRIGGER OPTION Function Activates the trigger feature. OSD Option H POSITION V POSITION OSD TIMER TRANSPARENT Function Move OSD horizontally on screen...
.... Adjust OSD displaying time. Selects the type of time, in seconds, that the monitor displays the trigger Input image. Selects the input source for the Trigger. Move OSD vertically on Next page. INSTRUCTION MANUAL 13 TRIGGER Value 0 ~ 100 0 ~ 100 5 ~ 60 Off or On Option TRIGGER ENABLE TRIGGER INPUT BUZZER TRIGGER TIME TRIGGER OPTION Function Activates the trigger feature. OSD Option H POSITION V POSITION OSD TIMER TRANSPARENT Function Move OSD horizontally on screen...
Manual
Page 15
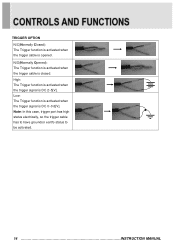
Low: The Trigger function is activated when the trigger signal is closed. N/O(Normally Opened): The Trigger function is activated when the trigger cable is DC 0~0.6[V]. Note: In this case, trigger port has high status electrically, so the trigger cable has to have ground(or earth) status to be activated. 14 INSTRUCTION MANUAL High: The Trigger function is activated when the trigger signal is opened. TRIGGER OPTION N/C(Normally Closed): The Trigger function is activated when the trigger cable is DC 2~5[V].
Low: The Trigger function is activated when the trigger signal is closed. N/O(Normally Opened): The Trigger function is activated when the trigger cable is DC 0~0.6[V]. Note: In this case, trigger port has high status electrically, so the trigger cable has to have ground(or earth) status to be activated. 14 INSTRUCTION MANUAL High: The Trigger function is activated when the trigger signal is opened. TRIGGER OPTION N/C(Normally Closed): The Trigger function is activated when the trigger cable is DC 2~5[V].
Manual
Page 16
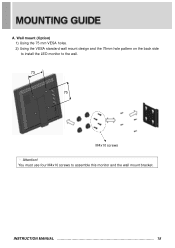
INSTRUCTION MANUAL 15 A. You must use four M4x10 screws to the wall. 75 75 M4x10 screws ※ Attention! Wall mount (Option) 1) Using the 75 mm VESA holes. 2) Using the VESA standard wall mount design and the 75mm hole pattern on the back side to install the LED monitor to assemble this monitor and the wall mount bracket.
INSTRUCTION MANUAL 15 A. You must use four M4x10 screws to the wall. 75 75 M4x10 screws ※ Attention! Wall mount (Option) 1) Using the 75 mm VESA holes. 2) Using the VESA standard wall mount design and the 75mm hole pattern on the back side to install the LED monitor to assemble this monitor and the wall mount bracket.
Manual
Page 17
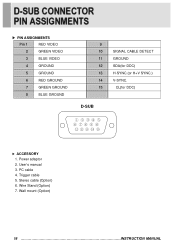
Stereo cable (Option) 6. PC cable 4. Trigger cable 5. ▶ PIN ASSIGNMENTS Pin 1 RED VIDEO 2 GREEN VIDEO 3 BLUE VIDEO 4 GROUND 5 GROUND 6 RED GROUND 7 GREEN GROUND 8 BLUE GROUND 9 10 SIGNAL CABLE DETECT 11 GROUND 12 SDA(for DDC) 13 H-SYNC.(or H+V SYNC.) 14 V-SYNC. 15 CL(for DDC) D-SUB ▶ ACCESSORY 1. Wall mount (Option) 16 INSTRUCTION MANUAL User's manual 3. Wire Stand (Option) 7. Power adaptor 2.
Stereo cable (Option) 6. PC cable 4. Trigger cable 5. ▶ PIN ASSIGNMENTS Pin 1 RED VIDEO 2 GREEN VIDEO 3 BLUE VIDEO 4 GROUND 5 GROUND 6 RED GROUND 7 GREEN GROUND 8 BLUE GROUND 9 10 SIGNAL CABLE DETECT 11 GROUND 12 SDA(for DDC) 13 H-SYNC.(or H+V SYNC.) 14 V-SYNC. 15 CL(for DDC) D-SUB ▶ ACCESSORY 1. Wall mount (Option) 16 INSTRUCTION MANUAL User's manual 3. Wire Stand (Option) 7. Power adaptor 2.
Manual
Page 18
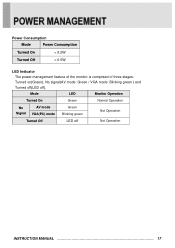
Power Consumption Mode Power Consumption Turned On < 8.2W Turned Off < 0.5W LED Indicator The power management feature of the monitor is comprised of three stages: Turned on(Green), No signal(AV mode: Green / VGA mode: Blinking green ) and Turned off(LED off Not Operation INSTRUCTION MANUAL 17 Mode LED Monitor Operation Turned On Green Normal Operation No Signal AV mode VGA(PC) mode Green Blinking green Not Operation Turned Off LED off ).
Power Consumption Mode Power Consumption Turned On < 8.2W Turned Off < 0.5W LED Indicator The power management feature of the monitor is comprised of three stages: Turned on(Green), No signal(AV mode: Green / VGA mode: Blinking green ) and Turned off(LED off Not Operation INSTRUCTION MANUAL 17 Mode LED Monitor Operation Turned On Green Normal Operation No Signal AV mode VGA(PC) mode Green Blinking green Not Operation Turned Off LED off ).
Manual
Page 19
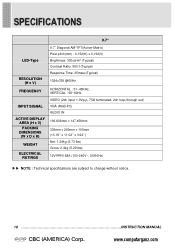
9.7'' LED-Type RESOLUTION (H x V) FREQUENCY 9.7'' Diagonal AM-TFT(Active-Matrix) Pixel pitch(mm) : 0.192(H) x 0.192(V) Brightness: 300cd/m² (Typical) Contrast Ratio: 600:1(Typical) Response Time: 35msec(Typical) 1024x768 @60Hz HORIZONTAL : 31~48KHz, VERTICAL : 56~60Hz INPUT SIGNAL ACTIVE DISPLAY AREA (H x V) PACKING DIMENSIONS (W x D x H) WEIGHT ELECTRICAL RATINGS VIDEO (2ch input 1.0Vp-p, 75Ω terminated, 2ch loop-through out) VGA (RGB-PC) AUDIO IN 196.608mm x 147.456mm 335mm x 280mm x 100mm (13.19...
9.7'' LED-Type RESOLUTION (H x V) FREQUENCY 9.7'' Diagonal AM-TFT(Active-Matrix) Pixel pitch(mm) : 0.192(H) x 0.192(V) Brightness: 300cd/m² (Typical) Contrast Ratio: 600:1(Typical) Response Time: 35msec(Typical) 1024x768 @60Hz HORIZONTAL : 31~48KHz, VERTICAL : 56~60Hz INPUT SIGNAL ACTIVE DISPLAY AREA (H x V) PACKING DIMENSIONS (W x D x H) WEIGHT ELECTRICAL RATINGS VIDEO (2ch input 1.0Vp-p, 75Ω terminated, 2ch loop-through out) VGA (RGB-PC) AUDIO IN 196.608mm x 147.456mm 335mm x 280mm x 100mm (13.19...