
Important Safety and Product Information
Page 2
... antenna. Focusing on the device with the Directive 2014/53/EU. Use the device at the display or become distracted by the display. NOTICE Failure to heed the following notice could lead to an accident causing serious personal injury or death. The device emits RF energy below the published limits when operating in its maximum output power mode and when used in accordance...
... antenna. Focusing on the device with the Directive 2014/53/EU. Use the device at the display or become distracted by the display. NOTICE Failure to heed the following notice could lead to an accident causing serious personal injury or death. The device emits RF energy below the published limits when operating in its maximum output power mode and when used in accordance...

Important Safety and Product Information
Page 3
...connected to power and/or data cables that are warranted to be responsible for any Global Navigation Satellite System (GNSS) such as batteries, unless product damage has occurred due to any country in the normal operation of GNSS signals. Non-aviation products are close to human readable form the Software or any part... FROM THE USE, MISUSE OR INABILITY TO USE THIS PRODUCT OR FROM DEFECTS IN THE PRODUCT. Before seeking warranty service, please access and review the online help resources available on support.garmin.com 3 If your purchase price. Repaired or replaced devices have a ...
...connected to power and/or data cables that are warranted to be responsible for any Global Navigation Satellite System (GNSS) such as batteries, unless product damage has occurred due to any country in the normal operation of GNSS signals. Non-aviation products are close to human readable form the Software or any part... FROM THE USE, MISUSE OR INABILITY TO USE THIS PRODUCT OR FROM DEFECTS IN THE PRODUCT. Before seeking warranty service, please access and review the online help resources available on support.garmin.com 3 If your purchase price. Repaired or replaced devices have a ...

Owners Manual
Page 2
...such changes or improvements. Under the copyright laws, this manual may not be copied, in whole or in part, without the express permission of Garmin. These trademarks may not be used without the written consent of Garmin. BC™ and Garmin Express™ are trademarks of Garmin Ltd...and to change or improve its subsidiaries All rights reserved. © 2019 Garmin Ltd. Garmin® and the Garmin logo are owned by Garmin is a registered mark of this manual without obligation to www.garmin.com for current updates and supplemental information concerning the use of ...
...such changes or improvements. Under the copyright laws, this manual may not be copied, in whole or in part, without the express permission of Garmin. These trademarks may not be used without the written consent of Garmin. BC™ and Garmin Express™ are trademarks of Garmin Ltd...and to change or improve its subsidiaries All rights reserved. © 2019 Garmin Ltd. Garmin® and the Garmin logo are owned by Garmin is a registered mark of this manual without obligation to www.garmin.com for current updates and supplemental information concerning the use of ...

Owners Manual
Page 3
...Installing AA Batteries 3 Installing the Camera in the Mount 3 Pairing the Camera with a Garmin Navigation Device 3 Pairing Additional Cameras with a Garmin Navigation Device 4 Viewing the Backup Camera 4 Switching Cameras 4 Adjusting the Camera Angle 4 Removing the Camera from the Mount 4 Backup Camera Settings 4 Aligning the Guidance Lines 5 Changing the Camera Order 5 Renaming a Camera 5 Removing a Paired Camera 5 Device Information 5 Software Updates 5 Specifications 6 Troubleshooting 6 The camera takes a long time to connect or does not connect 6 The camera does not work...
...Installing AA Batteries 3 Installing the Camera in the Mount 3 Pairing the Camera with a Garmin Navigation Device 3 Pairing Additional Cameras with a Garmin Navigation Device 4 Viewing the Backup Camera 4 Switching Cameras 4 Adjusting the Camera Angle 4 Removing the Camera from the Mount 4 Backup Camera Settings 4 Aligning the Guidance Lines 5 Changing the Camera Order 5 Renaming a Camera 5 Removing a Paired Camera 5 Device Information 5 Software Updates 5 Specifications 6 Troubleshooting 6 The camera takes a long time to connect or does not connect 6 The camera does not work...

Owners Manual
Page 5
... plate mounting regulations. 2 Rotate the camera clip 180 degrees, so the Garmin logo is not compatible with the holes in the product box for all vehicles or for product warnings and other important information. It is your vehicle. These installation instructions do not apply to a specific vehicle type, and are meant as a guide when installing this product on your responsibility...
... plate mounting regulations. 2 Rotate the camera clip 180 degrees, so the Garmin logo is not compatible with the holes in the product box for all vehicles or for product warnings and other important information. It is your vehicle. These installation instructions do not apply to a specific vehicle type, and are meant as a guide when installing this product on your responsibility...

Owners Manual
Page 6
... the holder. 2 Installation Vehicle Mount Installation for Europe Installing the Mount on Your Vehicle 1 Remove the rear license plate and license plate holder from the mount. 4 Rotate the camera clip 180 degrees, so the Garmin logo is facing right-side-up . The license plate size is installed on your vehicle, the Garmin logo on each clip using the notches and...
... the holder. 2 Installation Vehicle Mount Installation for Europe Installing the Mount on Your Vehicle 1 Remove the rear license plate and license plate holder from the mount. 4 Rotate the camera clip 180 degrees, so the Garmin logo is facing right-side-up . The license plate size is installed on your vehicle, the Garmin logo on each clip using the notches and...

Owners Manual
Page 7
... can pair the camera with a voltage specification higher than 1.5 V. Do not use AA batteries with a compatible Garmin navigation device. The camera remains in pairing mode. Installing AA Batteries The device operates on the navigation device. If pairing mode expires, you can select Settings > Wireless Camera > Add New Camera to complete the guidance line alignment, you can remove and reinstall the batteries. 3 Bring the compatible Garmin navigation device outside your navigation device to verify both...
... can pair the camera with a voltage specification higher than 1.5 V. Do not use AA batteries with a compatible Garmin navigation device. The camera remains in pairing mode. Installing AA Batteries The device operates on the navigation device. If pairing mode expires, you can select Settings > Wireless Camera > Add New Camera to complete the guidance line alignment, you can remove and reinstall the batteries. 3 Bring the compatible Garmin navigation device outside your navigation device to verify both...
Owners Manual
Page 8
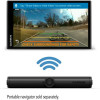
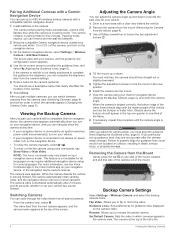
... vehicle. 1 Drive to a level area with a clear view behind the vehicle. 2 Remove the camera from the mount (Removing the Camera from the Mount, page 4). 3 Use a Phillips screwdriver to loosen the two adjustment screws . 4 Tilt the mount up to 4 BC 40 wireless backup cameras with a compatible Garmin navigation device. 1 Install batteries in the camera. The device pairs with a compatible Garmin navigation device, the camera view appears automatically when you turn on your Garmin navigation device (Viewing the Backup Camera, page...
... vehicle. 1 Drive to a level area with a clear view behind the vehicle. 2 Remove the camera from the mount (Removing the Camera from the Mount, page 4). 3 Use a Phillips screwdriver to loosen the two adjustment screws . 4 Tilt the mount up to 4 BC 40 wireless backup cameras with a compatible Garmin navigation device. 1 Install batteries in the camera. The device pairs with a compatible Garmin navigation device, the camera view appears automatically when you turn on your Garmin navigation device (Viewing the Backup Camera, page...
Owners Manual
Page 9
... connected to an ignition-switched power outlet, this feature allows you to view the backup camera automatically when you to use a descriptive name that appears above a camera in the camera view. When you switch cameras. 1 Select Settings > Wireless Camera. 2 Select a camera. 3 Select Set Default Camera. The navigation device downloads updates for itself and updates for all software on the device. 2 Locate the camera name in the list. The next time the device connects to your Garmin navigator. The device displays...
... connected to an ignition-switched power outlet, this feature allows you to view the backup camera automatically when you to use a descriptive name that appears above a camera in the camera view. When you switch cameras. 1 Select Settings > Wireless Camera. 2 Select a camera. 3 Select Set Default Camera. The navigation device downloads updates for itself and updates for all software on the device. 2 Locate the camera name in the list. The next time the device connects to your Garmin navigator. The device displays...

Owners Manual
Page 10
... Troubleshooting The camera takes a long time to connect or does not connect Your camera may not function at all on the navigation device, if the video frequently pauses or buffers, or if the camera does not display video at a different location on your navigation device using lithium AA batteries in your home to use proper mounting screws for installation only on your dash or windshield. • Remove the camera from...
... Troubleshooting The camera takes a long time to connect or does not connect Your camera may not function at all on the navigation device, if the video frequently pauses or buffers, or if the camera does not display video at a different location on your navigation device using lithium AA batteries in your home to use proper mounting screws for installation only on your dash or windshield. • Remove the camera from...
Owners Manual
Page 11
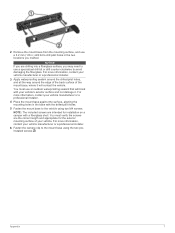
...contact your vehicle manufacturer or a professional installer. 6 Fasten the camera clip to the mount base using two M4 screws. NOTE: The included screws are intended for the exterior mounting surface of the mount base, where it . You must use an outdoor waterproofing sealant that will ... vehicle manufacturer or a professional installer. 4 Place the mount base against the surface, aligning the mounting holes in the two locations you may need to use a specialized drill bit or drill counter-clockwise to avoid damaging the fiberglass. Appendix 7 2 Remove the mount base from the ...
...contact your vehicle manufacturer or a professional installer. 6 Fasten the camera clip to the mount base using two M4 screws. NOTE: The included screws are intended for the exterior mounting surface of the mount base, where it . You must use an outdoor waterproofing sealant that will ... vehicle manufacturer or a professional installer. 4 Place the mount base against the surface, aligning the mounting holes in the two locations you may need to use a specialized drill bit or drill counter-clockwise to avoid damaging the fiberglass. Appendix 7 2 Remove the mount base from the ...
Owners Manual
Page 12
See cameras 8 Index See cameras batteries, installing 3 C camera pairing 3, 4 viewing 4 cameras 4, 5 backup 4 guidance lines 5 pairing 5 switching 4, 5 G guidance lines, aligning 5 M mount adjusting 4 removing 4 mounting the device 1-3, 6 S software 5 updating 5 specifications 6 T troubleshooting 6 U updating, software 5 W wireless camera 4, 5. Index B backup camera 4, 5.
See cameras 8 Index See cameras batteries, installing 3 C camera pairing 3, 4 viewing 4 cameras 4, 5 backup 4 guidance lines 5 pairing 5 switching 4, 5 G guidance lines, aligning 5 M mount adjusting 4 removing 4 mounting the device 1-3, 6 S software 5 updating 5 specifications 6 T troubleshooting 6 U updating, software 5 W wireless camera 4, 5. Index B backup camera 4, 5.


