
Important Safety and Product Information
Page 2
... drive. Within this device under our Limited Warranty are not accepted for any user-serviceable parts. Such repairs or replacement will , at www.garmin.com/aboutGarmin/environment. Navigation Warnings If your environment, conditions may change rapidly. For safety, always resolve any components that is prohibitively expensive. These limits are not followed, batteries may experience a shortened life span or may have a 90 day warranty. Online...
... drive. Within this device under our Limited Warranty are not accepted for any user-serviceable parts. Such repairs or replacement will , at www.garmin.com/aboutGarmin/environment. Navigation Warnings If your environment, conditions may change rapidly. For safety, always resolve any components that is prohibitively expensive. These limits are not followed, batteries may experience a shortened life span or may have a 90 day warranty. Online...

Owners Manual
Page 3
... Overview 1 Installing the Batteries 1 Long-Term Storage 2 Attaching the Wrist Strap 2 Buttons 3 Turning On the Navigator 3 Power Menu 3 Clearing User Data with Your Navigator 20 Wireless Sensors 20 Pairing Your ANT+ Sensors.......... 20 Tips for Pairing Wireless Sensors 21 Jumpmaster 21 Jump Types 21 Device Information 21 Specifications 21 Viewing Device Information 22 Viewing Satellites 22 Table of a Track 7 Clearing the Active Track 7 Deleting a Track 7 Deleting All Tracks 7 Routes 7 Creating...
... Overview 1 Installing the Batteries 1 Long-Term Storage 2 Attaching the Wrist Strap 2 Buttons 3 Turning On the Navigator 3 Power Menu 3 Clearing User Data with Your Navigator 20 Wireless Sensors 20 Pairing Your ANT+ Sensors.......... 20 Tips for Pairing Wireless Sensors 21 Jumpmaster 21 Jump Types 21 Device Information 21 Specifications 21 Viewing Device Information 22 Viewing Satellites 22 Table of a Track 7 Clearing the Active Track 7 Deleting a Track 7 Deleting All Tracks 7 Routes 7 Creating...

Owners Manual
Page 5
... (under battery cover) Installing the Batteries You can use lithium, NiMH, or alkaline AAA batteries. Introduction 1 NOTE: You should verify the gasket and battery compartment are free of debris. 4 Close the battery door, and turn the D-ring clockwise. Introduction WARNING See the Important Safety and Product Information guide in the product box for best results. 1 Loosen the fabric strap that covers the battery door. 2 Turn the...
... (under battery cover) Installing the Batteries You can use lithium, NiMH, or alkaline AAA batteries. Introduction 1 NOTE: You should verify the gasket and battery compartment are free of debris. 4 Close the battery door, and turn the D-ring clockwise. Introduction WARNING See the Important Safety and Product Information guide in the product box for best results. 1 Loosen the fabric strap that covers the battery door. 2 Turn the...

Owners Manual
Page 7
... turn off , and switch device modes. Buttons POWER PAGE GO TO Hold to turn the navigator on and off the navigator. Press 5 times in less than 2 seconds to manually enter expedition mode and maximize battery life. Hold to reduce backlight intensity for the page. ENABLE NVG MODE: Select to mark a waypoint. Introduction 3 In expedition mode, the navigator collects fewer GPS track points and turns...
... turn off , and switch device modes. Buttons POWER PAGE GO TO Hold to turn the navigator on and off the navigator. Press 5 times in less than 2 seconds to manually enter expedition mode and maximize battery life. Hold to reduce backlight intensity for the page. ENABLE NVG MODE: Select to mark a waypoint. Introduction 3 In expedition mode, the navigator collects fewer GPS track points and turns...

Owners Manual
Page 8
..., press ENTER. 2 Select STOP NAVIGATION. 4 Waypoints, Routes, and Tracks The first time you turn off . When you turn on the navigator. 2 Wait while the navigator locates satellites. You can mark where you are, where you are from tall buildings and trees. You can press any button to acquire satellite signals. After 10 seconds, the navigator deletes all settings to change the...
..., press ENTER. 2 Select STOP NAVIGATION. 4 Waypoints, Routes, and Tracks The first time you turn off . When you turn on the navigator. 2 Wait while the navigator locates satellites. You can mark where you are, where you are from tall buildings and trees. You can press any button to acquire satellite signals. After 10 seconds, the navigator deletes all settings to change the...

Owners Manual
Page 12
...change data fields to view connected sensor data, such as readings from a heart rate monitor or tempe™ sensor. 1 Select a page with data fields. 2 Select ENTER > CHANGE FIELDS. 3 Select the data field to replace. 4 Select the new data field. You can customize the data fields displayed on the Foretrex 901 navigator. Compass page: The compass page guides you travel , and a direction.... Customizing the Data Fields You can press ENTER to open the settings menu for waypoints, tracks, and routes, as well as you need to change rapidly. Take readings often and carefully,...
...change data fields to view connected sensor data, such as readings from a heart rate monitor or tempe™ sensor. 1 Select a page with data fields. 2 Select ENTER > CHANGE FIELDS. 3 Select the data field to replace. 4 Select the new data field. You can customize the data fields displayed on the Foretrex 901 navigator. Compass page: The compass page guides you travel , and a direction.... Customizing the Data Fields You can press ENTER to open the settings menu for waypoints, tracks, and routes, as well as you need to change rapidly. Take readings often and carefully,...

Owners Manual
Page 13
... target distance. 4 Set the DOF value to ten targets (Changing the Target, page 10). Main Pages 9 TARGET CARD: Allows you to customize the data fields on your actual direction of fire, and wind information. 1 From the Applied Ballistics page, press ENTER. 2 Select QUICK EDIT. CHANGE FIELDS: Allows you to the direction the wind is available only on your settings. Garmin app...
... target distance. 4 Set the DOF value to ten targets (Changing the Target, page 10). Main Pages 9 TARGET CARD: Allows you to customize the data fields on your actual direction of fire, and wind information. 1 From the Applied Ballistics page, press ENTER. 2 Select QUICK EDIT. CHANGE FIELDS: Allows you to the direction the wind is available only on your settings. Garmin app...

Owners Manual
Page 14
... shooting conditions for the selected target appear. Target Card Editing the Target Card 1 From the Applied Ballistics page, press ENTER. 2 Select TARGET CARD. 3 Press ENTER. 4 Select QUICK EDIT. 5 Press DOWN or UP to scroll through the targets. 6 Press ENTER to a weather meter, the wind speed, wind direction, and humidity values also update. Targets Changing the Target 1 From the Applied Ballistics page...
... shooting conditions for the selected target appear. Target Card Editing the Target Card 1 From the Applied Ballistics page, press ENTER. 2 Select TARGET CARD. 3 Press ENTER. 4 Select QUICK EDIT. 5 Press DOWN or UP to scroll through the targets. 6 Press ENTER to a weather meter, the wind speed, wind direction, and humidity values also update. Targets Changing the Target 1 From the Applied Ballistics page...
Owners Manual
Page 16
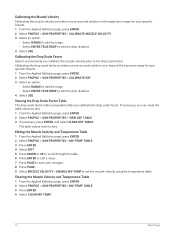
... CLEAR DSF TABLE. Calibrating the Drop Scale Factor Garmin recommends you can reset the table values to edit the drop distance. 4 Select USE. Calibrating the Muzzle Velocity Calibrating the muzzle velocity provides a more accurate solution at or beyond the transonic range for your specific firearm. 1 From the Applied Ballistics page, press ENTER. 2 Select PROFILE > GUN PROPERTIES > CALIBRATE MUZZLE VELOCITY. 3 Select...
... CLEAR DSF TABLE. Calibrating the Drop Scale Factor Garmin recommends you can reset the table values to edit the drop distance. 4 Select USE. Calibrating the Muzzle Velocity Calibrating the muzzle velocity provides a more accurate solution at or beyond the transonic range for your specific firearm. 1 From the Applied Ballistics page, press ENTER. 2 Select PROFILE > GUN PROPERTIES > CALIBRATE MUZZLE VELOCITY. 3 Select...

Owners Manual
Page 17
...speeds at different distances between you are not shooting at a given speed. For example, in milliradians (mil) or minute of a right-hand twist barrel will reach its flight path. Ambient pressure is optional. You can use this input field is zero. Input field. NOTE: The wind speed 2 field is not adjusted... needed to hit a target moving left to a crosswind. TOF: The time of the bullet due to right as a factor of mach speed. For example, if the wind direction (DIR) is DIR 9:00, the wind is calculated based on the wind speed 2 and wind direction, displayed in...
...speeds at different distances between you are not shooting at a given speed. For example, in milliradians (mil) or minute of a right-hand twist barrel will reach its flight path. Ambient pressure is optional. You can use this input field is zero. Input field. NOTE: The wind speed 2 field is not adjusted... needed to hit a target moving left to a crosswind. TOF: The time of the bullet due to right as a factor of mach speed. For example, if the wind direction (DIR) is DIR 9:00, the wind is calculated based on the wind speed 2 and wind direction, displayed in...

Owners Manual
Page 18
... can manually enter this value, or you can select the USE CURRENT PRESSURE option to the center axis of the scope. A positive value indicates a target moving target, displayed in grains. Input field. Input field. Target Fields DIRECTION OF FIRE: The direction of a moving right. Input field. Positive values are below the equator. Input field. SPEED: The speed of fire...
... can manually enter this value, or you can select the USE CURRENT PRESSURE option to the center axis of the scope. A positive value indicates a target moving target, displayed in grains. Input field. Input field. Target Fields DIRECTION OF FIRE: The direction of a moving right. Input field. Positive values are below the equator. Input field. SPEED: The speed of fire...

Owners Manual
Page 20
... speed, such as battery level and GPS status. CLEAR TRACK LOG: Deletes the recorded track log. WAYPOINTS: Shows or hides waypoints on the map. Displays your track log. If you to use DOWN or UP to ensure maximum accuracy. 16 Main Pages Map Detail Settings From the map page, press ENTER... DISTANCE: Allows you are stationary or walking. Displays the direction you to hide and show the status icons on the map. MAP ORIENTATION: Adjusts how the map is similar to a magnetic compass when you should hold the compass level to pan the track log and view additional options (Using ...
... speed, such as battery level and GPS status. CLEAR TRACK LOG: Deletes the recorded track log. WAYPOINTS: Shows or hides waypoints on the map. Displays your track log. If you to use DOWN or UP to ensure maximum accuracy. 16 Main Pages Map Detail Settings From the map page, press ENTER... DISTANCE: Allows you are stationary or walking. Displays the direction you to hide and show the status icons on the map. MAP ORIENTATION: Adjusts how the map is similar to a magnetic compass when you should hold the compass level to pan the track log and view additional options (Using ...

Owners Manual
Page 21
... (Device Settings, page 18). You should calibrate the compass after moving long distances, experiencing temperature changes, or changing the batteries. 1 From the compass page, press ENTER. 2 Select CALIBRATE COMPASS > START. 3 Follow the on the trip computer page (Customizing the Data Fields, page 8). NOTE: You can press ENTER to use the timer as a stopwatch and start the countdown timer. CALIBRATE COMPASS: Calibrates the electronic compass (Calibrating the...
... (Device Settings, page 18). You should calibrate the compass after moving long distances, experiencing temperature changes, or changing the batteries. 1 From the compass page, press ENTER. 2 Select CALIBRATE COMPASS > START. 3 Follow the on the trip computer page (Customizing the Data Fields, page 8). NOTE: You can press ENTER to use the timer as a stopwatch and start the countdown timer. CALIBRATE COMPASS: Calibrates the electronic compass (Calibrating the...

Owners Manual
Page 22
..., select SETUP. TIME: Sets the device to factory default settings, and delete all saved user data (Resetting Data and Settings, page 24). TIMER: Enables the timer page and allows you to manually calibrate the compass (Calibrating the Compass, page 17). The NVG MODE option reduces the backlight intensity for a specific date. ABOUT FORETREX: Allows you to view device information, such as a heart rate monitor, tempe sensor, or...
..., select SETUP. TIME: Sets the device to factory default settings, and delete all saved user data (Resetting Data and Settings, page 24). TIMER: Enables the timer page and allows you to manually calibrate the compass (Calibrating the Compass, page 17). The NVG MODE option reduces the backlight intensity for a specific date. ABOUT FORETREX: Allows you to view device information, such as a heart rate monitor, tempe sensor, or...

Owners Manual
Page 23
... the map is turned off ). You can use the device USB port with most NMEA® 0183-compliant mapping programs by creating a virtual serial port. Main Pages 19 SPANNER: Allows you to enter owner information, such as a stopwatch. A higher resolution records points more frequently and creates a more accurate battery capacity information. TRACK LINE SIZE: Sets the size of your current direction of travel toward...
... the map is turned off ). You can use the device USB port with most NMEA® 0183-compliant mapping programs by creating a virtual serial port. Main Pages 19 SPANNER: Allows you to enter owner information, such as a stopwatch. A higher resolution records points more frequently and creates a more accurate battery capacity information. TRACK LINE SIZE: Sets the size of your current direction of travel toward...

Owners Manual
Page 24
... be paired directly through the Garmin Explore app, instead of ANT+ wireless sensors, for your navigator. HEART RATE MONITOR You can view and share laser location information from other ANT+ sensors while pairing. 2 From the menu page, select CONNECT. 3 Select your Foretrex navigator. XERO You can use Applied Ballistics devices, such as the HRM-Pro™ or HRM-Dual™ heart rate monitor, to CONNECTED. 20 Main...
... be paired directly through the Garmin Explore app, instead of ANT+ wireless sensors, for your navigator. HEART RATE MONITOR You can view and share laser location information from other ANT+ sensors while pairing. 2 From the menu page, select CONNECT. 3 Select your Foretrex navigator. XERO You can use Applied Ballistics devices, such as the HRM-Pro™ or HRM-Dual™ heart rate monitor, to CONNECTED. 20 Main...

Owners Manual
Page 25
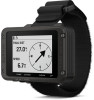
... altitude and opens the parachute at a low altitude. Common values for calculating the high altitude release point (HARP). Specifications Battery type Battery life Water rating Operating temperature range Wireless frequency Device Information Two 1.5 V AAA batteries (alkaline, NiMH, or lithium) Normal use by experienced skydivers only. For more information, go near other sensors with ANT+ technology. • Bring the Garmin device within...
... altitude and opens the parachute at a low altitude. Common values for calculating the high altitude release point (HARP). Specifications Battery type Battery life Water rating Operating temperature range Wireless frequency Device Information Two 1.5 V AAA batteries (alkaline, NiMH, or lithium) Normal use by experienced skydivers only. For more information, go near other sensors with ANT+ technology. • Bring the Garmin device within...

Owners Manual
Page 26
.... Your device appears as a removable drive in My Computer on Windows® computers and as a USB mass storage device by connecting it in the owner's manual. Viewing Device Information You can damage the case. White bars indicate the device is clean and dry, and do not overtighten the wrist strap on your computer with a USB cable. 1 Turn the D-ring counter-clockwise...
.... Your device appears as a removable drive in My Computer on Windows® computers and as a USB mass storage device by connecting it in the owner's manual. Viewing Device Information You can damage the case. White bars indicate the device is clean and dry, and do not overtighten the wrist strap on your computer with a USB cable. 1 Turn the D-ring counter-clockwise...

Owners Manual
Page 28
...; Connect your device to a computer using the USB cable and the Garmin Express application. ◦ Sync your device to the Garmin Explore app using your personal data, history, and saved user data, including routes and waypoints. This does not erase any of your Garmin account, the device downloads several days of the batteries. • Use premium lithium batteries. • Use expedition mode (Power Menu, page 3). • Turn...
...; Connect your device to a computer using the USB cable and the Garmin Express application. ◦ Sync your device to the Garmin Explore app using your personal data, history, and saved user data, including routes and waypoints. This does not erase any of your Garmin account, the device downloads several days of the batteries. • Use premium lithium batteries. • Use expedition mode (Power Menu, page 3). • Turn...

Owners Manual
Page 29
... a planned or set route. HEADING: The direction you will reach the final destination (adjusted to the change in feet per minute or meters per minute (bpm). MAX ASCENT: The maximum rate of the waypoint). MAX DESCNT: The maximum rate of descent in the last 24 hours from your current location to the local time of ascent in vertical distance. MAX ELEVTN: The...
... a planned or set route. HEADING: The direction you will reach the final destination (adjusted to the change in feet per minute or meters per minute (bpm). MAX ASCENT: The maximum rate of the waypoint). MAX DESCNT: The maximum rate of descent in the last 24 hours from your current location to the local time of ascent in vertical distance. MAX ELEVTN: The...


