
Owner's Manual
Page 3
...configure your Garmin GPSMAP 176/176C safely and responsibly. About This Manual To get acquainted with information about the Main Menu and how to use your unit. There are missing, contact your unit in these operations. GPSMAP 176/176C Owner's Manual i The Getting ...GPS receiver. The Main Menu chapter provides detailed explanations about features such as GPSMAP 176/176C care information. Simply look up the topic you in detail. The Introduction chapter contains the Table of the box. You can also find warranty and FCC information in the GPSMAP 176/176C...
...configure your Garmin GPSMAP 176/176C safely and responsibly. About This Manual To get acquainted with information about the Main Menu and how to use your unit. There are missing, contact your unit in these operations. GPSMAP 176/176C Owner's Manual i The Getting ...GPS receiver. The Main Menu chapter provides detailed explanations about features such as GPSMAP 176/176C care information. Simply look up the topic you in detail. The Introduction chapter contains the Table of the box. You can also find warranty and FCC information in the GPSMAP 176/176C...

Owner's Manual
Page 4
... may damage plastic components. Immersing the Unit in Water The GPSMAP 176/176C is waterproof to skin oils, waxes, and abrasive cleaners. at 800/800.1020 or Garmin Europe at 44/0870.8501241. ii GPSMAP 176/176C Owner's Manual Avoid chemical cleaners and solvents that is coated with a mild... detergent solution and then wipe dry. WARNING: The GPSMAP 176/176C lens is specified as in the ...
... may damage plastic components. Immersing the Unit in Water The GPSMAP 176/176C is waterproof to skin oils, waxes, and abrasive cleaners. at 800/800.1020 or Garmin Europe at 44/0870.8501241. ii GPSMAP 176/176C Owner's Manual Avoid chemical cleaners and solvents that is coated with a mild... detergent solution and then wipe dry. WARNING: The GPSMAP 176/176C lens is specified as in the ...
Owner's Manual
Page 5
Table of Contents Introduction i About This Manual i Care Information ii Getting Started 3 Unit Basics 3 Interface Keys 6 Basic Operation 7 Initializing the GPS Receiver 7 Using the Map Pointer 9 Selecting Map Zoom Ranges 11 Creating and Using Waypoints 12 Marking Your Present Location 12 Creating Waypoints Graphically 13 Entering ...Find 39 Main Pages 41 Map Page 41 Compass Page 45 Highway Page 46 Active Route Page 48 Numbers Page 48 Main Menu Page 49 GPS Tab 50 Trip Tab 54 Route Tab 54 Points Tab 54 Track Tab 55 Alarm Tab 57 GPSMAP 176/176C Owner's Manual 1
Table of Contents Introduction i About This Manual i Care Information ii Getting Started 3 Unit Basics 3 Interface Keys 6 Basic Operation 7 Initializing the GPS Receiver 7 Using the Map Pointer 9 Selecting Map Zoom Ranges 11 Creating and Using Waypoints 12 Marking Your Present Location 12 Creating Waypoints Graphically 13 Entering ...Find 39 Main Pages 41 Map Page 41 Compass Page 45 Highway Page 46 Active Route Page 48 Numbers Page 48 Main Menu Page 49 GPS Tab 50 Trip Tab 54 Route Tab 54 Points Tab 54 Track Tab 55 Alarm Tab 57 GPSMAP 176/176C Owner's Manual 1
Owner's Manual
Page 6
... 58 Sun & Moon Tab 61 Hunt & Fish Tab 62 Map Tab 63 General Tab 63 Map Tab 63 Waypoint Tab 64 Point Tab 64 Marine Tab 64 Navaids Tab 65 Line Tab 65 Track Tab 66 Area Tab 66 Topo Tab 66 City Tab 67 Road Tab 67 Other Tab...Power/Data 79 Interfacing 79 Satellite Information 80 What is WAAS 81 What is Differential GPS (DGPS 81 Map Datums 82 Navigation Terms 84 Messages 86 LORAN TD System 88 Optional Accessories 90 Software License Agreement 91 Product Registration 91 Limited Warranty 92 FCC Compliance 93 Safety Information 94 Index 95 2 GPSMAP 176/176C Owner's Manual
... 58 Sun & Moon Tab 61 Hunt & Fish Tab 62 Map Tab 63 General Tab 63 Map Tab 63 Waypoint Tab 64 Point Tab 64 Marine Tab 64 Navaids Tab 65 Line Tab 65 Track Tab 66 Area Tab 66 Topo Tab 66 City Tab 67 Road Tab 67 Other Tab...Power/Data 79 Interfacing 79 Satellite Information 80 What is WAAS 81 What is Differential GPS (DGPS 81 Map Datums 82 Navigation Terms 84 Messages 86 LORAN TD System 88 Optional Accessories 90 Software License Agreement 91 Product Registration 91 Limited Warranty 92 FCC Compliance 93 Safety Information 94 Index 95 2 GPSMAP 176/176C Owner's Manual
Owner's Manual
Page 7
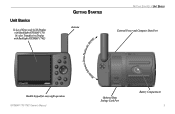
Unit Basics 12-Level Gray scale LCD Display with Backlight (GPSMAP 176) 16 color Transflective Display with Backlight (GPSMAP 176C) GETTING STARTED Antenna GETTING STARTED > UNIT BASICS External Power and Computer Data Port otate Antenna to Down Position for Storage R Backlit keypad for easy night operation GPSMAP 176/176C Owner's Manual Optional Data Storage Card Port Battery Compartment 3
Unit Basics 12-Level Gray scale LCD Display with Backlight (GPSMAP 176) 16 color Transflective Display with Backlight (GPSMAP 176C) GETTING STARTED Antenna GETTING STARTED > UNIT BASICS External Power and Computer Data Port otate Antenna to Down Position for Storage R Backlit keypad for easy night operation GPSMAP 176/176C Owner's Manual Optional Data Storage Card Port Battery Compartment 3

Owner's Manual
Page 8
Immediately after installing new batteries, turn clockwise. 4 GPSMAP 176/176C Owner's Manual NOTE: The GPSMAP 176/176C saves user data in the case. To reinstall the battery lid, place the locking pin into the unit and turn the D-ring 1/4 turn the unit ... and used batteries. Data is not lost when the batteries are removed. Do NOT mix Alkaline batteries with Lithium or Ni-Cad rechargeable batteries. The GPSMAP 176/176C uses 4 AA batteries, which can be Alkaline, rechargeable, Lithium, or Ni-Cad.
Immediately after installing new batteries, turn clockwise. 4 GPSMAP 176/176C Owner's Manual NOTE: The GPSMAP 176/176C saves user data in the case. To reinstall the battery lid, place the locking pin into the unit and turn the D-ring 1/4 turn the unit ... and used batteries. Data is not lost when the batteries are removed. Do NOT mix Alkaline batteries with Lithium or Ni-Cad rechargeable batteries. The GPSMAP 176/176C uses 4 AA batteries, which can be Alkaline, rechargeable, Lithium, or Ni-Cad.

Owner's Manual
Page 9
To remove the antenna: 1. The alignment notches in the casing must line up with the notches on the back of the GPSMAP 176/176C. 2. Pull the antenna away from the connector on the antenna. 3. Rotate the antenna to approximately a seven o'clock position. GETTING STARTED > UNIT BASICS Alignment Notches GPSMAP 176/176C Owner's Manual 5 Remove the external power cable from the GPSMAP 176/176C.
To remove the antenna: 1. The alignment notches in the casing must line up with the notches on the back of the GPSMAP 176/176C. 2. Pull the antenna away from the connector on the antenna. 3. Rotate the antenna to approximately a seven o'clock position. GETTING STARTED > UNIT BASICS Alignment Notches GPSMAP 176/176C Owner's Manual 5 Remove the external power cable from the GPSMAP 176/176C.

Owner's Manual
Page 10
... Keys • From the Map page, press to zoom in progress and return to the main page. POWER Key • Press and hold for MOB. GPSMAP 176/176C Owner's Manual GETTING STARTED > INTERFACE KEYS Interface Keys PAGE Key • Press to cycle through lists, highlight fields, on -screen messages. • Press and release at...
... Keys • From the Map page, press to zoom in progress and return to the main page. POWER Key • Press and hold for MOB. GPSMAP 176/176C Owner's Manual GETTING STARTED > INTERFACE KEYS Interface Keys PAGE Key • Press to cycle through lists, highlight fields, on -screen messages. • Press and release at...
Owner's Manual
Page 11
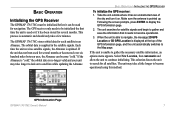
... turn it can become "cold." This selection forces the unit to satellites while updating the Almanac. The GPSMAP 176/176C stores orbital data for each satellite in the satellite signals. If the Almanac is "cold," the orbital data is ...GPS Information Page GPSMAP 176/176C Owner's Manual 7 If the unit has not been used or if it has been stored for several months or has moved over six hundred miles between uses, the Almanac can be used for navigation. Make sure the antenna is supplied in an Almanac. BASIC OPERATION Initializing the GPS Receiver The GPSMAP 176/176C...
... turn it can become "cold." This selection forces the unit to satellites while updating the Almanac. The GPSMAP 176/176C stores orbital data for each satellite in the satellite signals. If the Almanac is "cold," the orbital data is ...GPS Information Page GPSMAP 176/176C Owner's Manual 7 If the unit has not been used or if it has been stored for several months or has moved over six hundred miles between uses, the Almanac can be used for navigation. Make sure the antenna is supplied in an Almanac. BASIC OPERATION Initializing the GPS Receiver The GPSMAP 176/176C...
Owner's Manual
Page 12
BASIC OPERATION > INITIALIZING THE GPS RECEIVER Initialization Options If the GPSMAP 176/176C is unable to help the unit acquire satellites. Depending on to satellites, select New Location. Continue Acquiring-if you are having trouble locking on ... . This options saves battery power and allows the map to simulator mode, the GPS receiver is set to redraw faster. When the unit is turned off for use the pointer on the GPS Information page, see page 50. 8 GPSMAP 176/176C Owner's Manual Stored w/o Batteries-if you have stored the unit without batteries, the date stored in ...
BASIC OPERATION > INITIALIZING THE GPS RECEIVER Initialization Options If the GPSMAP 176/176C is unable to help the unit acquire satellites. Depending on to satellites, select New Location. Continue Acquiring-if you are having trouble locking on ... . This options saves battery power and allows the map to simulator mode, the GPS receiver is set to redraw faster. When the unit is turned off for use the pointer on the GPS Information page, see page 50. 8 GPSMAP 176/176C Owner's Manual Stored w/o Batteries-if you have stored the unit without batteries, the date stored in ...

Owner's Manual
Page 13
... on -screen waypoints and map items, allowing you to provide continuous map coverage. Press QUIT to exit pan mode and re-center on the screen. GPSMAP 176/176C Owner's Manual 9 Press the ROCKER up, down, left, or right direction to move the pointer to the pointer are displayed in mind that the boat icon moves...
... on -screen waypoints and map items, allowing you to provide continuous map coverage. Press QUIT to exit pan mode and re-center on the screen. GPSMAP 176/176C Owner's Manual 9 Press the ROCKER up, down, left, or right direction to move the pointer to the pointer are displayed in mind that the boat icon moves...
Owner's Manual
Page 14
.... Press QUIT to exit the Waypoint Review page. Refer to "Creating and Using Waypoints" on your data card through the Data Card Information screen. 10 GPSMAP 176/176C Owner's Manual Use the ROCKER to highlight OK or press QUIT to exit the Information page. Use the ROCKER to highlight the individual tabs to create a new...
.... Press QUIT to exit the Waypoint Review page. Refer to "Creating and Using Waypoints" on your data card through the Data Card Information screen. 10 GPSMAP 176/176C Owner's Manual Use the ROCKER to highlight OK or press QUIT to exit the Information page. Use the ROCKER to highlight the individual tabs to create a new...
Owner's Manual
Page 15
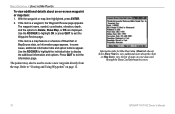
... the distance from 20 ft. Using Built-In Basemap BASIC OPERATION > SELECTING MAP ZOOM RANGES The GPSMAP 176/176C has a built-in . Using BlueChart/MapSource Data Overzoom, no additional data GPSMAP 176/176C Owner's Manual 11 to 800 mi. (5 m to the other. Press the OUT key to zoom out and...OUT keys, with the best resolution. • When the selected zoom range exceeds the resolution of the data window. The GPSMAP 176/176C displays cartography as long as chart information is available through optional BlueChart or MapSource data. Map coverage conforms to zoom in worldwide...
... the distance from 20 ft. Using Built-In Basemap BASIC OPERATION > SELECTING MAP ZOOM RANGES The GPSMAP 176/176C has a built-in . Using BlueChart/MapSource Data Overzoom, no additional data GPSMAP 176/176C Owner's Manual 11 to 800 mi. (5 m to the other. Press the OUT key to zoom out and...OUT keys, with the best resolution. • When the selected zoom range exceeds the resolution of the data window. The GPSMAP 176/176C displays cartography as long as chart information is available through optional BlueChart or MapSource data. Map coverage conforms to zoom in worldwide...

Owner's Manual
Page 16
... use the ROCKER to highlight OK and press ENTER/MARK to save the waypoint. 12 GPSMAP 176/176C Owner's Manual When done, use the ROCKER to highlight the new symbol and press ENTER/ MARK. ...manually enter a set of the name and press ENTER/MARK. To enter a different name, highlight the name field and press ENTER/MARK. BASIC OPERATION > CREATING AND USING WAYPOINTS Creating and Using Waypoints The Garmin GPSMAP 176/176C...8226; Text Entry-allows you quickly create a new waypoint at the GPS tab on the Main Menu GPS tab. Press and hold ENTER/MARK until the New Waypoint window appears....
... use the ROCKER to highlight OK and press ENTER/MARK to save the waypoint. 12 GPSMAP 176/176C Owner's Manual When done, use the ROCKER to highlight the new symbol and press ENTER/ MARK. ...manually enter a set of the name and press ENTER/MARK. To enter a different name, highlight the name field and press ENTER/MARK. BASIC OPERATION > CREATING AND USING WAYPOINTS Creating and Using Waypoints The Garmin GPSMAP 176/176C...8226; Text Entry-allows you quickly create a new waypoint at the GPS tab on the Main Menu GPS tab. Press and hold ENTER/MARK until the New Waypoint window appears....
Owner's Manual
Page 17
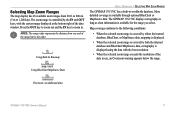
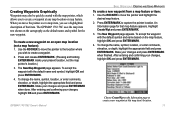
...Highlight Create Wpt and press ENTER/MARK. 3. Choose Create Wpt on the cartography as the default name and symbol for that item. The GPSMAP 176/176C uses the map item text shown on the Information page to create a waypoint at this map item's location. 13 The New Map ...when finished. An Information page for the new waypoint. Use the ROCKER to move the pointer and highlight the desired map feature. 2. GPSMAP 176/176C Owner's Manual BASIC OPERATION > CREATING AND USING WAYPOINTS To create a new waypoint from a map feature or item: 1. After entering and confirming ...
...Highlight Create Wpt and press ENTER/MARK. 3. Choose Create Wpt on the cartography as the default name and symbol for that item. The GPSMAP 176/176C uses the map item text shown on the Information page to create a waypoint at this map item's location. 13 The New Map ...when finished. An Information page for the new waypoint. Use the ROCKER to move the pointer and highlight the desired map feature. 2. GPSMAP 176/176C Owner's Manual BASIC OPERATION > CREATING AND USING WAYPOINTS To create a new waypoint from a map feature or item: 1. After entering and confirming ...

Owner's Manual
Page 18
...The New Waypoint page appears, with the next available waypoint number and the receiver's last know location as the default name and location. 3. Use the ROCKER to save the waypoint. 14 GPSMAP 176/176C Owner's Manual To change the name, symbol, or enter comments, depth or elevation, ...highlight the appropriate field and press ENTER/ MARK. To create a new waypoint by manually entering location coordinates through the Points tab of the...
...The New Waypoint page appears, with the next available waypoint number and the receiver's last know location as the default name and location. 3. Use the ROCKER to save the waypoint. 14 GPSMAP 176/176C Owner's Manual To change the name, symbol, or enter comments, depth or elevation, ...highlight the appropriate field and press ENTER/ MARK. To create a new waypoint by manually entering location coordinates through the Points tab of the...

Owner's Manual
Page 19
... new waypoint and press ENTER/ MARK. 4. If it does not, highlight the field and press ENTER/ MARK, select Current Location, and press ENTER/MARK. 3. GPSMAP 176/176C Owner's Manual 15 Highlight the distance and/or bearing fields below From Current Location and press ENTER/MARK. Select a point from your screen. 2. Projecting Waypoints A waypoint...
... new waypoint and press ENTER/ MARK. 4. If it does not, highlight the field and press ENTER/ MARK, select Current Location, and press ENTER/MARK. 3. GPSMAP 176/176C Owner's Manual 15 Highlight the distance and/or bearing fields below From Current Location and press ENTER/MARK. Select a point from your screen. 2. Projecting Waypoints A waypoint...

Owner's Manual
Page 20
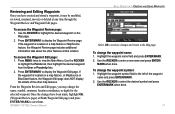
... menu. 2. To calculate the average location: 1. When you are available by pressing MENU on the Waypoint Edit and Waypoint Review pages. Average Location Screen 16 GPSMAP 176/176C Owner's Manual The Select Route screen appears. Watch as the fields change as the unit calculates the average location of a route. Select Average Location from the...
... menu. 2. To calculate the average location: 1. When you are available by pressing MENU on the Waypoint Edit and Waypoint Review pages. Average Location Screen 16 GPSMAP 176/176C Owner's Manual The Select Route screen appears. Watch as the fields change as the unit calculates the average location of a route. Select Average Location from the...
Owner's Manual
Page 21
... the Map page. 2. Use the ROCKER to select the desired symbol and press ENTER/MARK when done. 17 Press ENTER/MARK to the Map page. GPSMAP 176/176C Owner's Manual BASIC OPERATION > CREATING AND USING WAYPOINTS Select OK to exit/save them. Press MENU twice to enter a new name and press ENTER/ MARK when done...
... the Map page. 2. Use the ROCKER to select the desired symbol and press ENTER/MARK when done. 17 Press ENTER/MARK to the Map page. GPSMAP 176/176C Owner's Manual BASIC OPERATION > CREATING AND USING WAYPOINTS Select OK to exit/save them. Press MENU twice to enter a new name and press ENTER/ MARK when done...
Owner's Manual
Page 22
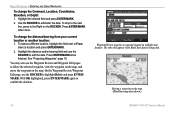
... OK highlighted, press ENTER/MARK again to edit/enter the data. Waypoint Review page for a waypoint located on the map. (BlueChart map data shown.) 18 GPSMAP 176/176C Owner's Manual BASIC OPERATION > CREATING AND USING WAYPOINTS To change the distance/bearing from your current location or another location: 1. Use the ROCKER to confirm...
... OK highlighted, press ENTER/MARK again to edit/enter the data. Waypoint Review page for a waypoint located on the map. (BlueChart map data shown.) 18 GPSMAP 176/176C Owner's Manual BASIC OPERATION > CREATING AND USING WAYPOINTS To change the distance/bearing from your current location or another location: 1. Use the ROCKER to confirm...


