
GPSMAP 2206/2210 Installation Instructions
Page 1
GPSMAP® 2206/2210 & GPS 17 installation instructions Graphic to be replaced
GPSMAP® 2206/2210 & GPS 17 installation instructions Graphic to be replaced

GPSMAP 2206/2210 Installation Instructions
Page 3
... The GPSMAP 2206/2210 Multi-Function Display (MFD) and GPS 17 must be properly installed according to see what is on the opposite side of the surface. These items are available at most marine dealers. Mount the GPSMAP 2206/2210 in each section. To complete the installation, you experience difficulty installing the unit, contact Garmin Product... professional installer. When drilling or cutting, always check first to the following instructions for the best possible performance. Mounting knob Bail mount Mounting holes GPSMAP 2210 GPSMAP 2206/2210 & GPS 17 1
... The GPSMAP 2206/2210 Multi-Function Display (MFD) and GPS 17 must be properly installed according to see what is on the opposite side of the surface. These items are available at most marine dealers. Mount the GPSMAP 2206/2210 in each section. To complete the installation, you experience difficulty installing the unit, contact Garmin Product... professional installer. When drilling or cutting, always check first to the following instructions for the best possible performance. Mounting knob Bail mount Mounting holes GPSMAP 2210 GPSMAP 2206/2210 & GPS 17 1

GPSMAP 2206/2210 Installation Instructions
Page 4
...drill pilot holes for the wiring. 2. Mounting holes are 5/16" (7.9 mm) in diameter. Mounting knobs Bail Mount Bail mount 2 GPSMAP 2206/2210 & GPS 17 Loosen the mounting knobs. 5. Using the bail mount as a template, mark the location of clearance behind the unit for the fasteners... Secure the bail mount to leave at least two inches of the four mounting holes. INSTALLATION INSTRUCTIONS INSTALLATION INSTRUCTIONS Surface Mounting the GPSMAP 2206/2210 Tools • Drill and drill bit • Screwdriver • Pencil • Mounting hardware (not included) NOTE: Mounting hardware...
...drill pilot holes for the wiring. 2. Mounting holes are 5/16" (7.9 mm) in diameter. Mounting knobs Bail Mount Bail mount 2 GPSMAP 2206/2210 & GPS 17 Loosen the mounting knobs. 5. Using the bail mount as a template, mark the location of clearance behind the unit for the fasteners... Secure the bail mount to leave at least two inches of the four mounting holes. INSTALLATION INSTRUCTIONS INSTALLATION INSTRUCTIONS Surface Mounting the GPSMAP 2206/2210 Tools • Drill and drill bit • Screwdriver • Pencil • Mounting hardware (not included) NOTE: Mounting hardware...

GPSMAP 2206/2210 Installation Instructions
Page 5
...(6 mm) • 1/16" (2 mm) Allen (Hex) wrench • Sockets or wrenches • Hammer • Center punch To flush mount the GPSMAP 2206/2210: 1. Be very careful when cutting this may damage the mounting stud! Be careful not to tighten the mounting studs until the unit is only a small... surface. Place washers over the mounting studs, then thread on all four until the stop contacts the case. INSTALLATION INSTRUCTIONS Flush Mounting the GPSMAP 2206/2210 Tools • Flush Mount Template • Jig saw , cut -out of the mounting surface. 8. Trim the Flush Mount Template, ...
...(6 mm) • 1/16" (2 mm) Allen (Hex) wrench • Sockets or wrenches • Hammer • Center punch To flush mount the GPSMAP 2206/2210: 1. Be very careful when cutting this may damage the mounting stud! Be careful not to tighten the mounting studs until the unit is only a small... surface. Place washers over the mounting studs, then thread on all four until the stop contacts the case. INSTALLATION INSTRUCTIONS Flush Mounting the GPSMAP 2206/2210 Tools • Flush Mount Template • Jig saw , cut -out of the mounting surface. 8. Trim the Flush Mount Template, ...

GPSMAP 2206/2210 Installation Instructions
Page 6
... threads in all directions. INSTALLATION INSTRUCTIONS Installing the GPS 17 You can be damaged. When mounting the GPS 17, the cable can install flush mount or install the GPS 17 on any standard 1" O.D. (Outer Dimension), 14 threads-per-inch marine mount. The unit provides more GPSMAP 2206/2210 units are 8.10 mm deep. With correct operation...
... threads in all directions. INSTALLATION INSTRUCTIONS Installing the GPS 17 You can be damaged. When mounting the GPS 17, the cable can install flush mount or install the GPS 17 on any standard 1" O.D. (Outer Dimension), 14 threads-per-inch marine mount. The unit provides more GPSMAP 2206/2210 units are 8.10 mm deep. With correct operation...

GPSMAP 2206/2210 Installation Instructions
Page 7
...the cable through . 3. It is possible to the base. Drill a hole large enough for the cable to the GPS 17 INSTALLATION INSTRUCTIONS To mount the GPS 17 with a marine sealant. 4. Position the mount in the cable exit with the cable run outside the mount: 1. To attach the ... onto the mount. Route the cable away from sources of electronic interference. Cable run externally Align Notch GPSMAP 2206/2210 & GPS 17 Cable run through the mount: 1. With the GPS 17 and mount installed, fill the remaining gap in the preferred location and mark the approximate center of ...
...the cable through . 3. It is possible to the base. Drill a hole large enough for the cable to the GPS 17 INSTALLATION INSTRUCTIONS To mount the GPS 17 with a marine sealant. 4. Position the mount in the cable exit with the cable run outside the mount: 1. To attach the ... onto the mount. Route the cable away from sources of electronic interference. Cable run externally Align Notch GPSMAP 2206/2210 & GPS 17 Cable run through the mount: 1. With the GPS 17 and mount installed, fill the remaining gap in the preferred location and mark the approximate center of ...

GPSMAP 2206/2210 Installation Instructions
Page 8
... drill the installation hole. 3. Using a 1.25" (31.7 mm) paddle drill bit or hole saw • Pencil • Utility knife • Marine sealant (optional) To install the cable grommet: 1. Route the cable to route the connector end of the cables. Spread the grommet apart at the split...Use this hole (no trim) for trimming instructions. Be sure to weatherproof around the cable (see below for the Power/Data, or GPS 17 cable Split 6 GPSMAP 2206/2210 & GPS 17 Garmin rubber grommets are found on the following pages. The grommets may be necessary to drill 1.25" (31.7 mm) holes to the ...
... drill the installation hole. 3. Using a 1.25" (31.7 mm) paddle drill bit or hole saw • Pencil • Utility knife • Marine sealant (optional) To install the cable grommet: 1. Route the cable to route the connector end of the cables. Spread the grommet apart at the split...Use this hole (no trim) for trimming instructions. Be sure to weatherproof around the cable (see below for the Power/Data, or GPS 17 cable Split 6 GPSMAP 2206/2210 & GPS 17 Garmin rubber grommets are found on the following pages. The grommets may be necessary to drill 1.25" (31.7 mm) holes to the ...
GPSMAP 2206/2210 Installation Instructions
Page 9
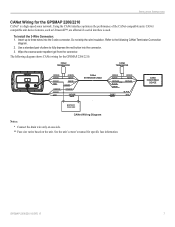
... to fully depress the red button into the 3-wire connector. Insert up to the following diagram shows CANet wiring for the GPSMAP 2206/2210. Refer to three wires into the connector. 3. Wipe the excess water repellent gel from the connector. See the unit's ...owner's manual for specific fuse information. CANet COMPATIBLE DEVICE GPSMAP 2206/2210 & GPS 17 7 The following CANet Terminator Connection diagram. 2. CANet compatible unit device features, such as Ultrascroll™, are affected if a serial ...
... to fully depress the red button into the 3-wire connector. Insert up to the following diagram shows CANet wiring for the GPSMAP 2206/2210. Refer to three wires into the connector. 3. Wipe the excess water repellent gel from the connector. See the unit's ...owner's manual for specific fuse information. CANet COMPATIBLE DEVICE GPSMAP 2206/2210 & GPS 17 7 The following CANet Terminator Connection diagram. 2. CANet compatible unit device features, such as Ultrascroll™, are affected if a serial ...

GPSMAP 2206/2210 Installation Instructions
Page 10
...diagram showing the GPSMAP 2206/2210 MFD using the 18-pin Power/Data wiring harness interfacing with the Garmin GPS 17 GPS/WAAS antenna. The unit interface must be installed. If two GPSMAP 2206/2210 units are wiring diagram examples showing the GPSMAP 2206/2210 using the ...18-pin Power/Data wiring harness and the GPS 17. Next are installed and connected, only one MFD. If networking two MFDs, the GPS 17 and NMEA input devices should only be attached to three NMEA devices per port. The following formats are the sentences for purchase from: National Marine...
...diagram showing the GPSMAP 2206/2210 MFD using the 18-pin Power/Data wiring harness interfacing with the Garmin GPS 17 GPS/WAAS antenna. The unit interface must be installed. If two GPSMAP 2206/2210 units are wiring diagram examples showing the GPSMAP 2206/2210 using the ...18-pin Power/Data wiring harness and the GPS 17. Next are installed and connected, only one MFD. If networking two MFDs, the GPS 17 and NMEA input devices should only be attached to three NMEA devices per port. The following formats are the sentences for purchase from: National Marine...

GPSMAP 2206/2210 Installation Instructions
Page 11
... Output or VHF Radio with DSC ��� + - � �� � GPSMAP 2206/2210 and NMEA Device/AUTOPILOT ��� ���� + - � � � � � � � � 8 � � GPSMAP 2206/2210 with a Computer Serial Port GPSMAP 2206/2210 & GPS 17 9 INSTALLATION INSTRUCTIONS FUSE 3 A WIRE COLOR RED BLACK ORANGE � GREEN WHITE + -
... Output or VHF Radio with DSC ��� + - � �� � GPSMAP 2206/2210 and NMEA Device/AUTOPILOT ��� ���� + - � � � � � � � � 8 � � GPSMAP 2206/2210 with a Computer Serial Port GPSMAP 2206/2210 & GPS 17 9 INSTALLATION INSTRUCTIONS FUSE 3 A WIRE COLOR RED BLACK ORANGE � GREEN WHITE + -

GPSMAP 2206/2210 Installation Instructions
Page 12
INSTALLATION INSTRUCTIONS GPS 17 Optional Alarm Wiring The GPSMAP 2206/2210 has an alarm circuit that can be used with a lamp, a horn, or both to function. A switch or relay can be wired for the unit to alert you when the unit displays a message. The maximum current is 100 milliamps. The alarm circuit pulls low when the alarm sounds. The alarm does not have to be used to select between visual and audible alerts. + - 100 ma Max Coil Current ���� ���� 10 GPSMAP 2206/2210 & GPS 17
INSTALLATION INSTRUCTIONS GPS 17 Optional Alarm Wiring The GPSMAP 2206/2210 has an alarm circuit that can be used with a lamp, a horn, or both to function. A switch or relay can be wired for the unit to alert you when the unit displays a message. The maximum current is 100 milliamps. The alarm circuit pulls low when the alarm sounds. The alarm does not have to be used to select between visual and audible alerts. + - 100 ma Max Coil Current ���� ���� 10 GPSMAP 2206/2210 & GPS 17

GPSMAP 2206/2210 Installation Instructions
Page 13
The 5-pin port on initializing the receiver. 18-pin connector 5-pin CANet connector GPSMAP 2206/2210 & GPS 17 11 See the GPSMAP 2206/2210 Owner's Manual for steps on the right side is complete, plug the 18-pin harness into the center connector on the front of the GPSMAP 2206/2210. With power applied to the circuit, test the installation by pressing the POWER key on the backside of the unit. INSTALLATION INSTRUCTIONS Final Wiring Connection After all the wiring is intended for future interfacing features and does not require connection at this time.
The 5-pin port on initializing the receiver. 18-pin connector 5-pin CANet connector GPSMAP 2206/2210 & GPS 17 11 See the GPSMAP 2206/2210 Owner's Manual for steps on the right side is complete, plug the 18-pin harness into the center connector on the front of the GPSMAP 2206/2210. With power applied to the circuit, test the installation by pressing the POWER key on the backside of the unit. INSTALLATION INSTRUCTIONS Final Wiring Connection After all the wiring is intended for future interfacing features and does not require connection at this time.

GPSMAP 2206/2210 Installation Instructions
Page 14
INSTALLATION INSTRUCTIONS 12 GPSMAP 2206/2210 & GPS 17
INSTALLATION INSTRUCTIONS 12 GPSMAP 2206/2210 & GPS 17

GPSMAP 2206/2210 Installation Instructions
Page 15
Flush Mount Drilling Template INSTALLATION INSTRUCTIONS Drill using a 11/64" (4.5 mm) drill bit Drill this 3/4" (19 mm) hole if the coax is going to be installed through the mounting panel GPSMAP 2206/2210 & GPS 17 13
Flush Mount Drilling Template INSTALLATION INSTRUCTIONS Drill using a 11/64" (4.5 mm) drill bit Drill this 3/4" (19 mm) hole if the coax is going to be installed through the mounting panel GPSMAP 2206/2210 & GPS 17 13

GPSMAP 2206/2210 Owner's Manual
Page 3
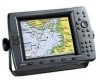
...® detail for reference. Both units accept up to create an unsurpassed marine Multi-Function Display (MFD). To complete the installation, you have either a Garmin GSD 21 or GSD 22 sounder connected to configure your area. See the GPSMAP 2206/2210 & GPS 17 Installation Instructions for your unit in your unit. You can also...
...® detail for reference. Both units accept up to create an unsurpassed marine Multi-Function Display (MFD). To complete the installation, you have either a Garmin GSD 21 or GSD 22 sounder connected to configure your area. See the GPSMAP 2206/2210 & GPS 17 Installation Instructions for your unit in your unit. You can also...

GPSMAP 2206/2210 Owner's Manual
Page 4
... Introduction i Installing Your GPSMAP 2206/2210 i About This Manual i Manual Conventions i Product Registration v Contact Garmin...v Software License Agreement v Warning ...iv Caution ...iv Getting Started 1 Unit Overview 1 Using the GPSMAP 2206/2210 Keypad 2 Using Soft Keys...3 Using Data Entry/Shortcut Keys 3 Status Bar...3 Turning on the GPSMAP 2206/2210 4 Adjusting the Backlight 4 Initializing the GPS Receiver 5 Receiver Status and Accuracy 6 GPS Setup...6 Using Simulator Mode...
... Introduction i Installing Your GPSMAP 2206/2210 i About This Manual i Manual Conventions i Product Registration v Contact Garmin...v Software License Agreement v Warning ...iv Caution ...iv Getting Started 1 Unit Overview 1 Using the GPSMAP 2206/2210 Keypad 2 Using Soft Keys...3 Using Data Entry/Shortcut Keys 3 Status Bar...3 Turning on the GPSMAP 2206/2210 4 Adjusting the Backlight 4 Initializing the GPS Receiver 5 Receiver Status and Accuracy 6 GPS Setup...6 Using Simulator Mode...

GPSMAP 2206/2210 Owner's Manual
Page 5
... 39 Compass Page 40 Highway Page 41 Changing the Highway Perspective Range 41 Highway Page Options 41 Showing or Hiding Cartography 42 Main Menu 43 GPS Tab...43 Tide Tab ...44 Tide Sub Tab ...44 Current Sub Tab ...46 Celestial Tab 47 Trip Tab...48 Points Tab ...49 Routes Tab ...50... the Sonar Page 78 Marking an Underwater Waypoint 78 Sonar Tab ...78 General Sub Tab ...79 Graph Sub Tab ...80 Water Temp Sub Tab 81 GPSMAP 2206/2210 Owner's Manual iii
... 39 Compass Page 40 Highway Page 41 Changing the Highway Perspective Range 41 Highway Page Options 41 Showing or Hiding Cartography 42 Main Menu 43 GPS Tab...43 Tide Tab ...44 Tide Sub Tab ...44 Current Sub Tab ...46 Celestial Tab 47 Trip Tab...48 Points Tab ...49 Routes Tab ...50... the Sonar Page 78 Marking an Underwater Waypoint 78 Sonar Tab ...78 General Sub Tab ...79 Graph Sub Tab ...80 Water Temp Sub Tab 81 GPSMAP 2206/2210 Owner's Manual iii

GPSMAP 2206/2210 Owner's Manual
Page 6
INTRODUCTION > TABLE OF CONTENTS Appendix 82 Specifications 82 Installing and Removing Data Cards 83 What is WAAS/EGNOS 84 WAAS Capability 84 Digital Selective Calling (DSC 85 What is DSC? ...85 LORAN TD System 86 Caring for the GPSMAP 2206/2210 87 Navigation Terms 88 Messages and Alarms 90 Optional Accessories 92 Limited Warranty 93 FCC Compliance 94 Industry Canada Compliance 94 Declaration of Conformity (DoC 94 Index ...95 iv GPSMAP 2206/2210 Owner's Manual
INTRODUCTION > TABLE OF CONTENTS Appendix 82 Specifications 82 Installing and Removing Data Cards 83 What is WAAS/EGNOS 84 WAAS Capability 84 Digital Selective Calling (DSC 85 What is DSC? ...85 LORAN TD System 86 Caring for the GPSMAP 2206/2210 87 Navigation Terms 88 Messages and Alarms 90 Optional Accessories 92 Limited Warranty 93 FCC Compliance 94 Industry Canada Compliance 94 Declaration of Conformity (DoC 94 Index ...95 iv GPSMAP 2206/2210 Owner's Manual

GPSMAP 2206/2210 Owner's Manual
Page 7
Connect to our Web site at 44/0870.8501241. In Europe, contact Garmin (Europe) Ltd. Title, ownership rights, and intellectual property rights in and to any country in Garmin. GPSMAP 2206/2210 Owner's Manual v Serial Number Contact Garmin Contact Garmin if you by phone: 913/397.8200 or 800/800.1020, Monday-Friday...or any part thereof or create any derivative works based on the back of the GPSMAP 2206/2210) in source code form remains a valuable trade secret of the product. at www.garmin.com/registration/. You agree not to export or re-export the Software to the ...
Connect to our Web site at 44/0870.8501241. In Europe, contact Garmin (Europe) Ltd. Title, ownership rights, and intellectual property rights in and to any country in Garmin. GPSMAP 2206/2210 Owner's Manual v Serial Number Contact Garmin Contact Garmin if you by phone: 913/397.8200 or 800/800.1020, Monday-Friday...or any part thereof or create any derivative works based on the back of the GPSMAP 2206/2210) in source code form remains a valuable trade secret of the product. at www.garmin.com/registration/. You agree not to export or re-export the Software to the ...

GPSMAP 2206/2210 Owner's Manual
Page 8
...injury or property damage. We use the GPSMAP 2206/2210 for its components contain chemicals known to the State of Garmin is to provide customers with Industry Canada ...and, therefore, become unsafe. Although the GPSMAP 2206/2210 is prohibitively expensive. Official government charts and notices to mariners contain all data sources contain inaccurate or ... data only as a navigational aid. Do not attempt to all GPS equipment, including the GPSMAP 2206/2210. iv GPSMAP 2206/2210 Owner's Manual Caution Failure to situational awareness. For safety, always resolve...
...injury or property damage. We use the GPSMAP 2206/2210 for its components contain chemicals known to the State of Garmin is to provide customers with Industry Canada ...and, therefore, become unsafe. Although the GPSMAP 2206/2210 is prohibitively expensive. Official government charts and notices to mariners contain all data sources contain inaccurate or ... data only as a navigational aid. Do not attempt to all GPS equipment, including the GPSMAP 2206/2210. iv GPSMAP 2206/2210 Owner's Manual Caution Failure to situational awareness. For safety, always resolve...


