
Important Safety and Product Information
Page 2
...vehicle of California to provide route suggestions. This notice is designed to cause cancer, birth defects, or reproductive harm. See www .garmin.com/prop65 for various purposes, such as the steering wheel, the foot pedals, or the transmission levers. Minimize the amount of deployment...or above any discrepancies before attempting such operations. • When navigating, carefully compare information displayed on the windshield. • Always use of the road or interfere with applicable local laws and regulations. • In addition, the GPS device may affect safety while...
...vehicle of California to provide route suggestions. This notice is designed to cause cancer, birth defects, or reproductive harm. See www .garmin.com/prop65 for various purposes, such as the steering wheel, the foot pedals, or the transmission levers. Minimize the amount of deployment...or above any discrepancies before attempting such operations. • When navigating, carefully compare information displayed on the windshield. • Always use of the road or interfere with applicable local laws and regulations. • In addition, the GPS device may affect safety while...

Important Safety and Product Information
Page 3
...Connect the equipment into an outlet that may cause harmful interference to Such repairs or replacement will be made by an authorized Garmin relating to the use . Canada Standard RSS-210. repair or replace any transportation cost. These limits are designed to provide reasonable protection against ...in specific locations on , the user is encouraged to try to be free from using the suction cup mount on your Garmin purchase. Garmin does not assume any responsibility for one of Conformity, see the Garmin Web site for a Class B digital device, pursuant to the equipment, and ...
...Connect the equipment into an outlet that may cause harmful interference to Such repairs or replacement will be made by an authorized Garmin relating to the use . Canada Standard RSS-210. repair or replace any transportation cost. These limits are designed to provide reasonable protection against ...in specific locations on , the user is encouraged to try to be free from using the suction cup mount on your Garmin purchase. Garmin does not assume any responsibility for one of Conformity, see the Garmin Web site for a Class B digital device, pursuant to the equipment, and ...

Important Safety and Product Information
Page 4
... for devices purchased outside the United States depending on the outside of direction, distance, location or topography. IN NO EVENT SHALL GARMIN BE LIABLE FOR ANY INCIDENTAL, SPECIAL, INDIRECT OR CONSEQUENTIAL DAMAGES, INCLUDING, WITHOUT Informations importantes relatives au produit et à la..., DAMAGES FOR ANY TRAFFIC FINES OR CITATIONS, WHETHER RESULTING FROM THE USE, MISUSE OR INABILITY TO USE THE PRODUCT OR FROM DEFECTS IN THE PRODUCT. Garmin retains the exclusive right to the Garmin service center in contravention of purchase for shipping instructions and an RMA tracking...
... for devices purchased outside the United States depending on the outside of direction, distance, location or topography. IN NO EVENT SHALL GARMIN BE LIABLE FOR ANY INCIDENTAL, SPECIAL, INDIRECT OR CONSEQUENTIAL DAMAGES, INCLUDING, WITHOUT Informations importantes relatives au produit et à la..., DAMAGES FOR ANY TRAFFIC FINES OR CITATIONS, WHETHER RESULTING FROM THE USE, MISUSE OR INABILITY TO USE THE PRODUCT OR FROM DEFECTS IN THE PRODUCT. Garmin retains the exclusive right to the Garmin service center in contravention of purchase for shipping instructions and an RMA tracking...

Declaration of Conformity
Page 1
EN 300 440-v2 V1.2.1 Electromagnetic compatibility and Radio spectrum Matters (ERM); Radio equipment to be used in the 1 GHz to which Conformity is Declared: EN 60950-1:2006 Information Technology Equipment. Part 3: Specific ... 24th June 2010 Methods of Equipment: Model Number(s): GARMIN International & 1200 E. 151st Street Olathe, Kansas 66062 U.S.A GARMIN Corporation No. 68, Jangshu 2nd Rd., Sijhih, Taipei County, TAIWAN, R.O.C. Short range devices (SRD); Information Technology Equipment GPSMAP 62 GPSMAP 62S GPSMAP 62St The undersigned does hereby declare that the equipment ...
EN 300 440-v2 V1.2.1 Electromagnetic compatibility and Radio spectrum Matters (ERM); Radio equipment to be used in the 1 GHz to which Conformity is Declared: EN 60950-1:2006 Information Technology Equipment. Part 3: Specific ... 24th June 2010 Methods of Equipment: Model Number(s): GARMIN International & 1200 E. 151st Street Olathe, Kansas 66062 U.S.A GARMIN Corporation No. 68, Jangshu 2nd Rd., Sijhih, Taipei County, TAIWAN, R.O.C. Short range devices (SRD); Information Technology Equipment GPSMAP 62 GPSMAP 62S GPSMAP 62St The undersigned does hereby declare that the equipment ...

Owner's Manual
Page 1
GPSMAP® 62 series owner's manual For use with the GPSMAP 62, 62s and, 62st
GPSMAP® 62 series owner's manual For use with the GPSMAP 62, 62s and, 62st

Owner's Manual
Page 2
...;, BlueChart®, City Navigator®, and GPSMAP® are trademarks of their respective owners. These trademarks may be viewed and to notify any storage medium, for current updates and supplemental information concerning the use and operation of this document is a registered trademarks of Garmin Ltd. © 2010 Garmin Ltd. Other trademarks and trade names...
...;, BlueChart®, City Navigator®, and GPSMAP® are trademarks of their respective owners. These trademarks may be viewed and to notify any storage medium, for current updates and supplemental information concerning the use and operation of this document is a registered trademarks of Garmin Ltd. © 2010 Garmin Ltd. Other trademarks and trade names...

Owner's Manual
Page 3
... Main Pages........11 Customizing the Data Fields.....11 Restoring Default Page Settings 11 Map 11 Compass 13 Using the Compass 14 Using Sight 'N Go 14 Elevation Plot 15 Opening the Main Menu........... 16 Trip Computer 17 Main Menu Features and Settings 18 Geocaches 18 Share Wirelessly 18 ...
... Main Pages........11 Customizing the Data Fields.....11 Restoring Default Page Settings 11 Map 11 Compass 13 Using the Compass 14 Using Sight 'N Go 14 Elevation Plot 15 Opening the Main Menu........... 16 Trip Computer 17 Main Menu Features and Settings 18 Geocaches 18 Share Wirelessly 18 ...

Owner's Manual
Page 4
... 34 Registering Your Device........... 34 Updating the Software 34 Viewing Important Device Information 34 Contacting Garmin Product Support 34 Using the Backlight 35 Specifications 35 Maximizing Battery Life 36 About the Batteries 37 Buying Optional Accessories... 38 Using Optional Fitness Accessories 38 Data Management 39 Attaching the Wrist Strap......... 42 Attaching the Carabiner...
... 34 Registering Your Device........... 34 Updating the Software 34 Viewing Important Device Information 34 Contacting Garmin Product Support 34 Using the Backlight 35 Specifications 35 Maximizing Battery Life 36 About the Batteries 37 Buying Optional Accessories... 38 Using Optional Fitness Accessories 38 Data Management 39 Attaching the Wrist Strap......... 42 Attaching the Carabiner...

Owner's Manual
Page 5
... (page 3). 4. GPSMAP 62 Series Owner's Manual 1 Mark a waypoint (page 5). 5. Navigate a route (page 7). 6. Getting Started Manual Conventions When you are instructed to press something in a list, and then press ENTER (page 4). Install the batteries (page 3). 2. Turn on the unit. The small arrows (>) used in the text indicate... guide in the product box for example, "Select Delete > Yes." Calibrate the compass (page 13). Use the Rocker to know the basic features. 1. When using your device the first time, you should complete the following tasks to set up the device and get ...
... (page 3). 4. GPSMAP 62 Series Owner's Manual 1 Mark a waypoint (page 5). 5. Navigate a route (page 7). 6. Getting Started Manual Conventions When you are instructed to press something in a list, and then press ENTER (page 4). Install the batteries (page 3). 2. Turn on the unit. The small arrows (>) used in the text indicate... guide in the product box for example, "Select Delete > Yes." Calibrate the compass (page 13). Use the Rocker to know the basic features. 1. When using your device the first time, you should complete the following tasks to set up the device and get ...

Owner's Manual
Page 6
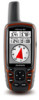
Available only on two AA batteries. Getting Started Device Overview 1 56 2 4 7 8 3 2 1 Internal antenna 2 Display 3 Buttons (page 4) 4 5 mini-USB port (under weather cap) 6 MCX connector for GPS antenna (under batteries). Use precharged GPSMAP 62 Series Owner's Manual Use alkaline, NiMH, or lithium batteries. Available only on the GPSMAP 62s and the GPSMAP 62st. 8 Battery compartment Battery Information The device operates on the GPSMAP 62s and the GPSMAP 62st. 7 microSD™ card slot (under weather cap).
Available only on two AA batteries. Getting Started Device Overview 1 56 2 4 7 8 3 2 1 Internal antenna 2 Display 3 Buttons (page 4) 4 5 mini-USB port (under weather cap) 6 MCX connector for GPS antenna (under batteries). Use precharged GPSMAP 62 Series Owner's Manual Use alkaline, NiMH, or lithium batteries. Available only on the GPSMAP 62s and the GPSMAP 62st. 8 Battery compartment Battery Information The device operates on the GPSMAP 62s and the GPSMAP 62st. 7 microSD™ card slot (under weather cap).

Owner's Manual
Page 7
Insert the batteries, observing polarity. 3. Setting Your Language 1. If necessary, turn counterclockwise and pulling up. 2. GPSMAP 62 Series Owner's Manual Getting Started Turning the Device On or Off Press and hold . Replace the battery cover. For best results, after you install new ... backlight status page. Quickly press to select a language. Installing the Batteries 1. A question mark flashes while the device determines your location. 4. The GPS bars indicate satellite 3 Use the Rocker to open area. 2.
Insert the batteries, observing polarity. 3. Setting Your Language 1. If necessary, turn counterclockwise and pulling up. 2. GPSMAP 62 Series Owner's Manual Getting Started Turning the Device On or Off Press and hold . Replace the battery cover. For best results, after you install new ... backlight status page. Quickly press to select a language. Installing the Batteries 1. A question mark flashes while the device determines your location. 4. The GPS bars indicate satellite 3 Use the Rocker to open area. 2.

Owner's Manual
Page 9
Navigating to a Waypoint Using the Search Menu You can edit a waypoint, you have saved. 1. From the main menu, select Waypoint Manager. 2. Select a waypoint. 4. Select Done. GPSMAP 62 Series Owner's Manual 5 Select an attribute (such as the name or location). 4. Select a .... 2. Select a waypoint. 3. From any page, press MARK. 2. Navigating with Waypoints and Routes Editing a Waypoint Before you can use the search menu to quickly find waypoints, tracks, routes, and coordinates that you must create a waypoint. 1. Creating Waypoints 1. Select Waypoints. 3....
Navigating to a Waypoint Using the Search Menu You can edit a waypoint, you have saved. 1. From the main menu, select Waypoint Manager. 2. Select a waypoint. 4. Select Done. GPSMAP 62 Series Owner's Manual 5 Select an attribute (such as the name or location). 4. Select a .... 2. Select a waypoint. 3. From any page, press MARK. 2. Navigating with Waypoints and Routes Editing a Waypoint Before you can use the search menu to quickly find waypoints, tracks, routes, and coordinates that you must create a waypoint. 1. Creating Waypoints 1. Select Waypoints. 3....

Owner's Manual
Page 10
Creating a Route 1. Select Use. 5. Press quit to your final destination. Editing a Route 1. Editing the Name of waypoints that leads you to save the route. Select Edit Route. 4. From the .... 7. Select an option: • Review-shows the point on the map. • Move Down (or Up)-changes the order of the point on the route. 6 GPSMAP 62 Series Owner's Manual
Creating a Route 1. Select Use. 5. Press quit to your final destination. Editing a Route 1. Editing the Name of waypoints that leads you to save the route. Select Edit Route. 4. From the .... 7. Select an option: • Review-shows the point on the map. • Move Down (or Up)-changes the order of the point on the route. 6 GPSMAP 62 Series Owner's Manual

Owner's Manual
Page 12
... the street. 8. Navigating with City Navigator® You can use optional City Navigator maps to http://buy.garmin.com or contact your Garmin dealer. Press FIND. 2. NOTE: Not all map data provides postal code searching. 5. Enter the house number. 7. Select the city. 6. Select Go. 8 GPSMAP 62 Series Owner's Manual Finding an Address with Waypoints and...
... the street. 8. Navigating with City Navigator® You can use optional City Navigator maps to http://buy.garmin.com or contact your Garmin dealer. Press FIND. 2. NOTE: Not all map data provides postal code searching. 5. Enter the house number. 7. Select the city. 6. Select Go. 8 GPSMAP 62 Series Owner's Manual Finding an Address with Waypoints and...

Owner's Manual
Page 13
...or loaded tracks by selecting Track Manager from the main menu. GPSMAP 62 Series Owner's Manual 9 You can save these tracks and navigate to record tracks more or less often. Select Recording Interval. 6. Tracks About Tracks Your Garmin device records a track log while you select Record, Show On ...Map, a line on the map indicates your tracks. 5. Select an option to them later. NOTE: Using the Most Often interval provides the most track detail and ...
...or loaded tracks by selecting Track Manager from the main menu. GPSMAP 62 Series Owner's Manual 9 You can save these tracks and navigate to record tracks more or less often. Select Recording Interval. 6. Tracks About Tracks Your Garmin device records a track log while you select Record, Show On ...Map, a line on the map indicates your tracks. 5. Select an option to them later. NOTE: Using the Most Often interval provides the most track detail and ...

Owner's Manual
Page 14
... using it. 1. From the main menu, select Track Manager > Current Track. 2. Select what you want to save . Select Tracks. 3. From the main menu, select Track Manager > Current Track. 2. Deleting a Track 1. Press FIND. 2. Tracks Viewing the Current Track The track being recorded is called the current track. 1. Select a track. 3. Select Go. 10 GPSMAP 62...
... using it. 1. From the main menu, select Track Manager > Current Track. 2. Select what you want to save . Select Tracks. 3. From the main menu, select Track Manager > Current Track. 2. Deleting a Track 1. Press FIND. 2. Tracks Viewing the Current Track The track being recorded is called the current track. 1. Select a track. 3. Select Go. 10 GPSMAP 62...

Owner's Manual
Page 15
...11 Select a data field. 4. Press enter. Restoring Default Page Settings 1. Waypoint names and symbols also appear on -screen instructions. GPSMAP 62 Series Owner's Manual Using the Main Pages Map The position icon represents your current direction of the page. • Select Track Up to operate this device... the following pages: map, compass, main menu, and trip computer. Select Change Data Fields. 3. Select Setup Map > Orientation. 3. Using the Main Pages The information needed to show your location on the map. Customizing the Data Fields You can customize the data fields that...
...11 Select a data field. 4. Press enter. Restoring Default Page Settings 1. Waypoint names and symbols also appear on -screen instructions. GPSMAP 62 Series Owner's Manual Using the Main Pages Map The position icon represents your current direction of the page. • Select Track Up to operate this device... the following pages: map, compass, main menu, and trip computer. Select Change Data Fields. 3. Select Setup Map > Orientation. 3. Using the Main Pages The information needed to show your location on the map. Customizing the Data Fields You can customize the data fields that...

Owner's Manual
Page 16
When Off is displayed (page 11). 12 • Guidance Text-allows you to select when to show guidance text on the device. GPSMAP 62 Series Owner's Manual Using the Main Pages Measuring Distance You can move the cursor around the map to measure distance from your map. Map Setup Options From the.... • Shaded Relief-shows detail relief on your current location. 3. Move the cursor to a point you to select the text size for optimal use on the map (if available) or turns off shading. The distance appears at or below the selected zoom level. ◦◦ Text Size-allows ...
When Off is displayed (page 11). 12 • Guidance Text-allows you to select when to show guidance text on the device. GPSMAP 62 Series Owner's Manual Using the Main Pages Measuring Distance You can move the cursor around the map to measure distance from your map. Map Setup Options From the.... • Shaded Relief-shows detail relief on your current location. 3. Move the cursor to a point you to select the text size for optimal use on the map (if available) or turns off shading. The distance appears at or below the selected zoom level. ◦◦ Text Size-allows ...

Owner's Manual
Page 17
... the bearing pointer points toward your destination, regardless of the direction you are moving long distances, experiencing temperature changes, or changing the batteries. 1. GPSMAP 62 Series Owner's Manual 13 Using the Main Pages Calibrating the Compass notice Calibrate the electronic compass outdoors. To purchase additional maps, see page 38. Do not stand near...
... the bearing pointer points toward your destination, regardless of the direction you are moving long distances, experiencing temperature changes, or changing the batteries. 1. GPSMAP 62 Series Owner's Manual 13 Using the Main Pages Calibrating the Compass notice Calibrate the electronic compass outdoors. To purchase additional maps, see page 38. Do not stand near...

Owner's Manual
Page 18
... the bearing pointer to the object. 1. Using Sight 'N Go NOTE: Sight 'N Go is available only with the GPSMAP 62s and GPSMAP 62st. From the main menu, select Sight 'N Go. 2. GPSMAP 62 Series Owner's Manual You can use the compass to navigate an active route. 1. Use the compass to navigate to mils (0 mils...as the heading reference. ◦◦ Magnetic-automatically sets the magnetic declination for your destination. Hold the device level. 3. Using the Main Pages Using the Compass You can point the device at an object. 3. Point the device at an object in the direction, and ...
... the bearing pointer to the object. 1. Using Sight 'N Go NOTE: Sight 'N Go is available only with the GPSMAP 62s and GPSMAP 62st. From the main menu, select Sight 'N Go. 2. GPSMAP 62 Series Owner's Manual You can use the compass to navigate an active route. 1. Use the compass to navigate to mils (0 mils...as the heading reference. ◦◦ Magnetic-automatically sets the magnetic declination for your destination. Hold the device level. 3. Using the Main Pages Using the Compass You can point the device at an object. 3. Point the device at an object in the direction, and ...


