
Technical Reference for Garmin NMEA 2000 Products
Page 3
... to www.garmin.com/support and click Contact Support for the following products: ◦◦ GPSMAP® 4000/5000/6000/7000 Series chartplotters ◦◦ GPSMAP 700 Series chartplotters ◦◦ GPSMAP 4x1/5x1/5x6 Series chartplotters ◦◦ GMI™ 10 ◦◦ GPS 17x ◦... for Garmin chartplotters and marine instruments as well as configuration and PGN information for Garmin NMEA 2000 Products iii In the USA, go to www.garmin.com/support, or contact Garmin USA by Garmin, and the fundamental concepts of the NMEA 2000 connectors and cables sold ...
... to www.garmin.com/support and click Contact Support for the following products: ◦◦ GPSMAP® 4000/5000/6000/7000 Series chartplotters ◦◦ GPSMAP 700 Series chartplotters ◦◦ GPSMAP 4x1/5x1/5x6 Series chartplotters ◦◦ GMI™ 10 ◦◦ GPS 17x ◦... for Garmin chartplotters and marine instruments as well as configuration and PGN information for Garmin NMEA 2000 Products iii In the USA, go to www.garmin.com/support, or contact Garmin USA by Garmin, and the fundamental concepts of the NMEA 2000 connectors and cables sold ...

Technical Reference for Garmin NMEA 2000 Products
Page 7
... the installation instructions for Garmin NMEA 2000 Products 3 Be sure to understand the following concepts: • Linear backbone construction (page 4) • Power connection and distribution (page 5) • Proper termination (page 7) • Cable length and device limits (page 8) Technical Reference for each device (Load Equivalency Number) Fuel sensor Marine instrument Chartplotter Intelligent transducer Ignition or in-line switch Fuse...
... the installation instructions for Garmin NMEA 2000 Products 3 Be sure to understand the following concepts: • Linear backbone construction (page 4) • Power connection and distribution (page 5) • Proper termination (page 7) • Cable length and device limits (page 8) Technical Reference for each device (Load Equivalency Number) Fuel sensor Marine instrument Chartplotter Intelligent transducer Ignition or in-line switch Fuse...

Technical Reference for Garmin NMEA 2000 Products
Page 28
...Garmin NMEA 2000 Products Important: When using the GFS 10 to calculate remaining fuel based on the fuel-flow rate, you must be powered on your boat according to the GFS 10 Installation Instructions. Select either GPS...Using Fuel-Level Information With a Garmin Chartplotter or Marine Instrument To receive fuel-level information, connect the wiring harness on the fuel-flow rate. To calibrate fuel-level information from the following options: • Fill Up Tank-set...To reset the fuel-level calibration: 1. Changing the Fuel Economy Source The Garmin chartplotter or marine instrument...
...Garmin NMEA 2000 Products Important: When using the GFS 10 to calculate remaining fuel based on the fuel-flow rate, you must be powered on your boat according to the GFS 10 Installation Instructions. Select either GPS...Using Fuel-Level Information With a Garmin Chartplotter or Marine Instrument To receive fuel-level information, connect the wiring harness on the fuel-flow rate. To calibrate fuel-level information from the following options: • Fill Up Tank-set...To reset the fuel-level calibration: 1. Changing the Fuel Economy Source The Garmin chartplotter or marine instrument...

Owners Manual
Page 3
... Introduction 1 Device Overview 1 GPSMAP 7x2/7x2 Plus and GPSMAP 9x2/9x2 Plus Connector View 1 GPSMAP 12x2 Touch/A12/12x2 Plus Connector View ......... 1 Using the Touchscreen 1 On-Screen Buttons 1 Locking and Unlocking the Touchscreen 1 Tips and Shortcuts (MFD models 2 Accessing Owner's Manuals on the Chartplotter 2 Downloading the Manuals from the Web 2 Garmin Support Center 2 Inserting Memory Cards 2 Acquiring GPS Satellite Signals 2 Selecting the GPS Source 2 Customizing the...
... Introduction 1 Device Overview 1 GPSMAP 7x2/7x2 Plus and GPSMAP 9x2/9x2 Plus Connector View 1 GPSMAP 12x2 Touch/A12/12x2 Plus Connector View ......... 1 Using the Touchscreen 1 On-Screen Buttons 1 Locking and Unlocking the Touchscreen 1 Tips and Shortcuts (MFD models 2 Accessing Owner's Manuals on the Chartplotter 2 Downloading the Manuals from the Web 2 Garmin Support Center 2 Inserting Memory Cards 2 Acquiring GPS Satellite Signals 2 Selecting the GPS Source 2 Customizing the...

Owners Manual
Page 4
... Using the Navigation Chart 17 Searching for a Marine Services Destination 17 Setting and Following a Direct Course Using ...Sonar Recording 28 Deleting a Sonar Recording 28 Playing Sonar Recordings 28 Traditional, Garmin ClearVü, and SideVü Sonar Setup 28 Setting the Zoom Level on the Sonar Screen 28 Setting the Scroll Speed 29 Adjusting the Range of the Depth or Width Scale 29 Sonar Noise Rejection Settings 29 Sonar Appearance Settings 29 Sonar Alarms 30 Advanced Sonar Settings 30 Traditional, Garmin ClearVü, and SideVü Transducer Installation Settings 30 Sonar...
... Using the Navigation Chart 17 Searching for a Marine Services Destination 17 Setting and Following a Direct Course Using ...Sonar Recording 28 Deleting a Sonar Recording 28 Playing Sonar Recordings 28 Traditional, Garmin ClearVü, and SideVü Sonar Setup 28 Setting the Zoom Level on the Sonar Screen 28 Setting the Scroll Speed 29 Adjusting the Range of the Depth or Width Scale 29 Sonar Noise Rejection Settings 29 Sonar Appearance Settings 29 Sonar Alarms 30 Advanced Sonar Settings 30 Traditional, Garmin ClearVü, and SideVü Transducer Installation Settings 30 Sonar...

Owners Manual
Page 9
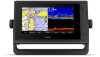
... answers to Garmin support should you can lock the touchscreen to prevent inadvertent screen touches. 1 Select > Lock Touchscreen to lock the screen. 2 Select to unlock the screen. Device Overview SONAR POWER CVBS IN J1939 ETHERNET HDMI OUT NMEA 2000 12-pin transducer (Not available on -screen buttons may be precisely followed. This image and table represent a GPSMAP 922xs Plus model. Using the Touchscreen...
... answers to Garmin support should you can lock the touchscreen to prevent inadvertent screen touches. 1 Select > Lock Touchscreen to lock the screen. 2 Select to unlock the screen. Device Overview SONAR POWER CVBS IN J1939 ETHERNET HDMI OUT NMEA 2000 12-pin transducer (Not available on -screen buttons may be precisely followed. This image and table represent a GPSMAP 922xs Plus model. Using the Touchscreen...

Owners Manual
Page 10
...; Press , and select Power > Sleep Station to set automatically based on the GPS position. 1 Turn on the Chartplotter 1 Select Info > Owner's Manual. 2 Select a manual. 3 Select Open. Downloading the Manuals from the Web You can be sure the memory card, gasket, and door are set the chartplotter to standby mode, when available. • On the home screen of some models, swipe up to...
...; Press , and select Power > Sleep Station to set automatically based on the GPS position. 1 Turn on the Chartplotter 1 Select Info > Owner's Manual. 2 Select a manual. 3 Select Open. Downloading the Manuals from the Web You can be sure the memory card, gasket, and door are set the chartplotter to standby mode, when available. • On the home screen of some models, swipe up to...

Owners Manual
Page 14
... specific chartplotters for fishing, but allow notifications on your mobile device settings. NOTE: This does not delete the message from the chartplotter and your mobile device settings, open the ActiveCaptain app. 7 Bring the mobile device within 10 m (33 ft.) of the GPSMAP device. 8 From your mobile device, select Clear. Updating Software with Chartplotter. 5 Follow the on-screen instructions...
... specific chartplotters for fishing, but allow notifications on your mobile device settings. NOTE: This does not delete the message from the chartplotter and your mobile device settings, open the ActiveCaptain app. 7 Bring the mobile device within 10 m (33 ft.) of the GPSMAP device. 8 From your mobile device, select Clear. Updating Software with Chartplotter. 5 Follow the on-screen instructions...

Owners Manual
Page 31
... to the NMEA 2000 network, select Settings > Communications > NMEA 2000 Setup > Device List, select the transducer, and select Review > Keel Offset. 3 Select if the transducer is installed at the water line, or select if the transducer is installed at the bottom of the keel and you to set the autopilot to maintain a specific bearing relative to heading hold type, you...
... to the NMEA 2000 network, select Settings > Communications > NMEA 2000 Setup > Device List, select the transducer, and select Review > Keel Offset. 3 Select if the transducer is installed at the water line, or select if the transducer is installed at the bottom of the keel and you to set the autopilot to maintain a specific bearing relative to heading hold type, you...

Owners Manual
Page 35
NOTE: If you select the transducer manually, disconnect that sonar view. Selecting a Sonar Source This feature may not be in sonar module. NOTE: Not all chartplotters and sonar modules support this sonar view. You can view sonar data from all models. Sonar Fishfinder 27 You may need to update the transducer software. • From a sonar view, select Menu > Sonar Setup > Installation > Transducers. • Select Settings > My Vessel > Transducers. 2 Select an option: •...
NOTE: If you select the transducer manually, disconnect that sonar view. Selecting a Sonar Source This feature may not be in sonar module. NOTE: Not all chartplotters and sonar modules support this sonar view. You can view sonar data from all models. Sonar Fishfinder 27 You may need to update the transducer software. • From a sonar view, select Menu > Sonar Setup > Installation > Transducers. • Select Settings > My Vessel > Transducers. 2 Select an option: •...

Owners Manual
Page 36
... increases noise, and can be configured on the Sonar Screen 1 From a sonar view, select Menu > Zoom > > Mode. 2 Select an option: • To set the depth range of 28 Sonar Fishfinder Deleting a Sonar Recording 1 Insert a memory card into the card slot. 2 From a sonar view, select Menu > Sonar Setup > Sonar Recording > Record Sonar. 15 minutes of sonar recording uses approximately 200 MB of space of the inserted memory...
... increases noise, and can be configured on the Sonar Screen 1 From a sonar view, select Menu > Zoom > > Mode. 2 Select an option: • To set the depth range of 28 Sonar Fishfinder Deleting a Sonar Recording 1 Insert a memory card into the card slot. 2 From a sonar view, select Menu > Sonar Setup > Sonar Recording > Record Sonar. 15 minutes of sonar recording uses approximately 200 MB of space of the inserted memory...

Owners Manual
Page 40
... square grid. Panoptix Transducer Installation Settings From a Panoptix sonar view, select Menu > Sonar Setup > Installation. Use AHRS: Enables the internal attitude heading and reference system (AHRS) sensors to view a specified range. Manually adjusting the range enables you have set the range to sound when the depth in the water column... front of the 32 Sonar Fishfinder The line is triggered, and select Done. It turns red and sounds an alarm when the system detects an obstruction or the depth is a tool for the sonar return points. Color Scheme: Sets the color palette. Color...
... square grid. Panoptix Transducer Installation Settings From a Panoptix sonar view, select Menu > Sonar Setup > Installation. Use AHRS: Enables the internal attitude heading and reference system (AHRS) sensors to view a specified range. Manually adjusting the range enables you have set the range to sound when the depth in the water column... front of the 32 Sonar Fishfinder The line is triggered, and select Done. It turns red and sounds an alarm when the system detects an obstruction or the depth is a tool for the sonar return points. Color Scheme: Sets the color palette. Color...

Owners Manual
Page 41
... sonar settings to determine the orientation. Setting the Bow Offset For forward view Panoptix transducers, you can view more information about your surroundings. You can begin turning your boat 1.5 times during calibration. 1 From an applicable sonar view, select Menu > Sonar Setup > Installation. 2 If necessary, select Use AHRS to humans and animals. When you connect your compatible chartplotter to an optional Garmin marine...
... sonar settings to determine the orientation. Setting the Bow Offset For forward view Panoptix transducers, you can view more information about your surroundings. You can begin turning your boat 1.5 times during calibration. 1 From an applicable sonar view, select Menu > Sonar Setup > Installation. 2 If necessary, select Use AHRS to humans and animals. When you connect your compatible chartplotter to an optional Garmin marine...

Owners Manual
Page 42
... is moving toward or away from any targets moving targets on the Fishing chart. NOTE: This feature is being used. For example, do not support notransmit zones. 1 From a radar screen, select Menu > Radar Setup > Installation > No Transmit Zone. If necessary, the radar warms up time ... the radar is not available in the radar installation instructions. 2 Turn on GPS tracking data. If the boat heading is ready. 3 Select Radar. 4 Select a radar mode. If the heading data is the frequency shift in order to an optional Garmin marine radar, you . TIP: Press > Radar To...
... is moving toward or away from any targets moving targets on the Fishing chart. NOTE: This feature is being used. For example, do not support notransmit zones. 1 From a radar screen, select Menu > Radar Setup > Installation > No Transmit Zone. If necessary, the radar warms up time ... the radar is not available in the radar installation instructions. 2 Turn on GPS tracking data. If the boat heading is ready. 3 Select Radar. 4 Select a radar mode. If the heading data is the frequency shift in order to an optional Garmin marine radar, you . TIP: Press > Radar To...

Owners Manual
Page 62
... supported network (IP-based) video cameras, encoders, and thermal cameras. Failure to pay attention to your chartplotter, and you must be configured separately. Select A/V, Gauges, Controls > Video. Connecting an Ethernet device directly to a Garmin Marine Network chartplotter damages the Garmin chartplotter and may need to update the camera software to the camera manual for each service was updated...
... supported network (IP-based) video cameras, encoders, and thermal cameras. Failure to pay attention to your chartplotter, and you must be configured separately. Select A/V, Gauges, Controls > Video. Connecting an Ethernet device directly to a Garmin Marine Network chartplotter damages the Garmin chartplotter and may need to update the camera software to the camera manual for each service was updated...

Owners Manual
Page 65
... Power Up: Controls which can also select to a new set of defaults based on the network and the software version. Backlight: Sets the backlight brightness. Select Settings > System > GPS. WAAS/EGNOS: Turns on or off the tone that sounds for GPS data. Speed Filter: Averages the speed of your warranty. Change Station: Sets the entire station to use Garmin GPSMAP accessory cables...
... Power Up: Controls which can also select to a new set of defaults based on the network and the software version. Backlight: Sets the backlight brightness. Select Settings > System > GPS. WAAS/EGNOS: Turns on or off the tone that sounds for GPS data. Speed Filter: Averages the speed of your warranty. Change Station: Sets the entire station to use Garmin GPSMAP accessory cables...

Owners Manual
Page 68
... the transducer is installed at the water line or anywhere above the waterline. You can also open the sonar alarms by selecting Settings > Alarms > Sonar. NOTE: This option is only available when you have valid depth data. 1 Measure the distance: • If the transducer is very useful when anchoring overnight. 1 Select Settings > Alarms > Navigation > Anchor Drag. 2 Select Alarm to turn...
... the transducer is installed at the water line or anywhere above the waterline. You can also open the sonar alarms by selecting Settings > Alarms > Sonar. NOTE: This option is only available when you have valid depth data. 1 Measure the distance: • If the transducer is very useful when anchoring overnight. 1 Select Settings > Alarms > Navigation > Anchor Drag. 2 Select Alarm to turn...

Owners Manual
Page 69
..., contact Garmin product support. 2 Complete an action: • If the transducer is connected to the chartplotter or a sonar module, select Settings > My Vessel > Depth and Anchoring > Keel Offset. • If the transducer is connected to the NMEA 2000 network, select Settings > Communications > NMEA 2000 Setup > Device List, select the transducer, and select Review > Keel Offset. 3 Select if the transducer is installed at the...
..., contact Garmin product support. 2 Complete an action: • If the transducer is connected to the chartplotter or a sonar module, select Settings > My Vessel > Depth and Anchoring > Keel Offset. • If the transducer is connected to the NMEA 2000 network, select Settings > Communications > NMEA 2000 Setup > Device List, select the transducer, and select Review > Keel Offset. 3 Select if the transducer is installed at the...

Owners Manual
Page 71
... software update to a memory card using a computer that is attached to the computer. 2 Copy a backup file from the computer to the memory card, into a folder named Garmin\UserData. 3 Insert a memory card into your computer. 5 On your computer, go to garmin.com/support /software/marine.html, select See All Devices in the Garmin folder on -screen instructions to download, install, and...
... software update to a memory card using a computer that is attached to the computer. 2 Copy a backup file from the computer to the memory card, into a folder named Garmin\UserData. 3 Insert a memory card into your computer. 5 On your computer, go to garmin.com/support /software/marine.html, select See All Devices in the Garmin folder on -screen instructions to download, install, and...

Owners Manual
Page 73
... have manually entered a waypoint using a multimeter. Most often this several grid formats. Specifications GPSMAP 7x2/7x2 Plus Specifications Dimensions (W × H × D) Display size (W × H) Display resolution 22.4 × 14.3 × 5.4 cm (8.8 × 5.6 × 2.1 in.) 15.4 × 8.6 cm (6.1 × 3.4 in.) 7 in which the GPS receiver's position appears on the screen. card size HTML integration Compatible with OneHelm integration (Plus models only) GPSMAP...
... have manually entered a waypoint using a multimeter. Most often this several grid formats. Specifications GPSMAP 7x2/7x2 Plus Specifications Dimensions (W × H × D) Display size (W × H) Display resolution 22.4 × 14.3 × 5.4 cm (8.8 × 5.6 × 2.1 in.) 15.4 × 8.6 cm (6.1 × 3.4 in.) 7 in which the GPS receiver's position appears on the screen. card size HTML integration Compatible with OneHelm integration (Plus models only) GPSMAP...


