
Technical Reference for Garmin NMEA 2000 Products
Page 3
... information for in the installation instructions provided with Garmin NMEA 2000-certified displays and sensors. • The first section, NMEA 2000 Fundamentals, provides descriptions of connected NMEA 2000 devices that communicate using basic plug-and-play functionality. Contact Garmin If you have other questions about NMEA 2000-certified Garmin devices, contact Garmin Product Support or a certified NMEA 2000...
... information for in the installation instructions provided with Garmin NMEA 2000-certified displays and sensors. • The first section, NMEA 2000 Fundamentals, provides descriptions of connected NMEA 2000 devices that communicate using basic plug-and-play functionality. Contact Garmin If you have other questions about NMEA 2000-certified Garmin devices, contact Garmin Product Support or a certified NMEA 2000...

Technical Reference for Garmin NMEA 2000 Products
Page 7
... by the NMEA 2000 network; Battery - 12 Vdc Power cable Backbone extension cable Drop cable T-connector Male terminator NMEA 2000 backbone Sample NMEA 2000 Network Note: This diagram illustrates the NMEA 2000 data connections to the backbone with a T-connector. When you supply power to your NMEA 2000 network functions correctly. Consult the installation instructions for Garmin NMEA 2000 Products 3 Be...
... by the NMEA 2000 network; Battery - 12 Vdc Power cable Backbone extension cable Drop cable T-connector Male terminator NMEA 2000 backbone Sample NMEA 2000 Network Note: This diagram illustrates the NMEA 2000 data connections to the backbone with a T-connector. When you supply power to your NMEA 2000 network functions correctly. Consult the installation instructions for Garmin NMEA 2000 Products 3 Be...

Technical Reference for Garmin NMEA 2000 Products
Page 28
... Installation Instructions. You should not rely solely on your NMEA 2000 device, select Menu > Fuel Economy Source. 2. Carefully compare information displayed on the fuel-flow rate. Using Fuel-Flow Information With a Garmin Chartplotter or Marine Instrument Caution: The Garmin chartplotter or marine... the fuel page or fuel instrument screen on the GFS 10 for Garmin NMEA 2000 Products Choose from the GFS 10: 1. Using Fuel-Level Information With a Garmin Chartplotter or Marine Instrument To receive fuel-level information, connect the wiring harness on your NMEA 2000 device, select...
... Installation Instructions. You should not rely solely on your NMEA 2000 device, select Menu > Fuel Economy Source. 2. Carefully compare information displayed on the fuel-flow rate. Using Fuel-Flow Information With a Garmin Chartplotter or Marine Instrument Caution: The Garmin chartplotter or marine... the fuel page or fuel instrument screen on the GFS 10 for Garmin NMEA 2000 Products Choose from the GFS 10: 1. Using Fuel-Level Information With a Garmin Chartplotter or Marine Instrument To receive fuel-level information, connect the wiring harness on your NMEA 2000 device, select...

Owners Manual
Page 3
... Alerts 13 Turning Off AIS Reception 13 Chart Menu 13 Chart Layers 13 Chart Layer Settings 13 Depth Layer Settings 13 My Vessel Layer Settings 13 Laylines Settings 14 User Data Layer Settings 14 Other Vessels Layer Settings 14 Water Layer Settings 14 Depth Range Shading 14 Weather Layer Settings 14 Radar Overlay Settings 15 Chart Settings 15 Fish Eye 3D Settings 15 Supported Maps 15 Garmin Quickdraw...
... Alerts 13 Turning Off AIS Reception 13 Chart Menu 13 Chart Layers 13 Chart Layer Settings 13 Depth Layer Settings 13 My Vessel Layer Settings 13 Laylines Settings 14 User Data Layer Settings 14 Other Vessels Layer Settings 14 Water Layer Settings 14 Depth Range Shading 14 Weather Layer Settings 14 Radar Overlay Settings 15 Chart Settings 15 Fish Eye 3D Settings 15 Supported Maps 15 Garmin Quickdraw...

Owners Manual
Page 4
... Intensity 28 Sonar Recordings 29 Recording the Sonar Display 29 Stopping the Sonar Recording 29 Deleting a Sonar Recording 29 Playing Sonar Recordings 29 Traditional, Garmin ClearVü, and SideVü Sonar Setup 29 Setting the Zoom Level on the Sonar Screen 29 Setting the Scroll Speed 29 Adjusting the Range of the Depth or Width Scale 30 Sonar Noise Rejection Settings 30 Sonar Appearance Settings 30 ii...
... Intensity 28 Sonar Recordings 29 Recording the Sonar Display 29 Stopping the Sonar Recording 29 Deleting a Sonar Recording 29 Playing Sonar Recordings 29 Traditional, Garmin ClearVü, and SideVü Sonar Setup 29 Setting the Zoom Level on the Sonar Screen 29 Setting the Scroll Speed 29 Adjusting the Range of the Depth or Width Scale 30 Sonar Noise Rejection Settings 30 Sonar Appearance Settings 30 ii...

Owners Manual
Page 9
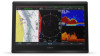
...fingers apart to zoom in AUDIO NMEA® 0183 and audio out POWER Power USB Touchscreen input from the route Creates a direct route, without turns, to the destination Creates an Auto Guidance route to unlock the screen. There is shown below. NETWORK Garmin Marine Network HDMI IN HDMI&#...updates. Introduction WARNING See the Important Safety and Product Information guide in a combination page or SmartMode™ layout or when accessories, such as a radar, are connected.. 2 microSD® memory card slots, 32 GB max. All route and navigation lines displayed on all models...
...fingers apart to zoom in AUDIO NMEA® 0183 and audio out POWER Power USB Touchscreen input from the route Creates a direct route, without turns, to the destination Creates an Auto Guidance route to unlock the screen. There is shown below. NETWORK Garmin Marine Network HDMI IN HDMI&#...updates. Introduction WARNING See the Important Safety and Product Information guide in a combination page or SmartMode™ layout or when accessories, such as a radar, are connected.. 2 microSD® memory card slots, 32 GB max. All route and navigation lines displayed on all models...

Owners Manual
Page 10
...; Press on the GPSMAP 8700 device to turn off using the GRID 20 remote. • Select Home from a computer or other third-party device NMEA 2000 NMEA 2000 network ENGINE/J1939 J1939 engine network Connector View (8700 models) POWER Power cable connection NETWORK Garmin Marine Network HDMI IN HDMI in NMEA 0183 NMEA 0183 and audio out USB Touchscreen input...
...; Press on the GPSMAP 8700 device to turn off using the GRID 20 remote. • Select Home from a computer or other third-party device NMEA 2000 NMEA 2000 network ENGINE/J1939 J1939 engine network Connector View (8700 models) POWER Power cable connection NETWORK Garmin Marine Network HDMI IN HDMI in NMEA 0183 NMEA 0183 and audio out USB Touchscreen input...

Owners Manual
Page 15
... delete the message from your internet service provider apply. This only dismisses and removes the notification. • To call on specific chartplotters for privacy. Updating Software with Chartplotter. 5 Follow the on-screen instructions to pair the app to the GPSMAP device. 6 When prompted, enter ... device settings. 3 Bring the devices within 10 m (33 ft.) of the chart you are ready to install the update, select ActiveCaptain > Software Updates > Install Now. The Garmin Express app downloads large charts more information about data limits or charges. Before your GPSMAP device can...
... delete the message from your internet service provider apply. This only dismisses and removes the notification. • To call on specific chartplotters for privacy. Updating Software with Chartplotter. 5 Follow the on-screen instructions to pair the app to the GPSMAP device. 6 When prompted, enter ... device settings. 3 Bring the devices within 10 m (33 ft.) of the chart you are ready to install the update, select ActiveCaptain > Software Updates > Install Now. The Garmin Express app downloads large charts more information about data limits or charges. Before your GPSMAP device can...

Owners Manual
Page 36
... chartplotters and sonar modules support this sonar view, you must install a Panoptix LiveScope transducer on the Garmin Marine Network. To see the highest intensity signal returns on the Sonar Screen 1 From a sonar view, drag the screen or select . 2 Select a location. 3 Select . 4 If necessary, edit the waypoint information. Selecting a Sonar Source This feature may need to set the transducer type to see shorelines, fish, and structures...
... chartplotters and sonar modules support this sonar view, you must install a Panoptix LiveScope transducer on the Garmin Marine Network. To see the highest intensity signal returns on the Sonar Screen 1 From a sonar view, drag the screen or select . 2 Select a location. 3 Select . 4 If necessary, edit the waypoint information. Selecting a Sonar Source This feature may need to set the transducer type to see shorelines, fish, and structures...

Owners Manual
Page 37
... the bottom depth, select Bottom Lock. From a sonar view, select Menu > Sonar Setup. In deeper water, you must download and install the HomePort™ application and record sonar data onto a memory card. 1 Remove the memory card from the device. 2 Insert the memory card into a card reader attached to use the default setting, select Default. Installation: Configures the transducer (Traditional, Garmin ClearV...
... the bottom depth, select Bottom Lock. From a sonar view, select Menu > Sonar Setup. In deeper water, you must download and install the HomePort™ application and record sonar data onto a memory card. 1 Remove the memory card from the device. 2 Insert the memory card into a card reader attached to use the default setting, select Default. Installation: Configures the transducer (Traditional, Garmin ClearV...

Owners Manual
Page 41
... the sonar settings to Panoptix transducers in the water. On the FrontVü screen, a depth line shows the depth at the bottom. CAUTION The ability to help you distinguish between the bow and the forward view Panoptix transducer installation location. Trails: Sets the how long the trails appear on the screen. You can set . You can enter the specific installation angle for the transducer using...
... the sonar settings to Panoptix transducers in the water. On the FrontVü screen, a depth line shows the depth at the bottom. CAUTION The ability to help you distinguish between the bow and the forward view Panoptix transducer installation location. Trails: Sets the how long the trails appear on the screen. You can set . You can enter the specific installation angle for the transducer using...

Owners Manual
Page 63
...;) mode, and allows you have a marine network cable Power over Ethernet (PoE) Isolation Coupler (P/N 010-10580-10) must be shared across the Garmin Marine Network. Video Settings Some cameras provide additional setup options. Home Position: Sets the home position of the image captured by the camera during a scan. Scan Width: Sets the width of the camera. Stabilization: Stabilizes the picture using...
...;) mode, and allows you have a marine network cable Power over Ethernet (PoE) Isolation Coupler (P/N 010-10580-10) must be shared across the Garmin Marine Network. Video Settings Some cameras provide additional setup options. Home Position: Sets the home position of the image captured by the camera during a scan. Scan Width: Sets the width of the camera. Stabilization: Stabilizes the picture using...

Owners Manual
Page 66
... about the GPS satellites and settings. Background: Sets the background image. Audio Alerts: Sets which devices turn on automatically when power is not shared across the Garmin Marine Network. Audio Alert Language: Sets the spoken language for audio alerts. Check the video source's manual to verify that appears when you should use of other messages and information are played. You need a longer cable, you turn on...
... about the GPS satellites and settings. Background: Sets the background image. Audio Alerts: Sets which devices turn on automatically when power is not shared across the Garmin Marine Network. Audio Alert Language: Sets the spoken language for audio alerts. Check the video source's manual to verify that appears when you should use of other messages and information are played. You need a longer cable, you turn on...

Owners Manual
Page 69
... applicable sonar view, select Menu > Sonar Setup > Alarms. You can set a fuel level alarm, a compatible fuel flow sensor must have a valid weather subscription. 1 Select Settings > Alarms > Weather. 2 Turn on the chart. 4 Select Back. My Vessel Settings NOTE: Some settings and options require additional charts or hardware. Transducers: Shows all transducers. Water Temp.: Sets an alarm to sound when the depth in use to...
... applicable sonar view, select Menu > Sonar Setup > Alarms. You can set a fuel level alarm, a compatible fuel flow sensor must have a valid weather subscription. 1 Select Settings > Alarms > Weather. 2 Turn on the chart. 4 Select Back. My Vessel Settings NOTE: Some settings and options require additional charts or hardware. Transducers: Shows all transducers. Water Temp.: Sets an alarm to sound when the depth in use to...

Owners Manual
Page 72
... to garmin.com/express. 6 Follow the on -screen instructions to register the device (Getting Started with the ActiveCaptain App, page 6). Help us better support you to use the ActiveCaptain app to complete the download. 7 Wait while the update downloads. near the bottom of time. 8 After the download is attached to a memory card as a troubleshooting tool. Copying User Data...
... to garmin.com/express. 6 Follow the on -screen instructions to register the device (Getting Started with the ActiveCaptain App, page 6). Help us better support you to use the ActiveCaptain app to complete the download. 7 Wait while the update downloads. near the bottom of time. 8 After the download is attached to a memory card as a troubleshooting tool. Copying User Data...

Owners Manual
Page 74
... time. See the chartplotter installation instructions for connection information. 1 Select OneHelm™, A/V, Gauges > Video. 2 Select the HDMI source for a Connected Computer (8700 Model) NOTICE To prevent corrosion due to moisture, you should use an active HDMI cable only. A selection page opens on all cable connections in full screen mode. Devices Item Device Computer GPSMAP chartplotter Touchscreen monitor Connections From...
... time. See the chartplotter installation instructions for connection information. 1 Select OneHelm™, A/V, Gauges > Video. 2 Select the HDMI source for a Connected Computer (8700 Model) NOTICE To prevent corrosion due to moisture, you should use an active HDMI cable only. A selection page opens on all cable connections in full screen mode. Devices Item Device Computer GPSMAP chartplotter Touchscreen monitor Connections From...

Owners Manual
Page 75
... is a math model which is very sensitive to acquire the satellites correctly. • Ensure the device is using an external GPS antenna connected using the latest software. Make sure the antenna appears on the cable or the installation instructions for connection information and diagrams. • If the device is using the NMEA 2000 network, select Settings > Communications > NMEA 2000 Setup > Device...
... is a math model which is very sensitive to acquire the satellites correctly. • Ensure the device is using an external GPS antenna connected using the latest software. Make sure the antenna appears on the cable or the installation instructions for connection information and diagrams. • If the device is using the NMEA 2000 network, select Settings > Communications > NMEA 2000 Setup > Device...

Installation Instructions PDF
Page 3
... m) Fuse 8 in. (20.3 cm) Battery 8 in a station. • Although it is recommended that you install all excess marine sealant. 26Install the trim caps by a Garmin Marine Network cable. Station Connection Considerations This device can use in most installation situations. Connecting a PoE device directly to work together as all of the devices are installed. • After installing a locking ring on the mounting method...
... m) Fuse 8 in. (20.3 cm) Battery 8 in a station. • Although it is recommended that you install all excess marine sealant. 26Install the trim caps by a Garmin Marine Network cable. Station Connection Considerations This device can use in most installation situations. Connecting a PoE device directly to work together as all of the devices are installed. • After installing a locking ring on the mounting method...
Installation Instructions PDF
Page 6
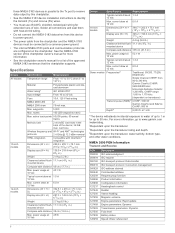
... this chartplotter. • See the NMEA 0183 device installation instructions to identify the transmit (Tx) and receive (Rx) wires. • You must be connected to a common power ground. • The internal NMEA 0183 ports and communication protocols are configured on transducer) Transmit power (RMS)3 CHIRP: 1000 W Garmin ClearVü and SideVü CHIRP: 500 W Depth4 5,000 ft...
... this chartplotter. • See the NMEA 0183 device installation instructions to identify the transmit (Tx) and receive (Rx) wires. • You must be connected to a common power ground. • The internal NMEA 0183 ports and communication protocols are configured on transducer) Transmit power (RMS)3 CHIRP: 1000 W Garmin ClearVü and SideVü CHIRP: 500 W Depth4 5,000 ft...

Important Safety and Product Information
Page 2
... device that utilizes a terrestrial broadband network operating on , the user is longer. In addition, Garmin reserves the right to a Garmin Authorized service facility in another country that can radiate radio frequency energy and may , in its option: (i) repair the device using new parts or previously used parts that satisfy Garmin's quality standards, (ii) replace the device with a new device or a refurbished device...
... device that utilizes a terrestrial broadband network operating on , the user is longer. In addition, Garmin reserves the right to a Garmin Authorized service facility in another country that can radiate radio frequency energy and may , in its option: (i) repair the device using new parts or previously used parts that satisfy Garmin's quality standards, (ii) replace the device with a new device or a refurbished device...


